WCF入门教程(二)从零做起-创建WCF服务
通过最基本的操作看到最简单的WCF如何实现的。这是VS的SDK默认创建的样本
1、创建WCF服务库
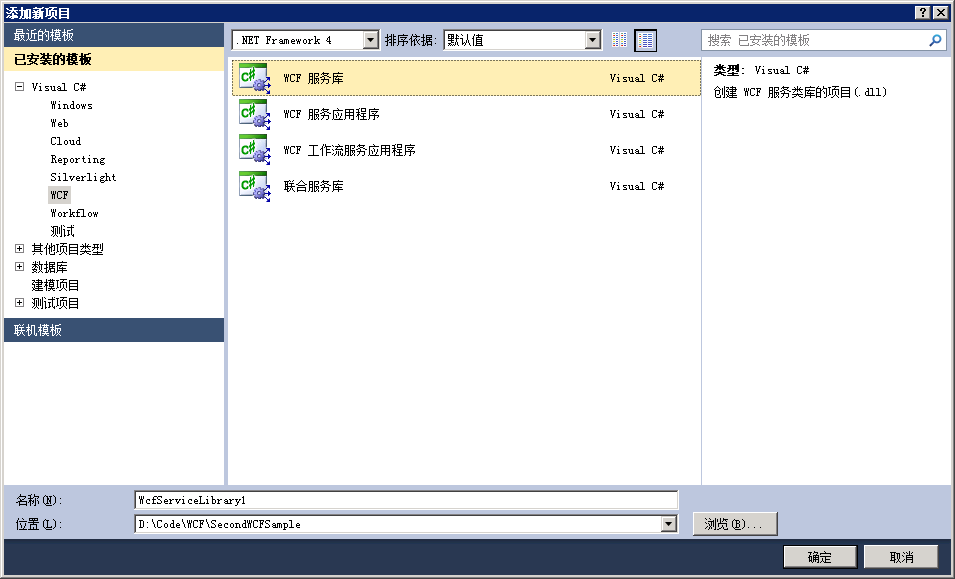
2、看其生成结构

1)IService1.cs(协议)
定义了协议,具体什么操作,操作的参数和返回值等信息
通过ServiceContract、OperationContract、DataContract、DataMember等属性参数,将服务、操作、数据结构定义清楚。
在这里我们还清晰看到,WCF服务传输数据类型不只是通用数据类型,而且还可以传输自定义的复杂类型。哪些字段要进行传输,都可以通过DataMember标签予以指定。
using System;
using System.Collections.Generic;
using System.Linq;
using System.Runtime.Serialization;
using System.ServiceModel;
using System.Text;

namespace SecondWCFSample
{
    // 注意: 使用“重构”菜单上的“重命名”命令,可以同时更改代码和配置文件中的接口名“IService1”。
    [ServiceContract]
    public interface IService1
    {
        [OperationContract]
        string GetData(int value);

        [OperationContract]
        CompositeType GetDataUsingDataContract(CompositeType composite);

        // TODO: 在此添加您的服务操作
    }

    // 使用下面示例中说明的数据协定将复合类型添加到服务操作
    [DataContract]
    public class CompositeType
    {
        bool boolValue = true;
        string stringValue = "Hello ";

        [DataMember]
        public bool BoolValue
        {
            get { return boolValue; }
            set { boolValue = value; }
        }

        [DataMember]
        public string StringValue
        {
            get { return stringValue; }
            set { stringValue = value; }
        }
    }
}
2)Service1.cs(服务实现)
实现协议定义的方法、数据结构。
using System;
using System.Collections.Generic;
using System.Linq;
using System.Runtime.Serialization;
using System.ServiceModel;
using System.Text;

namespace SecondWCFSample
{
    // 注意: 使用“重构”菜单上的“重命名”命令,可以同时更改代码和配置文件中的类名“Service1”。
    public class Service1 : IService1
    {
        public string GetData(int value)
        {
            return string.Format("You entered: {0}", value);
        }

        public CompositeType GetDataUsingDataContract(CompositeType composite)
        {
            if (composite == null)
            {
                throw new ArgumentNullException("composite");
            }
            if (composite.BoolValue)
            {
                composite.StringValue += "Suffix";
            }
            return composite;
        }
    }
}
3)App.Config(配置)
定义了了Host,Endpoint,我们需要认真阅读这个配置文件的结构,以及备注说明,在以后系统开发中肯定会用到。
<?xml version="1.0" encoding="utf-8" ?>
<configuration>

  <system.web>
    <compilation debug="true" />
  </system.web>
  <!-- 部署服务库项目时,必须将配置文件的内容添加到
  主机的 app.config 文件中。System.Configuration 不支持库的配置文件。-->
  <system.serviceModel>
    <services>
      <service name="SecondWCFSample.Service1">
        <host>
          <baseAddresses>
            <add baseAddress = "http://localhost:8732/Design_Time_Addresses/SecondWCFSample/Service1/" />
          </baseAddresses>
        </host>
        <!-- Service Endpoints -->
        <!-- 除非完全限定,否则地址将与上面提供的基址相关 -->
        <endpoint address ="" binding="wsHttpBinding" contract="SecondWCFSample.IService1">
          <!--
              部署时,应删除或替换下列标识元素,以反映
             用来运行所部署服务的标识。删除之后,WCF 将
              自动推断相应标识。
          -->
          <identity>
            <dns value="localhost"/>
          </identity>
        </endpoint>
        <!-- Metadata Endpoints -->
        <!-- 元数据交换终结点供相应的服务用于向客户端做自我介绍。 -->
        <!-- 此终结点不使用安全绑定,应在部署前确保其安全或将其删除-->
        <endpoint address="mex" binding="mexHttpBinding" contract="IMetadataExchange"/>
      </service>
    </services>
    <behaviors>
      <serviceBehaviors>
        <behavior>
          <!-- 为避免泄漏元数据信息,
          请在部署前将以下值设置为 false 并删除上面的元数据终结点  -->
          <serviceMetadata httpGetEnabled="True"/>
          <!-- 要接收故障异常详细信息以进行调试,
          请将以下值设置为 true。在部署前设置为 false
            以避免泄漏异常信息-->
          <serviceDebug includeExceptionDetailInFaults="False" />
        </behavior>
      </serviceBehaviors>
    </behaviors>
  </system.serviceModel>

</configuration>
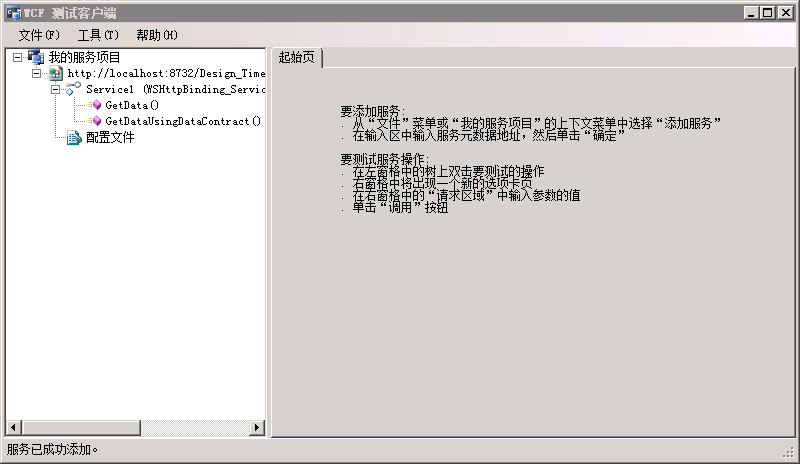
3、测试运行
直接以这个项目为启动项目,即可看到WCF测试客户端。
我们可以看到WCF测试客户端,包括,具体协议。然后我们点击某一个操作,即可看到起请求参数列表,填入合适的值,点击调用,即可看到最后的运行结果

4、增加方法
在以后的协定中增加方法HelloWorld
代码如下:
    [ServiceContract(Namespace="http://wcf.yank.com",Name="Service1",ProtectionLevel=ProtectionLevel.EncryptAndSign)]
    public interface IService1
    {
        [OperationContract]
        string GetData(int value);

        [OperationContract]
        CompositeType GetDataUsingDataContract(CompositeType composite);

        string HelloWorld(string name);

        // TODO: 在此添加您的服务操作
    }
在Service类中实现
        public string HelloWorld(string name)
        {
            return string.Format("Hello {0},Welcome to the WCF world.", name);
        }
直接运行,我们会发现,测试窗口没有看到此方法,为什么呢?
原因:接口方法中,并没有指定[OperationContract],这是操作的协定标识。
我们加上,运行就能看到了。修改后:
        [OperationContract]
        string HelloWorld(string name);
运行结果:

其他的属性标签也直接关系着服务协定,关于属性标签的有关问题参见:
http://www.cnblogs.com/yank/p/3666672.html
5、增加新的服务协定
声明服务协定
using System;
using System.ServiceModel;

namespace SecondWCFSample
{
    [ServiceContract]
    public interface IContact
    {
        [OperationContract]
        string HelloWorld(string name);
    }
}
实现服务:
using System;

namespace SecondWCFSample
{
    public class Contact: IContact
    {
        public string HelloWorld(string name)
        {
            return string.Format("Hello {0},Welcome to the WCF world.", name);
        }
    }
}
配置服务:
在Services的节点下增加新的服务
      <service name="SecondWCFSample.Contact">
        <host>
          <baseAddresses>
            <add baseAddress = "http://localhost:8732/Design_Time_Addresses/SecondWCFSample/Contact/" />
          </baseAddresses>
        </host>
        <!-- Service Endpoints -->
        <!-- 除非完全限定,否则地址将与上面提供的基址相关 -->
        <endpoint address ="" binding="wsHttpBinding" contract="SecondWCFSample.IContact">
          <!--
              部署时,应删除或替换下列标识元素,以反映
             用来运行所部署服务的标识。删除之后,WCF 将
              自动推断相应标识。
          -->
          <identity>
            <dns value="localhost"/>
          </identity>
        </endpoint>
        <!-- Metadata Endpoints -->
        <!-- 元数据交换终结点供相应的服务用于向客户端做自我介绍。 -->
        <!-- 此终结点不使用安全绑定,应在部署前确保其安全或将其删除-->
        <endpoint address="mex" binding="mexHttpBinding" contract="IMetadataExchange"/>
      </service>
运行结果:

6、源码地址
关于如何书写配置文件,这里不展开介绍,具体可见:
WCF入门教程(五)配置文件
http://www.cnblogs.com/yank/p/3668371.html