1、创建项目:只需要选择web模块即可测试
2、异步任务(使用多线程)
2.1 @EnableAsync
//开启异步功能
@EnableAsync
@SpringBootApplication
public class Springboot13Application {
    public static void main(String[] args) {
        SpringApplication.run(Springboot13Application.class, args);
    }
}
2.2 @Async
@Service
public class TestService {
    //表示这是一个异步方法
    @Async
    public void test(){
        try {
            Thread.sleep(3000);
        } catch (InterruptedException e) {
            e.printStackTrace();
        }
        System.out.println("处理中");
    }
}
3、定时任务
3.1 @EnableScheduling
//开启任务
@EnableScheduling
@SpringBootApplication
public class Springboot13Application {
    public static void main(String[] args) {
        SpringApplication.run(Springboot13Application.class, args);
    }
}
3.2 @Scheduled
或者重新创建一个类,不在@Service中,需要使用@Component
@Service
public class TestService {
    // 0 0/5 14,18 * * ?    每天14点整,和18点整,每隔5分钟执行一次
    // 0 15  10 ? * 1-6    每个月的周一至周六10:15分执行一次
    // 0 0 2 ? * 6L         每个月的最后一个周六凌晨2点执行一次
    // 0 0 2 LW * ?         每个月的最后一个工作日凌晨2点执行一次
    // 0 0 2-4 ? * 1#1      每个月的第一个周一凌晨2点到4点期间,每个整点都执行一次;*/
    //0/4 * * * * * :       每4秒执行一次
    @Scheduled(cron = "0 * * 20 8 TUE")
    public void test(){
        System.out.println("定时任务执行...");
    }
}
3.3 实现并行执行任务,默认任务是串行(一个任务结束,才会开始另一个任务)
只需要创建一个配置类即可
@Configuration
@EnableScheduling。//如果启动类上有注解,应该可以不加
public class AsyncTaskConfig implements SchedulingConfigurer, AsyncConfigurer {
    //线程池线程数量
    private int corePoolSize = 5;

    @Bean
    public ThreadPoolTaskScheduler taskScheduler()
    {
        ThreadPoolTaskScheduler scheduler = new ThreadPoolTaskScheduler();
        scheduler.initialize();//初始化线程池
        scheduler.setPoolSize(corePoolSize);//线程池容量
        return scheduler;
    }

    @Override
    public Executor getAsyncExecutor() {
        Executor executor = taskScheduler();
        return executor;
    }

    @Override
    public AsyncUncaughtExceptionHandler getAsyncUncaughtExceptionHandler() {
        return null;
    }

    @Override
    public void configureTasks(ScheduledTaskRegistrar scheduledTaskRegistrar) {
        scheduledTaskRegistrar.setTaskScheduler(taskScheduler());
    }
}
3.4cron表达式
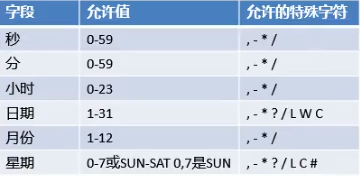

关于?的问题
比如我的任务是每个月的周一10点进行调度
0 0 10 * * 1 这种写法就是错的
0 0 10 ? * 1 这种写法就是对的,因为并不是每个月中的每一天都是周一,如果天和星期冲突了,就要写出?,所以天和星期如果一个指明了,另一个没有指明,那另一个只能用?代替
4 、邮件任务
4.1 引入依赖
        <dependency>
            <groupId>org.springframework.boot</groupId>
            <artifactId>spring-boot-starter-mail</artifactId>
        </dependency>
4.2 application.properties
spring.mail.username=1847003070@qq.com
spring.mail.password=xyxvywpfxzscejxx
spring.mail.host=smtp.qq.com
4.3 测试
    @Autowired
    JavaMailSender javaMailSender;

    @Test
    public void test(){
        //简单邮件测试
        SimpleMailMessage simpleMailMessage = new SimpleMailMessage();
        simpleMailMessage.setSubject("通知");
        simpleMailMessage.setText("今天放假啦");
        simpleMailMessage.setTo("760423314@qq.com");
        simpleMailMessage.setFrom("1847003070@qq.com");
        javaMailSender.send(simpleMailMessage);
    }
    @Test
    public void test2() throws MessagingException {
        //复杂邮件测试
        MimeMessage mimeMessage = javaMailSender.createMimeMessage();
        MimeMessageHelper mimeMessageHelper = new MimeMessageHelper(mimeMessage, true);

        mimeMessageHelper.setSubject("通知");
        mimeMessageHelper.setText("<b>今天放假啦</b>",true);
        mimeMessageHelper.setFrom("1847003070@qq.com");
        mimeMessageHelper.setFrom("760423314@qq.com");

        //上传文件
        mimeMessageHelper.addAttachment("1.jpg",new File("C:\Users\Public\Pictures\Sample Pictures"));

    }