一. 简介
关于Session的原理可参照Asp.Net版本Session的文章,去查阅。
1. 普通用法
(1).通过Nuget引入【Microsoft.AspNetCore.Http】程序集,Core Mvc中已经默认引入了,在哪使用using一下即可。
(2).注入Session相关的服务。
A:在ConfigureService注册基于服务器内存的Session, services.AddDistributedMemoryCache(); services.AddSession(); 在Configure中进行启用Session,app.UseSession();
注:一定要在mvc前面进行注入,进程外Session的注入后面介绍。
B:如果项目中使用了CookiePolicyOptions,一定要将里面true改为false,如: options.CheckConsentNeeded = context => false; 或者配置Session的性质,options.Cookie.IsEssential = true;(表示cookie是必须的),否则chrome中拿不到Session值
解释:这是个GDRP条例,让用户自己选择使用用cookie,详见 http://www.zhibin.org/archives/667 或 https://www.cnblogs.com/GuZhenYin/p/9154447.html
C:在控制器中通过 HttpContext.Session 来向Session中读写各种值。
注册和启用相关的代码:
 1  public void ConfigureServices(IServiceCollection services)
 2  {
 3             services.Configure<CookiePolicyOptions>(options =>
 4             {
 5                 // This lambda determines whether user consent for non-essential cookies is needed for a given request.
 6                 options.CheckConsentNeeded = context => false;       //改为false或者直接注释掉,上面的Session才能正常使用
 7                 options.MinimumSameSitePolicy = SameSiteMode.None;
 8             });
 9             //注册Session服务
10             //基于内存的Session
11             services.AddDistributedMemoryCache();
12             //默认过期时间为20分钟,每次访问都会重置
13             services.AddSession();
14
15             services.AddMvc().SetCompatibilityVersion(CompatibilityVersion.Version_2_2);
16   }
17   public void Configure(IApplicationBuilder app, IHostingEnvironment env)
18   {
19             if (env.IsDevelopment())
20             {
21                 app.UseDeveloperExceptionPage();
22             }
23             else
24             {
25                 app.UseExceptionHandler("/Home/Error");
26             }
27             app.UseStaticFiles();
28             app.UseCookiePolicy();
29             //启用Session管道
30             app.UseSession();
31
32             app.UseMvc(routes =>
33             {
34                 routes.MapRoute(
35                     name: "default",
36                     template: "{controller=CoreSession}/{action=Index6}/{id?}");
37             });
38   }
测试代码:
 1       public IActionResult Index()
 2         {
 3             string userName = HttpContext.Session.GetString("userName");
 4             if (string.IsNullOrEmpty(userName))
 5             {
 6                 userName = "ypf";
 7                 HttpContext.Session.SetString("userName", userName);
 8             }
 9             var t1 = HttpContext.Session.GetString("userName");
10             ViewBag.userName = userName;
11             return View();
12         }
13
14         public IActionResult Index2()
15         {
16             string userName = HttpContext.Session.GetString("userName");
17             ViewBag.userName = userName;
18             return View();
19         }
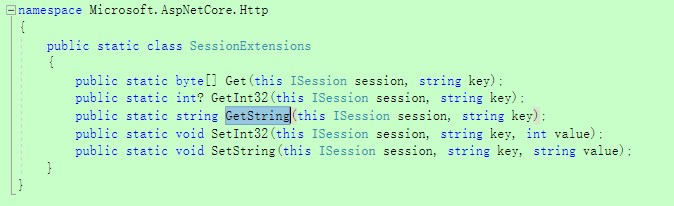
补充Session默认提供的方法:

2. 全局注册使用
(1).背景:通常便于管理,我们将Session进行全局统一注入,方便管理。
(2).步骤:
A: 在普通用法的前提下,在ConfigureService中进行统一对象的注册, services.AddSingleton<IHttpContextAccessor, HttpContextAccessor>();
B:在控制器利用构造函数进行注入。
C:正常使用即可,案例详见项目的Index3和Index4
代码分享:

 1  public class CoreSessionController : Controller
 2     {
 3         private readonly IHttpContextAccessor httpContextAccessor;
 4
 5         private ISession MySession => httpContextAccessor.HttpContext.Session;
 6
 7         public CoreSessionController(IHttpContextAccessor httpContextAccessor)
 8         {
 9             this.httpContextAccessor = httpContextAccessor;
10         }
11         #region 02-测试统一注入的用法
12         /// <summary>
13         /// 下面是统一注入使用的写法
14         /// </summary>
15         /// <returns></returns>
16
17         public IActionResult Index3()
18         {
19             string userName = MySession.GetString("userName");
20             if (string.IsNullOrEmpty(userName))
21             {
22                 userName = "ypf";
23                 MySession.SetString("userName", userName);
24             }
25             var t1 = MySession.GetString("userName");
26             ViewBag.userName = userName;
27             return View();
28         }
29
30         public IActionResult Index4()
31         {
32             string userName = MySession.GetString("userName");
33             ViewBag.userName = userName;
34             return View();
35         }
36         #endregion
37
38     }
二. 高级
1. Session的扩展
(1).背景
我们发现系统默认提供的Session方法,仅能存储byte、string、int类型,很不灵活,我们想能存储任何对象,这个时候就需要我们自行扩展。 对SessionExtensions类进行扩展
(2).利用Newtonsoft.Json进行扩展
A. 扩展代码详见SessionExtensions中的Set和Get方法
B. 案例详见Index5
(3).利用protobuf-net进行扩展
A. 通过Nuget安装程序集【protobuf-net】,这是谷歌的一个程序集,序列化和反序列效率更高
B. 扩展代码详见SessionExtensions中的Set2和Get2方法, 如果写入的是个类,类名上要加 [ProtoContract],属性上要加 [ProtoMember(1)] [ProtoMember(2)]等等, 如:UserInfor2
C. 案例详见Index6
扩展代码:
 1   public static class SessionExtensions
 2     {
 3         #region 01-利用Newtonsoft.Json进行扩展
 4         public static void Set<T>(this ISession session, string key, T value)
 5         {
 6             session.SetString(key, JsonConvert.SerializeObject(value));
 7         }
 8
 9         public static T Get<T>(this ISession session, string key)
10         {
11             var value = session.GetString(key);
12             return value == null ? default(T) : JsonConvert.DeserializeObject<T>(value);
13         }
14         #endregion
15
16         #region 02-利用protobuf-net进行扩展
17         public static void Set2<T>(this ISession session, string key, T value)
18         {
19             using (MemoryStream stream = new MemoryStream())
20             {
21                 Serializer.Serialize(stream, value);
22                 byte[] byteArrary = stream.ToArray();
23                 session.Set(key, byteArrary);
24             }
25         }
26
27         public static T Get2<T>(this ISession session, string key)
28         {
29             byte[] byteArray = session.Get(key);
30             if (byteArray == null)
31             {
32                 return default(T);
33             }
34             else
35             {
36                 using (MemoryStream stream = new MemoryStream(byteArray))
37                 {
38                     return Serializer.Deserialize<T>(stream);
39                 }
40             }
41         }
42         #endregion
43     }
类代码:
 1  public class UserInfor1
 2     {
 3         public string id { get; set; }
 4         public string userName { get; set; }
 5     }
 6     [ProtoContract]
 7     public class UserInfor2
 8     {
 9         [ProtoMember(1)]
10         public string id { get; set; }
11         [ProtoMember(2)]
12         public string userName { get; set; }
13
14     }
测试代码:
 1   #region 03-测试Newtonsoft.Json进行扩展
 2         public IActionResult Index5()
 3         {
 4             UserInfor1 user = HttpContext.Session.Get<UserInfor1>("u1");
 5             if (user == null)
 6             {
 7                 user = new UserInfor1();
 8                 user.id = "001";
 9                 user.userName = "Marren";
10                 HttpContext.Session.Set<UserInfor1>("u1", user);
11             }
12             ViewBag.id = user.id;
13             ViewBag.userName = user.userName;
14             return View();
15         }
16         #endregion
17
18         #region 04-测试protobuf-net进行扩展
19         public IActionResult Index6()
20         {
21             UserInfor2 user = HttpContext.Session.Get2<UserInfor2>("u2");
22             if (user == null)
23             {
24                 user = new UserInfor2();
25                 user.id = "001";
26                 user.userName = "Marren";
27                 HttpContext.Session.Set2<UserInfor2>("u2", user);
28             }
29             ViewBag.id = user.id;
30             ViewBag.userName = user.userName;
31             return View();
32         }
33         #endregion
2.Session的性质
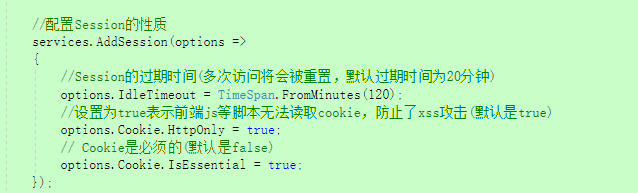
(1). Session的过期时间(多次访问将会被重置,默认过期时间为20分钟)
如:options.IdleTimeout = TimeSpan.FromMinutes(120);
(2). 设置为true表示前端js等脚本无法读取cookie,防止了xss攻击(默认是true)
如:options.Cookie.HttpOnly = true;
(3). Cookie是必须的(默认是false),可以覆盖上面的cookie策略
如:options.Cookie.IsEssential = true;
3. 如何在普通类中使用Session对象?
(1).说明
再普通类中如何调用Session,大约有两种思路:以构造函数的注入进去,但是如果这个类不是过滤器,使用的时候就需要实例化,又需要传入对象进去,如CheckLogin类,很麻烦,所以建议用第二种方案,直接吧实例好的Session传入进去,直接使用即可,如CheckLogin2.
(2). 方案一
先统一注入, services.AddSingleton<IHttpContextAccessor, HttpContextAccessor>();,然后再在控制器中进行构造函数注入,但调用的时候还需要传入进去。
PS:过滤器中可以直接context.httpContext.Session来设置
(3). 方案二
直接把实例好的Session传进去
 1  public class CheckLogin2
 2     {
 3         private ISession MySession { get; set; }
 4
 5         public CheckLogin2(ISession mySession)
 6         {
 7             MySession = mySession;
 8         }
 9         public bool isLogin()
10         {
11             string userName = MySession.GetString("userName");
12             if (string.IsNullOrEmpty(userName))
13             {
14                 return false;
15             }
16             return true;
17         }
18     }

三. 进程外Session
关于进程外Session的好处、解决了什么痛点问题,可以参考Asp.Net 中的进程外Session,去查阅。 (解决了IIS重启Session丢失的问题,解决了Session空间有限容易被挤爆的问题,但不能解决浏览器重启找不到Session的问题!)
特别说明:基于SQLServer或Redis数据的进程外Session 的数据库方面的配置和前面分布式缓存章节数据库的配置完全相同,去查阅。
1. 基于SQLServer
(1). 安装【Microsoft.Extensions.Caching.SqlServer】程序集,如果是Core MVC程序,自带的Microsoft.AspNetCore.App包里已经涵盖了该程序集,无需重复安装。
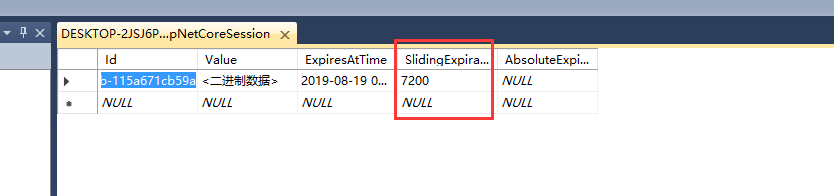
(2). 首先要有个目标数据库中(比如CacheDB数据库),然后以管理员身份cmd运行下面指令,会创建一张名叫“AspNetCoreSession”表,相应的Session信息都存在于这张表中。
【dotnet sql-cache create "Server=localhost;User=sa;Password=123456;Database=CacheDB" dbo AspNetCoreSession】成功后会提示:Table and index were created successfully.

PS:补充表的结构和含义, 分别是键、值、到期时刻(有问题)、滑动过期时间、绝对过期时间。

(3). 将原先基于内存的Session代码( services.AddDistributedMemoryCache(); )替换成基于SqlServer的代码,如下:
 1             //01-基于内存的Session
 2             //services.AddDistributedMemoryCache();
 3
 4             //02-基于SQLServer的Session
 5             services.AddDistributedSqlServerCache(options =>
 6             {
 7                 options.ConnectionString = Configuration["SqlSeverConnectionString"];
 8                 options.SchemaName = "dbo";
 9                 options.TableName = "AspNetCoreSession";
10             });
1 {
2   "Logging": {
3     "LogLevel": {
4       "Default": "Warning"
5     }
6   },
7   "AllowedHosts": "*",
8   "SqlSeverConnectionString": "Server=localhost;User=sa;Password=123456;Database=CacheDB"
9 }
(4). 其它的配置都不变,正常使用即可。
2. 基于Redis
(1). 安装【Microsoft.Extensions.Caching.StackExchangeRedis】程序集,Core MVC中这个也是不包含的。
(2). 下载Redis程序,打开redis-server.exe,启动Redis。

(3). 将原先基于内存的Session代码 ( services.AddDistributedMemoryCache(); ) 替换成基于Redis的代码,如下:
            //01-基于内存的Session
            //services.AddDistributedMemoryCache();

            //03-基于Redis的Session
            services.AddStackExchangeRedisCache(options =>
            {
                options.Configuration = "localhost";
                options.InstanceName = "SampleInstance";
            });
(4). 其它配置都不变,正常使用即可。
!
- 作 者 : Yaopengfei(姚鹏飞)
- 博客地址 : http://www.cnblogs.com/yaopengfei/
- 声 明1 : 本人才疏学浅,用郭德纲的话说“我是一个小学生”,如有错误,欢迎讨论,请勿谩骂^_^。
- 声 明2 : 原创博客请在转载时保留原文链接或在文章开头加上本人博客地址,否则保留追究法律责任的权利。