一. 前言
1.简介
简化模式(implicit grant type)不通过第三方应用程序的服务器,直接在浏览器中向认证服务器申请令牌,步骤在浏览器中完成,令牌对访问者是可见的,且客户端不需要认证。
注:该模式也有很大的弊端,就是请求令牌在浏览器中能被看到。
2. 流程图

流程
(A)客户端将用户导向认证服务器。
(B)用户决定是否给于客户端授权。
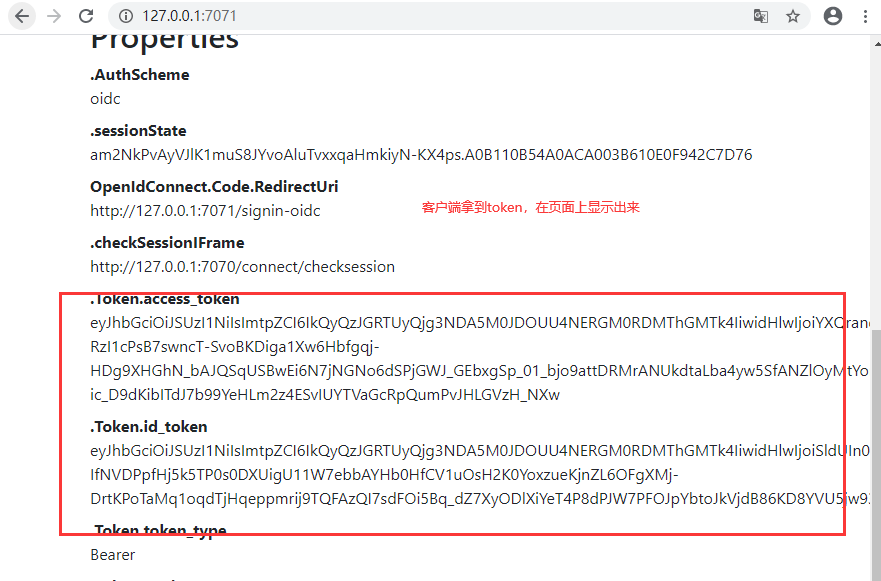
(C)假设用户给予授权,认证服务器将用户导向客户端指定的"重定向URI",并在URI的Hash部分包含了访问令牌。
(D)浏览器向资源服务器发出请求,其中不包括上一步收到的Hash值(#号的部分)。
(E)资源服务器返回一个网页,其中包含的代码可以获取Hash值中的令牌。
(F)浏览器执行上一步获得的脚本,提取出令牌。
(G)浏览器将令牌发给客户端。
(H)客户端拿到令牌以后,就可以去请求资源服务器获取资源了。
3. 流程剖析
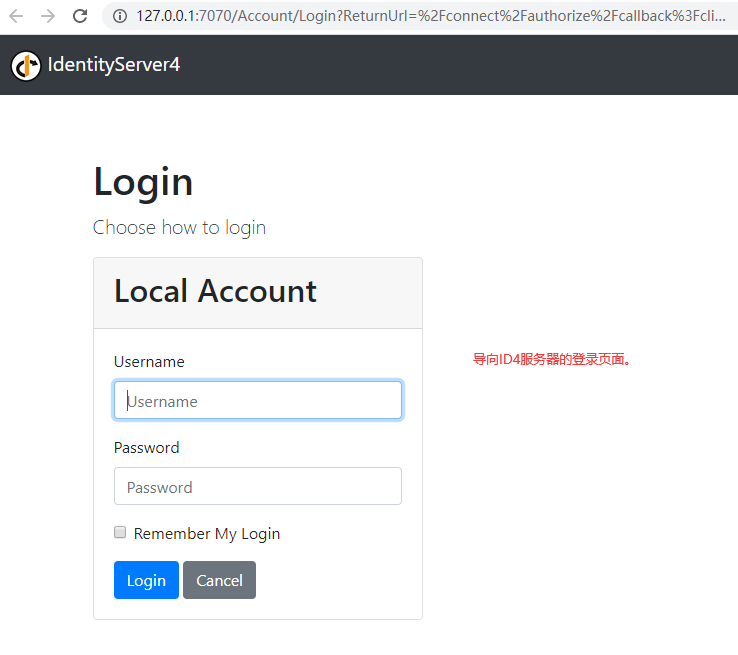
步骤A:导向认证服务器,如下请求,进而再导向认证服务器的登录页面。
GET /authorize?response_type=token&client_id=s6BhdRkqt3&state=xyz&redirect_uri=https%3A%2F%2Fclient%2Eexample%2Ecom%2Fcb
参数包括:
response_type:表示授权类型,此处的值固定为"token",必选项。
client_id:表示客户端的ID,必选项。
redirect_uri:表示重定向的URI,可选项。
scope:表示权限范围,可选项。
state:表示客户端的当前状态,可以指定任意值,认证服务器会原封不动地返回这个值。
步骤C:服务器回应客户端的URI
Location http://example.com/cb#access_token=2YotnFZFEjr1zCsicMWpAA&state=xyz&token_type=example&expires_in=3600
参数包括:
access_token:表示访问令牌,必选项。
token_type:表示令牌类型,该值大小写不敏感,必选项。
expires_in:表示过期时间,单位为秒。如果省略该参数,必须其他方式设置过期时间。
scope:表示权限范围,如果与客户端申请的范围一致,此项可省略。
state:如果客户端的请求中包含这个参数,认证服务器的回应也必须一模一样包含这个参数。
步骤D:浏览器会访问Location指定的网址,但是Hash部分(#后的部分)不会发送
步骤E:服务提供商的资源服务器发送过来的代码,会提取出Hash中的令牌。
二. 代码实操
1. 项目准备
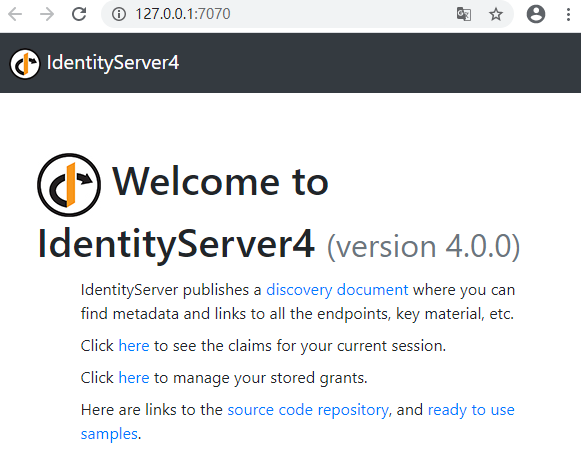
(1). ID4_Server2:授权认证服务器 【地址:http://127.0.0.1:7070】
(2). MvcImplictClient2:web性质的客户端 【地址:http://127.0.0.1:7071】
2. 搭建步骤
(一). ID4_Server2
(1).通过Nuget安装【IdentityServer4 4.0.2】程序集
(2).集成IDS4官方的UI页面
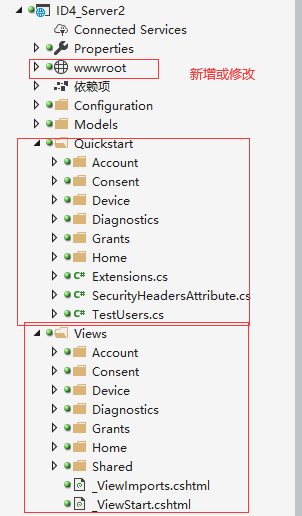
进入ID4_Server2的根目录,cdm模式下依次输入下面指令,集成IDS4相关的UI页面,发现新增或改变了【Quickstart】【Views】【wwwroot】三个文件夹
A.【dotnet new -i identityserver4.templates】
B.【dotnet new is4ui --force】 其中--force代表覆盖的意思, 空项目可以直接输入:【dotnet new is4ui】,不需要覆盖。
PS. 有时候正值版本更新期间,上述指令下载下来的文件可能不是最新的,这个时候只需要手动去下载,然后把上述三个文件夹copy到项目里即可
(下载地址:https://github.com/IdentityServer/IdentityServer4.Quickstart.UI)
(3).创建Config1配置类,进行可以使用IDS4资源的配置
A.隐式模式: AllowedGrantTypes = GrantTypes.Implicit,
B.授权成功返回的地址:RedirectUris = { "http://127.0.0.1:7071/signin-oidc" }, 7071是MvcImplictClient2客户端的端口,signin-oidc是IDS4监听的一个地址,可以拿到token信息。
代码分享:


    public class Config1
    {
        /// <summary>
        /// IDS资源
        /// </summary>
        /// <returns></returns>
        public static IEnumerable<IdentityResource> GetIds()
        {
            return new List<IdentityResource>
            {
                new IdentityResources.OpenId(),
                new IdentityResources.Profile(),
            };
        }

        /// <summary>
        /// 可以使用ID4 Server 客户端资源
        /// </summary>
        /// <returns></returns>
        public static IEnumerable<Client> GetClients()
        {
            List<Client> clients = new List<Client>() {
                new Client
                {
                    ClientId = "client1",
                    ClientSecrets = { new Secret("123456".Sha256()) },
                    //隐式模式
                    AllowedGrantTypes = GrantTypes.Implicit,
                    //需要确认授权
                    RequireConsent = true,
                    RequirePkce = true,
                    //允许token通过浏览器
                    AllowAccessTokensViaBrowser=true,
                    // where to redirect to after login(登录)
                    RedirectUris = { "http://127.0.0.1:7071/signin-oidc" },
                    // where to redirect to after logout(退出)
                    PostLogoutRedirectUris = { "http://127.0.0.1:7071/signout-callback-oidc" },
                    //允许的范围
                    AllowedScopes = new List<string>
                    {
                        IdentityServerConstants.StandardScopes.OpenId,
                        IdentityServerConstants.StandardScopes.Profile
                    },
                    AlwaysIncludeUserClaimsInIdToken=true
                }
            };
            return clients;
        }

        /// <summary>
        /// 定义可以使用ID4的用户资源
        /// </summary>
        /// <returns></returns>
        public static List<TestUser> GetUsers()
        {
            var address = new
            {
                street_address = "One Hacker Way",
                locality = "Heidelberg",
                postal_code = 69118,
                country = "Germany"
            };
            return new List<TestUser>()
            {
                new TestUser
                {
                        SubjectId = "001",
                        Username = "ypf1",    //账号
                        Password = "123456",  //密码
                        Claims =
                        {
                            new Claim(JwtClaimTypes.Name, "Alice Smith"),
                            new Claim(JwtClaimTypes.GivenName, "Alice"),
                            new Claim(JwtClaimTypes.FamilyName, "Smith"),
                            new Claim(JwtClaimTypes.Email, "AliceSmith@email.com"),
                            new Claim(JwtClaimTypes.EmailVerified, "true", ClaimValueTypes.Boolean),
                            new Claim(JwtClaimTypes.WebSite, "http://alice.com"),
                            new Claim(JwtClaimTypes.Address, JsonSerializer.Serialize(address), IdentityServerConstants.ClaimValueTypes.Json)
                        }
                 },
                 new TestUser
                 {
                        SubjectId = "002",
                        Username = "ypf2",
                        Password = "123456",
                        Claims =
                        {
                            new Claim(JwtClaimTypes.Name, "Bob Smith"),
                            new Claim(JwtClaimTypes.GivenName, "Bob"),
                            new Claim(JwtClaimTypes.FamilyName, "Smith"),
                            new Claim(JwtClaimTypes.Email, "BobSmith@email.com"),
                            new Claim(JwtClaimTypes.EmailVerified, "true", ClaimValueTypes.Boolean),
                            new Claim(JwtClaimTypes.WebSite, "http://bob.com"),
                            //这是新的序列化模式哦
                            new Claim(JwtClaimTypes.Address, JsonSerializer.Serialize(address), IdentityServerConstants.ClaimValueTypes.Json)
                        }
                  }
            };
        }
    }
(4).在Startup类中注册、启用、修改路由
A.在ConfigureService中进行IDS4的注册.
B.在Configure中启用IDS4 app.UseIdentityServer();
C.路由,这里需要注意,不要和原Controllers里冲突即可,该项目中没有Controllers文件夹,不要特别配置。
代码分享:
  public class Startup
    {
        public Startup(IConfiguration configuration)
        {
            Configuration = configuration;
        }

        public IConfiguration Configuration { get; }

        // This method gets called by the runtime. Use this method to add services to the container.
        public void ConfigureServices(IServiceCollection services)
        {
            services.AddControllersWithViews();

            //注册IDS4信息(简化模式)
            services.AddIdentityServer()
                    .AddDeveloperSigningCredential()
                    .AddInMemoryIdentityResources(Config1.GetIds())
                    .AddInMemoryClients(Config1.GetClients())
                    .AddTestUsers(Config1.GetUsers());
        }

        // This method gets called by the runtime. Use this method to configure the HTTP request pipeline.
        public void Configure(IApplicationBuilder app, IWebHostEnvironment env)
        {
            if (env.IsDevelopment())
            {
                app.UseDeveloperExceptionPage();
            }
            else
            {
                app.UseExceptionHandler("/Home/Error");
            }
            app.UseStaticFiles();
            app.UseRouting();

            //启用IDS4
            app.UseIdentityServer();
            app.UseAuthorization();
            app.UseEndpoints(endpoints =>
            {
                endpoints.MapControllerRoute(
                    name: "default",
                    pattern: "{controller=Home}/{action=Index}/{id?}");

                //修改默认启动路由
                //endpoints.MapDefaultControllerRoute();
            });
        }
    }
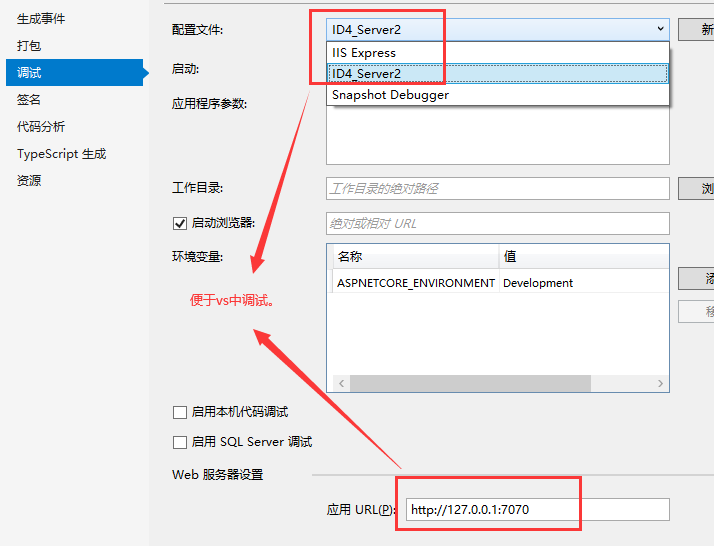
(5).配置启动端口,直接设置默认值: webBuilder.UseStartup<Startup>().UseUrls("http://127.0.0.1:7070");
(6).修改属性方便调试:项目属性→ 调试→应用URL(p),改为:http://127.0.0.1:7070 (把IISExpress和控制台启动的方式都改了,方便调试)
(二). MvcImplictClient2
(1).通过Nuget安装【Microsoft.AspNetCore.Authentication.OpenIdConnect 3.1.5】程序集
(2).在Startup中进行配置
a. ConfigureSevice:添加Cookie认证、添加通过OIDC协议远程请求认证(注意的几个地方:Authority、ResponseType、ResponseMode)
b. Config:开启认证、开启授权、默认路由后面添加授权RequireAuthorization。
代码分享:
public class Startup
    {
        public Startup(IConfiguration configuration)
        {
            Configuration = configuration;
        }

        public IConfiguration Configuration { get; }

        // This method gets called by the runtime. Use this method to add services to the container.
        public void ConfigureServices(IServiceCollection services)
        {
            services.AddControllersWithViews();


            JwtSecurityTokenHandler.DefaultMapInboundClaims = false;
            //添加Cookie认证
            services.AddAuthentication(options =>
            {
                options.DefaultScheme = "Cookies";
                options.DefaultChallengeScheme = "oidc";
            })
            .AddCookie("Cookies")
            //通过OIDC协议远程请求认证
            .AddOpenIdConnect("oidc", options =>
            {
                options.Authority = "http://127.0.0.1:7070";   //认证授权服务器地址
                options.RequireHttpsMetadata = false;
                options.ClientId = "client1";    //客户端ID
                options.ClientSecret = "123456"; //客户端秘钥
                options.ResponseType = OpenIdConnectResponseType.IdTokenToken;  //请求类型
                options.ResponseMode = OpenIdConnectResponseMode.FormPost;      //请求方式
                options.SaveTokens = true;
            });
        }

        // This method gets called by the runtime. Use this method to configure the HTTP request pipeline.
        public void Configure(IApplicationBuilder app, IWebHostEnvironment env)
        {
            if (env.IsDevelopment())
            {
                app.UseDeveloperExceptionPage();
            }
            else
            {
                app.UseExceptionHandler("/Home/Error");
            }
            app.UseStaticFiles();

            app.UseRouting();
            //开启认证
            app.UseAuthentication();
            //开启授权
            app.UseAuthorization();

            app.UseEndpoints(endpoints =>
            {
                //修改默认路由, RequireAuthorization
                endpoints.MapControllerRoute(
                    name: "default",
                    pattern: "{controller=Home}/{action=Index}/{id?}").RequireAuthorization();

            });
        }
    }
(3).编写控制器和view页面中的内容
控制器代码:
   public IActionResult Index()
   {
       string accessToken = HttpContext.GetTokenAsync("access_token").Result;
       string idToken = HttpContext.GetTokenAsync("id_token").Result;
       var claimsList = from c in User.Claims select new { c.Type, c.Value };
       return View();
    }
   public IActionResult Logout()
   {
       return SignOut("Cookies", "oidc");
   }
View页面代码:
@using Microsoft.AspNetCore.Authentication

<h2>Claims</h2>

<dl>
    @foreach (var claim in User.Claims)
    {
        <dt>@claim.Type</dt>
        <dd>@claim.Value</dd>
    }
</dl>

<h2>Properties</h2>

<dl>
    @foreach (var prop in (await Context.AuthenticateAsync()).Properties.Items)
    {
        <dt>@prop.Key</dt>
        <dd>@prop.Value</dd>
    }
</dl>
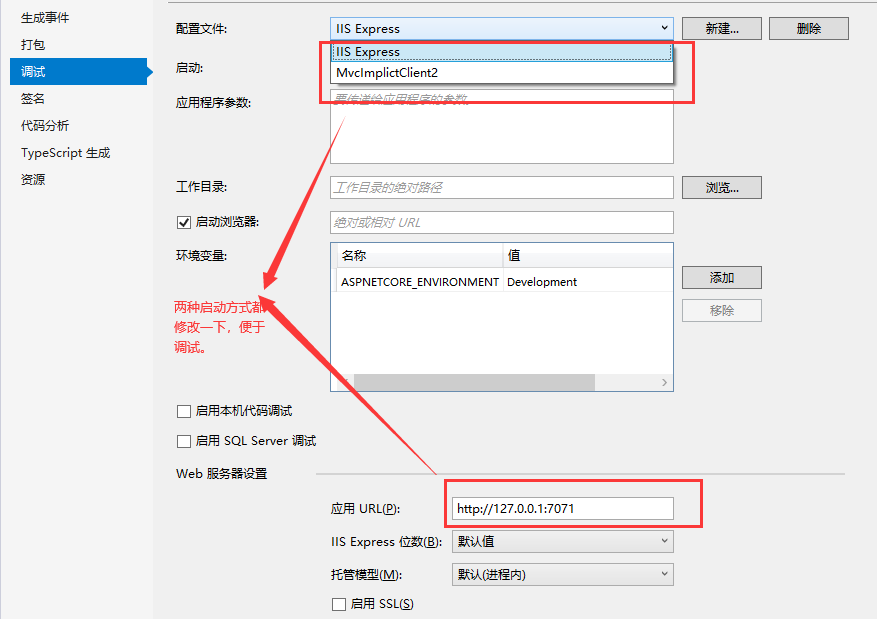
(4).配置启动端口,直接设置默认值: webBuilder.UseStartup<Startup>().UseUrls("http://127.0.0.1:7071");
(5).修改属性方便调试:项目属性→ 调试→应用URL(p),改为:http://127.0.0.1:7071(把IISExpress和控制台启动的方式都改了,方便调试)
3. 剖析测试
(1). 启动ID4_Server2项目
(2). 启动MvcImplictClient2项目

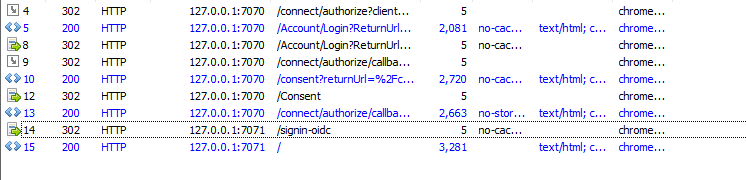
用Fiddler检测上述过程
参考文档:https://www.ruanyifeng.com/blog/2014/05/oauth_2_0.html
!
- 作 者 : Yaopengfei(姚鹏飞)
- 博客地址 : http://www.cnblogs.com/yaopengfei/
- 声 明1 : 如有错误,欢迎讨论,请勿谩骂^_^。
- 声 明2 : 原创博客请在转载时保留原文链接或在文章开头加上本人博客地址,否则保留追究法律责任的权利。