1mybatis和spring整合
1.1 mybaits和spring整合的思路
1、让spring管理SqlSessionFactory
2、让spring管理mapper动态代理对象和dao。
    使用spring和mybatis整合开发mapper代理及原始dao接口。
    自动开启事务,自动关闭 sqlsession.
3、让spring管理数据源( 数据库连接池)
1.2创建整合工程
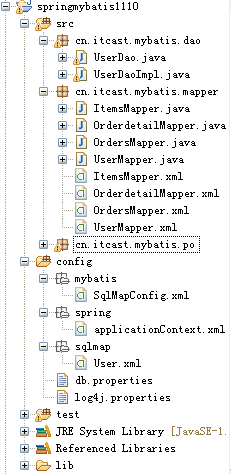

1.1加入jar包
1、mybatis3.2.7本身的jar包
2、数据库驱动包
3、spring3.2.0
4、spring和mybatis整合包
    从mybatis的官方下载spring和mybatis整合包
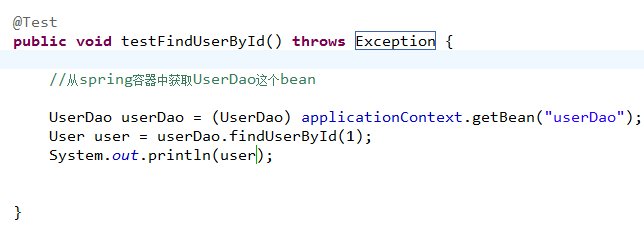
1.1log4j.properties
1.2SqlMapconfig.xml
mybatis配置文件:别名、settings,数据源不在这里配置
<!DOCTYPE configuration
PUBLIC "-//mybatis.org//DTD Config 3.0//EN"
"http://mybatis.org/dtd/mybatis-3-config.dtd">
<configuration>
    <!-- 定义 别名 -->
    <typeAliases>
        <!-- 批量别名定义 指定包路径,自动扫描包下边的pojo,定义别名,别名默认为类名(首字母小写或大写) -->
        <package name="cn.itcast.mybatis.po" />
    </typeAliases>
    <mappers>
        <!-- 加载原始dao使用的user.xml -->
        <mapper resource="sqlmap/User.xml"/>
        <package name="cn.itcast.mybatis.mapper" />
    </mappers>
</configuration>
1.3 applicationContext.xml
1、数据源(dbcp连接池)
2、SqlSessionFactory
3、mapper对象(bin)或dao
1.4整合开发原始dao接口
1.4.1配置SqlSessionFactory
在 applicationContext.xml配置SqlSessionFactory
<!-- SqlsessionFactory -->
    <bean id="sqlSessionFactory" class="org.mybatis.spring.SqlSessionFactoryBean">
        <!-- 数据源 -->
        <property name="dataSource" ref="dataSource"/>
        <!-- mybatis配置文件 -->
        <property name="configLocation" value="classpath:mybatis/SqlMapConfig.xml"/>
    </bean>

<!-- 加载配置文件 -->
    <context:property-placeholder location="classpath:db.properties" />
    <!-- 数据库连接池 -->
    <bean id="dataSource" class="org.apache.commons.dbcp.BasicDataSource"
        destroy-method="close">
        <property name="driverClassName" value="${jdbc.driver}" />
        <property name="url" value="${jdbc.url}" />
        <property name="username" value="${jdbc.username}" />
        <property name="password" value="${jdbc.password}" />
        <property name="maxActive" value="10" />
        <property name="maxIdle" value="5" />
    </bean>

db.properties:
jdbc.driver=com.mysql.jdbc.Driver
jdbc.url=jdbc:mysql://localhost:3306/mybatis
jdbc.username=root
jdbc.password=mysql

1.4.2开发dao
public class UserDaoImpl extends SqlSessionDaoSupport implements UserDao {
    @Override
    public User findUserById(int id) throws Exception {
        // 创建SqlSession
        SqlSession sqlSession = this.getSqlSession();//getSqlSession从SqlSessionDaoSupport 获取
        // 根据id查询用户信息
        User user = sqlSession.selectOne("test.findUserById", id);
        return user;
    }
}
1.4.3applicationContext.xml配置 dao
    <!-- 配置dao -->
    <bean id="userDao" class="cn.itcast.mybatis.dao.UserDaoImpl">
        <property name="sqlSessionFactory" ref="sqlSessionFactory"/>
    </bean>
1.4.4测试dao接口
1.1整合开发mapper代理方法
(mapper开发只写接口不写实现类,实现类由mybatis动态生成),
1.1.1开发mapper.xml和mapper.java

1.1.1applicationContext.xml使用MapperFactoryBean
<!-- 配置mapper
    MapperFactoryBean:用于生成mapper代理对象,当有多个mapper的时候每一个mapper都要配置,
     -->
    <bean id="userMapper" class="org.mybatis.spring.mapper.MapperFactoryBean">
        <property name="mapperInterface" value="cn.itcast.mybatis.mapper.UserMapper"/>全路径名
        <property name="sqlSessionFactory" ref="sqlSessionFactory"/>没有整合spring的时候是通过sqlSessionFactory得到sqlSession再通过getMapper()方法,
    </bean>
使用此方法对于每个mapper都需要配置,比较繁琐。
1.1.2applicationContext.xml使用MapperScannerConfigurer(扫描mapper)
<!--
    MapperScannerConfigurer:mapper的扫描器,将包下边的mapper接口自动创建代理对象,
    自动创建到spring容器中,bean的id是mapper的类名(首字母小写)
     -->
    <bean class="org.mybatis.spring.mapper.MapperScannerConfigurer">
        <!-- 配置扫描包的路径
        如果要扫描多个包,中间使用半角逗号分隔
         -->
        <property name="basePackage" value="cn.itcast.mybatis.mapper"/>
        <!-- 使用sqlSessionFactoryBeanName -->
        <property name="sqlSessionFactoryBeanName" value="sqlSessionFactory"/>
    </bean>
    使用扫描器自动扫描mapper,生成代理对象,比较方便。
1.1.3测试mapper接口

全部代码:
UserMapper
public interface UserMapper {

    //根据用户id查询用户信息
    public User findUserById(int id) throws Exception;

    //根据用户名称  查询用户信息
    public List<User> findUserByName(String username) throws Exception;

    //自定义查询条件查询用户信息
    public List<User> findUserList(UserQueryVo userQueryVo) throws Exception;

    //查询用户,使用resultMap进行映射
    public List<User> findUserListResultMap(UserQueryVo userQueryVo)throws Exception;
    //查询用户,返回记录个数
    public int findUserCount(UserQueryVo userQueryVo) throws Exception;

    //插入用户
    public void insertUser(User user)throws Exception;
    //删除用户
    public void deleteUser(int id) throws Exception;
    //修改用户
    public void updateUser(User user) throws Exception;


}
UserMapper.xml
<?xml version="1.0" encoding="UTF-8" ?>
<!DOCTYPE mapper
PUBLIC "-//mybatis.org//DTD Mapper 3.0//EN"
"http://mybatis.org/dtd/mybatis-3-mapper.dtd">
<!-- namespace命名空间,为了对sql语句进行隔离,方便管理 ,mapper开发dao方式,使用namespace有特殊作用
mapper代理开发时将namespace指定为mapper接口的全限定名
 -->
<mapper namespace="cn.itcast.mybatis.mapper.UserMapper">
<!-- 在mapper.xml文件中配置很多的sql语句,执行每个sql语句时,封装为MappedStatement对象
mapper.xml以statement为单位管理sql语句
 -->

     <!-- 将用户查询条件定义为sql片段
     建议对单表的查询条件单独抽取sql片段,提高公用性
     注意:不要将where标签放在sql片段
       -->
     <sql id="query_user_where">
             <!-- 如果 userQueryVo中传入查询条件,再进行sql拼接-->
            <!-- test中userCustom.username表示从userQueryVo读取属性值-->
            <if test="userCustom!=null">
                <if test="userCustom.username!=null and userCustom.username!=''">
                    and username like '%${userCustom.username}%'
                </if>
                <if test="userCustom.sex!=null and userCustom.sex!=''">
                    and sex = #{userCustom.sex}
                </if>

                <!-- 还有很的查询条件 -->
            </if>
            <if test="ids!=null">
                <!-- 根据id集合查询用户信息 -->
                <!-- 最终拼接的效果:
                SELECT id ,username ,birthday  FROM USER WHERE username LIKE '%小明%' AND id IN (16,22,25)
                collection:集合的属性
                open:开始循环拼接的串
                close:结束循环拼接的串
                item:每次循环取到的对象
                separator:每两次循环中间拼接的串
                 -->
                 <foreach collection="ids" open=" AND id IN ( " close=")" item="id" separator=",">
                     #{id}
                 </foreach>
                 <!--
                 SELECT id ,username ,birthday  FROM USER WHERE username LIKE '%小明%' AND (id = 16 OR id = 22 OR id = 25)
                  <foreach collection="ids" open=" AND ( " close=")" item="id" separator="OR">
                     id = #{id}
                 </foreach>
                  -->
            </if>
     </sql>

     <!-- 定义resultMap,列名和属性名映射配置
     id:mapper.xml中的唯一标识
     type:最终要映射的pojo类型
      -->
     <resultMap id="userListResultMap" type="user" >
         <!-- 列名
         id_,username_,birthday_
         id:要映射结果集的唯 一标识 ,称为主键
         column:结果集的列名
         property:type指定的哪个属性中
          -->
          <id column="id_" property="id"/>
          <!-- result就是普通列的映射配置 -->
          <result column="username_" property="username"/>
          <result column="birthday_" property="birthday"/>

     </resultMap>

    <!-- 根据id查询用户信息 -->
    <!--
        id:唯一标识 一个statement
        #{}:表示 一个占位符,如果#{}中传入简单类型的参数,#{}中的名称随意
        parameterType:输入 参数的类型,通过#{}接收parameterType输入 的参数
        resultType:输出结果 类型,不管返回是多条还是单条,指定单条记录映射的pojo类型
     -->
    <select id="findUserById" parameterType="int" resultType="user" >
        SELECT * FROM USER WHERE id= #{id}

    </select>

    <!-- 根据用户名称查询用户信息,可能返回多条
    ${}:表示sql的拼接,通过${}接收参数,将参数的内容不加任何修饰拼接在sql中。

     -->
    <select id="findUserByName" parameterType="java.lang.String" resultType="cn.itcast.mybatis.po.User">
        select * from user where username like '%${value}%'
    </select>

    <!-- 自定义查询条件查询用户的信息
    parameterType:指定包装类型
    %${userCustom.username}%:userCustom是userQueryVo中的属性,通过OGNL获取属性的值
     -->
    <select id="findUserList" parameterType="userQueryVo" resultType="user">

        select id,username,birthday from user
        <!-- where标签相当 于where关键字,可以自动去除第一个and -->
        <where>
            <!-- 引用sql片段,如果sql片段和引用处不在同一个mapper必须前边加namespace -->
            <include refid="query_user_where"></include>
            <!-- 下边还有很其它的条件 -->
            <!-- <include refid="其它的sql片段"></include> -->
        </where>


    </select>

    <!-- 使用resultMap作结果映射
    resultMap:如果引用resultMap的位置和resultMap的定义在同一个mapper.xml,
    直接使用resultMap的id,如果不在同一个mapper.xml要在resultMap的id前边加namespace

     -->
    <select id="findUserListResultMap" parameterType="userQueryVo" resultMap="userListResultMap">

        select id id_,username username_,birthday birthday_ from user where username like '%${userCustom.username}%'
    </select>

    <!-- 输出简单类型
    功能:自定义查询条件,返回查询记录个数,通常用于实现 查询分页
     -->
     <select id="findUserCount" parameterType="userQueryVo" resultType="int">
         select count(*) from user
        <!-- where标签相当 于where关键字,可以自动去除第一个and -->
        <where>
            <!-- 引用sql片段,如果sql片段和引用处不在同一个mapper必须前边加namespace -->
            <include refid="query_user_where"></include>
            <!-- 下边还有很其它的条件 -->
            <!-- <include refid="其它的sql片段"></include> -->
        </where>
     </select>

    <!-- 添加用户
    parameterType:输入 参数的类型,User对象 包括 username,birthday,sex,address
    #{}接收pojo数据,可以使用OGNL解析出pojo的属性值
    #{username}表示从parameterType中获取pojo的属性值
    selectKey:用于进行主键返回,定义了获取主键值的sql
    order:设置selectKey中sql执行的顺序,相对于insert语句来说
    keyProperty:将主键值设置到哪个属性
    resultType:select LAST_INSERT_ID()的结果 类型

     -->
    <insert id="insertUser" parameterType="cn.itcast.mybatis.po.User" >
        <selectKey keyProperty="id" order="AFTER" resultType="int">
            select LAST_INSERT_ID()
        </selectKey>

        INSERT INTO USER(username,birthday,sex,address) VALUES(#{username},#{birthday},#{sex},#{address})
    </insert>

    <!-- mysql的uuid生成主键 -->
    <!-- <insert id="insertUser" parameterType="cn.itcast.mybatis.po.User">
        <selectKey keyProperty="id" order="BEFORE" resultType="string">
            select uuid()
        </selectKey>

        INSERT INTO USER(id,username,birthday,sex,address) VALUES(#{id},#{username},#{birthday},#{sex},#{address})
    </insert> -->

    <!-- oracle
    在执行insert之前执行select 序列.nextval() from dual取出序列最大值,将值设置到user对象 的id属性
     -->
    <!-- <insert id="insertUser" parameterType="cn.itcast.mybatis.po.User">
        <selectKey keyProperty="id" order="BEFORE" resultType="int">
            select 序列.nextval() from dual
        </selectKey>

        INSERT INTO USER(id,username,birthday,sex,address) VALUES(#{id},#{username},#{birthday},#{sex},#{address})
    </insert> -->

    <!-- 用户删除  -->
    <delete id="deleteUser" parameterType="int">
     delete from user where id=#{id}
    </delete>
    <!-- 用户更新
    要求:传入的user对象中包括 id属性值
    -->
    <update id="updateUser" parameterType="cn.itcast.mybatis.po.User" flushCache="false">
        update user set username=#{username},birthday=#{birthday},sex=#{sex},address=#{address} where id=#{id}
    </update>

</mapper>
SqlMapConfig.xml
<!DOCTYPE configuration
PUBLIC "-//mybatis.org//DTD Config 3.0//EN"
"http://mybatis.org/dtd/mybatis-3-config.dtd">
<configuration>
    <!-- 定义 别名 -->
    <typeAliases>
        <!-- 批量别名定义 指定包路径,自动扫描包下边的pojo,定义别名,别名默认为类名(首字母小写或大写) -->
        <package name="cn.itcast.mybatis.po" />
    </typeAliases>
    <mappers>
        <!-- 加载原始dao使用的user.xml -->
        <mapper resource="sqlmap/User.xml"/>
        <package name="cn.itcast.mybatis.mapper" />
    </mappers>
</configuration>
applicationContext.xml
<beans xmlns="http://www.springframework.org/schema/beans"
    xmlns:xsi="http://www.w3.org/2001/XMLSchema-instance" xmlns:mvc="http://www.springframework.org/schema/mvc"
    xmlns:context="http://www.springframework.org/schema/context"
    xmlns:aop="http://www.springframework.org/schema/aop" xmlns:tx="http://www.springframework.org/schema/tx"
    xsi:schemaLocation="http://www.springframework.org/schema/beans
        http://www.springframework.org/schema/beans/spring-beans-3.2.xsd
        http://www.springframework.org/schema/mvc
        http://www.springframework.org/schema/mvc/spring-mvc-3.2.xsd
        http://www.springframework.org/schema/context
        http://www.springframework.org/schema/context/spring-context-3.2.xsd
        http://www.springframework.org/schema/aop
        http://www.springframework.org/schema/aop/spring-aop-3.2.xsd
        http://www.springframework.org/schema/tx
        http://www.springframework.org/schema/tx/spring-tx-3.2.xsd ">

    <!-- 加载配置文件 -->
    <context:property-placeholder location="classpath:db.properties" />
    <!-- 数据库连接池 -->
    <bean id="dataSource" class="org.apache.commons.dbcp.BasicDataSource"
        destroy-method="close">
        <property name="driverClassName" value="${jdbc.driver}" />
        <property name="url" value="${jdbc.url}" />
        <property name="username" value="${jdbc.username}" />
        <property name="password" value="${jdbc.password}" />
        <property name="maxActive" value="10" />
        <property name="maxIdle" value="5" />
    </bean>


    <!-- SqlsessionFactory -->
    <bean id="sqlSessionFactory" class="org.mybatis.spring.SqlSessionFactoryBean">
        <!-- 数据源 -->
        <property name="dataSource" ref="dataSource"/>
        <!-- mybatis配置文件 -->
        <property name="configLocation" value="classpath:mybatis/SqlMapConfig.xml"/>
    </bean>

    <!-- 配置dao -->
    <bean id="userDao" class="cn.itcast.mybatis.dao.UserDaoImpl">
        <property name="sqlSessionFactory" ref="sqlSessionFactory"/>
    </bean>

    <!-- 配置mapper
    MapperFactoryBean:用于生成mapper代理对象,当有多个mapper的时候每一个mapper都要配置,
     -->
    <!-- <bean id="userMapper" class="org.mybatis.spring.mapper.MapperFactoryBean">
        <property name="mapperInterface" value="cn.itcast.mybatis.mapper.UserMapper"/>全路径名
        <property name="sqlSessionFactory" ref="sqlSessionFactory"/>没有整合spring的时候是通过sqlSessionFactory得到sqlSession再通过getMapper()方法,
    </bean> -->
    <!--
    MapperScannerConfigurer:mapper的扫描器,将包下边的mapper接口自动创建代理对象,
    自动创建到spring容器中,bean的id是mapper的类名(首字母小写)
     -->
    <bean class="org.mybatis.spring.mapper.MapperScannerConfigurer">
        <!-- 配置扫描包的路径
        如果要扫描多个包,中间使用半角逗号分隔
         -->
        <property name="basePackage" value="cn.itcast.mybatis.mapper"/>
        <!-- 使用sqlSessionFactoryBeanName -->
        <property name="sqlSessionFactoryBeanName" value="sqlSessionFactory"/>
    </bean>

</beans>