百度uid-generator源码
https://github.com/baidu/uid-generator
snowflake算法
uid-generator是基于Twitter开源的snowflake算法实现的。
snowflake将long的64位分为了3部分,时间戳、工作机器id和序列号,位数分配如下。
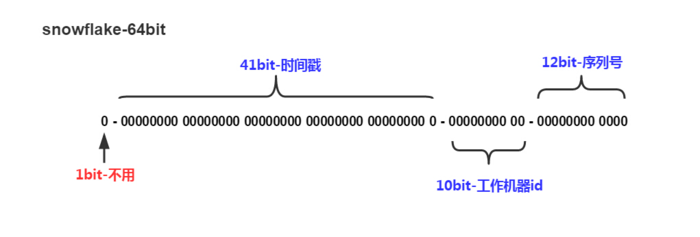
其中,时间戳部分的时间单位一般为毫秒。也就是说1台工作机器1毫秒可产生4096个id(2的12次方)。
源码实现分析
与原始的snowflake算法不同,uid-generator支持自定义时间戳、工作机器id和序列号等各部分的位数,以应用于不同场景。默认分配方式如下。

-
sign(1bit)
固定1bit符号标识,即生成的UID为正数。 -
delta seconds (28 bits)
当前时间,相对于时间基点"2016-05-20"的增量值,单位:秒,最多可支持约8.7年(注意:1. 这里的单位是秒,而不是毫秒! 2.注意这里的用词,是“最多”可支持8.7年,为什么是“最多”,后面会讲) -
worker id (22 bits)
机器id,最多可支持约420w次机器启动。内置实现为在启动时由数据库分配,默认分配策略为用后即弃,后续可提供复用策略。 -
sequence (13 bits)
每秒下的并发序列,13 bits可支持每秒8192个并发。(注意下这个地方,默认支持qps最大为8192个)
DefaultUidGenerator
DefaultUidGenerator的产生id的方法与基本上就是常见的snowflake算法实现,仅有一些不同,如以秒为为单位而不是毫秒。
DefaultUidGenerator的产生id的方法如下。
    protected synchronized long nextId() {
        long currentSecond = getCurrentSecond();

        // Clock moved backwards, refuse to generate uid
        if (currentSecond < lastSecond) {
            long refusedSeconds = lastSecond - currentSecond;
            throw new UidGenerateException("Clock moved backwards. Refusing for %d seconds", refusedSeconds);
        }

        // At the same second, increase sequence
        if (currentSecond == lastSecond) {
            sequence = (sequence + 1) & bitsAllocator.getMaxSequence();
            // Exceed the max sequence, we wait the next second to generate uid
            if (sequence == 0) {
                currentSecond = getNextSecond(lastSecond);
            }

        // At the different second, sequence restart from zero
        } else {
            sequence = 0L;
        }

        lastSecond = currentSecond;

        // Allocate bits for UID
        return bitsAllocator.allocate(currentSecond - epochSeconds, workerId, sequence);
    }
CachedUidGenerator
CachedUidGenerator支持缓存生成的id。
基本实现原理
关于CachedUidGenerator,文档上是这样介绍的。
【采用RingBuffer来缓存已生成的UID, 并行化UID的生产和消费】

使用RingBuffer缓存生成的id。RingBuffer是个环形数组,默认大小为8192个,里面缓存着生成的id。
获取id
会从ringbuffer中拿一个id,支持并发获取
填充id
RingBuffer填充时机
-
程序启动时,将RingBuffer填充满,缓存着8192个id
-
在调用getUID()获取id时,检测到RingBuffer中的剩余id个数小于总个数的50%,将RingBuffer填充满,使其缓存8192个id
-
定时填充(可配置是否使用以及定时任务的周期)
【UidGenerator通过借用未来时间来解决sequence天然存在的并发限制】
因为delta seconds部分是以秒为单位的,所以1个worker 1秒内最多生成的id书为8192个(2的13次方)。
从上可知,支持的最大qps为8192,所以通过缓存id来提高吞吐量。
为什么叫借助未来时间?
因为每秒最多生成8192个id,当1秒获取id数多于8192时,RingBuffer中的id很快消耗完毕,在填充RingBuffer时,生成的id的delta seconds 部分只能使用未来的时间。
(因为使用了未来的时间来生成id,所以上面说的是,【最多】可支持约8.7年)
源码剖析
获取id
   @Override
    public long getUID() {
        try {
            return ringBuffer.take();
        } catch (Exception e) {
            LOGGER.error("Generate unique id exception. ", e);
            throw new UidGenerateException(e);
        }
    }
RingBuffer缓存已生成的id
(注意:这里的RingBuffer不是Disruptor框架中的RingBuffer,但是借助了很多Disruptor中RingBuffer的设计思想,比如使用缓存行填充解决伪共享问题)
RingBuffer为环形数组,默认容量为sequence可容纳的最大值(8192个),可以通过boostPower参数设置大小。
tail指针、Cursor指针用于环形数组上读写slot:
-
Tail指针
表示Producer生产的最大序号(此序号从0开始,持续递增)。Tail不能超过Cursor,即生产者不能覆盖未消费的slot。当Tail已赶上curosr,此时可通过rejectedPutBufferHandler指定PutRejectPolicy -
Cursor指针
表示Consumer消费到的最小序号(序号序列与Producer序列相同)。Cursor不能超过Tail,即不能消费未生产的slot。当Cursor已赶上tail,此时可通过rejectedTakeBufferHandler指定TakeRejectPolicy
CachedUidGenerator采用了双RingBuffer,Uid-RingBuffer用于存储Uid、Flag-RingBuffer用于存储Uid状态(是否可填充、是否可消费)
由于数组元素在内存中是连续分配的,可最大程度利用CPU cache以提升性能。但同时会带来「伪共享」FalseSharing问题,为此在Tail、Cursor指针、Flag-RingBuffer中采用了CacheLine 补齐方式。

public class RingBuffer {
    private static final Logger LOGGER = LoggerFactory.getLogger(RingBuffer.class);

    /** Constants */
    private static final int START_POINT = -1;
    private static final long CAN_PUT_FLAG = 0L; //用于标记当前slot的状态,表示可以put一个id进去
    private static final long CAN_TAKE_FLAG = 1L; //用于标记当前slot的状态,表示可以take一个id
    public static final int DEFAULT_PADDING_PERCENT = 50; //用于控制何时填充slots的默认阈值:当剩余的可用的slot的个数,小于bufferSize的50%时,需要生成id将slots填满

    /** The size of RingBuffer's slots, each slot hold a UID */
    private final int bufferSize; //slots的大小,默认为sequence可容量的最大值,即8192个
    private final long indexMask;

    private final long[] slots;  //slots用于缓存已经生成的id
    private final PaddedAtomicLong[] flags; //flags用于存储id的状态(是否可填充、是否可消费)

    /** Tail: last position sequence to produce */
    //Tail指针
    //表示Producer生产的最大序号(此序号从0开始,持续递增)。Tail不能超过Cursor,即生产者不能覆盖未消费的slot。当Tail已赶上curosr,此时可通过rejectedPutBufferHandler指定PutRejectPolicy
    private final AtomicLong tail = new PaddedAtomicLong(START_POINT); //

    /** Cursor: current position sequence to consume */
    //表示Consumer消费到的最小序号(序号序列与Producer序列相同)。Cursor不能超过Tail,即不能消费未生产的slot。当Cursor已赶上tail,此时可通过rejectedTakeBufferHandler指定TakeRejectPolicy
    private final AtomicLong cursor = new PaddedAtomicLong(START_POINT);

    /** Threshold for trigger padding buffer*/
    private final int paddingThreshold; //用于控制何时填充slots的阈值

    /** Reject put/take buffer handle policy */
    //当slots满了,无法继续put时的处理策略。默认实现:无法进行put,仅记录日志
    private RejectedPutBufferHandler rejectedPutHandler = this::discardPutBuffer;
    //当slots空了,无法继续take时的处理策略。默认实现:仅抛出异常
    private RejectedTakeBufferHandler rejectedTakeHandler = this::exceptionRejectedTakeBuffer;

    /** Executor of padding buffer */
    //用于运行【生成id将slots填满】任务
    private BufferPaddingExecutor bufferPaddingExecutor;
RingBuffer填充时机
-
程序启动时,将RingBuffer填充满,缓存着8192个id
-
在调用getUID()获取id时,检测到RingBuffer中的剩余id个数小于总个数的50%,将RingBuffer填充满,使其缓存8192个id
-
定时填充(可配置是否使用以及定时任务的周期)
填充RingBuffer
    /**
     * Padding buffer fill the slots until to catch the cursor
     */
    public void paddingBuffer() {
        LOGGER.info("Ready to padding buffer lastSecond:{}. {}", lastSecond.get(), ringBuffer);

        // is still running
        if (!running.compareAndSet(false, true)) {
            LOGGER.info("Padding buffer is still running. {}", ringBuffer);
            return;
        }

        // fill the rest slots until to catch the cursor
        boolean isFullRingBuffer = false;
        while (!isFullRingBuffer) {
            //获取生成的id,放到RingBuffer中。
            List<Long> uidList = uidProvider.provide(lastSecond.incrementAndGet());
            for (Long uid : uidList) {
                isFullRingBuffer = !ringBuffer.put(uid);
                if (isFullRingBuffer) {
                    break;
                }
            }
        }

        // not running now
        running.compareAndSet(true, false);
        LOGGER.info("End to padding buffer lastSecond:{}. {}", lastSecond.get(), ringBuffer);
    }
生成id(上面代码中的uidProvider.provide调用的就是这个方法)
    /**
     * Get the UIDs in the same specified second under the max sequence
     *
     * @param currentSecond
     * @return UID list, size of {@link BitsAllocator#getMaxSequence()} + 1
     */
    protected List<Long> nextIdsForOneSecond(long currentSecond) {
        // Initialize result list size of (max sequence + 1)
        int listSize = (int) bitsAllocator.getMaxSequence() + 1;
        List<Long> uidList = new ArrayList<>(listSize);

        // Allocate the first sequence of the second, the others can be calculated with the offset
        //这里的实现很取巧
        //因为1秒内生成的id是连续的,所以利用第1个id来生成后面的id,而不用频繁调用snowflake算法
        long firstSeqUid = bitsAllocator.allocate(currentSecond - epochSeconds, workerId, 0L);
        for (int offset = 0; offset < listSize; offset++) {
            uidList.add(firstSeqUid + offset);
        }

        return uidList;
    }
填充缓存行解决“伪共享”
关于伪共享,可以参考这篇文章《伪共享(false sharing),并发编程无声的性能杀手》
    //数组在物理上是连续存储的,flags数组用来保存id的状态(是否可消费、是否可填充),在填入id和消费id时,会被频繁的修改。
    //如果不进行缓存行填充,会导致频繁的缓存行失效,直接从内存中读数据。
    private final PaddedAtomicLong[] flags;

    //tail和cursor都使用缓存行填充,是为了避免tail和cursor落到同一个缓存行上。
    /** Tail: last position sequence to produce */
    private final AtomicLong tail = new PaddedAtomicLong(START_POINT);

    /** Cursor: current position sequence to consume */
    private final AtomicLong cursor = new PaddedAtomicLong(START_POINT)
/**
 * Represents a padded {@link AtomicLong} to prevent the FalseSharing problem<p>
 *
 * The CPU cache line commonly be 64 bytes, here is a sample of cache line after padding:<br>
 * 64 bytes = 8 bytes (object reference) + 6 * 8 bytes (padded long) + 8 bytes (a long value)
 * @author yutianbao
 */
public class PaddedAtomicLong extends AtomicLong {
    private static final long serialVersionUID = -3415778863941386253L;

    /** Padded 6 long (48 bytes) */
    public volatile long p1, p2, p3, p4, p5, p6 = 7L;

    /**
     * Constructors from {@link AtomicLong}
     */
    public PaddedAtomicLong() {
        super();
    }

    public PaddedAtomicLong(long initialValue) {
        super(initialValue);
    }

    /**
     * To prevent GC optimizations for cleaning unused padded references
     */
    public long sumPaddingToPreventOptimization() {
        return p1 + p2 + p3 + p4 + p5 + p6;
    }

}
可以参考下面文章
一个Java对象到底占用多大内存?https://www.cnblogs.com/magialmoon/p/3757767.html
写Java也得了解CPU--伪共享 https://www.cnblogs.com/techyc/p/3625701.html