1.SpringBoot整合任务机制
1.1.SpringBoot实现异步方法
日常开发中涉及很多界面与后端的交互响应,都不是同步的,基于SpringBoot为我们提供了注解方式实现异步方法。使得前端的请求响应与后端的业务逻辑方法实现异步执行。提升了客户的体验。不由得说一句,SpringBoot的封装的确是精妙强大,以前需要多线程、Ajax实现异步,而SpringBoot底层封装之后,两个注解就Over了!
①需要在SpringApplication执行类上开启异步,使用@EnableAsync:
@SpringBootApplication
@EnableAsync  //开启异步
public class SpringtestApplication {

    public static void main(String[] args) {
        SpringApplication.run(SpringtestApplication.class, args);
    }

}
②同时在执行调用耗时的方法上加上@Async表示该方法是异步方法:
@Service
public class AsyncService {
    @Async
    public void execute(){
        try {
            Thread.sleep(3000);  //执行系统耗时任务
        } catch (InterruptedException e) {
            e.printStackTrace();
        }
        System.out.println("任务执行成功!");
    }
}
③那么执行Controller层的调用异步方法时就会异步去执行方法,得到响应“success”返回而同时异步执行后台耗时方法:
@RestController
public class AsyncController {
    @Autowired
    private AsyncService service;

    @RequestMapping("/execute")
    public String executeTask(){
        service.execute();  //异步执行3s
        return "success";   //异步返回结果
    }
}
1.2.SpringBoot实现邮件发送
Spring Boot中发送邮件具体的使用步骤如下
1、添加Starter模块依赖
2、添加Spring Boot配置(QQ/网易系/Gmail)
3、调用JavaMailSender接口发送邮件
①在pom.xml中添加邮件发送starter依赖:
<!--邮件发送-->
<dependency>
    <groupId>org.springframework.boot</groupId>
    <artifactId>spring-boot-starter-mail</artifactId>
</dependency>
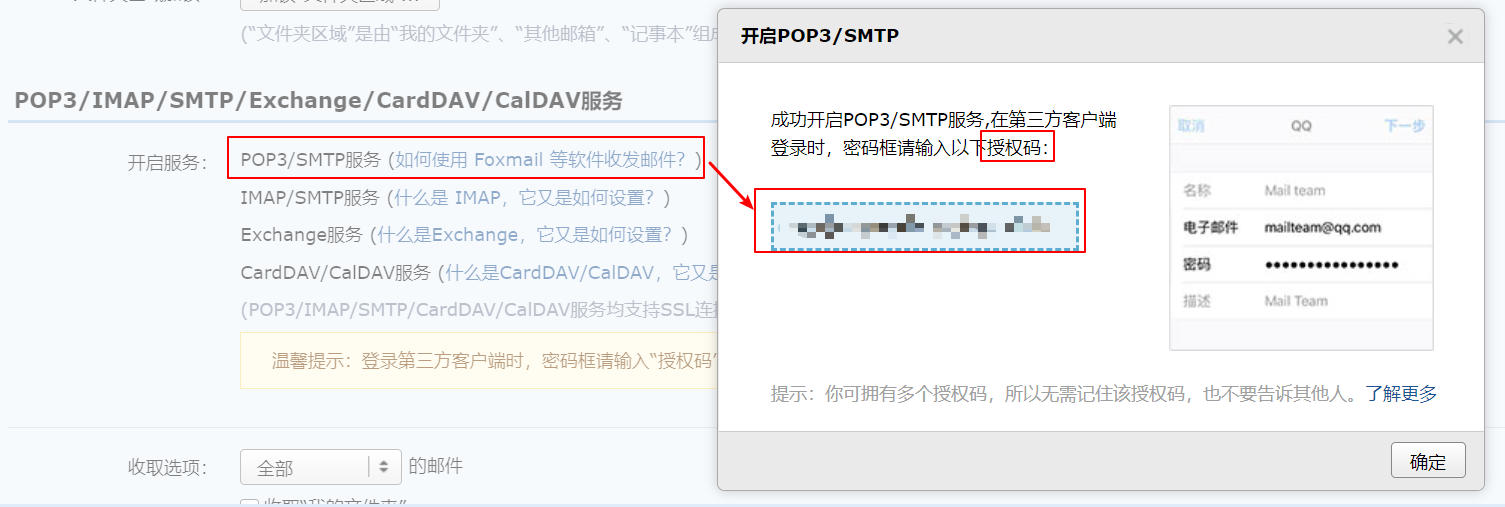
②对应QQ邮箱发送,去QQ邮箱客户端开启POP3/SMTP服务,获取授权码:
③添加配置参数,在application.yml中配置邮箱发送方式:
QQ邮箱:
# QQ邮箱配置
spring:
  mail:
    host: smtp.qq.com #发送邮件服务器
    username: 241667****@qq.com #发送邮件的邮箱地址
    password: ************ #客户端授权码,不是邮箱密码,这个在qq邮箱设置里面自动生成的
    properties.mail.smtp.port: 465 #端口号465或587
    from: 241667****@qq.com # 发送邮件的地址,和上面username一致
    protocol: smtps  #如果使用端口为465,将protocol的smtp改为smtps;配置文件端口为587,则可以使用smtp。
  #开启加密验证
  properties.mail.smtp.ssl.enable: true
网易邮箱:
##网易系(126/163/yeah)邮箱配置
spring:
  mail:
    host: smtp.163.com #发送邮件服务器
    username: hyfmail****@163.com #发送邮件的邮箱地址
    password: ************ #客户端授权码,不是邮箱密码,网易的是自己设置的
    properties.mail.smtp.port: 465 #465或者994
    from: hyfmail****@163.com # 发送邮件的地址,和上面username一致
    properties.mail.smtp.ssl.enable: true
    default-encoding: utf-8
④编写邮件发送接口,实现类:
public interface IMailService {
    /**
     * 发送文本邮件
     * @param to 收件人
     * @param subject 主题
     * @param content 内容
     */
    void sendSimpleMail(String to, String subject, String content);

    /**
     * 发送HTML邮件
     * @param to 收件人
     * @param subject 主题
     * @param content 内容
     */
    public void sendHtmlMail(String to, String subject, String content);

    /**
     * 发送带附件的邮件
     * @param to 收件人
     * @param subject 主题
     * @param content 内容
     * @param filePath 附件
     */
    public void sendAttachmentsMail(String to, String subject, String content, String filePath);
}
@Service
public class MailServiceImpl implements IMailService {
    private final Logger logger = LoggerFactory.getLogger(this.getClass());

    /**
     * Spring Boot 提供了一个发送邮件的简单抽象,使用的是下面这个接口,这里直接注入即可使用
     */
    @Autowired
    private JavaMailSenderImpl mailSender;

    /**
     * 配置文件中我的qq邮箱
     */
    @Value("${spring.mail.from}")
    private String from;

    @Override
    public void sendSimpleMail(String to, String subject, String content) {
        //创建SimpleMailMessage对象
        SimpleMailMessage message = new SimpleMailMessage();
        //邮件发送人
        message.setFrom(from);
        //邮件接收人
        message.setTo(to);
        //邮件主题
        message.setSubject(subject);
        //邮件内容
        message.setText(content);
        //发送邮件
        mailSender.send(message);
    }

    /**
     * html邮件
     * @param to 收件人
     * @param subject 主题
     * @param content 内容
     */
    @Override
    public void sendHtmlMail(String to, String subject, String content) {
        //获取MimeMessage对象
        MimeMessage message = mailSender.createMimeMessage();
        MimeMessageHelper messageHelper;
        try {
            messageHelper = new MimeMessageHelper(message, true);
            //邮件发送人
            messageHelper.setFrom(from);
            //邮件接收人
            messageHelper.setTo(to);
            //邮件主题
            message.setSubject(subject);
            //邮件内容,html格式
            messageHelper.setText(content, true);
            //发送
            mailSender.send(message);
            //日志信息
            logger.info("邮件已经发送。");
        } catch (MessagingException e) {
            logger.error("发送邮件时发生异常!", e);
        }
    }

    /**
     * 带附件的邮件
     * @param to 收件人
     * @param subject 主题
     * @param content 内容
     * @param filePath 附件
     */
    @Override
    public void sendAttachmentsMail(String to, String subject, String content, String filePath) {
        MimeMessage message = mailSender.createMimeMessage();
        try {
            MimeMessageHelper helper = new MimeMessageHelper(message, true);
            helper.setFrom(from);
            helper.setTo(to);
            helper.setSubject(subject);
            helper.setText(content, true);

            FileSystemResource file = new FileSystemResource(new File(filePath));
            String fileName = filePath.substring(filePath.lastIndexOf(File.separator));
            helper.addAttachment(fileName, file);
            mailSender.send(message);
            //日志信息
            logger.info("邮件已经发送。");
        } catch (MessagingException e) {
            logger.error("发送邮件时发生异常!", e);
        }
    }
}
⑤编写测试类:
@SpringBootTest(classes = {SendmailApplication.class})
@RunWith(SpringRunner.class)
public class MailAppTest {

    @Autowired
    private IMailService mailService;

    /**
     * 测试发送文本邮件
     */
    @Test
    public void testSendMail() {
        mailService.sendSimpleMail("hyfmailsave@163.com","主题:你好普通邮件","内容:第一封邮件");
    }

    /**
     * 测试发送Html邮件
     */
    @Test
    public void sendHtmlMail(){
        mailService.sendHtmlMail("hyfmailsave@163.com","主题:你好html邮件","<h1>内容:第一封html邮件</h1>");
    }

    @Test
    public void sendMimeContentMail(){
        mailService.sendAttachmentsMail("hyfmailsave@163.com", "主题:你好复杂带附件邮件",
                "<p style='color:red'>谢谢你的html邮件及问候~</p>", "E:\Workspaces\SpringBoot_Study\springboot_test\src\main\resources\static\1.jpg");
    }
}
1.3.定时任务
SpringBoot中执行定时任务主要用到有两个重要接口与两个任务调度的注解:
- TaskScheduler 任务调度者
- TaskExecutor 任务执行者
- @EnableScheduling 开启定时功能的注解
- @Scheduled 用于在需要定时执行的方法上,表示在某一时刻定时执行
对应注解使用如下:
启动类:
@SpringBootApplication
@EnableAsync  //开启异步
@EnableScheduling  //开启定时功能的注解
public class SpringtestApplication {

    public static void main(String[] args) {
        SpringApplication.run(SpringtestApplication.class, args);
    }

}
启动方法:
@Service
public class ScheduleService {
    //定时执行注解@Scheduled,需要使用cron表达式进行定时任务执行
    //表示每天下午13:43触发
    @Scheduled(cron = "0 43 13 ? * *")
    public void timeExecute(){
        System.out.println("该任务被触发执行了~~~");
    }
}
启动SpringBoot项目,SpringBoot则会开启定时任务执行并扫描方法上需要定时执行的注解,去定时执行相关的任务。
常用cron表达式如下:
0 0 2 1 * ? 表示在每月的1日的凌晨2点调整任务

0 15 10 ? * MON-FRI 表示周一到周五每天上午10:15执行作业

0 15 10 ? 6L 2002-2006 表示2002-2006年的每个月的最后一个星期五上午10:15执行作

0 0 10,14,16 * * ? 每天上午10点,下午2点,4点

0 0/30 9-17 * * ? 朝九晚五工作时间内每半小时

0 0 12 ? * WED 表示每个星期三中午12点

0 0 12 * * ? 每天中午12点触发

0 15 10 ? * * 每天上午10:15触发

0 15 10 * * ? 每天上午10:15触发

0 15 10 * * ? 每天上午10:15触发

0 15 10 * * ? 2005 2005年的每天上午10:15触发

0 * 14 * * ? 在每天下午2点到下午2:59期间的每1分钟触发

0 0/5 14 * * ? 在每天下午2点到下午2:55期间的每5分钟触发

0 0/5 14,18 * * ? 在每天下午2点到2:55期间和下午6点到6:55期间的每5分钟触发

0 0-5 14 * * ? 在每天下午2点到下午2:05期间的每1分钟触发

0 10,44 14 ? 3 WED 每年三月的星期三的下午2:10和2:44触发

0 15 10 ? * MON-FRI 周一至周五的上午10:15触发

0 15 10 15 * ? 每月15日上午10:15触发

0 15 10 L * ? 每月最后一日的上午10:15触发

0 15 10 ? * 6L 每月的最后一个星期五上午10:15触发

0 15 10 ? * 6L 2002-2005 2002年至2005年的每月的最后一个星期五上午10:15触发

0 15 10 ? * 6#3 每月的第三个星期五上午10:15触发
更多cron表达式请参阅:
https://www.jianshu.com/p/b4b8950fb987 《简书--cron表达式》
https://www.matools.com/cron 《crom在线表达式生成器》
本博客写作参考文档相关:
https://www.jianshu.com/p/a7097a21b42d
https://blog.csdn.net/SixthMagnitude/article/details/114173570
https://www.bilibili.com/video/BV1PE411i7CV?p=52
https://www.jianshu.com/p/b4b8950fb987 《简书--cron表达式》
https://www.matools.com/cron 《crom在线表达式生成器》
示例代码已上传至Github地址:
https://github.com/devyf/SpringBoot_Study/tree/master/helloword_create