今天想要用html2canvas做一个截图保存,参考了一个demo:姑且叫做demo1.html
当然前提是要有html2canvas.js jq可有可无
demo.html:
<!DOCTYPE html>
<html>
<head>
<meta charset="utf-8">
<meta http-equiv="X-UA-Compatible" content="IE=edge">
<title>html2canvas example</title>
<script type="text/javascript" src="html2canvas.js"></script>
</head>
<script type="text/javascript">
function takeScreenshot() {
//console.log('test');
html2canvas(document.getElementById('view'), {
onrendered: function(canvas) {
document.body.appendChild(canvas);
},
// 300,
// height: 300
});
}
</script>
<body>
<div id="view" style="background:url(images/pic1.jpg) 50%; 700px; height: 500px;">
<input type="button" value="截图" onclick="takeScreenshot()">
</div>
</body>
</html>
然后我就注意到,为什么他把设置里面的宽高给注释了呢?为什么dom的style里面设置了呢?他俩有什么区别呢?
我又看到了demo2.html:
demo2.html
<!DOCTYPE html>
<html>
<head>
<meta charset="UTF-8">
<title></title>
</head>
<body tabindex="1" class="loadingInProgress" id="contbox">
<script src="https://code.jquery.com/jquery-3.2.1.min.js"></script>
<script src="https://cdn.bootcss.com/html2canvas/0.4.1/html2canvas.js"></script>
<script>
//以下是截图代码
$(function(){
$("#btn").click(function(){
html2canvas($("#contbox"), {
height: $("#contbox").outerHeight() + 20,
$("#contbox").outerWidth() + 20 ,
onrendered: function(canvas) {
//将canvas画布放大若干倍,然后盛放在较小的容器内,就显得不模糊了
var timestamp = Date.parse(new Date());
//把截取到的图片替换到a标签的路径下载
$("#down1").attr('href',canvas.toDataURL());
//下载下来的图片名字
$("#down1").attr('download',timestamp + '.png') ;
document.body.appendChild(canvas);
}
//可以带上宽高截取你所需要的部分内容
});
});
});
</script>
<div class="btn" id="btn">截取屏幕</div>
<div><a id="down1" class="down" href="##" download="downImg" >截图下载</a></div>
<div>你的网页内容………………</div>
</body>
</html>
为什么要用demo2呢,主要是demo1在电脑上跑不起来,不好看!demo2可以跑起来,并且能看出一些端倪!
当然,只是一些端倪,主要的还在我们的demo3.html
demo3.html
<!DOCTYPE html>
<html>
<head>
<title>Demo</title>
<meta http-equiv="Content-Type" content="text/html; charset=utf-8" />
<script type="text/javascript">
function drawDiagonal(id){
var canvas=document.getElementById(id);
var context=canvas.getContext("2d");
context.beginPath();
context.moveTo(0,0);
context.lineTo(100,100);
context.stroke();
}
window.onload=function(){
drawDiagonal("diagonal1");
drawDiagonal("diagonal2");
drawDiagonal("diagonal3");
drawDiagonal("diagonal4");
}
</script>
</head>
<body>
<canvas id="diagonal1" style="border:1px solid;" width="100px" height="100px"></canvas>
<canvas id="diagonal2" style="border:1px solid;200px;height:200px;" width="100px" height="100px"></canvas>
<canvas id="diagonal3" style="border:1px solid;200px;height:200px;"></canvas>
<canvas id="diagonal4"></canvas>
</body>
</html>
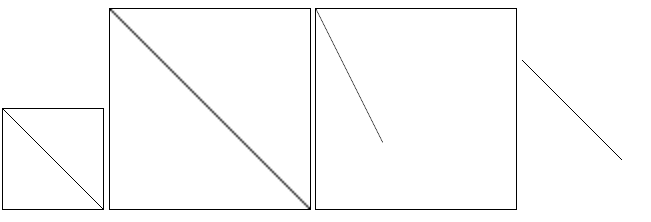
效果如下:

到这里,可能就差不多明白了。首先我们要知道,我们在html2canvas()里面设置宽和高,是设置的画布的宽和高,而style里面的宽和高,是canvas自己本身渲染所需的宽和高,也就是画板的宽和高,这是不一样的,一般情况下,我们只在style里面设置,画布的宽和高就会被默认为(300px,height:150px),而画板就变成了我们设置的大小。
因为canvas就相当于是一个画板和画纸,我们直接设置width和height时,就相当于对画板和画纸都进行了设置,而我们设置style里面的宽和高时,相当于只对画板进行了设置,没有对画纸设置,还是默认的300×150。所以为了不让画板空出一片,我们就要把画纸也拉伸到和画板一样的宽和高,于是就出现了上述的情况。
不过我的例子总是画板比画布高的,那画布比画板高的呢?
其实是一样的,且看demo4:
demo4.html
<!DOCTYPE html>
<html>
<head>
<title>Demo</title>
<meta http-equiv="Content-Type" content="text/html; charset=utf-8" />
<script type="text/javascript">
function drawDiagonal(id){
var canvas=document.getElementById(id);
var context=canvas.getContext("2d");
context.beginPath();
context.moveTo(0,0);
context.lineTo(100,100);
context.stroke();
}
window.onload=function(){
drawDiagonal("diagonal1");
}
</script>
</head>
<body>
<canvas id="diagonal1" style="border:1px solid;200px;height:200px;" width="300px" height="300px"></canvas>
</body>
</html>
可以明显看出,我们的画板大小是200*200 而画纸大小是300*300 纸也要和画板一样大,所以纸相应缩小 。于是我们的斜线处在了200*200的三分之一处!不是100px*100px!
现在,你应该明白了吧?
当然啦,我举的例子基本上都是成比例的,不成比例的不是不容易观察嘛!自己感兴趣了可以多多举一些不成比例的例子,自己观察,当然我觉着那就有点吹毛求疵啦~~~
今天的内容到此结束,canvas的探索还要继续,小程序里面的组件也要明白远离~
最后,用我dk结个尾~~~
