一.vuex是什么?
1.vuex是什么:
Vuex 是一个专为 Vue.js 应用程序开发的状态管理模式 。 ---源于vuex官网
通俗点讲,vuex就是管理数据状态的。vuex官网:https://vuex.vuejs.org/zh/
2.Vuex 背后的基本思想:
把组件的共享状态抽取出来,以一个全局单例模式管理。在这种模式下,我们的组件树构成了一个巨大的“视图”,不管在树的哪个位置,任何组件都能获取状态或者触发行为!
通过定义和隔离状态管理中的各种概念并通过强制规则维持视图和状态间的独立性,我们的代码将会变得更结构化且易维护。
3.什么时候使用vuex:
构建一个中大型单页应用,很可能会考虑如何更好地在组件外部管理状态。否则,用个简单的 store 模式就可以了。(因为使用 Vuex 可能是繁琐冗余的)
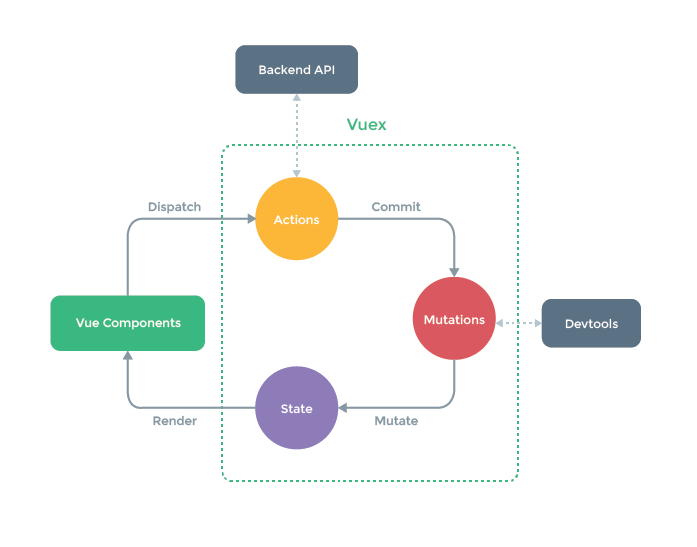
先放一张vuex原理图混个脸熟(奸笑)
二.基本用法
1.Vuex的核心
vuex由以下几部分组成:
- state
- getters
- mutations
- actions
- modules
store容器(就是实例化的vuex)中在state里添加状态,然后用mutations更改状态,getters来获得部分状态, actions来异步更改状态,modules来分块管理状态。
2.使用
2.1 安装
参考官网 https://vuex.vuejs.org/zh/installation.html
这里我们以脚手架vue Cli的应用形式举例讲解
2.2具体使用
①入口文件main.js 引入vue 和vuex
import Vue from 'vue'
import Vuex from 'vuex'

Vue.use(Vuex)
②创建vuex实例store
 1 const store = new Vuex.Store({ //创建一个vuex实例store
 2   //全局状态
 3   state:{
 4
 5   },
 6   getters:{
 7
 8   },
 9   mutations :{
10
11   },
12   actions:{
13
14   }
15 })
16
17 /* eslint-disable no-new */
18 new Vue({
19   el: '#app',
20   router,
21   components: { App },
22   template: '<App/>',
23   store  //将vuex实例挂载到Vue中
24 })
注意:state ,gettwes, mutations ,actions单词别拼错了(我开始学习的时候,项目一直报错,就发现是因为单词拼错导致的,除了state,其他都有s)
接下来以购物车中的商品数量count为例:
State
state:{
     count:0  //商品数量初始化
},
使用:暂时在App.vue页面使用
在computed中以count为方法名,再将store容器中state对象的count返回--->return store.state.count
 1 <script>
 2 export default {
 3   name: 'App',
 4   computed:{
 5       count(){
 6          return  this.$store.state.count
 7         }
 8   }
 9 }
10 </script>
然后count当作普通computed中的属性使用即可
页面效果:
![]()
Getter
对数据进行包装处理后使用
1   getters:{
2    //对state进行包装处理   再return值出去
3      myCount:(state)=>{
4        return state.count + '万'
5      }
6   },
使用:
 1 <template>
 2   <div id="app">
 3       <h4>小玲的购物车中一共有{{count}}个商品</h4>
 4       <h4>小玲的购物车中一共有{{myCount}}个商品</h4>
 5     <router-view/>
 6   </div>
 7 </template>
 8
 9 <script>
10 export default {
11   name: 'App',
12   computed:{
13     count(){
14       return this.$store.state.count
15     },
16     myCount(){
17       return this.$store.getters.myCount   //使用
18     }
19   }
20 }
21 </script>
页面效果:

Getter还可以接受getters作为第二个参数
1 myCount1:(state,getters)=>{  //state作为第一个参数  也接受其他getter作为第二个参数
2    let oldArr = state.count1;
3        oldArr.push(getters.myCount)
4        return oldArr
5  }
6 //count1:[1,3,5,7,9]
App.vue 使用方法和接收state这一个参数一样
<h5>现在的数据:{{myCount1}}</h5>
1 myCount1(){
2     return this.$store.getters.myCount1
3  }
实现效果:

mutations
更改 Vuex 的 store 中的状态的唯一方法是提交 mutation。Vuex 中的 mutation 非常类似于事件:每个 mutation 都有一个字符串的 事件类型 (type) 和 一个 回调函数 (handler)。这个回调函数就是我们实际进行状态更改的地方,并且它会接受 state 作为第一个参数:
1   //main.js
    mutations :{
2     increment(state){
3       state.count ++
4   },
5      desincrement(state){
6       state.count --
7   }
8   },
现在先来写个静态页面,在page目录下新建一个cart.vue(或者直接使用HelloWorld.vue其他.vue文件也可以)
然后写一个增加商品数量和减少商品数量的按钮
 1   <template>
 2     <div class="hello">
 3       <h4 class="mr">{{ msg }}</h4>
 4       <el-row>
 5          <el-button type="primary">+</el-button>
 6           <span>{{count}}</span>
 7         <el-button type="success">-</el-button>
 8      </el-row>
 9    </div>
10  </template>
11
12  <script>
13  export default {
14    name: 'HelloWorld',
15    data() {
16      return {
17        msg: '购物车页面'
18      }
19    },
20    computed:{
21      count(){
22        return this.$store.state.count; //商品数量
23      }
24    },
25    mounted() {
26
27    },
28    methods: {
29    }
30  }
31  </script>
32
33  <!-- Add "scoped" attribute to limit CSS to this component only -->
34  <style scoped>
35  h1, h2 {
36    font-weight: normal;
37  }
38  ul {
39    list-style-type: none;
40    padding: 0;
41  }
42  li {
43    display: inline-block;
44    margin: 0 10px;
45  }
46  a {
47    color: #42b983;
48  }61 </style>
//el-row和el-button参考 https://element.eleme.cn/#/zh-CN 这里不再讲述啦
现在页面显示的效果如下图(app.vue中的无关代码暂时注释掉):

接下来更改 Vuex 的 store 中的状态,我们不能直接调用一个 mutation handler。这个选项更像是事件注册:“当触发一个类型为 increment的 mutation 时,调用此函数。”要唤醒一个 mutation handler,你需要以相应的 type 调用 store.commit 方法:
store.commit('increment')
具体使用方式:
1   methods: {
2      increment(){ //增加
3       this.$store.commit('increment'); //唤醒、触发类型为increment的mutations方法
4     },
5     desincrement(){//减少
6       this.$store.commit('desincrement'); //唤醒、触发类型为desincrement的mutations方法
7  }
8 }
然后把方法绑定在对应的按钮上
1 <el-row>
2      <el-button type="primary" @click="increment">+</el-button>
3         <span>{{count}}</span>
4      <el-button type="success" @click="desincrement">-</el-button>
5 </el-row>
好啦,现在就可以改变store中count的数量啦,上效果图

另外我们还可以向 store.commit 传入额外的参数,即 mutation 的 载荷(payload):当参数布置一个时,payload也可以是一个对象,直接作为参数传入
main.js:
  mutations :{
    increment(state,n){ //①直接传入额外的参数n
      state.count += n
   },
     desincrement(state,payload){  //②传入载荷payload是一个对象
      state.count -= payload.amount
} }
cart.vue
1   methods: {
2    increment(){
3      this.$store.commit('increment',2);
4    },
5     desincrement(){
6      this.$store.commit('desincrement',{amount:1});
7    }
8 }
9 </script>
注意:①当传入的参数只有一个时,可以直接传参;当参数不止一个时载荷payload可以作为一个对象,传入多个参数。值得注意的是处理方式的不同
②一条重要的原则就是要记住 mutation 必须是同步函数
actions
Action 类似于 mutation,不同在于:
- Action 提交的是 mutation,而不是直接变更状态。
- Action 可以包含任意异步操作。
需要注意的是,Action 函数接受一个与 store 实例具有相同方法和属性的 context 对象,因此你可以调用 context.commit 提交一个 mutation,或者通过 context.state 和 context.getters 来获取 state 和 getters
main.js
1  actions:{
2     //注册一个简单的action
3     myIncrease(context){ //接受context对象
4     //...
5     context.commit('increment',2) //此时触发type为increment的mutation要接受第二个参数,所以需要传一个参数;如果不传参会出错
6 } 7 }
action用dispatch 来分发(就当是action需要用dispatch来触发),这点是和mutations不同的地方
 1   methods: {
 2    increment(){
 3      this.$store.commit('increment',2);
 4    },
 5     desincrement(){
 6      this.$store.commit('desincrement',{amount:1});
 7    },
 8    myincrement(){
 9      this.$store.dispatch('myIncrease');
10      //dispatch分发action中myIncrease的方法,相当于用dispatch来触发action中的myIncrease方法
11
12    }
13   }
然后将methods中的myincrement绑定在增加按钮上,实现效果和increment 方法一样
<el-button type="primary" @click="myincrement">+</el-button>
还可以支持载荷和对象的形式分发
1      myincrement1(){
2      this.$store.dispatch('myIncrease',{amount:2}); //以载荷的形式分发
3     },
4       myincrement2(){
5       this.$store.dispatch({
6        type:'myIncrease',
7        amount:2
8        }); //以对象的形式分发
9    },
Action通常是异步的,比如一些定时器或者api请求都可以放在这里,具体的做法可以参考官网,讲的非常详细了。
附上完整代码:
main.js
 1 // The Vue build version to load with the `import` command
 2 // (runtime-only or standalone) has been set in webpack.base.conf with an alias.
 3 import Vue from 'vue'
 4 import Vuex from 'vuex'
 5 import ElementUI from 'element-ui'
 6 import 'element-ui/lib/theme-chalk/index.css'
 7 import App from './App'
 8 import router from './router'
 9 //import axios from './api'
10 //import './config/rem'
11
12 Vue.config.productionTip = false
13
14 Vue.use(Vuex)
15 Vue.use(ElementUI)
16 //Vue.prototype.$http = axios // 将api挂载到vue的原型上 --- restful风格
17
18 const store = new Vuex.Store({ //创建一个vuex实例
19   //全局状态
20   state:{
21      count:0,
22      count1:[1,3,5,7,9]
23   },
24   getters:{
25   /*  myCount(state){
26       return state.count
27     } */
28      myCount:(state)=>{
29        return state.count
30      },
31      myCount1:(state,getters)=>{  //state作为第一个参数  也接受其他getter作为第二个参数
32       let oldArr = state.count1;
33           oldArr.push(getters.myCount)
34          return oldArr
35     }
36   },
37   mutations :{
38     increment(state,n){
39       state.count += n
40   },
41      desincrement(state,payload){
42        console.log(payload)
43        state.count -= payload.amount
44   }
45   },
46   actions:{
47     //注册一个简单的action
48     myIncrease(context){ //接受context对象
49     //...
50     context.commit('increment',2)
51    }
52   }
53 })
54 /* eslint-disable no-new */
55 new Vue({
56   el: '#app',
57   router,
58   components: { App },
59   template: '<App/>',
60   store
61 })
App.vue
 1 <template>
 2   <div id="app">
 3     <!--   <h4>小玲的购物车中一共有{{count}}个商品</h4>
 4       <h4>小玲的购物车中一共有{{myCount}}个商品</h4>
 5       <h5>现在的数据:{{myCount1}}</h5> -->
 6     <router-view/>
 7   </div>
 8 </template>
 9
10 <script>
11 export default {
12   name: 'App',
13   computed:{
14     count(){
15       return this.$store.state.count
16     },
17     myCount(){
18       return this.$store.getters.myCount
19     },
20     myCount1(){
21        return this.$store.getters.myCount1
22     }
23   }
24 }
25 </script>
26
27 <style>
28 #app {
29   font-family: 'Avenir', Helvetica, Arial, sans-serif;
30   -webkit-font-smoothing: antialiased;
31   -moz-osx-font-smoothing: grayscale;
32   text-align: center;
33   color: #2c3e50;
34   margin-top: 60px;
35 }
36 </style>
Helloworld.vue
 1 <template>
 2   <div class="hello">
 3     <h4 class="mr">{{ msg }}</h4>
 4     <el-row>
 5         <el-button type="primary" @click="myincrement">+</el-button>
 6         <span>{{count}}</span>
 7       <el-button type="success" @click="desincrement">-</el-button>
 8     </el-row>
 9   </div>
10 </template>
11
12 <script>
13 export default {
14   name: 'HelloWorld',
15   data() {
16     return {
17       msg: '购物车页面'
18     }
19   },
20   computed:{
21     count(){
22       return this.$store.state.count;
23     }
24   },
25   mounted() {
26     this.getList()
27   },
28   methods: {
29    increment(){
30      this.$store.commit('increment',2);
31    },
32     desincrement(){
33      this.$store.commit('desincrement',{amount:1});
34    },
35     myincrement(){
36      this.$store.dispatch('myIncrease'); //dispatch分发action中myIncrease的方法,相当于用dispatch来触发action中的myIncrease方法
37     },
38      myincrement1(){
39      this.$store.dispatch('myIncrease',{amount:2}); //以载荷的形式分发
40    },
41       myincrement2(){
42       this.$store.dispatch({
43        type:'myIncrease',
44        amount:2
45        }); //以对象的形式分发
46    }
47   }
48 }
49 </script>
50
51 <!-- Add "scoped" attribute to limit CSS to this component only -->
52 <style scoped>
53 h1, h2 {
54   font-weight: normal;
55 }
56 ul {
57   list-style-type: none;
58   padding: 0;
59 }
60 li {
61   display: inline-block;
62   margin: 0 10px;
63 }
64 a {
65   color: #42b983;
66 }
67 .mr{margin-bottom: 2rem;}
68 </style>
辅助函数
实际开发中,我们在一个组件中可以会用到很多状态,这时就可以借助辅助函数。是es6的语法糖,能够方便我们使用store。
先介绍几个方法
mapState辅助函数:当一个组件需要获取多个状态时候,将这些状态都声明为计算属性会有些重复和冗余。为了解决这个问题,我们可以使用 mapState 辅助函数帮助我们生成计算属性,让你少按几次键
mapState 辅助函数帮助我们生成计算属性,让你少按几次键mapGetters 辅助函数:mapGetters 辅助函数仅仅是将 store 中的 getter 映射到局部计算属性
mapMutations 辅助函数:将组件中的 methods 映射为 store.commit 调用(需要在根节点注入 store)
mapActions 辅助函数:将组件的 methods 映射为 store.dispatch 调用(需要先在根节点注入 store)
具体使用方式见下方代码:
 1 <script>
 2 import {mapState, mapGetters} from 'vuex'
 3 export default {
 4   name: 'App',
 5   computed:{
 6     // ...mapState(['count']),    //当映射的计算属性的名称与 state 的子节点名称相同时,我们也可以给 mapState 传一个字符串数组
 7      ...mapState({
 8        count1:state=>state.app.count    //映射关系(获取state中的资源)当计算属性的名称和state子节点名称不同时,可以以箭头函数的形式来,箭头函数可使代码更简练
 9     }),
10     ...mapGetters(['myCount'])
11  }
12 }
13 </script>
先引入vuex中的辅助函数mapState, mapGetters等(按照实际使用情况引入),然后还可以用对象展开运算符 与其他局部计算属性混用(一般加上扩展用算符【...】比较好)。最后氨基酸属性使用就行
当页面只使用一个state子节点时,可以直接在mapState函数中传入字符串数组;
当使用多个state子节点时,可以以映射关系的方式处理
mapGetters同mapState
对于mapMutations,mapActions组件中使用方式如下代码
...mapMutations(['increment','desincrement'])
...mapActions(['myIncrease','myDecrease']),
这样,使用辅助函数就大大简化了代码~
这里只是简单的介绍了一下,可以去官网查看更详细的使用方法
(其实以上只是简单过了一遍官网,要是觉得讲的不清楚不明白的可以移步到官网学习)
项目结构
由于使用单一状态树,应用的所有状态会集中到一个比较大的对象。当应用变得非常复杂时,store 对象就有可能变得相当臃肿。
为了解决以上问题,Vuex 允许我们将 store 分割成模块(module)。每个模块拥有自己的 state、mutation、action、getter、甚至是嵌套子模块——从上至下进行同样方式的分割:
 1 const moduleA = {
 2   state: { ... },
 3   mutations: { ... },
 4   actions: { ... },
 5   getters: { ... }
 6 }
 7
 8 const moduleB = {
 9   state: { ... },
10   mutations: { ... },
11   actions: { ... }
12 }
13
14 const store = new Vuex.Store({
15   modules: {
16     a: moduleA,
17     b: moduleB
18   }
19 })
20
21 store.state.a // -> moduleA 的状态
22 store.state.b // -> moduleB 的状态
在实际开发中,遇到一些大型项目并且业务比较复杂时,每个模块都有很多数据需要处理,这时一个main.js 或者一个store.js文件可能不便于管理和维护,此时就可以把每个模块放到一个单独的文件进行处理,然后只保留一个index.js作为vuex的出口文件,如下图文件目录:
store
│ index.js
│ mutation-types.js
│
└─module
│ app.js
│ cart.js
在index.js出口文件中引入各个模块
 1 import Vue from 'vue'
 2 import Vuex from 'vuex'
 3 import app from './module/app'
 4 import cart from './module/cart'
 5
 6 Vue.use(Vuex)
 7
 8 const store = new Vuex.Store({
 9     modules:{
10         app,
11         cart
12     }
13 })
14
15 export default store
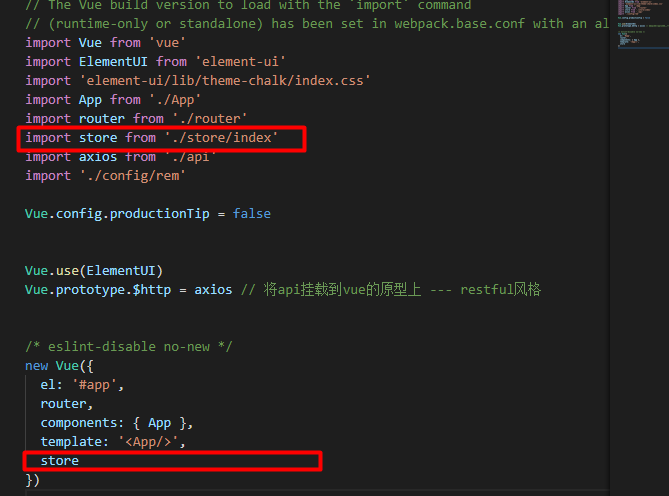
然后再main.js文件中引入store,并将store挂载到vue上
对于每个模块,我们直接导出就行啦
 1 import {INCRMENT,DESCREMENT} from '../mutation-types'
 2
 3 const app = {
 4     //全局状态
 5     state:{
 6         count:0
 7     },
 8     getters:{
 9          //对state进行包装处理   return值出去
10          myCount(state){
11              return state.count + '个'
12          }
13     },
14     mutations :{
15        [INCRMENT](state,n){
16         state.count += n
17     },
18        [DESCREMENT](state,n){
19         state.count -= n
20     }
21     },
22     actions:{
23         //执行型逻辑相关的
24      /*    myIncrease(context){
25            //...
26            context.commit('increment')
27        },*/
28        myDecrease(context){
29            context.commit('desincrement',1)
30        },
31        //异步操作
32         async myIncrease(context,obj){
33             context.commit('increment',2)
34             const product = [1,2,3,4,5] //await this.$http('')
35             console.log(obj)
36             return product
37         }
38     }
39 }
40
41 export default app
附上mutation-types.js文件的代码
export const INCRMENT = 'INCRMENT'
export const DESCREMENT = 'DESCREMENT'
组件Helloworld.vue中使用:
 1 <template>
 2   <div class="hello">
 3     <h4 class="mr">{{ msg }}</h4>
 4     <h6>{{count}}个aa</h6>
 5     <h6>{{myCount}}bb</h6>
 6     <el-row>
 7         <el-button type="primary" @click="increment">+</el-button>
 8         <span>{{count}}</span>
 9       <el-button type="success" @click="desincrement">-</el-button>
10     </el-row>
11   </div>
12 </template>
13
14 <script>
15 import {mapState,mapGetters,mapMutations,mapActions} from 'vuex'  //先引入vuex中的辅助函数
16 export default {
17   name: 'HelloWorld',
18   data() {
19     return {
20       msg: '购物车页面'
21     }
22   },
23   computed:{
24     ...mapState({
25       count:state=>state.cart.count
26     }),
27     ...mapGetters(['myCount'])   //如果你想将一个 getter 属性另取一个名字,使用对象形式:...mapGetters({myOtherCount:'myCount'})    相当于把`this.myOtherCount`映射为`this.$store.cart.getters.myCount`},
28  mounted() {
29
30  },
31  methods: {
32 ...mapMutations(['INCRMENT','DESCREMENT'])
33
34   increment(){ //增加
35     this.$store.commit('INCRMENT',2);
36   },
37   desincrement(){ //减少
38     this.$store.commit('DESCREMENT',1);
39   }
40  }
41 }
42 </script>
上效果图:
现在补充讲一下mutation-types.js文件
import * as types 简单粗暴地引入全部。最后推荐几篇写的比较好的文章:https://www.jianshu.com/p/04ebf09e72a1
https://juejin.im/post/5860cc47128fe10069e19c26
再次附上官网:https://vuex.vuejs.org/zh/