有过dubbo/dubbox使用经验的朋友,看到下面这张图,一定很熟悉,就是SOA架构的最基本套路。

与dubbo对比,上图的3大要素中,spring cloud是借助以下组件来实现的:
1、注册中心:
spring cloud默认使用eureka server来做注册中心,而dubbo默认使用的是zookeeper。eureka的注册信息是保存在一个双层的Map对象中的,换句话说在内存中,不象zookeeper是长久保存在节点中。
2、服务提供方:
spring-web(Spring MVC)提供了完善的http rest服务框架,用这一套就能提供rest服务。(目前spring cloud官方提供的示例基本上都是http rest服务,理论上讲,应该也可以扩展成rpc服务,而dubbo是以rpc为主的,这点有些区别)
3、服务消费方:
依赖于spring-web,负载均衡采用ribbon组件来完成,大致原理是从注册中心发现可用服务的信息,缓存在本地,然后按一定的负载均衡算法进行调用。(跟dubbo类似,只不过dubbo是自己实现的负载均衡)
下面是这三方的最基本示例:
一、项目结构
注:spring-cloud是完全基于Spring Boot来构建项目的,所以对spring boot不熟悉的,建议先看本博客的spring boot系列。
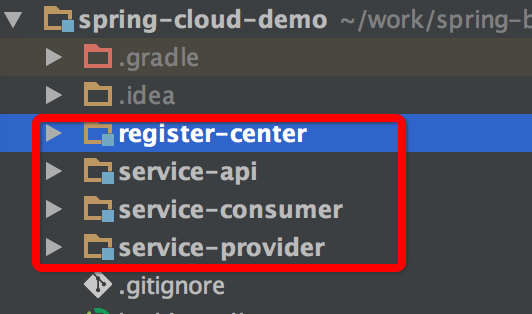
register-center 即 eureka 注册中心
service-api 为服务契约
service-consumer 为服务消费方
service-provider 为服务提供方
二、register-center
2.1 依赖项
buildscript {
    repositories {
        maven {
            url "http://maven.aliyun.com/nexus/content/groups/public/"
        }
    }
    dependencies {
        classpath("org.springframework.boot:spring-boot-gradle-plugin:1.5.4.RELEASE")
    }
}

apply plugin: 'spring-boot'

dependencyManagement {
    imports {
        mavenBom "org.springframework.cloud:spring-cloud-dependencies:Dalston.RELEASE"
    }
}

dependencies {
    compile 'org.springframework.cloud:spring-cloud-starter-eureka-server'
    compile 'org.springframework.boot:spring-boot-starter-actuator'
    testCompile 'org.springframework.boot:spring-boot-starter-test'
}
2.2 main入口程序
package com.cnblogs.yjmyzz.spring.cloud.study;

import org.springframework.boot.SpringApplication;
import org.springframework.boot.autoconfigure.SpringBootApplication;
import org.springframework.cloud.netflix.eureka.server.EnableEurekaServer;

/**
 * Created by 菩提树下的杨过 on 2017/6/17.
 */
@SpringBootApplication
@EnableEurekaServer
public class RegisterServer {

    public static void main(String[] args) {
        SpringApplication.run(RegisterServer.class, args);
    }
}
主要是靠最上面的@EnableEurekaServer这个注解,其它完全没有花头。
2.3 配置
server:
  port: 8000

eureka:
  client:
    register-with-eureka: false
    fetch-registry: false
    service-url:
      defaultZone: http://localhost:8000/eureka
解释一下:
注册中心本身也是一个服务,也可以当成普通服务向其它注册中心来注册,由于本示例中,只有一个eureka server自己就充当注册中心,也不需要跟其它注册中心同步注册信息,所以都设置成false。最后一行的defaultZone,初次接触可以先不管,先理解成注册中心对外暴露的地址即可。
2.4 启动
启动后,浏览http://localhost:8000/,可以看到类似下图:
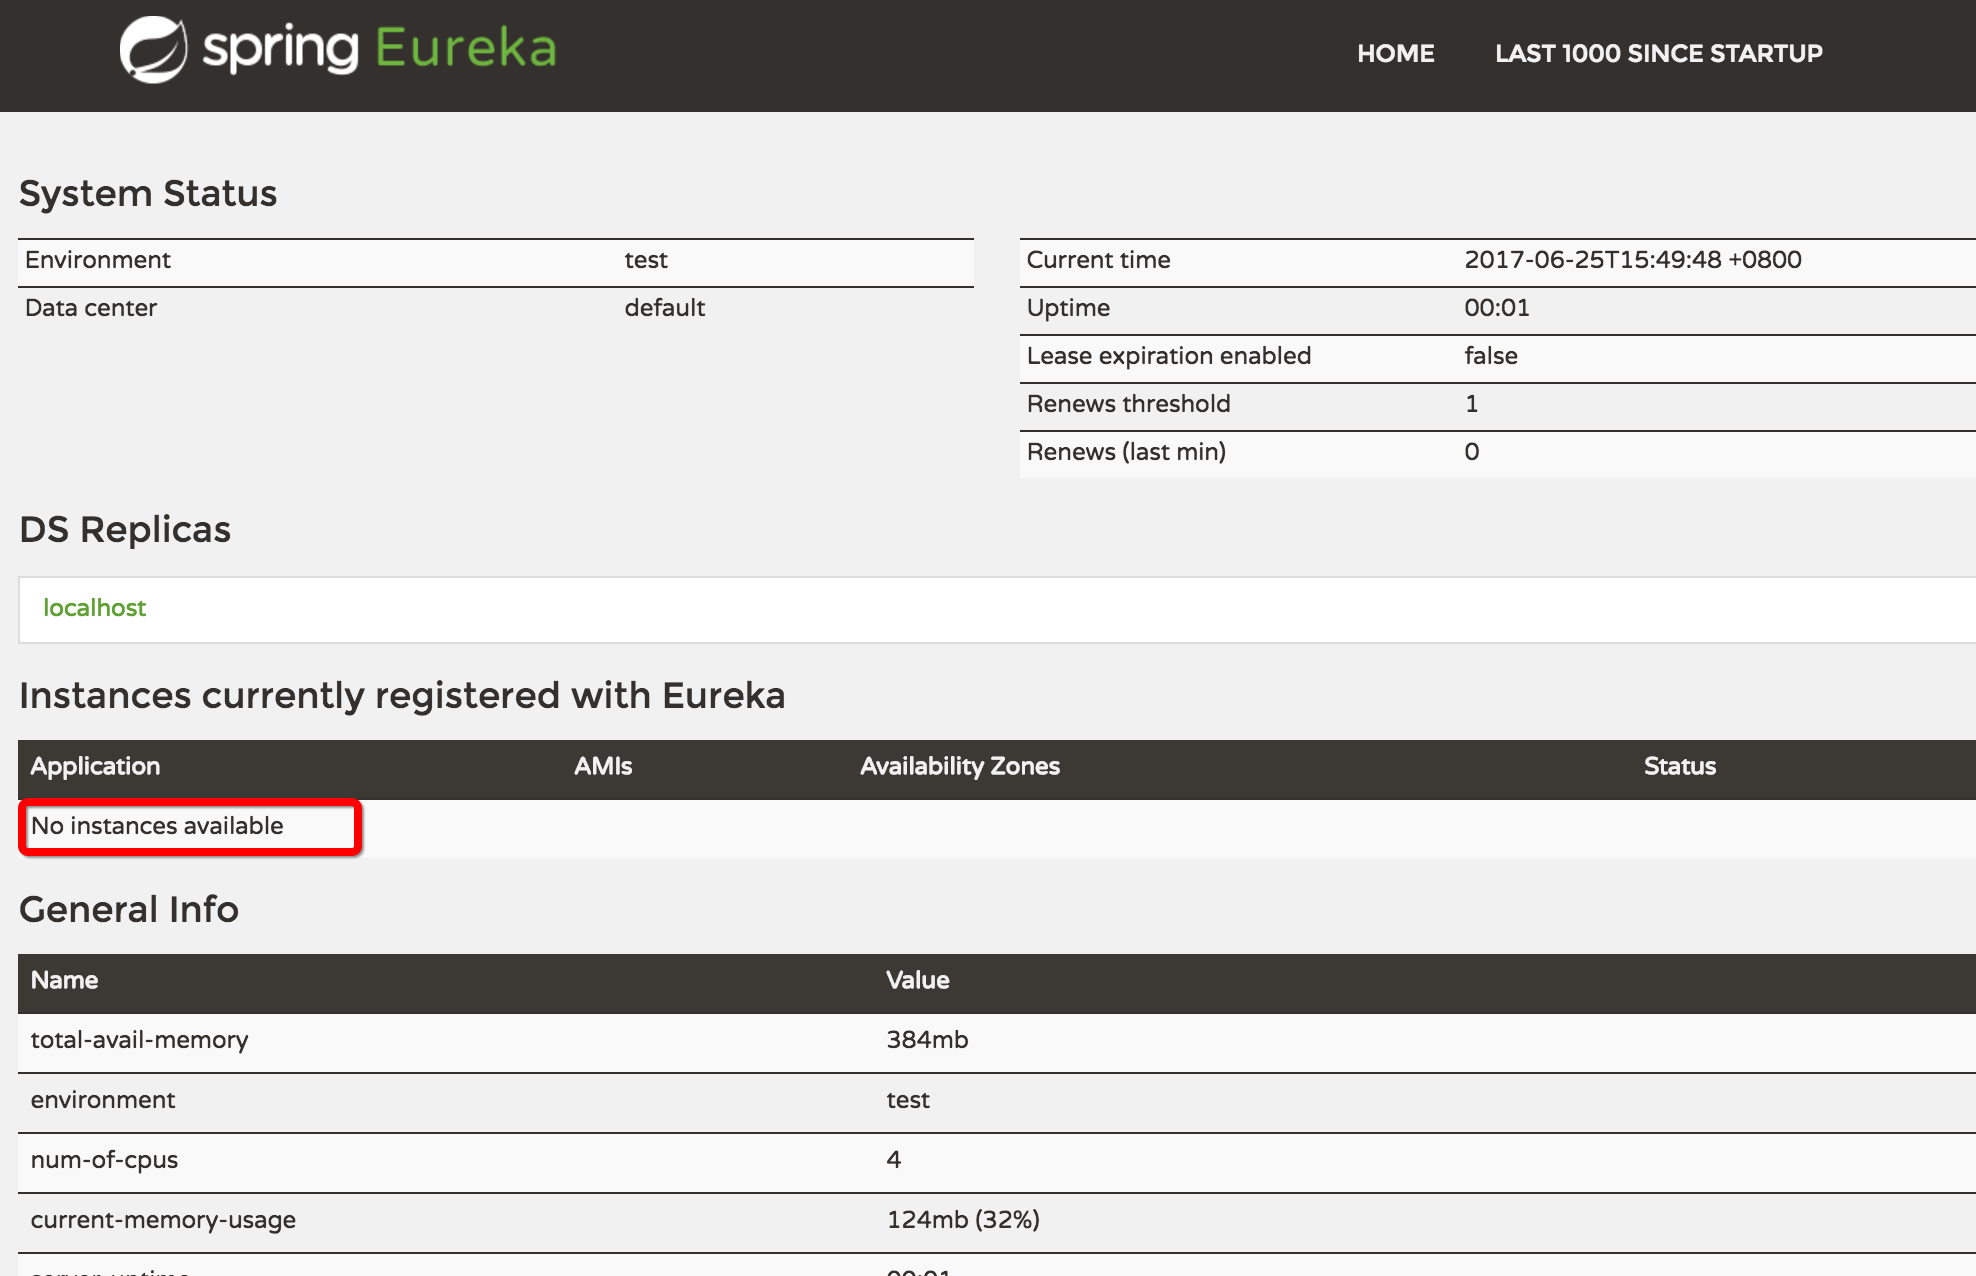
现在没有任何服务注册,所以在Application里,显示No instances available.
三、service-api
为了方便后面讲解,先定义一个服务接口,以及对应的DTO
package com.cnblogs.yjmyzz.spring.cloud.study.api;

import com.cnblogs.yjmyzz.spring.cloud.study.dto.UserDTO;

/**
 * Created by 菩提树下的杨过 on 2017/6/17.
 */
public interface UserService {

    UserDTO findUser(Integer userId);
}
以及
package com.cnblogs.yjmyzz.spring.cloud.study.dto;

import lombok.Data;

/**
 * Created by 菩提树下的杨过 on 2017/6/17.
 */
@Data
public class UserDTO {

    private Integer userId;

    private String userName;
}
四、service-provider
4.1 依赖项
buildscript {
    repositories {
        maven {
            url "http://maven.aliyun.com/nexus/content/groups/public/"
        }
    }
    dependencies {
        classpath("org.springframework.boot:spring-boot-gradle-plugin:1.5.4.RELEASE")
    }
}

apply plugin: 'spring-boot'

dependencyManagement {
    imports {
        mavenBom "org.springframework.cloud:spring-cloud-dependencies:Dalston.RELEASE"
    }
}

dependencies {
    compile(project(":service-api"))
    compile 'org.springframework.cloud:spring-cloud-starter-eureka'
    compile 'org.springframework.boot:spring-boot-starter-actuator'
    compile 'org.springframework.boot:spring-boot-starter-web'
    testCompile 'org.springframework.boot:spring-boot-starter-test'
}
4.2 接口实现
package com.cnblogs.yjmyzz.spring.cloud.study.service.impl;

import com.cnblogs.yjmyzz.spring.cloud.study.api.UserService;
import com.cnblogs.yjmyzz.spring.cloud.study.dto.UserDTO;
import org.springframework.stereotype.Service;

@Service("userService")
public class UserServiceImpl implements UserService {

    @Override
    public UserDTO findUser(Integer userId) {
        UserDTO user = new UserDTO();
        user.setUserId(userId);
        user.setUserName("菩提树下的杨过");
        return user;
    }
}
这里只是随便示意一下,直接返回一个固定的UserDTO实例。
4.3 controller
package com.cnblogs.yjmyzz.spring.cloud.study.controller;

import com.cnblogs.yjmyzz.spring.cloud.study.api.UserService;
import com.cnblogs.yjmyzz.spring.cloud.study.dto.UserDTO;
import org.springframework.beans.factory.annotation.Autowired;
import org.springframework.web.bind.annotation.GetMapping;
import org.springframework.web.bind.annotation.PathVariable;
import org.springframework.web.bind.annotation.RestController;

@RestController
public class UserController {

    @Autowired
    private UserService userService;

    @GetMapping("/user/{id}")
    public UserDTO findUser(@PathVariable Integer id) {
        return userService.findUser(id);
    }
}
这里用了一个新的注解GetMapping,相当于之前SpringMVC中@RequestMapping(method = RequestMethod.GET),更简洁而已。
到目前为止,都跟常规的SpringMVC无异。
4.4 main入口
package com.cnblogs.yjmyzz.spring.cloud.study;

import org.springframework.boot.SpringApplication;
import org.springframework.boot.autoconfigure.SpringBootApplication;
import org.springframework.cloud.client.discovery.EnableDiscoveryClient;

/**
 * Created by yangjunming on 2017/6/17.
 */
@EnableDiscoveryClient
@SpringBootApplication
public class ServiceProvider {

    public static void main(String[] args) {
        SpringApplication.run(ServiceProvider.class, args);
    }
}
依旧还是@EnableDiscoveryClient挑大梁,表明这是一个eureka的客户端程序(即:能向eureka server注册)
4.5 配置
server:
  port: 8001

spring:
  application:
    name: "service-provider-demo"
eureka:
  instance:
    prefer-ip-address: true
  client:
    service-url:
      defaultZone: http://localhost:8000/eureka/
应该不难理解,最后那几行,表示用自己IP地址向 http://localhost:8000/eureka/注册
4.6 启动
启动成功后,再看eureka 刚才的页面,会发现已经注册进来了。
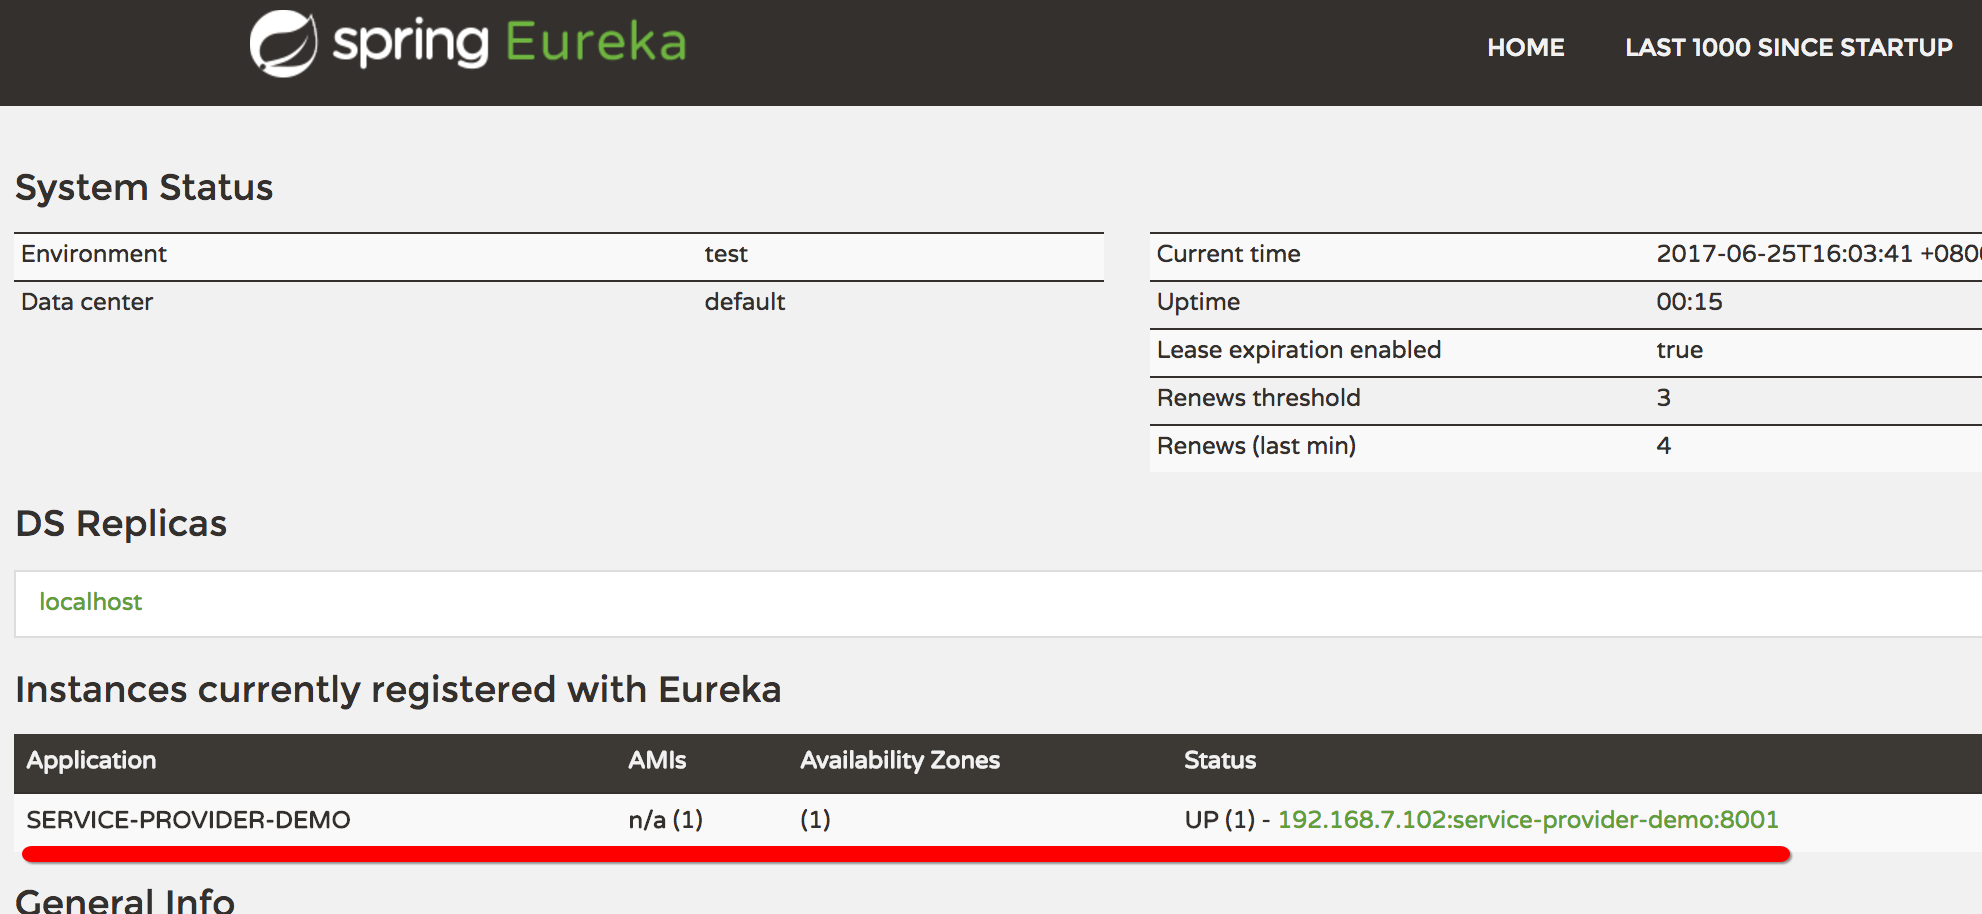
注:大家可以把service-provider多启动几个实例(端口错开,不要冲突即可),然后再观察下这个界面,可以看到注册了多个provider实例
五、service-consumer
5.1 依赖项
buildscript {
    repositories {
        maven {
            url "http://maven.aliyun.com/nexus/content/groups/public/"
        }
    }
    dependencies {
        classpath("org.springframework.boot:spring-boot-gradle-plugin:1.5.4.RELEASE")
    }
}

apply plugin: 'spring-boot'

dependencyManagement {
    imports {
        mavenBom "org.springframework.cloud:spring-cloud-dependencies:Dalston.RELEASE"
    }
}

dependencies {
    compile(project(":service-api"))
    compile 'org.springframework.cloud:spring-cloud-starter-eureka'
    compile 'org.springframework.boot:spring-boot-starter-actuator'
    compile 'org.springframework.cloud:spring-cloud-starter-ribbon'
    compile 'org.springframework.boot:spring-boot-starter-web'
    testCompile 'org.springframework.boot:spring-boot-starter-test'
}
5.2 建一个调用的Controller
package com.cnblogs.yjmyzz.spring.cloud.study.service.controller;

import com.cnblogs.yjmyzz.spring.cloud.study.dto.UserDTO;
import org.springframework.beans.factory.annotation.Autowired;
import org.springframework.cloud.client.ServiceInstance;
import org.springframework.cloud.client.discovery.DiscoveryClient;
import org.springframework.cloud.client.loadbalancer.LoadBalancerClient;
import org.springframework.web.bind.annotation.GetMapping;
import org.springframework.web.bind.annotation.PathVariable;
import org.springframework.web.bind.annotation.RestController;
import org.springframework.web.client.RestTemplate;

import java.util.List;

/**
 * Created by yangjunming on 2017/6/17.
 */
@RestController
public class OrderController {

    @Autowired
    private RestTemplate restTemplate;

    @Autowired
    private LoadBalancerClient loadBalancerClient;

    @Autowired
    private DiscoveryClient discoveryClient;

    @GetMapping("/order/{userId}/{orderNo}")
    public String findOrder(@PathVariable Integer userId, @PathVariable String orderNo) {
        UserDTO user = restTemplate.getForEntity("http://SERVICE-PROVIDER-DEMO/user/" + userId, UserDTO.class).getBody();
        if (user != null) {
            return user.getUserName() + " 的订单" + orderNo + " 找到啦!";
        }

        return "用户不存在!";
    }

    @GetMapping("/user-instance")
    public List<ServiceInstance> showInfo() {
        return this.discoveryClient.getInstances("SERVICE-PROVIDER-DEMO");
    }

    @GetMapping("/log-instance")
    public ServiceInstance chooseInstance() {
        return this.loadBalancerClient.choose("SERVICE-PROVIDER-DEMO");
    }


}
这里暴露了3个url,一个个来看:
a. /order/{userId}/{orderNo} 这个用来示例如何调用service-provider中的方法,注意这里我们并没有用http://localhost:8001/user/1 来调用,而通过http://service-provider-demo/user/ 指定service-provider的application name,让系统从注册中心去发现服务。
b. /user-instance , /log-instance 这二个url 用来辅助输出从注册中心发现的服务实例相关的信息,并非必须。
这里面还有二个注入的实例:restTemplate 、loadBalancerClient ,分别用来发起rest的http请求,以及使用负载均衡从可用的服务列表中,挑出一个可用实例。
5.3 main入口
package com.cnblogs.yjmyzz.spring.cloud.study.service;

import org.springframework.boot.SpringApplication;
import org.springframework.boot.autoconfigure.SpringBootApplication;
import org.springframework.cloud.client.discovery.EnableDiscoveryClient;
import org.springframework.cloud.client.loadbalancer.LoadBalanced;
import org.springframework.context.annotation.Bean;
import org.springframework.web.client.RestTemplate;

@EnableDiscoveryClient
@SpringBootApplication
public class ServiceConsumer {

    @Bean
    @LoadBalanced
    RestTemplate restTemplate() {
        return new RestTemplate();
    }

    public static void main(String[] args) {
        SpringApplication.run(ServiceConsumer.class, args);
    }
}
依然靠二个关键的注解:@EnableDiscoveryClient、@LoadBalanced,特别是@LoadBalanced,经过这个修饰的restTemplate,就不是普通的restTemplate了,而是具备负载均衡能力的restTemplate,即每次都会用负载均衡算法,从可用服务列表中,挑一个进行调用。
5.3 启动

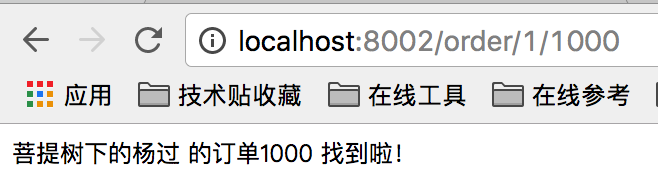
可以从eukera中看到,service-provider与service-consumer都注册进来了。
调用一下试试:http://localhost:8002/order/1/1000,成功的话会看到下面的输出
注:此时可以把注册中心eureka server停掉,然后再调用下http://localhost:8002/order/1/1000,会发现仍然可以正常调用,说明注册中心的服务列表,在本机是有缓存的,这跟dubbo/dubbox类似。
另外还可以验证下负载均衡,方法如下:
先把service-provider启2个,开二个终端窗口:
java -jar xxx.jar --server.port=9001
java -jar xxx.jar --server.port=9002
这样就能跑二个应用起来,然后看注册中心

然后再调用下consumer的log-instance

可以看到,这次选择的是9002端口应对的实例,然后再刷新一下:

这回选择的是另一个端口9001的实例,说明负载均衡确实起作用了。
至此,一个最基本的SOA框架雏形搭建起来了,当然还有很多地方需要完善,比如:注册中心如何做到HA,服务融断如何处理,注册中心如何安全认证(防止其它服务乱注册)等等,后面再讲。