一.环境以及注意事项
1.windows10家庭版 python 3.7.1
2.需要使用到的库 wordcloud(词云),jieba(中文分词库),安装过程不展示
3.注意事项:由于wordcloud默认是英文不支持中文,所以需要一个特殊字体 simsum.tff.下载地址: https://s3-us-west-2.amazonaws.com/notion-static/b869cb0c7f4e4c909a069eaebbd2b7ad/simsun.ttf
请安装到C:WindowsFonts 里面
4.测试所用的三国演义txt文本下载地址(不保证永久有效):https://www.ixdzs.com/d/1/1241/
5.调试过程可能会出现许多小问题,请检查单词是否拼写正确,如words->word等等
6.特别提醒:背景图片和文本需 放在和py文件同一个地方
二.词频统计以及输出
(1) 代码如下(封装为txt函数)
函数作用:jieba库三种模式中的精确模式(输出的分词完整且不多余) jieba.lcut(str): 返回列表类型
def txt():  #输出词频前N的词语
    txt = open("三国演义.txt","r").read() #打开txt文件,要和python在同一文件夹
    words = jieba.lcut(txt)  #精确模式,返回一个列表
    counts = {}  #创建字典
    excludes = ("将军","二人","却说","荆州","不可","不能","如此","如何",
                "军士","左右","军马","商议","大喜") #规定要去除的没意义的词语
    for word in words:
        if len(word) == 1:                          #把意义相同的词语归一
            continue
        elif word == "诸葛亮" or word == "孔明曰":
            rword = "孔明"
        elif word == '关公' or word == '云长':
            rword = '关羽'
        elif word == '玄德' or word == '玄德曰':
            rword = '刘备'
        elif word == '孟德' or word == "丞相" or word == '曹躁':
            rword = '曹操'
        else:
            rword = word
        counts[rword] = counts.get(rword,0) + 1     #字典的运用,统计词频P167
    for word in excludes: #删除之前所规定的词语
        del(counts[word])
    items = list(counts.items())   #返回所有键值对P168
    items.sort(key=lambda x:x[1], reverse =True) #降序排序
    N =eval(input("请输入N:代表输出的数字个数"))
    wordlist=list()
    for i in range(N):
        word,count = items[i]
        print("{0:<10}{1:<5}".format(word,count)) #输出前N个词频的词语
(2)效果图

三.词频+词云
(1) 词云代码如下 (由于是词频与词云结合,此函数不能直接当普通词云函数使用,自行做恰当修改即可)
def create_word_cloud(filename):
    wl = txt() #调用函数获取str
    cloud_mask = np.array(Image.open("love.jpg"))#词云的背景图,需要颜色区分度高 需要把背景图片名字改成love.jpg
    wc = WordCloud(
        background_color = "black", #背景颜色
        mask = cloud_mask,          #背景图cloud_mask
        max_words=100,              #最大词语数目
        font_path = 'simsun.ttf',   #调用font里的simsun.tff字体,需要提前安装
        height=1200,                #设置高度
        width=1600,                 #设置宽度
        max_font_size=1000,         #最大字体号
        random_state=1000,          #设置随机生成状态,即有多少种配色方案
        )
    myword = wc.generate(wl)  # 用 wl的词语 生成词云
    # 展示词云图
    plt.imshow(myword)
    plt.axis("off")
    plt.show()
    wc.to_file('1.jpg')  # 把词云保存下当前目录(与此py文件目录相同)
(2) 词频加词云结合的 完整 代码如下
from wordcloud import WordCloud
import matplotlib.pyplot as plt
import jieba
import numpy as np
from PIL import Image

def txt():  #输出词频前N的词语并且以str的形式返回
    txt = open("三国演义.txt","r").read() #打开txt文件,要和python在同一文件夹
    words = jieba.lcut(txt)  #精确模式,返回一个列表
    counts = {}  #创建字典
    excludes = ("将军","二人","却说","荆州","不可","不能","如此","如何",
                "军士","左右","军马","商议","大喜") #规定要去除的没意义的词语
    for word in words:
        if len(word) == 1:                          #把意义相同的词语归一
            continue
        elif word == "诸葛亮" or word == "孔明曰":
            rword = "孔明"
        elif word == '关公' or word == '云长':
            rword = '关羽'
        elif word == '玄德' or word == '玄德曰':
            rword = '刘备'
        elif word == '孟德' or word == "丞相" or word == '曹躁':
            rword = '曹操'
        else:
            rword = word
        counts[rword] = counts.get(rword,0) + 1     #字典的运用,统计词频P167
    for word in excludes: #删除之前所规定的词语
        del(counts[word])
    items = list(counts.items())   #返回所有键值对P168
    items.sort(key=lambda x:x[1], reverse =True) #降序排序
    N =eval(input("请输入N:代表输出的数字个数"))
    wordlist=list()
    for i in range(N):
        word,count = items[i]
        print("{0:<10}{1:<5}".format(word,count)) #输出前N个词频的词语
        wordlist.append(word)    #把词语word放进一个列表
    a=' '.join(wordlist)  #把列表转换成str wl为str类型,所以需要转换
    return a

def create_word_cloud(filename):
    wl = txt() #调用函数获取str!!
                                    #图片名字 需一致
    cloud_mask = np.array(Image.open("love.jpg"))#词云的背景图,需要颜色区分度高

    wc = WordCloud(
        background_color = "black", #背景颜色
        mask = cloud_mask,          #背景图cloud_mask
        max_words=100,              #最大词语数目
        font_path = 'simsun.ttf',   #调用font里的simsun.tff字体,需要提前安装
        height=1200,                #设置高度
        width=1600,                 #设置宽度
        max_font_size=1000,         #最大字体号
        random_state=1000,          #设置随机生成状态,即有多少种配色方案
        )

    myword = wc.generate(wl)  # 用 wl的词语 生成词云
    # 展示词云图
    plt.imshow(myword)
    plt.axis("off")
    plt.show()
    wc.to_file('1.jpg')  # 把词云保存下当前目录(与此py文件目录相同)


if __name__ == '__main__':
    create_word_cloud('三国演义')
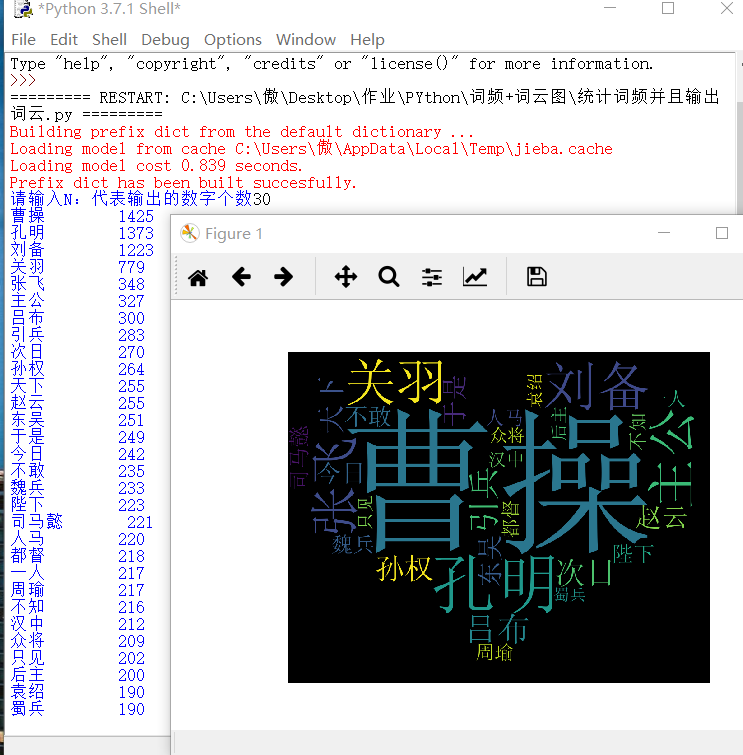
(3) 效果图如下(输出词频以及词云)

(4) 改进代码——自定义类,可自定义排除词语和同义词
注意:如果有OS报错,则尝试把字体文件放到.py当前目录的other目录下
# 自定义类版
class MyWordCloud:
    filePath = ""
    number = 1
    counts = {}
    excludes = []  # 需要排除的词语,例如不是,天气等常见词
    synonym = ()  # 同义词,元组,以该元组最后一个词语作为前面词语的意思

    def __init__(self, path, number, counts={}, excludes=[], synonym=()):
        self.filePath = path
        self.number = number
        self.counts = counts
        self.excludes = excludes
        self.synonym = synonym

    # 使用jieba库进行词频统计
    def count(self):
        txtFile = open(self.filePath, "r").read()
        words = jieba.lcut(txtFile)
        for word in words:
            if len(word) == 1 or len(word) > 4:  # 去除长度为1和大于4的字符
                continue
            for i in range(len(self.synonym)):
                for j in range(len(synonym[i])):
                    if word == synonym[i][j]:
                        word = synonym[i][len(synonym[i]) - 1]
            rword = word
            self.counts[rword] = self.counts.get(rword, 0) + 1  # <class 'int'> 统计词频,0为初值
        # 删除排除词语
        for x in self.excludes:
            del (self.counts[x])

        return self.counts

    # 输出前number词频最高的词语
    def printPreNumberWord(self):
        self.counts = self.count()
        for i in range(15):
            items = list(self.counts.items())
            items.sort(key=lambda x: x[1], reverse=True)  # 降序排序
            word, count = items[i]
            print("{0:<10}{1:<5}".format(word, count))

    # 获取词频最高的前number个词语
    def getPreNumberWord(self, counts=None):
        if (self.counts == None and counts == None):
            counts = self.count()
        else:
            counts = self.counts
        items = list(counts.items())
        items.sort(key=lambda x: x[1], reverse=True)  # 降序排序
        wordlist = []
        for i in range(self.number):
            word, count = items[i]
            # print("{0:<10}{1:<5}".format(word, count))  # 输出前N个词频的词语
            wordlist.append(word)  # 把词语word放进一个列表
        return wordlist

    # 生成词云图
    def create_word_cloud(self):
        cloud_mask = np.array(Image.open("./picture/worlCloud.jpg"))
        wc = WordCloud(
            background_color="black",  # 背景颜色
            mask=cloud_mask,  # 背景图cloud_mask
            max_words=100,  # 最大词语数目
            font_path='./other/simsun.ttf',  # 调用font里的simsun.tff字体,需要提前安装/下载
            height=1200,  # 设置高度
            width=1600,  # 设置宽度
            max_font_size=1000,  # 最大字体号
            random_state=1000,  # 设置随机生成状态,即有多少种配色方案
        )
        wl = ' '.join(self.getPreNumberWord())  # 把列表转换成str wl为str类型,所以需要转换
        img = wc.generate(wl)  # 用 wl的词语 生成词云
        # 展示词云图
        plt.imshow(img)
        plt.axis("off")
        plt.show()
        wc.to_file('./picture/1.jpg')  # 把词云保存


if __name__ == '__main__':
    filePath = "./txt/三国演义.txt"
    number = 20
    excludes = ["将军", "二人", "却说", "荆州", "不可", "不能", "引兵",
                "次日", "如此", "如何", "军士", "左右", "军马", "商议", "大喜"]
    synonym = (("诸葛亮", "孔明曰", "孔明"), ("关公", "云长", "关羽"), ("玄德", "玄德曰", "刘备"),
               ("孟德", "丞相", "曹躁", "曹操"))
    wl = MyWordCloud(filePath, number=number, excludes=excludes, synonym=synonym)
    wl.printPreNumberWord()
    wl.create_word_cloud()