说到在CRM Form上添加Ribbon Button,那就不得不提到一个Tool:Ribbon Workbench,使用这个Tool,能为我们添加button带来不少便利。
Ribbon Workbench下载地址:https://www.develop1.net/public/rwb/ribbonworkbench.aspx
关于Tool如何使用,这个在网上可以搜到不少文章,这里就不再赘述了。这里想要讲解的是,再好用的Tool,也并非是完美的,总有力所不逮的时候,所以我们不仅要会使用Tool,还应该认识隐藏在这之后的<RibbonDiffXml>,提高对Button配置的理解。
下面拿个简单的例子来说明:
<RibbonDiffXml xmlns:xsd="http://www.w3.org/2001/XMLSchema" xmlns:xsi="http://www.w3.org/2001/XMLSchema-instance">
  <CustomActions>
    <CustomAction Id="new.testentity.SendMessage.Button.CustomAction" Location="Mscrm.Form.testentity.MainTab.Save.Controls._children" Sequence="38">
      <CommandUIDefinition>
        <Button Command="new.testentity.sendemailrule" Id="new.testentity.SendMessage.Button" Image32by32="/_imgs/ribbon/SaveAndClose_32.png" Image16by16="/_imgs/FormEditorRibbon/SaveAndClose_16.png" LabelText="$LocLabels:new.testentity.SendMessage.Button.LabelText" Sequence="38" TemplateAlias="o1" />
      </CommandUIDefinition>
    </CustomAction>
  </CustomActions>
  <Templates>
    <RibbonTemplates Id="Mscrm.Templates" />
  </Templates>
  <CommandDefinitions>
    <CommandDefinition Id="new.testentity.sendemailrule">
      <EnableRules />
      <DisplayRules />
      <Actions>
        <JavaScriptFunction FunctionName="alertFunc" Library="$webresource:new_alertButton.js" />
      </Actions>
    </CommandDefinition>
  </CommandDefinitions>
  <RuleDefinitions>
    <TabDisplayRules />
    <DisplayRules />
    <EnableRules />
  </RuleDefinitions>
  <LocLabels>
    <LocLabel Id="new.testentity.SendMessage.Button.LabelText">
      <Titles>
        <Title description="Alert Button" languagecode="1033" />
      </Titles>
    </LocLabel>
  </LocLabels>
</RibbonDiffXml>
这个RibbonDiffXml,描述的是:在testentity这个Entity的Form上,添加一个Alert Button,Button的位置是在Save Group组里,序列是38,点击这个Button,会触发new_alertButton.js中的alertFunc方法。
那么如何将Xml和上面的描述信息去一一对应呢?
添加一个Button,首先是在Ribbon上添加Item,也就是用<CustomAction>来表示。

Id:就是Action的唯一标识,虽然没有强制要求如何命名,但是微软还是给了强烈的命名规则建议。
[solution identifier].[entity].[ribbon].[function].[element name]. For example: MyISV.account.form.SendToOtherSystem.Button.
Location:一个Item,是会在具体的Group里,这个用Tool可以看到,那么这个的命名规则就是Group名+".Controls"+"._children"。
Sequence:通过跟其它已存在的Item的Sequence进行比较,用来控制Item的位置的。
<CustomAction Id="new.testentity.SendMessage.Button.CustomAction" Location="Mscrm.Form.testentity.MainTab.Save.Controls._children" Sequence="38">
再回到例子里面,就不难理解,说的意思就是Item是在Save Group里,序列号是38。
接着我们看到<CommandUIDefinition>里面放着<Button>节点。
CRM用<CommandUIDefinition>来表示具体可见的Ribbon Element。

例子中是放了一个<Button>节点
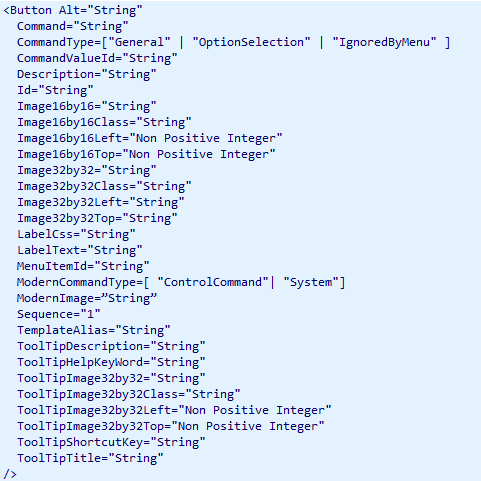
除了Id属性是必填的以外,其它的属性都不是必填的,我们定制一个button,当然不是为了放着好看,我们需要这个button,在点击的时候,能够触发一些定制,所以例子中用到了Command属性。
Id:Ribbon Element的唯一标识。建议命名规则[solution identifier].[entity].[ribbon].[function].[element name]. For example: MyISV.account.form.SendToOtherSystem.Button.
Command:指定的是已存在的CommandDefinication.Id,而CommandDefinication后面会讲到,是用来指定事件的。
LabelText:指定Button的显示名,例子中指定的是LocLabel对象。
<Button Command="new.testentity.sendemailrule" Id="new.testentity.SendMessage.Button" Image32by32="/_imgs/ribbon/SaveAndClose_32.png" Image16by16="/_imgs/FormEditorRibbon/SaveAndClose_16.png" LabelText="$LocLabels:new.testentity.SendMessage.Button.LabelText" Sequence="38" TemplateAlias="o1" />
例子中的这段,对应起来理解就是,添加一个Button Element,名字是"$LocLabels:new.testentity.SendMessage.Button.LabelText",点击触发"new.testentity.sendemailrule"配置的事件。
下面再来看<CommandDefinitions>

Id:唯一标识。命名规则[solution identifier].[entity].[ribbon].[function].[element name]. For example: MyISV.account.form.SendToOtherSystem.Button.
EnableRules和DisplayRules,顾名思义,就是控制只读和显示的。
Actions:指定要执行的命令。

这里我们使用的是<JavaScriptFunction>

必填项有两个:FunctionName和Library。
    <CommandDefinition Id="new.testentity.sendemailrule">
      <EnableRules />
      <DisplayRules />
      <Actions>
        <JavaScriptFunction FunctionName="alertFunc" Library="$webresource:new_alertButton.js" />
      </Actions>
    </CommandDefinition>
那么这段描述的就是执行new_alertButton.js中的Funtion alertFunc。
    <LocLabel Id="new.testentity.SendMessage.Button.LabelText">
      <Titles>
        <Title description="Alert Button" languagecode="1033" />
      </Titles>
    </LocLabel>
这段很好理解,就是定义了个Lable指定Button名。
到这里,这个RibbonXml的例子,我们就理解完毕了。所以其实就算没有Tool,我们自己就可以做到添加Ribbon Button。
纯手工打造的话,又如何操作呢?
首先是导出包含你要添加button的Entity的CRM Soluton,解压缩之后,打开customizations.xml,然后在</SavedQueries>节点后,添加手工打造的<RibbonDiffXml>

需要注意的是,如果涉及到WebResource的使用,记得在Solution中把WebReousce加上,然后再压缩,导入CRM,就能看到Button效果了。