三、基础语法
1.创建HTML
由上文也可以知道需要在html中添加:
<html xmlns:th="http://www.thymeleaf.org">
这样,下文才能正确使用th:*形式的标签!
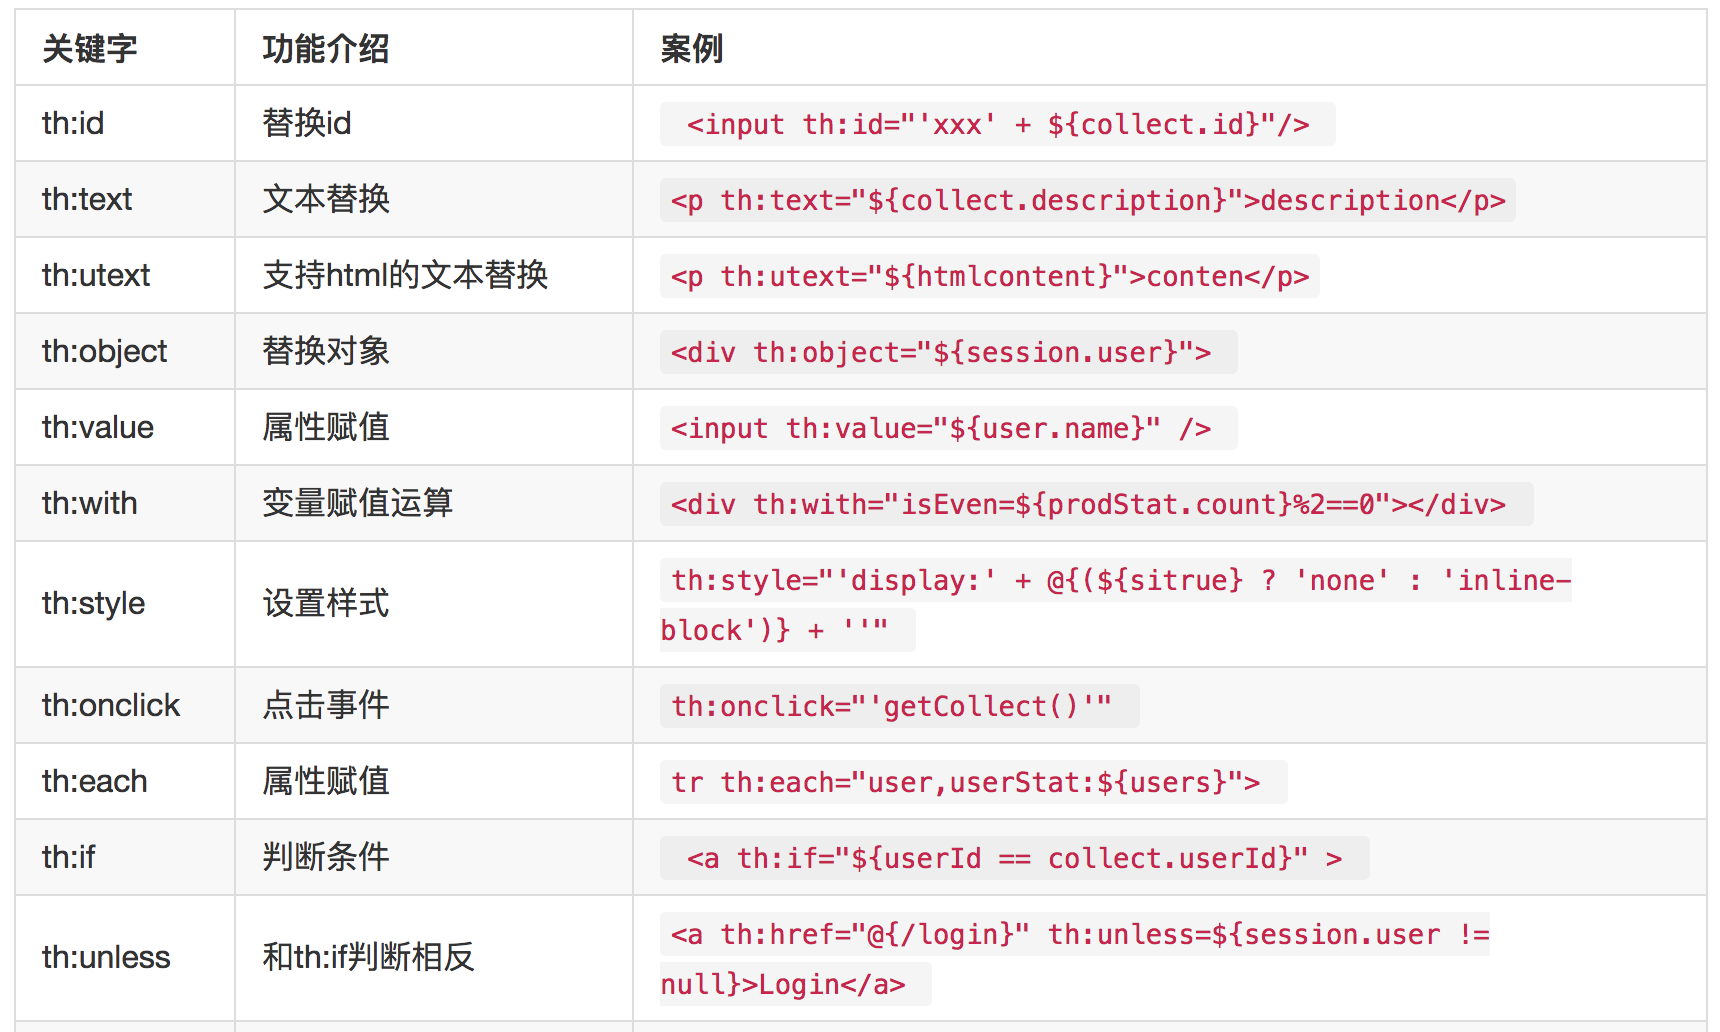
2.获取变量值${...}
通过${…}进行取值,这点和ONGL表达式语法一致!
  <!--/*@thymesVar id="name" type="java.lang.String"*/-->
    <p th:text="'Hello!, ' + ${name} + '!'">3333</p>
选择变量表达式*{...}

<div th:object="${session.user}">
    <p>Name: <span th:text="*{firstName}">Sebastian</span>.</p>
    <p>Surname: <span th:text="*{lastName}">Pepper</span>.</p>
    <p>Nationality: <span th:text={nationality}">Saturn</span>.</p>
</div>
等价于
<div>
    <p>Name: <span th:text="${session.user.firstName}">Sebastian</span>.</p>
    <p>Surname: <span th:text="${session.user.lastName}">Pepper</span>.</p>
    <p>Nationality: <span th:text="${session.user.nationality}">Saturn</span>.</p>
</div>
至于p里面的原有的值只是为了给前端开发时做展示用的.这样的话很好的做到了前后端分离。
这也是Thymeleaf非常好的一个特性:在无网络的情况下也能运行,也就是完全可以前端先写出页面,模拟数据展现效果,后端人员再拿此模板修改即可!
3.链接表达式: @{…}
用来配合link src href使用的语法,类似的标签有:th:href和th:src
<!-- Will produce 'http://localhost:8080/gtvg/order/details?orderId=3' (plus rewriting) -->

<a href="details.html" th:href="@{http://localhost:8080/gtvg/order/details(orderId=${o.id})}">view</a> <!-- Will produce '/gtvg/order/details?orderId=3' (plus rewriting) -->

<a href="details.html" th:href="@{/order/details(orderId=${o.id})}">view</a>

<a href="details.html" th:href="@{order/{orderId}/details(orderId=${o.id})}">Content路径,默认访问static下的order文件夹</a>
4.文本替换
<span th:text="'Welcome to our application, ' + ${user.name} + '!'">
或者下面的表达方式:(只能包含表达式变量,而不能有条件判断等!)
<span th:text="|Welcome to our application, ${user.name}!|">
5.运算符
数学运算
- 二元操作:+, - , * , / , %
- 一元操作: - (负)
逻辑运算
- 一元 : and or
- 二元 : !,not
比较运算(为避免转义尴尬,可以使用括号中的英文进行比较运算!)
- 比较:> , < , >= , <= ( gt , lt , ge , le )
- 等于:== , != ( eq , ne )
条件运算
- If-then: (if) ? (then)
- If-then-else: (if) ? (then) : (else)
- Default: (value) ?: (defaultvalue)
-
'User is of type ' + (${user.isAdmin()} ? 'Administrator' : (${user.type} ?: 'Unknown'))6.条件
if/unless
使用th:if和th:unless属性进行条件判断,th:unless于th:if恰好相反,只有表达式中的条件不成立,才会显示其内容。
<a th:href="@{/login}" th:unless=${session.user != null}>Login</a>
switch
<div th:switch="${user.role}">
  <p th:case="'admin'">User is an administrator</p>
  <p th:case="#{roles.manager}">User is a manager</p>
  <p th:case="*">User is some other thing</p>
</div>
7.循环
通过th:each
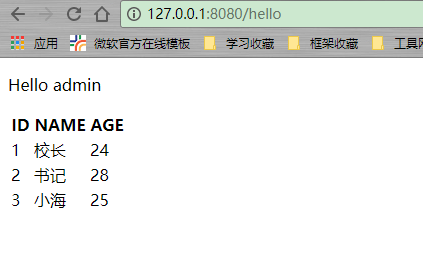
<!DOCTYPE HTML>
<html xmlns:th="http://www.thymeleaf.org">
<head>
    <title>hello</title>
    <meta http-equiv="Content-Type" content="text/html; charset=UTF-8"/>
</head>
<body>
    <!-- 不存在则忽略,显示hello null!(可以通过默认值进行设置)-->
    <p th:text="'Hello ' + (${name}?:'admin')">3333</p>
    <table>
        <tr>
            <th>ID</th>
            <th>NAME</th>
            <th>AGE</th>
        </tr>
        <tr th:each="emp : ${empList}">
            <td th:text="${emp.id}">1</td>
            <td th:text="${emp.name}">海</td>
            <td th:text="${emp.age}">18</td>
        </tr>
    </table>
</body>
</html>
后台:

@GetMapping(value = "/hello")
    public String hello(Model model) {
        List<Emp> empList = new ArrayList<>();
        empList.add(new Emp(1, "校长", 24));
        empList.add(new Emp(2, "书记", 28));
        empList.add(new Emp(3, "小海", 25));
        model.addAttribute("empList", empList);
        return "hello";
    }
效果:
更多循环深入,iterStat等示例,参考:http://blog.csdn.net/sun_jy2011/article/details/40710429
8.内置对象Utilites
一般不推荐在前端进行这些处理,前端页面以减少逻辑为宜
按 Ctrl+C 复制代码
按 Ctrl+C 复制代码
常用示例:
按 Ctrl+C 复制代码
按 Ctrl+C 复制代码
 String
完整参考:点击查看
四、常用标签
// 类似于th:object和th:field等进行表单参数绑定还是很有用的!使用与注意事项,参见:这里