前言
参数关联是接口测试和性能测试最为重要的一个步骤,很多接口的请求参数是动态的,并且需要从上一个接口的返回值里面取出来,一般只能用一次就失效了。
最常见的案例就是网站的登录案例,很多网站的登录并不仅仅只传username和psw两个参数,往往有其它的动态参数。
有时候还需要带上cookies参数,如JSESSIONID
登录参数
首先分析下目标网站【学信网:https://account.chsi.com.cn/passport/login】的登录接口请求参数。
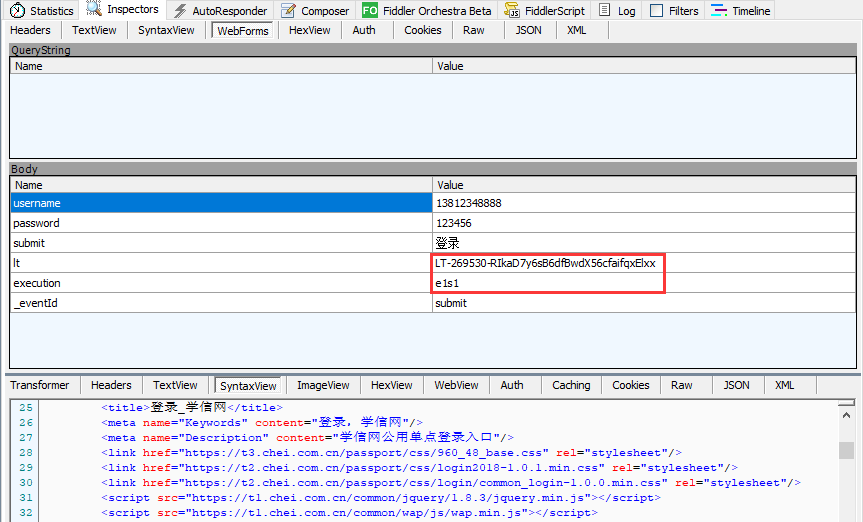
先随便输入账号和密码,使用fiddler工具抓包查看请求参数,用两个参数是网页自动给的参数(用户没输入)
- lt : LT-269530-RIkaD7y6sB6dfBwdX56cfaifqxElxx
- execution: e1s1
关闭浏览器后,重复上面操作,再抓包看请求参数,会发现变了
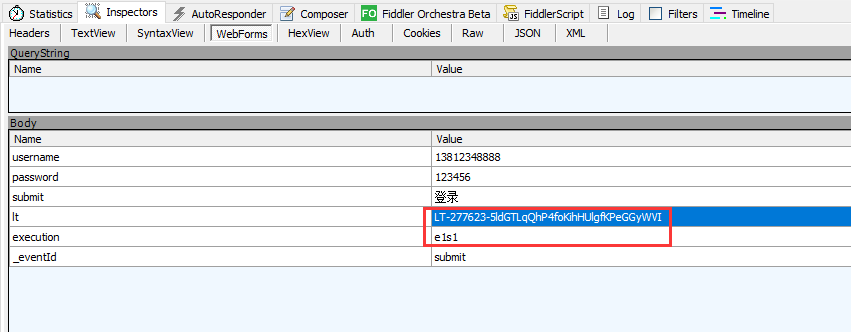
- lt : LT-277623-5ldGTLqQhP4foKihHUlgfKPeGGyWVI
- execution: e1s1
备注:execution参数是表示网站刷新次数,可以刷新下再登录,就变成 e2s1了
获取接口返回数据
我们想登录的话,必须先得到 lt 和 execution 这2个参数,那么问题来了:这两个参数是从哪来的?
打开登录页面https://account.chsi.com.cn/passport/login直接刷新,看返回的html内容
<input class="btn_login" name="submit" accesskey="l" value="登录" tabindex="4" type="submit" title="登录" />

<div class="account-oprate clearfix">
       <a class="find-yhm" href="https://account.chsi.com.cn/account/password!rtvlgname">找回用户名</a>
       <a class="find-mm" href="https://account.chsi.com.cn/account/password!retrive">找回密码</a>
       <a href="https://account.chsi.com.cn/account/preregister.action?from=account-login" class="regist-btn">注册</a>
</div>
<input type="hidden" name="lt" value="LT-279621-fnisPBt0FVGNFrfWzJJqhTEyw6VkfH" />
<input type="hidden" name="execution" value="e2s1" />
<input type="hidden" name="_eventId" value="submit" />
接下来可以用前面学的的lxml爬虫框架python笔记28-lxml.etree爬取html内容,从html中解析出value="LT-279621-fnisPBt0FVGNFrfWzJJqhTEyw6VkfH"和value="e2s1"这两个值
# conding:utf-8
import requests
from lxml import etree
import urllib3
urllib3.disable_warnings()

s = requests.session()
def get_it_execution():
    result = {}
    loginurl = "https://account.chsi.com.cn/passport/login"
    h1 = {
        "User-Agent": "Mozilla/5.0 (Windows NT 10.0; Win64; x64) AppleWebKit/537.36 (KHTML, like Gecko) Chrome/68.0.3440.106 Safari/537.36",
    }
    s.headers.update(h1)
    r = s.get(loginurl, verify=False)
    dom = etree.HTML(r.content.decode("utf-8"))

    try:
        result["lt"] = dom.xpath('//input[@name="lt"]')[0].get("value")
        result["execution"] = dom.xpath('//input[@name="execution"]')[0].get("value")
        print(result)
    except:
        print("lt、execution参数获取失败!")
    return result
if __name__ == "__main__":
    result = get_it_execution()
运行结果:
{'lt': 'LT-286330-a6Ogf3rt3Fcwt6XZcuKCa4HHzz0QA3', 'execution': 'e1s1'}
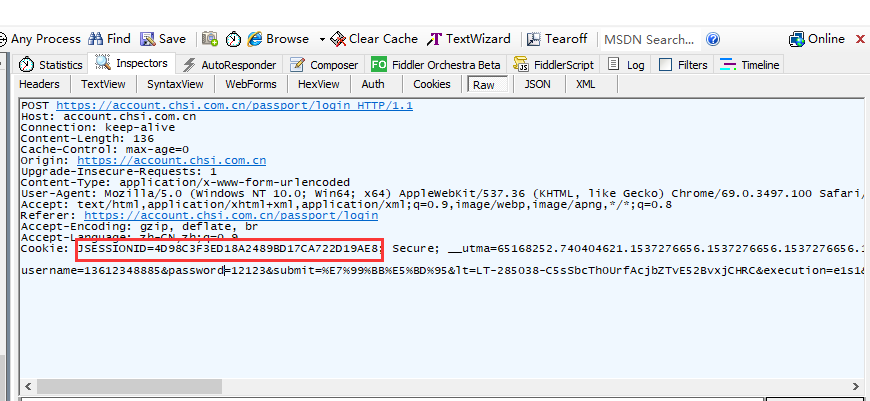
JSESSIONID
登录里面实际上会有一个非常重要的cookies参数,JSESSIONID=4D98C3F3ED18A2489BD17CA722D19AE8,这个JSESSIONID也是动态的,每次重新打开页面都会变。
这个参数也是第一次访问登录页面时候,服务器会自动返回过来的,使用浏览器无痕模式首次访问就能抓取到了。

cookies参数关联实现就非常简单了,直接用requests.session()去发个get请求就能自动保存了,所以上一步get_it_execution()实际上也同步了cookies参数。
参考代码
# conding:utf-8
import requests
from lxml import etree
import urllib3
urllib3.disable_warnings()


s = requests.session()

def get_it_execution():
    result = {}
    loginurl = "https://account.chsi.com.cn/passport/login"
    h1 = {
        "User-Agent": "Mozilla/5.0 (Windows NT 10.0; Win64; x64) AppleWebKit/537.36 (KHTML, like Gecko) Chrome/68.0.3440.106 Safari/537.36",
    }
    s.headers.update(h1)
    r = s.get(loginurl, verify=False)
    dom = etree.HTML(r.content.decode("utf-8"))

    try:
        result["lt"] = dom.xpath('//input[@name="lt"]')[0].get("value")
        result["execution"] = dom.xpath('//input[@name="execution"]')[0].get("value")
        print(result)
    except:
        print("lt、execution参数获取失败!")
    return result

def login(result, user='13812348888', psw='123456'):
    loginurl = "https://account.chsi.com.cn/passport/login"
    h2 = {
        "Referer": loginurl,
        "User-Agent": "Mozilla/5.0 (Windows NT 10.0; Win64; x64) AppleWebKit/537.36 (KHTML, like Gecko) Chrome/68.0.3440.106 Safari/537.36",
        "Accept": "text/html,application/xhtml+xml,application/xml;q=0.9,image/webp,image/apng,*/*;q=0.8",
        "Origin": "https://account.chsi.com.cn",
        "Content-Length": "119",
        "Cache-Control": "max-age=0",
        "Upgrade-Insecure-Requests": "1",
        "Content-Type": "application/x-www-form-urlencoded"
        }
    body = {
        "username": user,
        "password": psw,
        "rememberMe": "true",
        "lt": result["lt"],
        "execution": result["execution"],
        "_eventId": "submit"
    }
    s.headers.update(h2)
    r4 = s.post(loginurl, data=body, verify=False)
    print(r4.text)

if __name__ == "__main__":
    result = get_it_execution()
    login(result, user='13812348888', psw='123456')
作者:上海-悠悠 QQ群:588402570