一.线程和进程
1.操作系统中,线程是CPU调度和分派的基本单位,线程依存于程序中
2.操作系统中,进程是系统进行资源分配和调度的一个基本单位,一个程序至少有一个进程
3.一个进程由至少一个线程组成,线程组成进程
4.多进程、多进程实际是进程、线程、进程和线程的并发而不是并行,用来加快程序运行速度
5.Python既支持多线程,也支持多进程。
二.多线程threading
1.python3线程操作中常用模块:_thread和threading,其中一般都用threading模块
2.线程分为:内核线程:由操作系统内核创建和撤销;用户线程:不需要内核支持而在用户程序中实现的线程
3.Python中使用线程有两种方式:函数或者用类来包装线程对象
2. 创建线程


 1 import threading
 2
 3 #def main():#定义一个存放多线程的函数
 4 #   print(threading.active_count())#获取已激活的线程数
 5 #   print(threading.enumerate()) # see the thread list查询线程信息
 6 #   print(threading.current_thread())#查询当前运行的线程
 7
 8 def thread_job():#定义一个线程的工作的函数
 9     print('This is a thread of %s' % threading.current_thread())
10 def main():
11     thread = threading.Thread(target=thread_job,)#添加线程,参数为线程的目标(任务)
12     thread.start()#执行线程thread
13
14 if __name__ == '__main__':#在该程序中运行
15     main()
16 ---------------------------------------
17 This is a thread of <Thread(Thread-1, started 5664)>
 1 #调用 _thread 模块中的start_new_thread()函数来产生新线程
 2 #_thread.start_new_thread ( function, args[, kwargs] )(线程函数,函数的参数tuple,可选参数)
 3 import _thread
 4 import time
 5
 6 # 为线程定义一个函数
 7 def print_time( threadName, delay):
 8    count = 0
 9    while count < 5:
10       time.sleep(delay)
11       count += 1
12       print ("%s: %s" % ( threadName, time.ctime(time.time()) ))
13
14 # 创建两个线程
15 try:
16    _thread.start_new_thread( print_time, ("Thread-1", 2, ) )
17    _thread.start_new_thread( print_time, ("Thread-2", 4, ) )
18 except:
19    print ("Error: 无法启动线程")
20
21 while 1:
22    pass
23 ---------------------------------------------------------
24 Thread-1: Thu May 17 17:13:01 2018
25 Thread-2: Thu May 17 17:13:03 2018
26 Thread-1: Thu May 17 17:13:03 2018
27 Thread-1: Thu May 17 17:13:05 2018
28 Thread-2: Thu May 17 17:13:07 2018
29 。。。
 1 #从 threading.Thread 继承创建一个新的子类,并实例化后调用 start() 方法启动新线程,即它调用了线程的 run() 方法
 2 import threading
 3 import time
 4 exitFlag = 0
 5 class myThread (threading.Thread):
 6     def __init__(self, threadID, name, counter):
 7         threading.Thread.__init__(self)
 8         self.threadID = threadID
 9         self.name = name
10         self.counter = counter
11     def run(self):
12         print ("开始线程:" + self.name)
13         print_time(self.name, self.counter, 5)
14         print ("退出线程:" + self.name)
15
16 def print_time(threadName, delay, counter):
17     while counter:
18         if exitFlag:
19             threadName.exit()
20         time.sleep(delay)
21         print ("%s: %s" % (threadName, time.ctime(time.time())))
22         counter -= 1
23
24 # 创建新线程
25 thread1 = myThread(1, "Thread-1", 1)
26 thread2 = myThread(2, "Thread-2", 2)
27
28 # 开启新线程
29 thread1.start()
30 thread2.start()
31 thread1.join()
32 thread2.join()
33 print ("退出主线程")
34 ------------------------------------------------
35 开始线程:Thread-1
36 开始线程:Thread-2
37 Thread-1: Thu May 17 17:18:32 2018
38 Thread-2: Thu May 17 17:18:33 2018
39 Thread-1: Thu May 17 17:18:33 2018
40 。。。
3.join功能,控制执行顺序
 1 import threading
 2 import time
 3
 4 def thread_job():#定义一个线程
 5     print('T1 start
')#开始t1线程
 6     for i in range(10):#设置10步
 7         time.sleep(0.1)#任务间隔0.1秒,增加时耗
 8     print('T1 finish
')#结束t1线程
 9
10 def T2_job():#又定义一个线程
11     print('T2 start
')#开始
12     print('T2 finish
')#结束
13
14 def main():#定义主程序
15     thread1 = threading.Thread(target=thread_job, name='T1')#添加线程t1
16     thread2 = threading.Thread(target=T2_job, name='T2')#添加线程t2
17     thread1.start()#开始运行t1
18     thread2.start()#开始运行t2
19     #使用join控制多个线程的执行顺序
20     thread2.join()#等到t2运行完再进行下一步
21     thread1.join()#到t1运行完再进行下一步
22     print('all done
')#表明程序执行完
23
24 if __name__ == '__main__':
25     main()
26 --------------------------------------------------------
27 T1 start
28
29 T2 start
30
31 T2 finish
32
33 T1 finish
34
35 all done
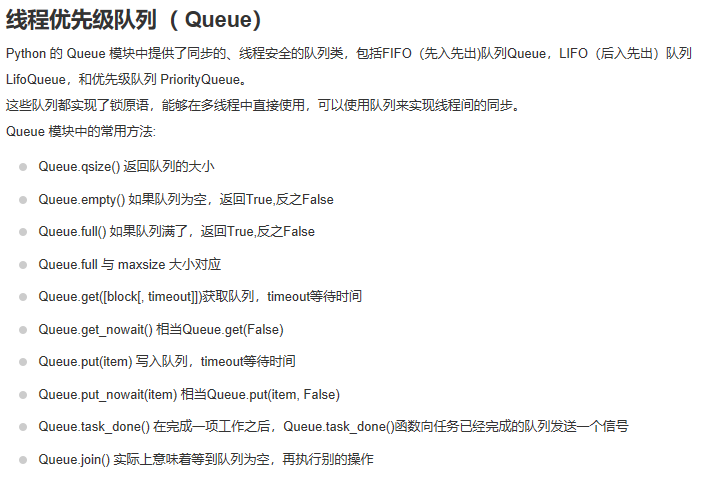
4.存储进程结果Queue,多线程调用的函数不能有返回值, 所以使用Queue存储多个线程运算的结果
 1 #,将数据列表中的数据传入,使用四个线程处理,将结果保存在Queue中,
 2 # 线程执行完后,从Queue中获取存储的结果
 3 import threading
 4 import time
 5 from queue import Queue#导入队列模块
 6
 7 def job(l,q):#函数的参数是一个列表l和一个队列q
 8     #函数的功能是,对列表的每个元素进行平方计算,将结果保存在队列中
 9     for i in range(len(l)):
10         l[i] = l[i]**2
11     q.put(l)#把列表l存放进队列q中
12
13 def multithreading():#定义一个多线程函数
14     q = Queue()#创建一个空队列,用来保存返回值
15     threads = []#定义一个多线程列表
16     data = [[1,2,3],[3,4,5],[4,4,4],[5,5,5]]#初始化一个多维数据列表
17     for i in range(4):#定义四个线程
18         t = threading.Thread(target=job, args=(data[i], q))
19         #创建一个线程,任务是job函数,被调用的job函数没有括号,只是一个索引,参数在后面
20         t.start()#开始t
21         threads.append(t)# #把每个线程append到线程列表中
22     for thread in threads:
23         thread.join()#分别join四个线程到主线程
24     results = []#定义一个空的列表results,将四个线运行后保存在队列中的结果返回给空列表results
25     for _ in range(4):
26           results.append(q.get()) #q.get()按顺序从q中拿出一个值
27     print(results)
28
29 if __name__ == '__main__':
30     multithreading()
31 -------------------------------------------------
32 [[1, 4, 9], [9, 16, 25], [16, 16, 16], [25, 25, 25]]
 1 import queue
 2 import threading
 3 import time
 4
 5 exitFlag = 0
 6
 7 class myThread (threading.Thread):
 8     def __init__(self, threadID, name, q):
 9         threading.Thread.__init__(self)
10         self.threadID = threadID
11         self.name = name
12         self.q = q
13     def run(self):
14         print ("开启线程:" + self.name)
15         process_data(self.name, self.q)
16         print ("退出线程:" + self.name)
17
18 def process_data(threadName, q):
19     while not exitFlag:
20         queueLock.acquire()
21         if not workQueue.empty():
22             data = q.get()
23             queueLock.release()
24             print ("%s processing %s" % (threadName, data))
25         else:
26             queueLock.release()
27         time.sleep(1)
28
29 threadList = ["Thread-1", "Thread-2", "Thread-3"]
30 nameList = ["One", "Two", "Three", "Four", "Five"]
31 queueLock = threading.Lock()
32 workQueue = queue.Queue(10)
33 threads = []
34 threadID = 1
35
36 # 创建新线程
37 for tName in threadList:
38     thread = myThread(threadID, tName, workQueue)
39     thread.start()
40     threads.append(thread)
41     threadID += 1
42
43 # 填充队列
44 queueLock.acquire()
45 for word in nameList:
46     workQueue.put(word)
47 queueLock.release()
48
49 # 等待队列清空
50 while not workQueue.empty():
51     pass
52
53 # 通知线程是时候退出
54 exitFlag = 1
55
56 # 等待所有线程完成
57 for t in threads:
58     t.join()
59 print ("退出主线程")
60 ------------------------------------------------------
61 开启线程:Thread-1
62 开启线程:Thread-2
63 开启线程:Thread-3
64 Thread-3 processing One
65 Thread-2 processing Two
66 Thread-1 processing Three
67 Thread-3 processing Four
68 Thread-2 processing Five
69 退出线程:Thread-3
70 退出线程:Thread-2
71 退出线程:Thread-1
72 退出主线程
5.GIL(Global Interpreter Lock)全局解释锁:它确保任何时候都只有一个Python线程执行,导致了多线程无法利用多核。
实质上python中的多线程就是节省了i/o时间
 1 # 测试 GIL
 2 import threading
 3 from queue import Queue
 4 import copy
 5 import time
 6
 7 def job(l, q):#传入一个列表和一个队列,
 8     #操作:计算列表的总和,并把它传入到队列中
 9     res = sum(l)
10     q.put(res)
11
12 def multithreading(l):#多线程函数
13     q = Queue()
14     threads = []
15     for i in range(4):#同时执行4个线程
16         t = threading.Thread(target=job, args=(copy.copy(l), q), name='T%i' % i)
17         t.start()#t开始执行
18         threads.append(t)#线程列表中添加t
19     [t.join() for t in threads]
20     total = 0
21     for _ in range(4):
22         total += q.get()
23     print(total)
24
25 def normal(l):#计算列表的总值
26     total = sum(l)
27     print(total)
28
29 if __name__ == '__main__':
30     l = list(range(1000000))
31     # 1.正常执行:一个列表扩展4倍,并打印出执行时间
32     s_t = time.time()
33     normal(l*4)
34     print('normal: ',time.time()-s_t)
35
36     #2.线程执行:建立四个线程执行
37     s_t = time.time()
38     multithreading(l)
39     print('multithreading: ', time.time()-s_t)
40 -------------------------------------------------------------
41 1999998000000
42 normal:  0.24673938751220703
43 1999998000000
44 multithreading:  0.244584321975708
6.lock线程锁:lock在不同线程使用同一共享内存时(只允许一个线程修改数据),能够确保线程之间互不影响,但是阻止了多线程并行,也可能导致死锁
如果多个线程共同对某个数据修改,则可能出现不可预料的结果,为了保证数据的正确性,需要对多个线程进行同步
多线程和多进程最大的不同在于:多进程中,同一个变量,各自有一份拷贝存在于每个进程中,互不影响,而多线程中,所有变量都由所有线程共享,所以,任何一个变量都可以被任何一个线
程修改,因此,线程之间共享数据最大的危险在于多个线程同时改一个变量,把内容给改乱了
 1 #使用lock的方法是, 在每个线程执行运算修改共享内存之前,执行lock.acquire()将共享内存上锁,
 2 # 确保当前线程执行时,内存不会被其他线程访问,
 3 # 执行运算完毕后,使用lock.release()将锁打开, 保证其他的线程可以使用该共享内存。
 4
 5 import threading
 6
 7 def job1():
 8     global A, lock#使用线程锁
 9     lock.acquire()#lock.acquire()将共享内存上锁
10     for i in range(10):
11         A += 1
12         print('job1', A)
13     lock.release()#lock.release()将锁打开, 保证其他的线程可以使用该共享内存
14
15 def job2():
16     global A, lock
17     lock.acquire()#确保当前线程执行时,内存不会被其他线程访问
18     for i in range(10):
19         A += 10
20         print('job2', A)
21     lock.release()#保证其他的线程可以使用该共享内存
22
23 if __name__ == '__main__':
24     lock = threading.Lock()#创建一个线程锁
25     A = 0
26     t1 = threading.Thread(target=job1)
27     t2 = threading.Thread(target=job2)
28     t1.start()
29     t2.start()
30     t1.join()
31     t2.join()
32 ------------------------------------------------------------
33 job1 1
34 job1 2
35 job1 3
36 job1 4
37 job1 5
38 job1 6
39 job1 7
40 job1 8
41 job1 9
42 job1 10
43 job2 20
44 job2 30
45 job2 40
46 job2 50
47 job2 60
48 job2 70
49 job2 80
50 job2 90
51 job2 100
 1 #使用 Thread 对象的 Lock 和 Rlock 可以实现简单的线程同步
 2 import threading
 3 import time
 4 class myThread (threading.Thread):
 5     def __init__(self, threadID, name, counter):
 6         threading.Thread.__init__(self)
 7         self.threadID = threadID
 8         self.name = name
 9         self.counter = counter
10     def run(self):
11         print ("开启线程: " + self.name)
12         # 获取锁,用于线程同步
13         threadLock.acquire()
14         print_time(self.name, self.counter, 3)
15         # 释放锁,开启下一个线程
16         threadLock.release()
17
18 def print_time(threadName, delay, counter):
19     while counter:
20         time.sleep(delay)
21         print ("%s: %s" % (threadName, time.ctime(time.time())))
22         counter -= 1
23
24 threadLock = threading.Lock()
25 threads = []
26
27 # 创建新线程
28 thread1 = myThread(1, "Thread-1", 1)
29 thread2 = myThread(2, "Thread-2", 2)
30
31 # 开启新线程
32 thread1.start()
33 thread2.start()
34
35 # 添加线程到线程列表
36 threads.append(thread1)
37 threads.append(thread2)
38
39 # 等待所有线程完成
40 for t in threads:
41     t.join()
42 print ("退出主线程")
43 ------------------------------------------------------
44 开启线程: Thread-1
45 开启线程: Thread-2
46 Thread-1: Thu May 17 17:25:58 2018
47 Thread-1: Thu May 17 17:25:59 2018
48 Thread-1: Thu May 17 17:26:00 2018
49 Thread-2: Thu May 17 17:26:02 2018
50 Thread-2: Thu May 17 17:26:04 2018
51 Thread-2: Thu May 17 17:26:06 2018
52 退出主线程
递归锁RLcok类的用法和Lock类一模一样,但它支持嵌套,在多个锁没有释放的时候一般会使用使用RLcok类
信号量(BoundedSemaphore类)用法和Lock类一模一样,但同时允许一定数量的线程更改数据
7.补充
三.多进程multiprocessing(或者说是多核)
1.多进程 Multiprocessing 和多线程 threading 类似,但是多核使用,用来弥补 threading 的一些劣势, 比如GIL
2.创建进程
 1 import multiprocessing as mp
 2 import threading as td
 3
 4 def job(a,d):#定义一个被线程和进程调用的函数
 5     print('aaaaa')
 6
 7 if __name__=='__main__':
 8 # 创建线程和进程
 9     t1 = td.Thread(target=job,args=(1,2))
10     p1 = mp.Process(target=job,args=(1,2))
11
12     t1.start()
13     p1.start()
14
15     t1.join()
16     p1.join()
17 -------------------------------------------------------
18 aaaaa
19 aaaaa
3.Queue:将每个核或线程的运算结果放在队里中, 等到每个线程或核运行完毕后再从队列中取出结果, 继续加载运算。
 1 import multiprocessing as mp
 2
 3 #调用的函数不能有返回值
 4 def job(q):
 5     res = 0
 6     for i in range(1000):
 7         res += i+i**2+i**3
 8     q.put(res) # queue把结果放到q中
 9
10 if __name__ == '__main__':
11     q = mp.Queue()
12     p1 = mp.Process(target=job, args=(q,))
13     #要加逗号,否则TypeError: 'Queue' object is not iterable
14     p2 = mp.Process(target=job, args=(q,))
15     p1.start()
16     p2.start()
17     p1.join()
18     p2.join()
19     res1 = q.get()#获取q中的结果
20     res2 = q.get()
21     print(res1+res2)
22 --------------------------------------------------------------
23 499667166000
4.效率对比
 1 #多线程与多进程的效率对比
 2 import multiprocessing as mp
 3 import threading as td
 4 import time
 5
 6 def job(q):
 7     res = 0
 8     for i in range(1000000):
 9         res += i+i**2+i**3
10     q.put(res) # queue
11
12 def multicore():
13     q = mp.Queue()
14     p1 = mp.Process(target=job, args=(q,))
15     p2 = mp.Process(target=job, args=(q,))
16     p1.start()
17     p2.start()
18     p1.join()
19     p2.join()
20     res1 = q.get()
21     res2 = q.get()
22     print('multicore:' , res1+res2)
23
24 def normal():#普通运算
25     res = 0
26     for _ in range(2):
27         for i in range(1000000):
28             res += i+i**2+i**3
29     print('normal:', res)
30
31 def multithread():
32     q = mp.Queue()
33     t1 = td.Thread(target=job, args=(q,))
34     t2 = td.Thread(target=job, args=(q,))
35     t1.start()
36     t2.start()
37     t1.join()
38     t2.join()
39     res1 = q.get()
40     res2 = q.get()
41     print('multithread:', res1+res2)
42
43 if __name__ == '__main__':
44     st = time.time()
45     normal()
46     st1= time.time()
47     print('normal time:', st1 - st)
48
49     st2 = time.time()
50     multithread()
51     st3 = time.time()
52     print('multithread time:', st3 - st2)
53
54     st4 = time.time()
55     multicore()
56     st5 = time.time()
57     print('multicore time:', st5-st4)
58 -----------------------------------------------------------------
59 normal: 499999666667166666000000
60 normal time: 1.8749690055847168
61 multithread: 499999666667166666000000
62 multithread time: 1.583195686340332
63 multicore: 499999666667166666000000
64 multicore time: 1.2573533058166504
5.进程池pool
 1 #进程池就是我们将所要运行的东西,放到池子里,Python会自行解决多进程的问题
 2 import multiprocessing as mp
 3
 4 def job(x):
 5     return x*x
 6
 7 def multicore():
 8     pool = mp.Pool(processes=2)#创建进程池,定义调用2个cpu核
 9     # 让池子对应某一个函数,我们向池子里丢数据,池子就会返回函数返回的值
10     # Pool和之前的Process的不同点是丢向Pool的函数有返回值,而Process的没有返回值
11
12     res = pool.map(job, range(10))
13     #用map()获取结果,在map()中需要放入函数和需要迭代运算的值,然后它会自动分配给CPU核,返回结果
14     print(res)
15
16     res = pool.apply_async(job, (2,))
17     # apply_async()返回结果,只能传递一个值,它只会放入一个核进行运算,但是传入值时要注意是可迭代的,
18     # 所以在传入值后需要加逗号, 同时需要用get()方法获取返回值
19     print(res.get())
20
21     # 将apply_async()放入迭代器中,来输出多个结果
22     multi_res =[pool.apply_async(job, (i,)) for i in range(10)]
23     print([res.get() for res in multi_res])
24
25 if __name__ == '__main__':
26     multicore()
27 --------------------------------------------------
28 [0, 1, 4, 9, 16, 25, 36, 49, 64, 81]
29 4
30 [0, 1, 4, 9, 16, 25, 36, 49, 64, 81]
6.进程锁lock
 1 # 共享内存
 2 # import multiprocessing as mp
 3 #
 4 # # Value数据存储在一个共享的内存表中
 5 # value1 = mp.Value('i', 0)
 6 # value2 = mp.Value('d', 3.14)
 7 # #d和i参数用来设置数据类型的
 8 #
 9 # #Array类,可以和共享内存交互,来实现在进程之间共享数据。
10 # array = mp.Array('i', [1, 2, 3, 4])
11 # # 它只能是一维的,不能是多维的
12
13 #进程锁lock
14 import multiprocessing as mp
15 import time
16
17 def job(v, num, l):
18     l.acquire()#设置进程锁的使用,保证运行时一个进程的对锁内内容的独占
19     for _ in range(10):
20         time.sleep(0.1)
21         v.value += num# v.value获取共享变量值
22         print(v.value)
23     l.release()#进程锁保证了进程p1的完整运行,然后才进行了进程p2的运行
24
25 def multicore():
26     l = mp.Lock()# 定义一个进程锁
27     v = mp.Value('i', 0) # 定义共享变量
28     # 设定不同的number看如何抢夺内存
29     p1 = mp.Process(target=job, args=(v, 1, l))
30     p2 = mp.Process(target=job, args=(v, 3, l))
31     p1.start()
32     p2.start()
33     p1.join()
34     p2.join()
35
36 if __name__ == '__main__':
37     multicore()
38 -------------------------------------------------
39 1
40 2
41 3
42 4
43 5
44 6
45 7
46 8
47 9
48 10
49 13
50 16
51 19
52 22
53 25
54 28
55 31
56 34
57 37
58 40