声明:本证项目基于《Java-Shiro(六):Shiro Realm讲解(三)Realm的自定义及应用》构建项目为基础。
本文代码:《https://github.com/478632418/springmv_without_web_xml/tree/master/mybaits-test-dynamic-sql-02》
Shiro内部提供了对认证信息和授权信息的缓存,但是shiro默认是关闭认证信息缓存,对于授权信息的缓存shiro默认开启的。一般情况下,使用shiro缓存时,只需要关注授权信息缓存,因为认证信息只是一次验证查询,而授权信息需要在每次认证都会执行(访问量大),且一般情况下授权的数据量大。
但是,当用户信息被修改时,我们希望理解看到认证信息也被同步时,需要关注认证信息清空同步问题。
Shiro授权缓存的使用
配置
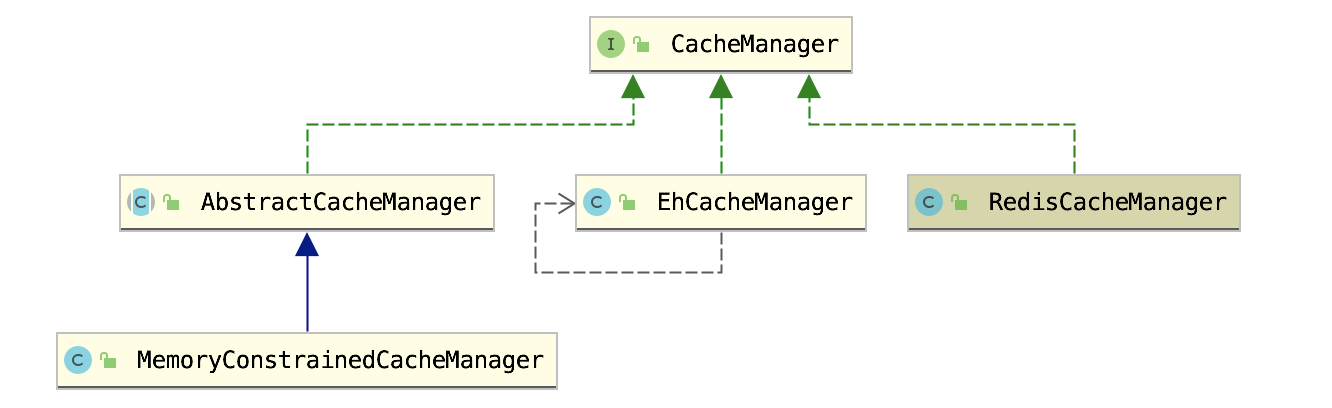
在授权信息缓存的方案包含以下三种:
1)使用Ehcache(系统混合缓存方案);
2)使用本地内存缓存方案;
3)自定义CacheManager(比如Redis用来作为缓存)。
1)使用Ehcache(系统混合缓存方案)
1)在pom.xml中引入shiro-ehcache依赖;
        <dependency>
            <groupId>org.apache.shiro</groupId>
            <artifactId>shiro-ehcache</artifactId>
            <version>${shiro.version}</version>
        </dependency>
2)在applicationContext-shiro.xml中添加ehcache配置并被securityManager的cacheManage引用:
    <!--cacheManager-->
    <bean id="cacheManager" class="org.apache.shiro.cache.ehcache.EhCacheManager">
        <property name="cacheManagerConfigFile" value="classpath:shiro-ehcache.xml"/>
    </bean>

    <!-- securityManager安全管理器 -->
    <bean id="securityManager" class="org.apache.shiro.web.mgt.DefaultWebSecurityManager">
        <property name="realm" ref="myRealm"></property>
        <property name="cacheManager" ref="cacheManager"></property>
    </bean>
3)在src/main/resources下添加shiro-ehcache.xml ehcache配置文件。
<?xml version="1.0" encoding="UTF-8"?>
<ehcache>
    <!-- 数据缓存地址,如,F:/develop/ehcache -->
    <diskStore path="java.io.tmpdir/shiro-spring-sample"/>
    <!--
    name="authorizationCache" //缓存名称
    maxEntriesLocalHeap="2000" //缓存最大条目数
    eternal="false" //对象是否永久有效,true则timeout失效
    timeToIdleSeconds="3600" //对象在失效前的闲置时间(单位:s),仅eternal=false时有效;默认为0,即可闲置时间无穷大。
    timeToLiveSeconds="0" //缓存数据的生成时间(单位:s),介于创建时间和失效时间之间;仅eternal=false有效;默认为0,即对象存活时间无穷大。
    overflowToDisk="false" //内存中对象数量达到maxElementInMemory时,是否将对象写到磁盘
    diskSpoolBufferSizeMB:设置diskStore磁盘缓存的缓存区大小,默认30MB。每个Cache都应该有自己的一个缓存区。
    maxElementOnDisk:磁盘最大缓存个数。
    diskPersistent:是否缓存虚拟机重启期数据,默认false。
    diskExpiryThreadIntervalSeconds: 磁盘失效线程运行时间间隔,默认120s。
    memoryStoreEvictionPolicy:达到maxElementInMemory时,Ehcache将会根据此策略去清理内存,默认策略是LRU(最近最少使用),可设为FIFO(先进先出)或LFU(较少使用)。
    clearOnFlush: 内存数量最大时是否清除。
     -->
    <defaultCache
            maxElementsInMemory="10000"
            eternal="false"
            timeToIdleSeconds="120"
            timeToLiveSeconds="120"
            overflowToDisk="false"
            diskPersistent="false"
            diskExpiryThreadIntervalSeconds="120"
            />

    <cache name="shiro-activeSessionCache"
           maxElementsInMemory="10000"
           eternal="true"
           overflowToDisk="true"
           diskPersistent="true"
           diskExpiryThreadIntervalSeconds="600"/>

    <cache name="org.apache.shiro.realm.SimpleAccountRealm.authorization"
           maxElementsInMemory="100"
           eternal="false"
           timeToLiveSeconds="600"
           overflowToDisk="false"/>

</ehcache>
备注:ehcache中cache标签属性意义:
name="authorizationCache" //缓存名称
maxEntriesLocalHeap="2000" //缓存最大条目数
eternal="false" //对象是否永久有效,true则timeout失效
timeToIdleSeconds="3600" //对象在失效前的闲置时间(单位:s),仅eternal=false时有效;默认为0,即可闲置时间无穷大。
timeToLiveSeconds="0" //缓存数据的生成时间(单位:s),介于创建时间和失效时间之间;仅eternal=false有效;默认为0,即对象存活时间无穷大。
overflowToDisk="false" //内存中对象数量达到maxElementInMemory时,是否将对象写到磁盘
diskSpoolBufferSizeMB:设置diskStore磁盘缓存的缓存区大小,默认30MB。每个Cache都应该有自己的一个缓存区。
maxElementOnDisk:磁盘最大缓存个数。
diskPersistent:是否缓存虚拟机重启期数据,默认false。
diskExpiryThreadIntervalSeconds: 磁盘失效线程运行时间间隔,默认120s。
memoryStoreEvictionPolicy:达到maxElementInMemory时,Ehcache将会根据此策略去清理内存,默认策略是LRU(最近最少使用),可设为FIFO(先进先出)或LFU(较少使用)。
clearOnFlush: 内存数量最大时是否清除。
2)使用本地内存缓存方案
applicationContext-shiro.xml中配置cacheManager,该cacheManager并被securityManager引用。
    <!-- // 采用本地内存方式缓存 -->
    <bean id="cacheManager" class="org.apache.shiro.cache.MemoryConstrainedCacheManager"/>

    <!-- securityManager安全管理器 -->
    <bean id="securityManager" class="org.apache.shiro.web.mgt.DefaultWebSecurityManager">
        <property name="realm" ref="myRealm"></property>
        <property name="cacheManager" ref="cacheManager"></property>
     </bean>
其他不需要配置即可。
3)自定义CacheManager
比如Redis用来作为缓存。
1)需要添加redis依赖到pom.xml
        <!-- redis依赖包 -->
        <dependency>
            <groupId>redis.clients</groupId>
            <artifactId>jedis</artifactId>
            <version>3.1.0</version>
        </dependency>
        <!-- https://mvnrepository.com/artifact/org.springframework.data/spring-data-redis -->
        <dependency>
            <groupId>org.springframework.data</groupId>
            <artifactId>spring-data-redis</artifactId>
            <version>2.2.3.RELEASE</version>
        </dependency>
2)在src/main/resources下新建applicaitonContext-redis.xml
<beans xmlns="http://www.springframework.org/schema/beans"
    xmlns:context="http://www.springframework.org/schema/context"
    xmlns:p="http://www.springframework.org/schema/p"
    xmlns:aop="http://www.springframework.org/schema/aop"
    xmlns:tx="http://www.springframework.org/schema/tx"
    xmlns:xsi="http://www.w3.org/2001/XMLSchema-instance"
    xsi:schemaLocation="http://www.springframework.org/schema/beans http://www.springframework.org/schema/beans/spring-beans-4.0.xsd
    http://www.springframework.org/schema/context http://www.springframework.org/schema/context/spring-context-4.0.xsd
    http://www.springframework.org/schema/aop http://www.springframework.org/schema/aop/spring-aop-4.0.xsd http://www.springframework.org/schema/tx http://www.springframework.org/schema/tx/spring-tx-4.0.xsd
    http://www.springframework.org/schema/util http://www.springframework.org/schema/util/spring-util-4.0.xsd">
      <!-- 加载配置文件 -->
    <context:property-placeholder location="classpath:jedis.properties" ignore-unresolvable="true" />

    <!-- 连接池配置 -->
    <bean id="jedisPoolConfig" class="redis.clients.jedis.JedisPoolConfig">
        <!-- 最大连接数 -->
        <property name="maxTotal" value="${redis.maxTotal}" />
        <!-- 最大空闲连接数 -->
        <property name="maxIdle" value="${redis.maxIdle}" />
        <!-- 每次释放连接的最大数目 -->
        <property name="numTestsPerEvictionRun" value="${redis.numTestsPerEvictionRun}" />
        <!-- 释放连接的扫描间隔(毫秒) -->
        <property name="timeBetweenEvictionRunsMillis" value="${redis.timeBetweenEvictionRunsMillis}" />
        <!-- 连接最小空闲时间 -->
        <property name="minEvictableIdleTimeMillis" value="${redis.minEvictableIdleTimeMillis}" />
        <!-- 连接空闲多久后释放, 当空闲时间>该值 且 空闲连接>最大空闲连接数 时直接释放 -->
        <property name="softMinEvictableIdleTimeMillis" value="${redis.softMinEvictableIdleTimeMillis}" />
        <!-- 获取连接时的最大等待毫秒数,小于零:阻塞不确定的时间,默认-1 -->
        <property name="maxWaitMillis" value="${redis.maxWaitMillis}" />
        <!-- 在获取连接的时候检查有效性, 默认false -->
        <property name="testOnBorrow" value="${redis.testOnBorrow}" />
        <!-- 在空闲时检查有效性, 默认false -->
        <property name="testWhileIdle" value="${redis.testWhileIdle}" />
        <!-- 连接耗尽时是否阻塞, false报异常,ture阻塞直到超时, 默认true -->
        <property name="blockWhenExhausted" value="${redis.blockWhenExhausted}" />
    </bean>

    <bean id="jedisPool" class="redis.clients.jedis.JedisPool">
        <constructor-arg name="host" value="${redis.host}"></constructor-arg>
        <constructor-arg name="port" value="${redis.port}"></constructor-arg>
        <constructor-arg name="poolConfig" ref="jedisPoolConfig"></constructor-arg>
    </bean>

    <!-- 需要密码 -->
    <bean id="connectionFactory" class="org.springframework.data.redis.connection.jedis.JedisConnectionFactory"
          p:host-name="${redis.host}"
          p:port="${redis.port}"
          p:password="${redis.pass}"
          p:pool-config-ref="jedisPoolConfig"/>

    <bean id="redisTemplate" class="org.springframework.data.redis.core.StringRedisTemplate">
        <property name="connectionFactory"     ref="connectionFactory" />
        <property name="keySerializer">
            <bean class="org.springframework.data.redis.serializer.StringRedisSerializer" />
        </property>
        <property name="valueSerializer">
            <bean class="org.springframework.data.redis.serializer.JdkSerializationRedisSerializer" />
        </property>
    </bean>
</beans>
配置中需要依赖资源文件jedis.properties
redis.maxTotal=2000
redis.maxIdle=50
redis.numTestsPerEvictionRun=1024
redis.timeBetweenEvictionRunsMillis=30000
redis.minEvictableIdleTimeMillis=1800000
redis.softMinEvictableIdleTimeMillis=10000
redis.maxWaitMillis=15000
redis.testOnBorrow=false
redis.testWhileIdle=false
redis.testOnReturn=false
redis.blockWhenExhausted=true
redis.host=127.0.0.1
redis.port=6379
redis.pass=
3)修改web.xml,ContextLoaderListener加载文件添加applicationContext-redis.xml,修改后为:
    <!-- 加载spring容器 -->
    <context-param>
        <param-name>contextConfigLocation</param-name>
        <param-value>
            classpath:applicationContext-redis.xml,
            classpath:applicationContext-shiro.xml,
            classpath:applicationContext-mybatis.xml
        </param-value>
    </context-param>
    <listener>
        <listener-class>org.springframework.web.context.ContextLoaderListener</listener-class>
    </listener>
4)新建redis缓存管理类RedisCache.java和RedisCacheManager.java
RedisCache.java


public class RedisCache<K, V> implements Cache<K, V> {
    @Autowired
    private RedisTemplate redisTemplate;
    private Logger logger;
    private String keyPrefix;

    public String getKeyPrefix() {
        return this.keyPrefix;
    }

    public void setKeyPrefix(String keyPrefix) {
        this.keyPrefix = keyPrefix;
    }

    public RedisCache(RedisTemplate redisTemplate) {
        this.logger = LoggerFactory.getLogger(this.getClass());
        this.keyPrefix = "shiro_redis_cache:";
        this.redisTemplate = redisTemplate;
    }

    public RedisCache(RedisTemplate redisTemplate, String prefix) {
        this(redisTemplate);
        this.keyPrefix = prefix;
    }

    /**
     * 获得byte[]型的key
     *
     * @param key
     * @return
     */
    private byte[] getByteKey(Object key) {
        if (key instanceof String) {
            String preKey = this.keyPrefix + key;
            return preKey.getBytes();
        } else {
            return SerializeUtils.serialize((Serializable) key);
        }
    }

    private RedisConnection getRedisConnect() {
        return redisTemplate.getConnectionFactory().getConnection();
    }

    @Override
    public Object get(Object key) throws CacheException {
        byte[] bytes = getByteKey(key);
        byte[] value = getRedisConnect().get(bytes);
        if (value == null) {
            return null;
        }
        return SerializeUtils.deserialize(value);
    }

    /**
     * 将shiro的缓存保存到redis中
     */
    @Override
    public Object put(Object key, Object value) throws CacheException {
        RedisConnection redisConnection = getRedisConnect();
        byte[] bytesKey = getByteKey(key);
        byte[] bytesValue = SerializeUtils.serialize((Serializable) value);

        redisConnection.set(bytesKey, bytesValue);

        byte[] bytes = redisConnection.get(getByteKey(key));
        Object object = SerializeUtils.deserialize(bytes);

        return object;

    }

    @Override
    public Object remove(Object key) throws CacheException {
        RedisConnection redisConnection = getRedisConnect();

        byte[] bytes = redisConnection.get(getByteKey(key));

        redisConnection.del(getByteKey(key));

        return SerializeUtils.deserialize(bytes);
    }

    /**
     * 清空所有缓存
     */
    @Override
    public void clear() throws CacheException {
        RedisConnection redisConnection = getRedisConnect();
        redisConnection.flushDb();
    }

    /**
     * 缓存的个数
     */
    @Override
    public int size() {
        RedisConnection redisConnection = getRedisConnect();
        Long size = redisConnection.dbSize();
        return size.intValue();
    }

    /**
     * 获取所有的key
     */
    @Override
    public Set keys() {
        RedisConnection redisConnection = getRedisConnect();
        Set<byte[]> keys = redisConnection.keys(new String("*").getBytes());
        Set<Object> set = new HashSet<Object>();
        for (byte[] bs : keys) {
            set.add(SerializeUtils.deserialize(bs));
        }
        return set;
    }


    /**
     * 获取所有的value
     */
    @Override
    public Collection values() {
        RedisConnection redisConnection = getRedisConnect();
        Set keys = this.keys();

        List<Object> values = new ArrayList<Object>();
        for (Object key : keys) {
            byte[] bytes = redisConnection.get(getByteKey(key));
            values.add(SerializeUtils.deserialize(bytes));
        }
        return values;
    }

}
RedisCacheManager.java
public class RedisCacheManager implements CacheManager {
    @Resource
    private RedisTemplate<Serializable, Object> redisTemplate;

    @Override
    public <K, V> Cache<K, V> getCache(String name) throws CacheException {
        return new RedisCache<K, V>(redisTemplate);
    }
}
5)修改applicationContext-shiro.xml配置文件,配置securityManager的cacheManager对象。
    <!-- 自定义cacheManager -->
    <bean id="cacheManager" class="com.dx.test.shiro.RedisCacheManager"/>

    <!-- securityManager安全管理器 -->
    <bean id="securityManager" class="org.apache.shiro.web.mgt.DefaultWebSecurityManager">
        <property name="realm" ref="myRealm"></property>
        <property name="cacheManager" ref="cacheManager"></property>
        <property name="sessionManager" ref="sessionManager"></property>
     </bean>
执行效果
执行效果:
1)进入登录页面http://localhost:8080/mybaits-test-dynamic-sql/login/,填写用户&密码点击登录按钮,用户认证通过;
2)该用户第一次授权,调用realm#doGetAuthorizationInfo(...)方法查询数据库。
3)该用户第二次授权,不调用realm#doGetAuthorizationInfo(...)方法查询数据库,直接从缓存中取出授权信息(授权标识符)。
清除缓存
如果用户正常退出,缓存自动清空;
如果用户非正常退出,缓存也自动清空;
如果修改了用户权限,而用户不退出系统,修改的权限无法立即生效。需要开发者变成实现:
1)在权限修改后,调用MyRealm的clearCache方法清除缓存。
在MyRealm类方法最下边添加方法clearCache方法:
    /**
     * 清空已经放入缓存的授权信息。
     * */
    public void clearCache() {
        PrincipalCollection principals=SecurityUtils.getSubject().getPrincipals();
        super.clearCache(principals);
    }
2)添加模拟编辑角色SysRoleController.java类:
@Controller
@RequestMapping(value = "/role")
public class SysRoleController {
    @Autowired
    private MyRealm myRealm;

    @RequestMapping(value = "/update", method = RequestMethod.GET)
    public String updateRole(SysRole sysRole, Map<String, Object> map) {
        BaseResult baseResult = null;
        ResultEnum enu = null;

        // 模拟:在这里做了以下业务:
        // 1)修改了角色下的资源信息;
        // 2)删除了角色;
        // 3)修改了用户的角色信息。

        myRealm.clearCache();

        enu = ResultEnum.Success;
        baseResult = new BaseResult(enu.getCode(), enu.getMessage(), enu.getDesc());
        map.put("result", baseResult);

        return "role/list.jsp";
    }
}
备注:
1)上边代码只是模拟测试代码,模拟修改了授权信息,实际上做了以下操作都会修改授权信息:
1.1)修改了角色下的资源信息;
1.2)删除了角色;
1.3)修改了用户的角色信息。
2)思考:如果修改了授权信息,实际系统已经修改了,但是认证的用户授权已经被缓存到了缓存中,假设不再修改授权信息的地方清理授权缓存,什么时候用户会获取修改后的授权信?
2.1)用户退出系统时会清理缓存,重新后在第一次授权时,会调用realm#doGetAuthorizationInfo(...)方法查询数据库,将最新的授权信息缓存;
2.2)缓存过期,在shiro-ehcache.xml配置的cache标签项中有配置自动过期时间,当然如果配置为0,永不过期。
3)测试
认证后,访问授权,然后修改授权信息,重新授权是否调用realm#doGetAuthorizationInfo(...)方法查询数据库。
备注:
1)认证:访问登录页面,输入账户密码点击‘登录’按钮,登录后台;
2)授权(url拦截、访问<shiro:标签>、@RequiresPermission、@RequiresRole等):访问后台页面,第一次会调用realm#doGetAuthorizationInfo(...)方法查询数据库,然后ehcache会缓存该授权吸信息到缓存中。第二次以后都不会再调用realm#doGetAuthorizationInfo(...)方法查询数据库;
3)修改授权信息,访问修改授权页面(http://localhost:8080/mybaits-test-dynamic-sql/role/update)
执行了以下三种操作都可能修改授权信息:
- 1)修改了角色下的资源信息;
- 2)删除了角色;
- 3)修改了用户的角色信息。
4)重新访问授权(url拦截、访问<shiro:标签>、@RequiresPermission、@RequiresRole等)信息:访问后台页面,如果缓存被情况的情况下会再次调用realm#doGetAuthorizationInfo(...)方法查询数据库,然后ehcache会缓存该授权信息到缓存中。
遇到问题:java.io.NotSerializableException: org.apache.shiro.util.SimpleByteSource
在使用Redis作为Shiro的缓存管理器的时候,在将SimpleAuthenticationInfo信息进行序列化的时候报异常:java.io.NotSerializableException: org.apache.shiro.util.SimpleByteSource
原因是:SimpleByteSource没有实现Serializable接口
解决办法:
1)重新定义SimpleByteSource(MySimpleByteSource.java)
/**
 * 解决:shiro 使用缓存时出现:java.io.NotSerializableException: org.apache.shiro.util.SimpleByteSource
 * 序列化后,无法反序列化的问题
 */
public class MySimpleByteSource implements ByteSource, Serializable {
    private byte[] bytes;
    private String cachedHex;
    private String cachedBase64;

    public MySimpleByteSource() {
    }

    public MySimpleByteSource(byte[] bytes) {
        this.bytes = bytes;
    }

    public MySimpleByteSource(char[] chars) {
        this.bytes = CodecSupport.toBytes(chars);
    }

    public MySimpleByteSource(String string) {
        this.bytes = CodecSupport.toBytes(string);
    }

    public MySimpleByteSource(ByteSource source) {
        this.bytes = source.getBytes();
    }

    public MySimpleByteSource(File file) {
        this.bytes = (new MySimpleByteSource.BytesHelper()).getBytes(file);
    }

    public MySimpleByteSource(InputStream stream) {
        this.bytes = (new MySimpleByteSource.BytesHelper()).getBytes(stream);
    }

    public static boolean isCompatible(Object o) {
        return o instanceof byte[] || o instanceof char[] || o instanceof String || o instanceof ByteSource || o instanceof File || o instanceof InputStream;
    }

    public void setBytes(byte[] bytes) {
        this.bytes = bytes;
    }

    @Override
    public byte[] getBytes() {
        return this.bytes;
    }

    @Override
    public String toHex() {
        if (this.cachedHex == null) {
            this.cachedHex = Hex.encodeToString(this.getBytes());
        }
        return this.cachedHex;
    }

    @Override
    public String toBase64() {
        if (this.cachedBase64 == null) {
            this.cachedBase64 = Base64.encodeToString(this.getBytes());
        }

        return this.cachedBase64;
    }

    @Override
    public boolean isEmpty() {
        return this.bytes == null || this.bytes.length == 0;
    }

    @Override
    public String toString() {
        return this.toBase64();
    }

    @Override
    public int hashCode() {
        return this.bytes != null && this.bytes.length != 0 ? Arrays.hashCode(this.bytes) : 0;
    }

    @Override
    public boolean equals(Object o) {
        if (o == this) {
            return true;
        } else if (o instanceof ByteSource) {
            ByteSource bs = (ByteSource) o;
            return Arrays.equals(this.getBytes(), bs.getBytes());
        } else {
            return false;
        }
    }

    private static final class BytesHelper extends CodecSupport {
        private BytesHelper() {
        }

        public byte[] getBytes(File file) {
            return this.toBytes(file);
        }

        public byte[] getBytes(InputStream stream) {
            return this.toBytes(stream);
        }
    }

}
2)修改MyRealm#doGetAuthenticationInfo()中使用salt代码:
    @Override
    protected AuthenticationInfo doGetAuthenticationInfo(AuthenticationToken token) throws AuthenticationException {
        System.out.println("‘MyRealm’执行认证操作:");
        if (token == null) {
            throw new UnsupportedTokenException();
        }

        UsernamePasswordToken userToken = (UsernamePasswordToken) token;
        if (userToken == null) {
            throw new UnsupportedTokenException();
        }

        // 获取当前需要登录的用户
        String username = userToken.getUsername();
        String userPwd = String.valueOf(userToken.getPassword());
        if (StringUtils.isBlank(username) || userPwd == null) {
            throw new IncorrectCredentialsException("用户名或密码不正确");
        }

        SysUser sysUser = this.sysUserMapper.getByUsername(username);
        if (sysUser == null) {
            throw new UnknownAccountException("用户名不存在");
        }

        Byte locked = Byte.valueOf("1");
        if (sysUser.getStatus().equals(locked)) {
            throw new LockedAccountException("用户已锁定");
        }
        Date now = new Date();
        if (sysUser.getExpireTime().before(now)) {
            throw new ExpiredCredentialsException("用户过期");
        }

        // 从数据库中取出密码,密码是加过盐的
        String password = sysUser.getPassword();
        // 从数据库中取出盐
        String salt=sysUser.getSalt();

        SysUser simpleSysUser=new SysUser();
        simpleSysUser.setUserName(sysUser.getUsername());
        simpleSysUser.setEmail(sysUser.getEmail());
        simpleSysUser.setPhone(sysUser.getPhone());
        simpleSysUser.setNickName(sysUser.getNickName());
        simpleSysUser.setSignature(sysUser.getSignature());

        // 该信息会提交给SecurityManager,在SecurityManager内部会进行验证:
        // 用户输入的password+salt+md5+hashIterations 是否等于 db password? 等于则通过认证,否则不通过认证。
        SimpleAuthenticationInfo authenticationInfo = new SimpleAuthenticationInfo(
                simpleSysUser,
                password.toCharArray(),
                new MySimpleByteSource(salt),
                this.getName());
        return authenticationInfo;
    }
配置认证缓存
指定缓存认证的缓存对象,以及是否开启缓存,这些配置都需要在realm属性上配置。
1)自定义缓存对象:
1)首先,开启realm的缓存控制开关属性;
2)其次,需要指定 realm.authenticationCache 属性(也即是指定缓存类对象)。
配置
主要两种实现方式:
1)采用自定义authenticationCache的cache对象;
2)集成ehcache,在ehcache中配置authenticationCache对象。
1)自定义缓存类对象
    <!-- 配置自定义Realm -->
    <bean id="myRealm" class="com.dx.test.shiro.MyRealm">
        <!-- 将凭证匹配器设置到realm中,realm按照凭证匹配器的要求进行散列 -->
        <property name="credentialsMatcher" ref="credentialsMatcher"></property>
        <!--启用缓存,默认SimpleAccountRealm关闭,默认AuthenticatingRealm、AuthorizingRealm、CachingRealm开启-->
        <property name="cachingEnabled" value="true"/>
        <!--启用身份验证缓存,即缓存AuthenticationInfo,默认false-->
        <property name="authenticationCachingEnabled" value="true"/>
        <!--启用授权缓存,即缓存AuthorizationInfo的信息,默认为true-->
        <property name="authorizationCachingEnabled" value="true"/>
        <property name="authenticationCache" ref="redisCache"></property>
    </bean>
    <bean id="redisCache" class="com.dx.test.shiro.RedisCache">
        <constructor-arg ref="redisTemplate"></constructor-arg>
    </bean>
备注:
1)其中RedisCache需要依赖redisTemplate bean,因此需要在ContextLoaderListener中添加applicationContext-redis.xml(上边有提过)。
2)cachingEnabled:启用缓存,默认SimpleAccountRealm关闭,默认AuthenticatingRealm、AuthorizingRealm、CachingRealm开启;
3)authenticationCachingEnabled:启用身份验证(认证)缓存,即缓存AuthenticationInfo,默认false;
4)authorizationCachingEnabled:启用授权缓存,即缓存AuthorizationInfo的信息,默认为true;
5)authenticationCache:进行认证信息缓存使用的缓存类对象。
根据上边配置中注释,我们可以得知:
当我们的自定义 MyRealm 继承自 AuthorizingRealm 时,cachingEnabled 属性值一定为 true。那么,主要控制是否开启认证的开关是 authenticationCachingEnabled。
2)集成ehcache实现认证缓存
除了上边自定义方式,实际上还可以集成Ehcache实现认证、授权缓存。这种方式,不仅仅可以配置认证缓存,对授权缓存也可以采用该方案。
<bean id="securityManager" class="org.apache.shiro.web.mgt.DefaultWebSecurityManager">
    <property name="realm" ref="myRealm"/>
    <property name="cacheManager" ref="ehCacheManager"/>
</bean>
<bean id="ehCacheManager" class="org.apache.shiro.cache.ehcache.EhCacheManager">
    <property name="cacheManagerConfigFile" value="classpath:ehcache.xml"/>
<bean/>
<bean id="myRealm" class="com.dx.test.shiro.MyRealm">
    <property name="credentialsMatcher" ref="credentialsMatcher"/>
    <property name="cachingEnabled" value="true"/>
    <property name="authenticationCachingEnabled" value="true"/>
    <property name="authenticationCacheName" value="authenticationCache"/>
    <property name="authorizationCachingEnabled" value="true"/>
    <property name="authorizationCacheName" value="authorizationCache"/>
</bean>
ehcache.xml配置内容:
<cache name="authorizationCache"
     maxEntriesLocalHeap="2000"
     eternal="false"
     timeToIdleSeconds="3600"
     timeToLiveSeconds="0"
     overflowToDisk="false"
     statistics="true">
</cache>
<cache name="authenticationCache"
     maxEntriesLocalHeap="2000"
     eternal="false"
     timeToIdleSeconds="3600"
     timeToLiveSeconds="0"
     overflowToDisk="false"
     statistics="true">
</cache>
测试
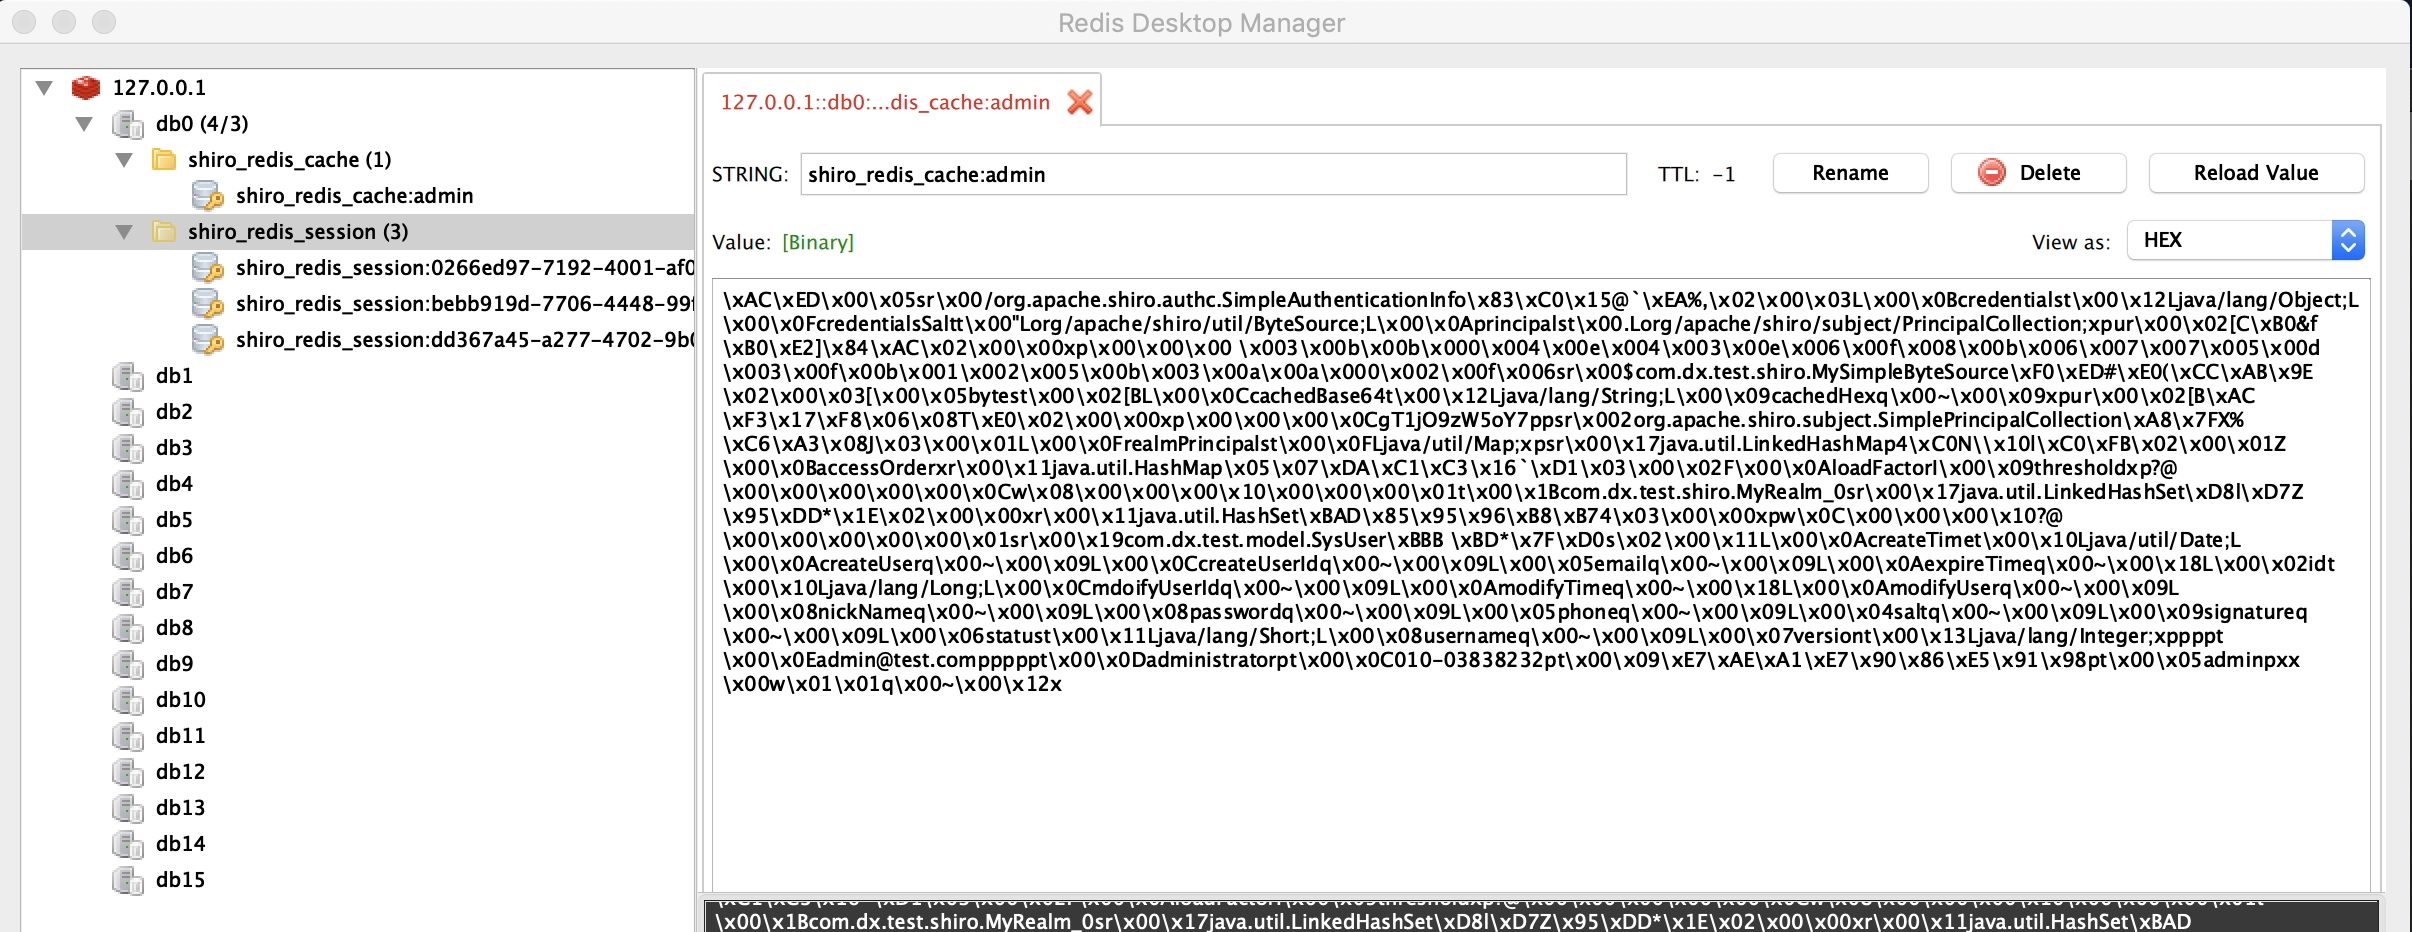
主要针对自定authenticationCache方案进行测试:
1)进入登录页面,输入账户密码,点击登录;
2)此时会发现redis中多了一条redis_cache:信息。
清除缓存
如果账户正常退出,会自动清空redis中缓存;
如果非正常退出,不会自动清空redis中缓存。(因此,这也是不推荐配置的一个原因);
当修改了用户基本信息时,如果强制执行清空认证信息,需要在MyRealm中定义clearXXX先关类。
MyRealm.java清空认证、授权信息方法定义:
    //重写以下方法并改为public,否则测试无法调用这些Protected的方法
    @Override
    public void clearCachedAuthenticationInfo(PrincipalCollection principals) {
        super.clearCachedAuthenticationInfo(principals);
    }
    @Override
    public void clearCachedAuthorizationInfo(PrincipalCollection principals) {
        super.clearCachedAuthorizationInfo(principals);
    }
    @Override
    public void clearCache(PrincipalCollection principals) {
        //同时调用以上俩方法,清空两个Info
        super.clearCache(principals);
    }

    public void clearAllCachedAuthorizationInfo(){
        getAuthorizationCache().clear();
    }
    public void clearAllCachedAuthenticationInfo() {
        getAuthenticationCache().clear();
    }
    public void clearAllCache() {
        clearAllCachedAuthenticationInfo();
        clearAllCachedAuthorizationInfo();
    }
注意:
1)如果采用了redis缓存认证方案,当执行clearAllCachedAuthenticationInfo()方法,会清退所有在线用户,用户需要重新登录才能继续操作;
2)如果采用ehcache缓存认证方案,当执行clearAllCachedAuthenticationInfo()方法,不会清空任何在线用户,用户不需要重新登录;
3)不管采用什么缓存授权信息,当执行了clearAllCachedAuthorizationInfo()方法,都会清空授权信息,用户再次操作调用授权时,会重新执行MyRealm#doGetAuthorizationInfo()方法。这就有缺点,也许只修改涉及到授权改变的用户授权缓存清空才合理,以下清空所有用户有点粗暴。