组件:
1,view视图容器:
省略....
2,scroll-view 视图容器:
1,实现横向滚动...
三个条件:
①:给scroll-view 添加属性 scroll-x ="true"
②:给scroll-view 添加样式 white-space="nowrap"
③:给scroll-view 中的元素 设置为 display="inline-block"


1 <scroll-view class="scroll-vw" scroll-x="true">
2     <view class="scroll-item view01"></view>
3     <view class="scroll-item view02"></view>
4     <view class="scroll-item view03"></view>
5     <view class="scroll-item view04"></view>
6     <view class="scroll-item view05"></view>
7 </scroll-view>
 1 .scroll-vw{
 2     width:100%;
 3     height: 210px;
 4     white-space: nowrap;
 5 }
 6 /*scroll 里面的view 设置 */
 7 .scroll-item{
 8     width:200px;
 9     height: 200px;
10     display: inline-block;
11 }
12
13
14 .view01{
15     background-color: red;
16 }
17 .view02{
18     background-color: green;
19 }
20 .view03{
21     background-color: blue;
22 }
23 .view04{
24     background-color: cyan;
25 }
26 .view05{
27     background-color: orange;
28 }
2,实现竖向滚动...
①:给scroll-view添加scroll-y="true"属性。
②:给scroll-view设置高度。
1 <scroll-view class="scroll-vw" scroll-y="true">
2     <view class="scroll-item view01"></view>
3     <view class="scroll-item view02"></view>
4     <view class="scroll-item view03"></view>
5     <view class="scroll-item view04"></view>
6     <view class="scroll-item view05"></view>
7 </scroll-view>
 1 .scroll-vw{
 2     width:200px;
 3     height: 200px;
 4 }
 5 /*scroll 里面的view 设置 */
 6 .scroll-item{
 7     width:200px;
 8     height: 200px;
 9 }
10 .view01{
11     background-color: red;
12 }
13 .view02{
14     background-color: green;
15 }
16 .view03{
17     background-color: blue;
18 }
19 .view04{
20     background-color: cyan;
21 }
22 .view05{
23     background-color: orange;
24 }
3,swiper视图容器:
滑块视图容器
在app里面,轮播图(banner)是非常常见的,因此小程序专门针对这个出了一个组件就是swiper。
swiper就是一个包裹轮播图的容器,里面的子元素必须是swiper-item组件。swiper可以自动的轮播子元素,并且天生就带有指示点,还可以使用手指左右滑动。
swiper的基本用法:
1 <swiper class="swp" autoplay indicator-dots style="{{width*2}}rpx;height:{{height*2}}rpx;">
2     <swiper-item>
3         <image src="https://i0.hdslb.com/bfs/archive/46632f7fa9e1f064ee313767772ad03e53e93b3e.png@880w_440h.png"></image>
4     </swiper-item>
5     <swiper-item>
6         <image src="https://i0.hdslb.com/bfs/sycp/creative_img/201910/bc03ffd6dfc3f79047d5119d63194dd5.jpg@880w_440h.jpg"></image>
7     </swiper-item>
8 </swiper>
1 .swp{
2     /*通过js获取物理设备的宽度  然后动态设置*/
3 }
4 .swp image{
5     width: 100%;
6     height: 100%;
7 }
 1 Page({
 2
 3   /**
 4    * 页面的初始数据
 5    */
 6   data: {
 7
 8   },
 9
10   /**
11    * 生命周期函数--监听页面加载
12    */
13   onLoad: function (options) {
14     var sysInfo = wx.getSystemInfoSync();
15     var width = sysInfo.windowWidth;
16     var height = width/2;
17     this.setData({
18         width,
19         height:height
20     });
21   },
22
23
24 })
swiper的其他用法:(参考: https://developers.weixin.qq.com/miniprogram/dev/component/swiper.html)
 1 <swiper class="swp" autoplay indicator-dots style="{{width*2}}rpx;height:{{height*2}}rpx;" current="2" interval="1500" duration="100" circular="true" previous-margin="30px" next-margin="30px" bindchange="changeEvent" bindanimationfinish="animationEvent">
 2     <swiper-item>
 3         <image src="https://i0.hdslb.com/bfs/archive/46632f7fa9e1f064ee313767772ad03e53e93b3e.png@880w_440h.png"></image>
 4     </swiper-item>
 5     <swiper-item>
 6         <image src="https://i0.hdslb.com/bfs/sycp/creative_img/201910/bc03ffd6dfc3f79047d5119d63194dd5.jpg@880w_440h.jpg"></image>
 7     </swiper-item>
 8     <swiper-item>
 9         <image src="https://i0.hdslb.com/bfs/sycp/creative_img/201910/65defdba129ef385c07eb9ae57015284.jpg@880w_440h.jpg"></image>
10     </swiper-item>
11     <swiper-item>
12         <image src="https://i0.hdslb.com/bfs/archive/4067b5c40438c6523beb698ee4ff9182e766d853.jpg@880w_440h.webp"></image>
13     </swiper-item>
14 </swiper>
1 .swp{
2     /*通过js获取物理设备的宽度  然后动态设置*/
3 }
4 .swp image{
5     width: 100%;
6     height: 100%;
7 }
 1 Page({
 2
 3   /**
 4    * 页面的初始数据
 5    */
 6     data: {
 7
 8     },
 9
10   /**
11    * 生命周期函数--监听页面加载
12    */
13     onLoad: function (options) {
14         var sysInfo = wx.getSystemInfoSync();
15         var width = sysInfo.windowWidth;
16         var height = width/2;
17         this.setData({
18             width,
19             height:height
20         });
21     },
22   /**
23    * 当轮播图发生变化时候 事件处理函数
24    */
25     changeEvent:function(evt){
26         console.log(evt);
27     },
28     /**
29      * 动画结束时候 事件处理函数
30      */
31     animationEvent:function(evt){
32         console.log(evt);
33     }
34 })
3,movable-view视图容器:
正常情况下,一个组件设置了后,如果不通过js或者css动画,那么是很难实现移动的。如果我们有些组件设置完成后想要能够移动。那么我们就可以借助movable-view组件来实现。
movable-view组件,正如他的名字一样,是可以移动的容器,但是这个容器必须要放在movable-area中才能移动。因此实际上是这两个组件配合使用才能实现移动的效果的。
movable-view的基本用法:
1 <movable-area class="area" scale-area="true">
2     <movable-view class="view" direction="all" inertia="true"
3         friction="1" x="{{x}}" y="{{y}}" scale="true" animation="{{ture}}" bindchange="changeEvent">移动</movable-view>
4 </movable-area>
5
6 <button bindtap="onMoveClick">点我</button>
 1 .area{
 2     width: 100%;
 3     height: 400rpx;
 4     background-color: cyan;
 5     overflow: hidden;
 6 }
 7 .area .view{
 8     width:200rpx;
 9     height: 200rpx;
10     background-color:darkred;
11     text-align: center;
12 }
 1 Page({
 2
 3     /**
 4      * 页面的初始数据
 5      */
 6     data: {
 7
 8     },
 9
10     /**
11      * 生命周期函数--监听页面加载
12      */
13     onLoad: function (options) {
14
15     },
16     onMoveClick: function(evt){
17         var x = 50;
18         var y = 50;
19         this.setData({
20             x:x,
21             y:y
22         });
23         console.log("click");
24         console.log(evt);
25
26     },
27     changeEvent:function(evt){
28         // console.log(evt);
29     }
30
31 })
注意:
1 movable-view 必须设置width和height属性,不设置默认为10px
2,movable-view 默认为绝对定位,top和left属性为0px
3, movable-view 是可以大于movable-area 的,但是,滑动的时候是不能超出movable-area的。
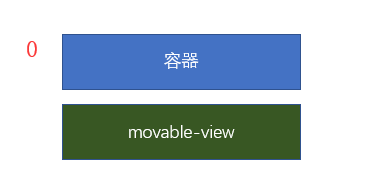
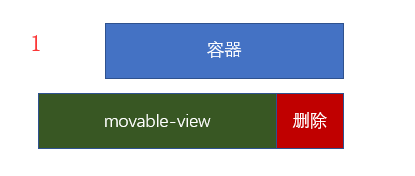
movable-view的案例:(实现微信中的左滑 删除效果...)
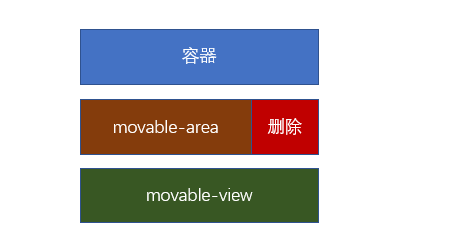
下面是示意图:
 1 <view class="listview">
 2   <view class='itemview'>
 3     <movable-area class="movablearea" style="{{(winWidth-100)*2}}rpx;">
 4       <movable-view class="movableview" style='{{winWidth*2}}rpx;' direction="horizontal" bindtouchstart='onTouchStartEvent' bindtouchend='onTouchEndEvent' bindchange="onChangeEvent" x="{{x}}">
 5         周杰伦
 6       </movable-view>
 7     </movable-area>
 8     <view class="delview">删除</view>
 9   </view>
10 </view>
11
12 <view>{{windowWidth}}</view>
 1 .listview{
 2     width: 100%;
 3     height: 1000rpx;
 4     background-color: #ccc;
 5 }
 6 .listview .itemview{
 7     width: 100%;
 8     height: 200rpx;
 9     display: flex;
10 }
11 /*
12 关系图
13 itemview movablearea  movableview周杰伦
14          delview删除
15 */
16 .itemview .movablearea{
17     width:375rpx; /*暂时 会在标签中从Js中获取 */
18     height: 100%;
19     background-color: yellow;
20 }
21  .itemview .movableview{
22     width:121px; /*暂时 会在标签中从Js中获取  实际尺寸和手机宽度相同*/
23     height: 100%;
24     background-color: skyblue;
25 }
26
27
28 .itemview .delview{
29     width: 200rpx;
30     height: 100%;
31     /*line-height: 200rpx;/*垂直居中*/
32     /*text-align: center;/*水平居中*/
33     /*上面两种也可以使用flex 布局 */
34     display: flex;
35     justify-content: center;
36     align-items: center;
37
38     background-color: red;
39 }
 1 Page({
 2
 3     /**
 4      * 页面的初始数据
 5      */
 6     data: {
 7
 8     },
 9
10     /**
11      * 生命周期函数--监听页面加载
12      */
13     onLoad: function (options) {
14         //获取具体手机上的信息
15         var systemInfo = wx.getSystemInfoSync();
16         var winWidth = systemInfo.windowWidth;
17         this.setData({
18             winWidth:winWidth
19         });
20     },
21     onTouchStartEvent:function(evt){
22         // console.log(evt);
23         // console.log("=====");
24         var startPageX = evt.touches[0].pageX;
25         this.setData({
26             startPageX:startPageX
27         })
28     },
29     //具体移动了多远看 movable-view 中的 bindchange事件
30     onChangeEvent: function (evt) {
31         // console.log(evt);
32         var x = evt.detail.x;
33         this.setData({
34             x: x
35         });
36     },
37     onTouchEndEvent:function(evt){
38         // console.log(evt);
39         var endPageX = evt.changedTouches[0].pageX;
40         var startPageX = this.data.startPageX;
41         var x = this.data.x;
42         //如果起始点大于结束点 说明是往左移动
43         if(startPageX >endPageX){
44             console.log("向左移动");
45             console.log(x);
46             //那么具体移动多少呢?看movable-view 中的 bindchange事件
47             if(x < -20){
48                 this.setData({
49                     x:-100
50                 });
51
52             }else{  //如果没有滑动太多,就返回0
53                 this.setData({
54                     x:0
55                 });
56             }
57         }else{
58             console.log("向右移动");
59             console.log(x);
60             if(x>-80){
61                 this.setData({
62                     x:0
63                 });
64             }else{
65                 this.setData({
66                     x:-100
67                 });
68             }
69         }
70     },
71 })