本教程介绍如何使用称作“可用性集”的功能提高 Azure 上虚拟机解决方案的可用性和可靠性。 可用性集可确保在 Azure 上部署的 VM 能够跨多个隔离的硬件群集分布。 这样,就可以确保当 Azure 中发生硬件或软件故障时,只有一部分 VM 会受到影响,整体解决方案仍可使用和正常工作。
本教程介绍如何执行下列操作:
- 创建可用性集
- 在可用性集中创建 VM
- 检查可用的 VM 大小
本教程需要 Azure PowerShell 模块 3.6 或更高版本。 运行 Get-Module -ListAvailable AzureRM 即可查找版本。 如果需要进行升级,请参阅 Install Azure PowerShell module(安装 Azure PowerShell 模块)。
可用性集概述
可用性集是一种逻辑分组功能,在 Azure 中使用它可以确保将 VM 资源部署在 Azure 数据中心后,这些资源相互隔离。 Azure 确保可用性集中部署的 VM 能够跨多个物理服务器、计算机架、存储单元和网络交换机运行。 如果出现硬件或 Azure 软件故障,只有一部分 VM 会受到影响,整体应用程序仍会保持运行,可供客户使用。 如果想要构建可靠的云解决方案,可用性集是一项关键功能。
假设某个基于 VM 的典型解决方案包含 4 个前端 Web 服务器,以及 2 个托管数据库的后端 VM。 在 Azure 中,需要在部署 VM 之前先定义两个可用性集:一个可用性集用于 Web 层,另一个可用性集用于数据库层。 创建新的 VM 时,可在 az vm create 命令中指定可用性集作为参数,Azure 会自动确保在可用性集中创建的 VM 在多个物理硬件资源之间保持独立。 如果运行某个 Web 服务器或数据库服务器的物理硬件有问题,可以确信 Web 服务器和数据库 VM 的其他实例会保持运行状态,因为它们位于不同的硬件上。
Note
在 Azure 中国区使用 Azure CLI 2.0 之前,请先运行 az cloud set -n AzureChinaCloud 来改变云环境。如果想切回国际版 Azure,请再次运行 az cloud set -n AzureCloud。
在 Azure 中部署基于 VM 的可靠解决方案时,使用可用性集。
创建可用性集
可以使用 New-AzureRmAvailabilitySet 创建一个可用性集。 在本示例中,将 myResourceGroupAvailability 资源组中名为 myAvailabilitySet 的可用性集的更新域数和容错域数均设置为 2。
创建资源组。
New-AzureRmResourceGroup -Name myResourceGroupAvailability -Location ChinaEast
使用 -sku aligned 参数通过 New-AzureRmAvailabilitySet 创建托管的可用性集。
New-AzureRmAvailabilitySet `
   -Location ChinaEast `
   -Name myAvailabilitySet `
   -ResourceGroupName myResourceGroupAvailability `
   -sku aligned `
   -PlatformFaultDomainCount 2 `
   -PlatformUpdateDomainCount 2
在可用性集内创建 VM
必须在可用性集中创建 VM,确保它们正确地分布在硬件中。 创建后,无法将现有 VM 添加到可用性集中。
同一位置的硬件分为多个更新域和容错域。 更新域是一组可同时重启的 VM 和基础物理硬件。 同一个容错域内的 VM 共享公用存储,以及公用电源和网络交换机。
使用 New-AzureRMVMConfig 创建 VM 配置时,可以使用 -AvailabilitySetId 参数指定可用性集的 ID。
在可用性集中使用 New-AzureRmVM 创建两个 VM。
$availabilitySet = Get-AzureRmAvailabilitySet `
    -ResourceGroupName myResourceGroupAvailability `
    -Name myAvailabilitySet

$cred = Get-Credential -Message "Enter a username and password for the virtual machine."

$subnetConfig = New-AzureRmVirtualNetworkSubnetConfig `
    -Name mySubnet `
    -AddressPrefix 192.168.1.0/24
$vnet = New-AzureRmVirtualNetwork `
    -ResourceGroupName myResourceGroupAvailability `
    -Location ChinaEast `
    -Name MYvNET `
    -AddressPrefix 192.168.0.0/16 `
    -Subnet $subnetConfig

for ($i=1; $i -le 2; $i++)
{
   $pip = New-AzureRmPublicIpAddress `
        -ResourceGroupName myResourceGroupAvailability `
        -Location ChinaEast `
        -Name "mypublicdns$(Get-Random)" `
        -AllocationMethod Static `
        -IdleTimeoutInMinutes 4

   $nsgRuleRDP = New-AzureRmNetworkSecurityRuleConfig `
        -Name myNetworkSecurityGroupRuleRDP$i `
        -Protocol Tcp `
        -Direction Inbound `
        -Priority 1000 `
        -SourceAddressPrefix * `
        -SourcePortRange * `
        -DestinationAddressPrefix * `
        -DestinationPortRange 3389 `
        -Access Allow

   $nsg = New-AzureRmNetworkSecurityGroup `
        -ResourceGroupName myResourceGroupAvailability `
        -Location ChinaEast `
        -Name myNetworkSecurityGroup$i `
        -SecurityRules $nsgRuleRDP

   $nic = New-AzureRmNetworkInterface `
        -Name myNic$i `
        -ResourceGroupName myResourceGroupAvailability `
        -Location ChinaEast `
        -SubnetId $vnet.Subnets[0].Id `
        -PublicIpAddressId $pip.Id `
        -NetworkSecurityGroupId $nsg.Id

   # Here is where we specify the availability set
   $vm = New-AzureRmVMConfig `
        -VMName myVM$i `
        -VMSize Standard_D1 `
        -AvailabilitySetId $availabilitySet.Id

   $vm = Set-AzureRmVMOperatingSystem `
        -ComputerName myVM$i `
        -Credential $cred `
        -VM $vm `
        -Windows `
        -EnableAutoUpdate `
        -ProvisionVMAgent
   $vm = Set-AzureRmVMSourceImage `
        -VM $vm `
        -PublisherName MicrosoftWindowsServer `
        -Offer WindowsServer `
        -Skus 2016-Datacenter `
        -Version latest
   $vm = Set-AzureRmVMOSDisk `
        -VM $vm `
        -Name myOsDisk$i `
        -DiskSizeInGB 128 `
        -CreateOption FromImage `
        -Caching ReadWrite
   $vm = Add-AzureRmVMNetworkInterface -VM $vm -Id $nic.Id
   New-AzureRmVM `
        -ResourceGroupName myResourceGroupAvailability `
        -Location ChinaEast `
        -VM $vm
}
创建和配置这两个 VM 需要几分钟的时间。 完成后,将拥有两个跨基础硬件分布的虚拟机。
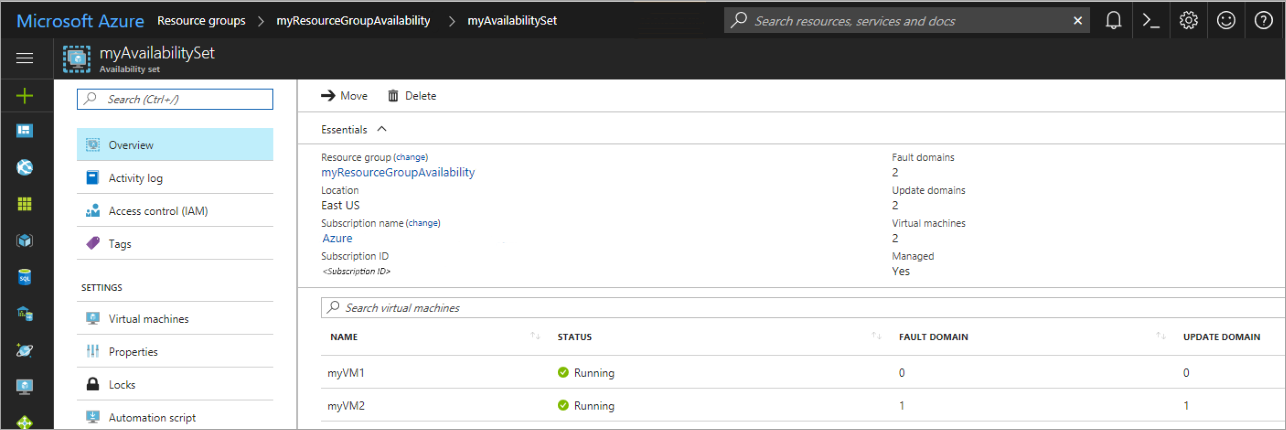
如果通过转到“资源组”>“我的资源组可用性”>“我的可用性集”在门户中查看可用性集,则应查看如何跨 2 个容错域和更新域分布 VM。
检查可用的 VM 大小
稍后可向可用性集添加更多 VM,但需了解在硬件上可用的 VM 大小。 使用 Get-AzureRMVMSize 列出可用性集的硬件群集上所有可用的大小。
Get-AzureRmVMSize `
   -AvailabilitySetName myAvailabilitySet `
   -ResourceGroupName myResourceGroupAvailability
后续步骤
在本教程中,你已学习了如何执行以下操作:
- 创建可用性集
- 在可用性集中创建 VM
- 检查可用的 VM 大小
请转到下一教程,了解虚拟机规模集。
立即访问http://market.azure.cn