Tomcat服务器下Jenkins插件开发过程
一.环境准备
首先需要安装的几个应用:jdk,maven,tomcat,git(配好环境变量)。
然后下载一个Jenkins.war文件,把这个文件放到tomcat-xxx/webapps文件夹下面。
运行tomcat-xxx/bin/startup.bat即可打开Jenkins控制台(默认为http://localhost:8080/jenkins)。
二.配置文件
1.由于要使用maven进行开发,所以需要对%USERPROFILE%.m2/setting.xml文件进行更改
<?xml version="1.0" encoding="UTF-8"?>
<settings xmlns="http://maven.apache.org/SETTINGS/1.0.0"
xmlns:xsi="http://www.w3.org/2001/XMLSchema-instance"
xsi:schemaLocation="http://maven.apache.org/SETTINGS/1.0.0 http://maven.apache.org/xsd/settings-1.0.0.xsd">
<pluginGroups>
<pluginGroup>org.jenkins-ci.tools</pluginGroup>
</pluginGroups>
<mirrors>
<mirror>
<id>repo.jenkins-ci.org</id>
<url>https://repo.jenkins-ci.org/public/</url>
<mirrorOf>m.g.o-public</mirrorOf>
</mirror>
</mirrors>
<profiles>
<profile>
<id>jenkins</id>
<activation>
<activeByDefault>true</activeByDefault> <!-- change this to false, if you don't like to have it on per default -->
</activation>
<repositories>
<repository>
<id>repo.jenkins-ci.org</id>
<url>https://repo.jenkins-ci.org/public/</url>
</repository>
</repositories>
<pluginRepositories>
<pluginRepository>
<id>repo.jenkins-ci.org</id>
<url>https://repo.jenkins-ci.org/public/</url>
</pluginRepository>
</pluginRepositories>
</profile>
</profiles>
</settings>
2.进入Jenkins控制台
在全局工具配置中对maven,jdk,git进行配置(主要配置其路径)
新建maven项目,在项目配置中的源码管理,配置获取GitHub上面已上传代码的Repository URL;在build中配置项目root的pom.xml文件目录(只需知道pom.xml的上一级目录,在Jenkins安装的工作目录下面)
3.插件配置(下面进行新建插件)
在Jenkins工作台的插件管理中需要下载常用的工具插件,如maven、git等(多下无害)
三 新建插件
打开命令行,进入我们希望的目录中,然后执行
Mvn –U archetype:generate -Dfilter=io.jenkins.archetypes:plugin -DarchetypeCatalog=remote
会出现一些选项要你选择:
…
Choose archetype:
1: remote -> io.jenkins.archetypes:empty-plugin (Skeleton of a Jenkins plugin with a POM and an empty source tree.)
2: remote -> io.jenkins.archetypes:global-configuration-plugin (Skeleton of a Jenkins plugin with a POM and an example piece of global configuration.)
3: remote -> io.jenkins.archetypes:hello-world-plugin (Skeleton of a Jenkins plugin with a POM and an example build step.)
Choose a number or apply filter (format: [groupId:]artifactId, case sensitive contains): : 3
Choose io.jenkins.archetypes:hello-world-plugin version:
1: 1.1
2: 1.2
3: 1.3
Choose a number: 3: 3
[INFO] Using property: groupId = unused
Define value for property artifactId: demo
Define value for property version 1.0-SNAPSHOT: :
[INFO] Using property: package = io.jenkins.plugins.sample
Confirm properties configuration:
groupId: unused
artifactId: demo
version: 1.0-SNAPSHOT
package: io.jenkins.plugins.sample
Y: : y
以上几个选择地方的含义:
- 选择hello-word-plugin作为我们的插件结构
- 选择1.3最新版本
- artifactid是强制要求的,而且在jenkins中运行时要求唯一,我们设置为demo。
- 默认是 1.0-SNAPSHOT作为开发的版本号。(maven中的版本号区别可以查看: 这里 )
- 最后最列举出来的信息进行确认Y
以上会创建一个目录,名字与artifactid的值一致(这里的值是demo),而且里面有一些基本的可运行的插件结构。执行以下指令来校验这个插件源码是否可以运行:
:mvn verify
verify会下载一系列依赖,然后进入生命周期,包括FindBugs静态分析和测试,直到显示如下信息:
[INFO] ------------------------------------------------------------------------
[INFO] BUILD SUCCESS
[INFO] ------------------------------------------------------------------------
[INFO] Total time: 06:11 min
[INFO] Finished at: 2017-03-02T14:14:34+01:00
[INFO] Final Memory: 73M/872M
[INFO] ------------------------------------------------------------------------
这样一个插件就建好了。。。
通过idea可以打开插件进行编写
四.导入插件到Jenkins
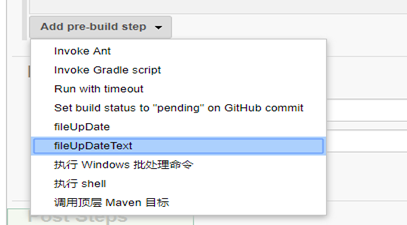
在Jenkins控制台插件管理-高级中上传你所新建的插件hpi文件

然后在新建项目的Pre Steps配置中找到你所新建的插件选中即可
最后进行项目构建
在选择插件的过程中,可能会找不到自己已上传的插件
需要插件中getDisplayName方法中返回插件名才能使用

这样构建前和构建后都可以使用此插件