How To Install Linux, Nginx, MySQL, PHP (LEMP stack) in Ubuntu 16.04 | DigitalOcean
https://www.digitalocean.com/community/tutorials/how-to-install-linux-nginx-mysql-php-lemp-stack-in-ubuntu-16-04
How To Install Linux, nginx, MySQL, PHP (LEMP) stack on CentOS 6 | DigitalOcean
https://www.digitalocean.com/community/tutorials/how-to-install-linux-nginx-mysql-php-lemp-stack-on-centos-6
About Lemp
LEMP stack is a group of open source software to get web servers up and running. The acronym stands for Linux, nginx (pronounced Engine x), MySQL, and PHP. Since the server is already running CentOS, the linux part is taken care of. Here is how to install the rest.
Step One—Install the Required Repositories
We will be installing all of the required software with Yum. However, because nginx is not available straight from CentOS, we'll need to install the epel repository.
sudo yum install epel-release
Step Two—Install MySQL
The next step is to begin installing the server software on the virtual private server, starting with MySQL and dependancies.
sudo yum install mysql-server
Once the download is complete, restart MySQL:
sudo /etc/init.d/mysqld restart
You can do some configuration of MySQL with this command:
sudo /usr/bin/mysql_secure_installation
The prompt will ask you for your current root password.
Since you just installed MySQL, you most likely won’t have one, so leave it blank by pressing enter.
Enter current password for root (enter for none):
OK, successfully used password, moving on...
Then the prompt will ask you if you want to set a root password. Go ahead and choose Y and follow the instructions.
CentOS automates the process of setting up MySQL, asking you a series of yes or no questions.
It’s easiest just to say Yes to all the options. At the end, MySQL will reload and implement the changes.
By default, a MySQL installation has an anonymous user, allowing anyone
to log into MySQL without having to have a user account created for
them.  This is intended only for testing, and to make the installation
go a bit smoother.  You should remove them before moving into a
production environment.

Remove anonymous users? [Y/n] y
 ... Success!

Normally, root should only be allowed to connect from 'localhost'.  This
ensures that someone cannot guess at the root password from the network.

Disallow root login remotely? [Y/n] y
... Success!

By default, MySQL comes with a database named 'test' that anyone can
access.  This is also intended only for testing, and should be removed
before moving into a production environment.

Remove test database and access to it? [Y/n] y
 - Dropping test database...
 ... Success!
 - Removing privileges on test database...
 ... Success!

Reloading the privilege tables will ensure that all changes made so far
will take effect immediately.

Reload privilege tables now? [Y/n] y
 ... Success!

Cleaning up...

All done!  If you've completed all of the above steps, your MySQL
installation should now be secure.

Thanks for using MySQL!
Step Three—Install nginx
As with MySQL, we will install nginx on our virtual private server using yum:
sudo yum install nginx
nginx does not start on its own. To get nginx running, type:
sudo /etc/init.d/nginx start
You can confirm that nginx has installed on your virtual private server by directing your browser to your IP address.
You can run the following command to reveal your server’s IP address.
ifconfig eth0 | grep inet | awk '{ print $2 }'
Step Four—Install PHP
The php-fpm package is located within the REMI repository, which, at this point, is disabled. The first thing we need to do is enable the REMI repository and install php and php-fpm:
sudo yum install php-fpm php-mysql
Step Five—Configure php
We need to make one small change in the php configuration. Open up php.ini:
sudo vi /etc/php.ini
Find the line, cgi.fix_pathinfo=1, and change the 1 to 0.
cgi.fix_pathinfo=0
If this number is kept as a 1, the php interpreter will do its best to process the file that is as near to the requested file as possible. This is a possible security risk. If this number is set to 0, conversely, the interpreter will only process the exact file path—a much safer alternative. Save and Exit.
Step Six—Configure nginx
Open up the default nginx config file:
sudo vi /etc/nginx/nginx.conf
Raise the number of worker processes to 4 then save and exit that file.
Now we should configure the nginx virtual hosts.
In order to make the default nginx file more concise, the virtual host details are in a different location.
sudo vi /etc/nginx/conf.d/default.conf
The configuration should include the changes below (the details of the changes are under the config information):
#
# The default server
#
server {
    listen       80;
    server_name example.com;


    location / {
        root   /usr/share/nginx/html;
        index index.php  index.html index.htm;
    }

    error_page  404              /404.html;
    location = /404.html {
        root   /usr/share/nginx/html;
    }

    error_page   500 502 503 504  /50x.html;
    location = /50x.html {
        root   /usr/share/nginx/html;
    }

    # pass the PHP scripts to FastCGI server listening on 127.0.0.1:9000
    #
    location ~ .php$ {
        root           /usr/share/nginx/html;
        fastcgi_pass   127.0.0.1:9000;
        fastcgi_index  index.php;
        fastcgi_param  SCRIPT_FILENAME   $document_root$fastcgi_script_name;
        include        fastcgi_params;
    }
}
Here are the details of the changes:
- Add index.php within the index line.
- Change the server_name to your domain name or IP address (replace the example.com in the configuration)
- Change the root to /usr/share/nginx/html;
- Uncomment the section beginning with "location ~ .php$ {",
- Change the root to access the actual document root, /usr/share/nginx/html;
- Change the fastcgi_param line to help the PHP interpreter find the PHP script that we stored in the document root home.
Save and Exit
Open up the php-fpm configuration:
sudo vi /etc/php-fpm.d/www.conf
Replace the apache in the user and group with nginx:
[...]
; Unix user/group of processes
; Note: The user is mandatory. If the group is not set, the default user's group
;	will be used.
; RPM: apache Choosed to be able to access some dir as httpd
user = nginx
; RPM: Keep a group allowed to write in log dir.
group = nginx
[...]
Finish by restarting php-fpm.
sudo service php-fpm restart
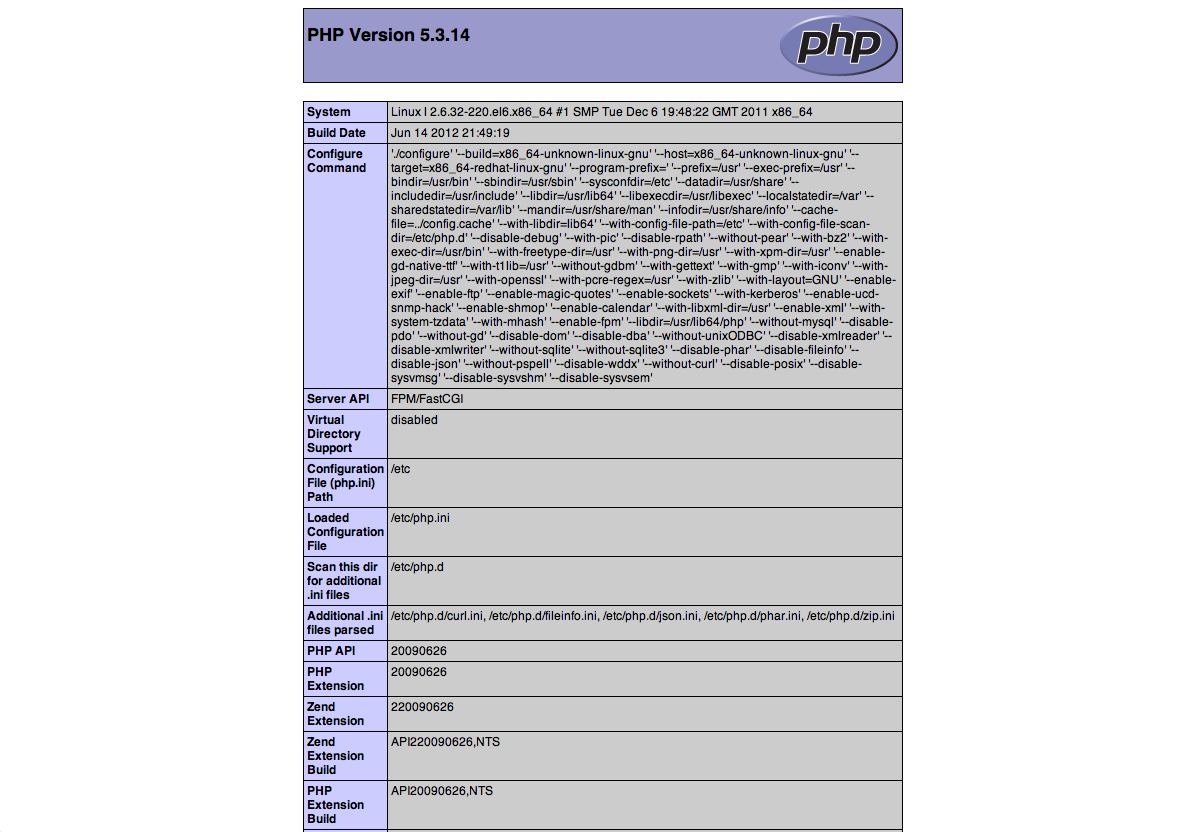
Step Seven—RESULTS: Create a php info page
Although LEMP is installed, we can still take a look and see the components online by creating a quick php info page
To set this up, first create a new file:
sudo vi /usr/share/nginx/html/info.php
Add in the following line:
<?php
phpinfo();
?>
Then Save and Exit.
Restart nginx so that all of the changes take effect:
sudo service nginx restart
Finish up by visiting your php info page (make sure you replace the example ip address with your correct one): http://12.34.56.789/info.php
It should look similar to this.
Step Eight—Set Up Autostart
You are almost done. The last step is to set all of the newly installed programs to automatically begin when the VPS boots.
sudo chkconfig --levels 235 mysqld on
sudo chkconfig --levels 235 nginx on
sudo chkconfig --levels 235 php-fpm on