消息队列(MQ)越来越火,在java开发的项目也属于比较常见的技术,MQ的相关使用也成java开发人员必备的技能。笔者公司采用的MQ是ActiveMQ,且消息都是用的点对点的模式。本文记录了实现Spring整合ActivateMQ的全过程及如何使用MQ,便于后续查阅。
一、项目的搭建
采用maven构建项目,免去了copy jar包的麻烦。因此,我们创建了一个java类型的Maven Project
(1)项目结构图
先把项目结构图看一下,便于对项目的理解。

(2)pom.xml
我们需要加入以下的依赖:
- spring-jms
- activemq-all
具体见下面代码
<project xmlns="http://maven.apache.org/POM/4.0.0" xmlns:xsi="http://www.w3.org/2001/XMLSchema-instance" xsi:schemaLocation="http://maven.apache.org/POM/4.0.0 http://maven.apache.org/xsd/maven-4.0.0.xsd">
  <modelVersion>4.0.0</modelVersion>
  <groupId>com.zxy</groupId>
  <artifactId>spring-activemq</artifactId>
  <version>1.0-SNAPSHOT</version>
  <name>spring-activemq</name>

	<dependencies>
		<!-- spring-jms 依赖 -->
		<dependency>
			<groupId>org.springframework</groupId>
			<artifactId>spring-jms</artifactId>
			<version>4.3.10.RELEASE</version>
		</dependency>

		<!-- activemq依赖 -->
		<dependency>
			<groupId>org.apache.activemq</groupId>
			<artifactId>activemq-all</artifactId>
			<version>5.9.1</version>
		</dependency>
	</dependencies>

</project>
24
1
<project xmlns="http://maven.apache.org/POM/4.0.0" xmlns:xsi="http://www.w3.org/2001/XMLSchema-instance" xsi:schemaLocation="http://maven.apache.org/POM/4.0.0 http://maven.apache.org/xsd/maven-4.0.0.xsd">2
<modelVersion>4.0.0</modelVersion>3
<groupId>com.zxy</groupId>4
<artifactId>spring-activemq</artifactId>5
<version>1.0-SNAPSHOT</version>6
<name>spring-activemq</name>7
8
<dependencies>9
<!-- spring-jms 依赖 -->10
<dependency>11
<groupId>org.springframework</groupId>12
<artifactId>spring-jms</artifactId>13
<version>4.3.10.RELEASE</version>14
</dependency>15
16
<!-- activemq依赖 -->17
<dependency>18
<groupId>org.apache.activemq</groupId>19
<artifactId>activemq-all</artifactId>20
<version>5.9.1</version>21
</dependency>22
</dependencies>23
24
</project>二、整合+写代码
先说明下,公司只用了ActiveMQ的点对点消息模式(queue),并没有用发布订阅模式(topic)。所以下文的整合也是按queue类型消息来配置的。
(1)配置applicationContext.xml
Spring整合ActiveMQ步骤如下:
- 注册ActiveMQ连接工厂—— 配置与ActiveMQ相关的一些基本配置
- 注册Spring Cache连接工厂—— 类似于数据库连接池一样的东西,用于提高效率。后续Connection和Session都是通过它来获取,不直接和ActiveMQ发生关系
- 注册JmsTemplate —— 主要用来发送MQ消息
- 注册Queue监听 —— 主要用来配置MQ消息的消费者
说明:因为JmsTemplate每次发送消息都需要创建Connection和Session,效率低。所以使用Spring的CachingConnectionFactory连接工厂来管理Connection和Session,原理类似于数据库连接池
具体配置代码如下:
<?xml version="1.0" encoding="UTF-8"?>
<beans xmlns="http://www.springframework.org/schema/beans"
xmlns:xsi="http://www.w3.org/2001/XMLSchema-instance"
xmlns:context="http://www.springframework.org/schema/context"
xmlns:jms="http://www.springframework.org/schema/jms"
xmlns:c="http://www.springframework.org/schema/c"
xsi:schemaLocation="http://www.springframework.org/schema/jms http://www.springframework.org/schema/jms/spring-jms-4.3.xsd
http://www.springframework.org/schema/beans http://www.springframework.org/schema/beans/spring-beans.xsd
http://www.springframework.org/schema/context http://www.springframework.org/schema/context/spring-context-4.3.xsd">
<!-- 开启包扫描 (减少在xml中注册bean)-->
<context:component-scan base-package="com.zxy.mq" />
<!-- #### ActiveMq配置 start ####-->
<!-- 1. ActiveMq连接工厂 -->
<bean id="activeMQConnectionFactory" class="org.apache.activemq.ActiveMQConnectionFactory">
<property name="brokerURL" value="tcp://localhost:61616" />
</bean>
<!--2. Spring Caching 连接工厂(类似数据库线程池的东西,减少连接的创建。) -->
<!-- 由于jmsTemplate每次发送消息都需要创建连接和创建session了,所以引入这个类似连接池的连接工厂,优化Mq的性能 -->
<bean id="connectionFactory" class="org.springframework.jms.connection.CachingConnectionFactory">
<!-- 目标连接工厂 指向 ActiveMq工厂 -->
<property name="targetConnectionFactory" ref="activeMQConnectionFactory" />
<!-- session缓存的最大个数-->
<property name="sessionCacheSize" value="100" />
</bean>
<!-- 3.配置jmsTemplate,用于发送发送mq消息 -->
<bean id="jmsTemplate" class="org.springframework.jms.core.JmsTemplate">
<property name="connectionFactory" ref="connectionFactory" />
<!-- 设置 jmsTemplate 不支持订阅模式,即:只支持queue模式。
如果项目需要同时支持queue和topic,那么就需要另外注册一个jmsTemplate(把pubSubDomain设为true)-->
<property name="pubSubDomain" value="false"></property>
</bean>
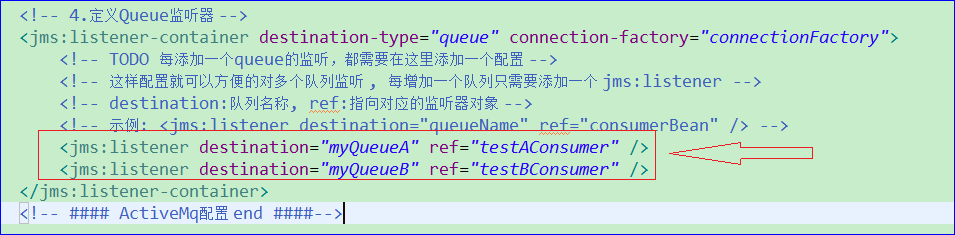
<!-- 4.定义Queue监听器 -->
<jms:listener-container destination-type="queue" connection-factory="connectionFactory">
<!-- TODO 每添加一个queue的监听,都需要在这里添加一个配置 -->
<!-- 这样配置就可以方便的对多个队列监听 , 每增加一个队列只需要添加一个 jms:listener -->
<!-- destination:队列名称, ref:指向对应的监听器对象 -->
<!-- 示例: <jms:listener destination="queueName" ref="consumerBean" /> -->
</jms:listener-container>
<!-- #### ActiveMq配置 end ####-->
</beans>
48
1
2
<beans xmlns="http://www.springframework.org/schema/beans"3
xmlns:xsi="http://www.w3.org/2001/XMLSchema-instance"4
xmlns:context="http://www.springframework.org/schema/context"5
xmlns:jms="http://www.springframework.org/schema/jms"6
xmlns:c="http://www.springframework.org/schema/c"7
xsi:schemaLocation="http://www.springframework.org/schema/jms http://www.springframework.org/schema/jms/spring-jms-4.3.xsd8
http://www.springframework.org/schema/beans http://www.springframework.org/schema/beans/spring-beans.xsd9
http://www.springframework.org/schema/context http://www.springframework.org/schema/context/spring-context-4.3.xsd">10
11
<!-- 开启包扫描 (减少在xml中注册bean)-->12
<context:component-scan base-package="com.zxy.mq" />13
14
<!-- #### ActiveMq配置 start ####-->15
<!-- 1. ActiveMq连接工厂 -->16
<bean id="activeMQConnectionFactory" class="org.apache.activemq.ActiveMQConnectionFactory">17
<property name="brokerURL" value="tcp://localhost:61616" />18
</bean>19
20
<!--2. Spring Caching 连接工厂(类似数据库线程池的东西,减少连接的创建。) -->21
<!-- 由于jmsTemplate每次发送消息都需要创建连接和创建session了,所以引入这个类似连接池的连接工厂,优化Mq的性能 -->22
<bean id="connectionFactory" class="org.springframework.jms.connection.CachingConnectionFactory">23
<!-- 目标连接工厂 指向 ActiveMq工厂 -->24
<property name="targetConnectionFactory" ref="activeMQConnectionFactory" />25
<!-- session缓存的最大个数-->26
<property name="sessionCacheSize" value="100" />27
</bean>28
29
<!-- 3.配置jmsTemplate,用于发送发送mq消息 -->30
<bean id="jmsTemplate" class="org.springframework.jms.core.JmsTemplate">31
<property name="connectionFactory" ref="connectionFactory" />32
<!-- 设置 jmsTemplate 不支持订阅模式,即:只支持queue模式。33
如果项目需要同时支持queue和topic,那么就需要另外注册一个jmsTemplate(把pubSubDomain设为true)-->34
<property name="pubSubDomain" value="false"></property>35
</bean>36
37
<!-- 4.定义Queue监听器 -->38
<jms:listener-container destination-type="queue" connection-factory="connectionFactory">39
<!-- TODO 每添加一个queue的监听,都需要在这里添加一个配置 -->40
<!-- 这样配置就可以方便的对多个队列监听 , 每增加一个队列只需要添加一个 jms:listener -->41
<!-- destination:队列名称, ref:指向对应的监听器对象 -->42
<!-- 示例: <jms:listener destination="queueName" ref="consumerBean" /> -->43
44
</jms:listener-container>45
<!-- #### ActiveMq配置 end ####-->46
47
</beans>48
(2)写一个通用的MQ消息生产者
一般我们传输mq消息都是json字符串。因此,文本类型的消息就能满足我们常见的需求了。所以我们可以认为文本消息就是通用的MQ消息类型。
代码如下:
package com.zxy.mq.producer;
import javax.jms.JMSException;
import javax.jms.Message;
import javax.jms.Session;
import org.springframework.beans.factory.annotation.Autowired;
import org.springframework.jms.core.JmsTemplate;
import org.springframework.jms.core.MessageCreator;
import org.springframework.stereotype.Component;

/**
 * 通用的ActiveMQ queue消息生产者
 * @author ZENG.XIAO.YAN
 * @time   2018-11-13 10:48:20
 * @version  v1.0
 */
@Component
public class CommonMqQueueProducer {
	@Autowired
	private JmsTemplate jmsTemplate;

	/**
	 * 发送点对点的文本类型的Mq消息
	 * @param queue 队列的名字
	 * @param message	文本消息(一般直接传输json字符串,所以可以认为文本消息是最通用的)
	 */
	public void send(String queue, String message) {
		jmsTemplate.send(queue, new MessageCreator() {
			@Override
			public Message createMessage(Session session) throws JMSException {
				return session.createTextMessage(message);
			}
		});
	}

}
35
1
package com.zxy.mq.producer;2
import javax.jms.JMSException;3
import javax.jms.Message;4
import javax.jms.Session;5
import org.springframework.beans.factory.annotation.Autowired;6
import org.springframework.jms.core.JmsTemplate;7
import org.springframework.jms.core.MessageCreator;8
import org.springframework.stereotype.Component;9
10
/**11
* 通用的ActiveMQ queue消息生产者12
* @author ZENG.XIAO.YAN13
* @time 2018-11-13 10:48:2014
* @version v1.015
*/16
17
public class CommonMqQueueProducer {18
19
private JmsTemplate jmsTemplate;20
21
/**22
* 发送点对点的文本类型的Mq消息23
* @param queue 队列的名字24
* @param message 文本消息(一般直接传输json字符串,所以可以认为文本消息是最通用的)25
*/26
public void send(String queue, String message) {27
jmsTemplate.send(queue, new MessageCreator() {28
29
public Message createMessage(Session session) throws JMSException {30
return session.createTextMessage(message);31
}32
});33
}34
35
}(3)写2个消费者
消费者类需要实现MessageListener接口,然后重写onMessage方法,且消费者需要交给Spring容器来实例化。
消费者A的代码如下:
package com.zxy.mq.consumer;
import javax.jms.JMSException;
import javax.jms.Message;
import javax.jms.MessageListener;
import javax.jms.TextMessage;
import org.springframework.stereotype.Component;

@Component
public class TestAConsumer implements MessageListener {

	@Override
	public void onMessage(Message message) {
		// myQueueA的消费者
		try {
			 String text = ((TextMessage) message).getText();
			 System.out.println(this.getClass().getSimpleName() + "接受到消息---->" + text);
		} catch (JMSException e) {
			e.printStackTrace();
		}
	}

}
22
1
package com.zxy.mq.consumer;2
import javax.jms.JMSException;3
import javax.jms.Message;4
import javax.jms.MessageListener;5
import javax.jms.TextMessage;6
import org.springframework.stereotype.Component;7
8
9
public class TestAConsumer implements MessageListener {10
11
12
public void onMessage(Message message) {13
// myQueueA的消费者14
try {15
String text = ((TextMessage) message).getText();16
System.out.println(this.getClass().getSimpleName() + "接受到消息---->" + text);17
} catch (JMSException e) {18
e.printStackTrace();19
}20
}21
22
} 消费者B的代码如下:
package com.zxy.mq.consumer;
import javax.jms.JMSException;
import javax.jms.Message;
import javax.jms.MessageListener;
import javax.jms.TextMessage;
import org.springframework.stereotype.Component;

@Component
public class TestBConsumer implements MessageListener {

	@Override
	public void onMessage(Message message) {
		// myQueueB的消费者
		try {
			 String text = ((TextMessage) message).getText();
			 System.out.println(this.getClass().getSimpleName() + "接受到消息---->" + text);
		} catch (JMSException e) {
			e.printStackTrace();
		}
	}

}
22
1
package com.zxy.mq.consumer;2
import javax.jms.JMSException;3
import javax.jms.Message;4
import javax.jms.MessageListener;5
import javax.jms.TextMessage;6
import org.springframework.stereotype.Component;7
8
9
public class TestBConsumer implements MessageListener {10
11
12
public void onMessage(Message message) {13
// myQueueB的消费者14
try {15
String text = ((TextMessage) message).getText();16
System.out.println(this.getClass().getSimpleName() + "接受到消息---->" + text);17
} catch (JMSException e) {18
e.printStackTrace();19
}20
}21
22
}(4)queue监听器中配置Listener并指向消费者
由于消费者需要监听queue消息,因此需要在applicationContext.xml的Queue监听器里面添加Listener并ref对应消费者。
配置消费者A监听的queue的名字为myQueueA,消费者B监听的queue的名字为myQueueB。
具体的配置见下图
三、测试
利用通用生产者来发送mq消息,然后消费者收到消息后会打印到控制台。
(1)测试代码
发送10个mq消息,myQueueA队列5个,myQueueB队列5个
测试代码如下:
package com.zxy.mq.test;
import org.springframework.context.ApplicationContext;
import org.springframework.context.support.ClassPathXmlApplicationContext;
import com.zxy.mq.producer.CommonMqQueueProducer;

/**
 * MQ消息测试类
 * @author ZENG.XIAO.YAN
 * @time   2018-11-15 14:04:35
 * @version  v1.0
 */
public class MqTestDemo {
	private static ApplicationContext applicationContext;
	// 静态代码块加载Spring容器
	static {
		applicationContext = new ClassPathXmlApplicationContext("classpath:applicationContext.xml");
		System.out.println("spring 容器已启动。。。");
	}

	public static void main(String[] args) {
		CommonMqQueueProducer mqQueueProducer = applicationContext.getBean(CommonMqQueueProducer.class);
		for (int i = 1; i < 11; i++) {
			// 奇数给myQueueA发,偶数给myQueueB发
			if (i % 2 == 1) {
				mqQueueProducer.send("myQueueA", "Mq消息A" + i);
			} else {
				mqQueueProducer.send("myQueueB", "Mq消息B" + i);
			}
		}
	}

}
x
1
package com.zxy.mq.test;2
import org.springframework.context.ApplicationContext;3
import org.springframework.context.support.ClassPathXmlApplicationContext;4
import com.zxy.mq.producer.CommonMqQueueProducer;5
6
/**7
* MQ消息测试类8
* @author ZENG.XIAO.YAN9
* @time 2018-11-15 14:04:3510
* @version v1.011
*/12
public class MqTestDemo {13
private static ApplicationContext applicationContext;14
// 静态代码块加载Spring容器15
static {16
applicationContext = new ClassPathXmlApplicationContext("classpath:applicationContext.xml");17
System.out.println("spring 容器已启动。。。");18
}19
20
public static void main(String[] args) {21
CommonMqQueueProducer mqQueueProducer = applicationContext.getBean(CommonMqQueueProducer.class);22
for (int i = 1; i < 11; i++) {23
// 奇数给myQueueA发,偶数给myQueueB发24
if (i % 2 == 1) {25
mqQueueProducer.send("myQueueA", "Mq消息A" + i);26
} else {27
mqQueueProducer.send("myQueueB", "Mq消息B" + i);28
}29
}30
}31
32
}(2)测试结果
通过控制台可以发现,对应queue的消费者接受到了消息,说明Spring整合ActiveMQ整合成功了。
控制台输出结果见下图

四、小结
(1)由于使用ActiveMQ官方原生的代码来发送MQ消息的代码比较复杂,因此采用JmsTemplate来发送MQ消息
(2)由于JmsTemplate发送MQ消息时每次都要创建Connection和Session。因此引入Spring提供的CachingConnectionFactory,起到类似于数据库连接池的效果
(3)注册JmsTemplate时,pubSubDomain这个属性的值要特别注意。默认值是false,也就是说默认只是支持queue模式,不支持topic模式。但是,如果将它改为true,则不支持queue模式。因此如果项目需要同时支持queue和topic模式,那么需要注册2个JmsTemplate,同时监听容器(<jms:listener-container>)也需要注册2个