JAVA验证识别:基于jTessBoxEditorFX和Tesseract-OCR训练样本
工具准备:
jTessBoxEditorFX下载:https://github.com/nguyenq/jTessBoxEditorFX
Tesseract-OCR下载:https://sourceforge.net/projects/tesseract-ocr/
主要步骤:
- JTessBoxEditorFX,Tesseract-OCR(环境变量配置)下载,jar包准备(maven,见下面pom文件)
- 下载验证码到本地(代码)
- 转换验证码图片格式
- 将转换后的验证码去噪二值化,剪切边缘(代码)
- 使用jTessBoxEditorFX进行.box文件的校对(改正识别错误的验证码):https://www.cnblogs.com/zhongtang/p/5555950.html
- 使用tesseract命令行进行.traineddata的生成,然后在java中调用:https://www.cnblogs.com/zhongtang/p/5555950.html
代码如下:
package yanZhengMaTest.pikachu;

import java.awt.image.BufferedImage;
import java.io.BufferedInputStream;
import java.io.File;
import java.io.FileNotFoundException;
import java.io.FileOutputStream;
import java.io.IOException;
import java.net.MalformedURLException;
import java.net.URL;

import javax.imageio.ImageIO;
import javax.net.ssl.HttpsURLConnection;

import org.opencv.core.Core;
import org.opencv.core.CvType;
import org.opencv.core.Mat;
import org.opencv.core.Rect;
import org.opencv.core.Size;
import org.opencv.imgcodecs.Imgcodecs;
import org.opencv.imgproc.Imgproc;

import net.sourceforge.tess4j.Tesseract;
import net.sourceforge.tess4j.TesseractException;

public class Test {

    static {
        System.loadLibrary(Core.NATIVE_LIBRARY_NAME);
    }; // 用来调用OpenCV库文件,必须添加

    public static void main(String[] args) throws FileNotFoundException, IOException, InterruptedException {

        //保存验证码的文件夹
        File imgFile = new File("C:\Users\pc\Desktop\formPic\unFormPic");
        //验证码保存地址
        String downAddress = "C:\Users\pc\Desktop\formPic\unFormPic\";
        //验证码下载地址
        String downURL = "https://www.qichamao.com/usercenter/varifyimage?t=0.6488481170232967";
        if (imgFile.listFiles().length < 400) {
            for (int i = 1; i <= 400; i++) {
                downloadPic(downURL, downAddress + i + ".gif");
                Thread.sleep(10 + (i % 100));
            }
        }

        //获取保存的验证码并转换为tif格式(Tesseract不支持识别gif图片)
        File imgFile0 = new File("C:\Users\pc\Desktop\formPic\unFormPic");
        for (File image : imgFile0.listFiles()) {
            changePicFormat("tif", image, "C:\Users\pc\Desktop\formPic\formedPic\");
        }
        System.out.println("图片格式转换成功");

        //获取转换为tif格式后的验证码,并进行加工(图片去噪,二值化),增加验证码识别度
        int picNum = 1;
        File imageFile1 = new File("C:\Users\pc\Desktop\formPic\formedPic");
        for (File image : imageFile1.listFiles()) {
            filterPic(image.getName(), picNum + ".tif");
            picNum++;
        }

        //获取加工后的
        File resultImgs = new File("C:\Users\pc\Desktop\result_cut");
        for (File link : resultImgs.listFiles()) {
            String reslut = getResult(link);
            System.out.println(link.getName() + "识别结果:" + reslut);
        }

    }

    // 图片处理及处理后的图片储存
    public static void filterPic(String imgName, String fileName) throws FileNotFoundException, IOException {
        // 图片去噪
        Mat src = Imgcodecs.imread("C:\Users\pc\Desktop\formPic\formedPic\" + imgName, Imgcodecs.IMREAD_UNCHANGED);
        Mat dst = new Mat(src.width(), src.height(), CvType.CV_8UC1);

        if (src.empty()) {
            System.out.println("没有图片");
        } else {
            System.out.println("图片处理成功");
        }

        Imgproc.boxFilter(src, dst, src.depth(), new Size(3.2, 3.2));
        Imgcodecs.imwrite("C:\Users\pc\Desktop\filter\" + fileName, dst);

        // 图片阈值处理,二值化
        Mat src1 = Imgcodecs.imread("C:\Users\pc\Desktop\filter\" + fileName, Imgcodecs.IMREAD_UNCHANGED);
        Mat dst1 = new Mat(src1.width(), src1.height(), CvType.CV_8UC1);

        Imgproc.threshold(src1, dst1, 165, 200, Imgproc.THRESH_TRUNC);
        Imgcodecs.imwrite("C:\Users\pc\Desktop\process\" + fileName, dst1);

        // 图片截取
        Mat src2 = Imgcodecs.imread("C:\Users\pc\Desktop\process\" + fileName, Imgcodecs.IMREAD_UNCHANGED);
        Rect roi = new Rect(4, 2, src2.cols() - 7, src2.rows() - 4); // 参数:x坐标,y坐标,截取的长度,截取的宽度
        Mat dst2 = new Mat(src2, roi);

        Imgcodecs.imwrite("C:\Users\pc\Desktop\result_cut\" + fileName, dst2);

    }

    // 获取验证码
    public static String getResult(File imageFile) {
        if (!imageFile.exists()) {
            System.out.println("图片不存在");
        }
        Tesseract tessreact = new Tesseract();
        tessreact.setDatapath("F:\Program Files (x86)\Tesseract-OCR\tessdata");
        tessreact.setLanguage("fontyp");    //将默认库设置为自己训练的库

        String result;
        try {
            result = tessreact.doOCR(imageFile);
            return result;
        } catch (TesseractException e) {
            e.printStackTrace();
            return null;
        }
    }

    /**
     * 图片格式转换
     *
     * @param outputFormat
     *            转换的格式
     * @param file
     *            要转换的图片
     * @param downAddress
     *            转换后保存的地址
     * @sourse: http://www.open-open.com/code/view/1453300186683
     */
    public static void changePicFormat(String outputFormat, File image, String downAddress) {

        try {
            BufferedImage bim = ImageIO.read(image);
            File output = new File(
                    downAddress + image.getName().substring(0, image.getName().lastIndexOf(".") + 1) + outputFormat);
            ImageIO.write(bim, outputFormat, output);
        } catch (IOException e) {
            e.printStackTrace();
        }
    }

    /**
     * 下载验证码
     *
     * @param picUrl
     *            验证码获取地址
     * @param address
     *            图片保存地址
     */
    public static void downloadPic(String picUrl, String imgAddress) {
        try {
            URL url = new URL(picUrl);
            HttpsURLConnection conn = (HttpsURLConnection) url.openConnection();
            //需要设置头信息,否则会被识别为机器而获取不到验证码图片
            conn.setRequestProperty("User-Agent",
                    "Mozilla/5.0 (Windows NT 10.0; WOW64) AppleWebKit/537.36 (KHTML, like Gecko) Chrome/68.0.3440.75 Safari/537.36");
            conn.connect();

            int result = -1;
            byte[] buf = new byte[1024];
            BufferedInputStream bis = new BufferedInputStream(conn.getInputStream());
            FileOutputStream fos = new FileOutputStream(imgAddress);
            while ((result = bis.read(buf)) != -1) {
                fos.write(buf);
            }
            fos.flush();

            fos.close();
            bis.close();
            System.out.println("图片下载成功");
        } catch (MalformedURLException e) {
            System.out.println("图片读取失败");
            e.printStackTrace();
        } catch (IOException e) {
            System.out.println();
            e.printStackTrace();
        }
    }

}
pom文件:
        <dependency>
            <groupId>net.sourceforge.tess4j</groupId>
            <artifactId>tess4j</artifactId>
            <version>4.1.1</version>
            <exclusions>
                <exclusion>
                    <groupId>com.sun.jna</groupId>
                    <artifactId>jna</artifactId>
                </exclusion>
            </exclusions>
        </dependency>
        <dependency>
            <groupId>org.openpnp</groupId>
            <artifactId>opencv</artifactId>
            <version>3.2.0-0</version>
        </dependency>
参考文章:
opensv的使用:https://blog.csdn.net/u012706811/article/details/52779271
opensv教程:https://www.w3cschool.cn/opencv/opencv-me9i28vh.html
opensv二值化:https://blog.csdn.net/liyuqian199695/article/details/53925046
opensv的maven地址:https://mvnrepository.com/artifact/org.openpnp/opencv/3.4.2-0
opensv图片过滤:https://blog.csdn.net/u012393192/article/details/78528550
opensv图片修剪:https://blog.csdn.net/sileixinhua/article/details/72811093
opensv案例含tesserate命令:https://www.cnblogs.com/zhongtang/p/5555950.html

附好文:https://blog.csdn.net/lmj623565791/article/details/23960391
异常处理:
1. 加载库异常:
Exception in thread "main" java.lang.UnsatisfiedLinkError: no opencv_java320
in java.library.path at
java.lang.ClassLoader.loadLibrary(ClassLoader.java:1867) at
java.lang.Runtime.loadLibrary0(Runtime.java:870) at
java.lang.System.loadLibrary(System.java:1122) at
yanZhengMaTest.pikachu.Test.<clinit>(Test.java:38)
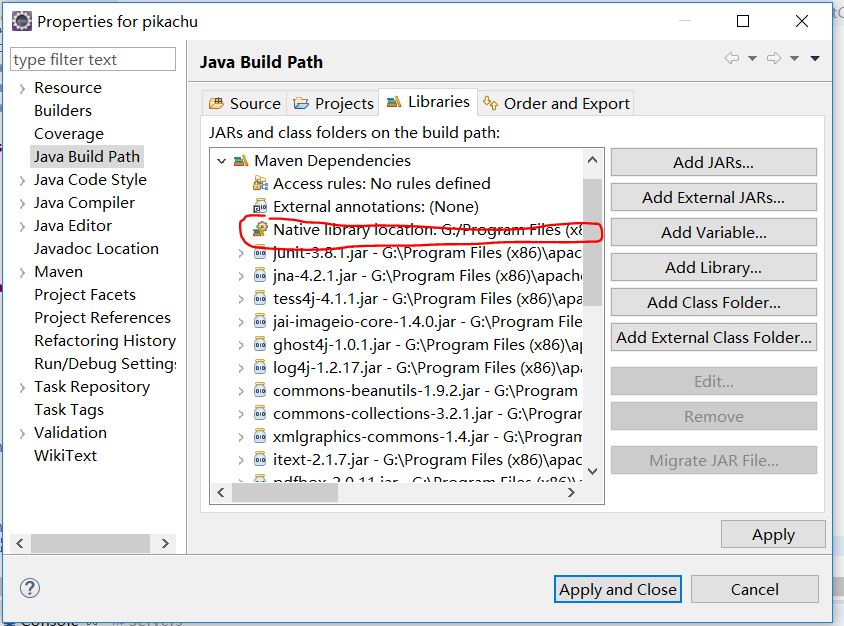
解决:
将以下图片位置的路径设置为:G:Program Files (x86)apache-maven epoorgopenpnpopencv3.2.0-0opencv-3.2.0-0 upatternopencvwindowsx86_64(根据自己maven的opencv包地址进行指定)。

2. jdk版本和opencv版本不匹配(Exception in thread "main" java.lang.UnsatisfiedLinkError: no jniopencv_highgui in java.library.path)
解决:更换opencv版本
3. 使用命令行生成.tr文件时候出现异常:
Page 406
Warning. Invalid resolution 1 dpi. Using 70 instead.
Estimating resolution as 269
Error during processing.
解决:可能图片转换格式或者下载的时候出错,将图片替换即可