Vue Router 是 Vue.js 官方的路由管理器。它和 Vue.js 的核心深度集成,让构建单页面应用变得易如反掌
<div id="app">
  <h1>Hello App!</h1>
  <p>
    <!-- 使用 router-link 组件来导航. -->
    <!-- 通过传入 `to` 属性指定链接. -->
    <!-- <router-link> 默认会被渲染成一个 `<a>` 标签 -->
    <router-link to="/foo">Go to Foo</router-link>
    <router-link to="/bar">Go to Bar</router-link>
  </p>
  <!-- 路由出口 -->
  <!-- 路由匹配到的组件将渲染在这里 -->
  <router-view></router-view>
</div>
在component同级目录下创建一个router文件夹,下面创建一个index.js的文件夹;

如果使用模块化机制编程,导入Vue和Router,要调用 Vue.use(Router)
index文件下的内容:
import Vue from 'vue'
import Router from 'vue-router'
import Vmain from '@/components/Vmain'

Vue.use(Router);

export default new Router({
  // mode: 'history', //去除路由地址中的#
  routes: [
    {
      path: '/',
      name: 'Vmain',
      component: Vmain,
    },
  ]
})
然后在Router对象中的routes中创建路径以及路径所对应的的组件和组件名
通过注入路由器,我们可以在任何组件内通过 this.$router 访问路由器,也可以通过 this.$route 访问当前路由:
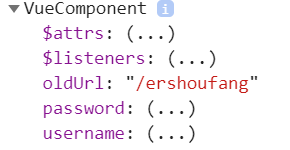
如果要拿到上一个路由。最简单的就是通过 beforeRouteEnter方法;该方法时在在mounted之后执行;
beforeRouteEnter(to,from,next){
next(vm =>{
// 通过访问vm来访问组件的实例;vm--->this
console.log(vm);
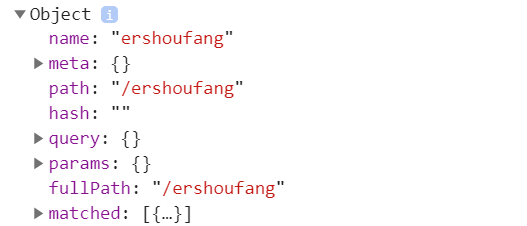
//from表示从哪个路由来的from.path是上一个Url的路径
//vm.oldUrl也是上一个Url的路径
console.log(from);
vm.oldUrl = from.path
})
 //拿到返回登录之前的url
            var tourl = that.oldUrl;
            if (tourl) {
              that.$router.push({  //重定向
                path: tourl
              })
            } else {
              that.$router.push({
                path: '/'
              })
            }
this.$router.push()来实现路由的跳转;
vue中this.$router.push() 传参
1 params 传参
注意:patams传参 ,路径不能使用path 只能使用name,不然获取不到传的数据
this.$router.push({name: 'dispatch', params: {paicheNo: obj.paicheNo}})
取数据:this.$route.params.paicheNo
this.$route.params.paicheNo
$router为VueRouter实例
$route为当前router跳转对象,里面可以获取name、path、query、params等
2 query传参
this.$router.push({path: '/transport/dispatch', query: {paicheNo: obj.paicheNo}})
取数据:this.$route.query.paicheNo
this.$route.query.paicheNo
两者传参的区别就是query传参相当于get请求,参数是在url上的;
而params传参相当于post请求,参数在请求体;
动态路由匹配
我们有一个 User 组件,对于所有 ID 各不相同的用户,都要使用这个组件来渲染
const User = {
  template: '<div>User</div>'
}

const router = new VueRouter({
  routes: [
    // 动态路径参数 以冒号开头
    { path: '/user/:id', component: User }
  ]
})
接收参数的话,$route.params
{id:1}
一个“路径参数”使用冒号 : 标记。当匹配到一个路由时,参数值会被设置到 this.$route.params,可以在每个组件内使用
当我们要从后端得到具体的数据的时候,需要数据的ID ,此时我们可以通过动态的路由匹配来获取当前数据的id值,从而传入后端,从后端返回当前id值的数据。
你可以在一个路由中设置多段“路径参数”,对应的值都会设置到 $route.params 中
| 模式 | 匹配路径 | $route.params |
|---|---|---|
| /user/:username | /user/evan | { username: 'evan' } |
| /user/:username/post/:post_id | /user/evan/post/123 | { username: 'evan', post_id: '123' } |
常规参数只会匹配被 / 分隔的 URL 片段中的字符。如果想匹配任意路径,我们可以使用通配符 (*):
{
  // 会匹配所有路径
  path: '*'
}
{
  // 会匹配以 `/user-` 开头的任意路径
  path: '/user-*'
}
当使用通配符路由时,请确保路由的顺序是正确的,也就是说含有通配符的路由应该放在最后。路由 { path: '*' } 通常用于客户端 404 错误。如果你使用了History 模式,请确保正确配置你的服务器。
当使用一个通配符时,$route.params 内会自动添加一个名为 pathMatch 参数。它包含了 URL 通过通配符被匹配的部分
// 给出一个路由 { path: '/user-*' }
this.$router.push('/user-admin')
this.$route.params.pathMatch // 'admin'
// 给出一个路由 { path: '*' }
this.$router.push('/non-existing')
this.$route.params.pathMatch // '/non-existing'
当你使用 history 模式时,URL 就像正常的 url,例如 http://yoursite.com/user/id,去除掉了#
const router = new VueRouter({
  mode: 'history',
  routes: [...]
})
详细见官网