http://www.oschina.net/translate/peer-to-peer-file-sharing-through-wcf?cmp&p=1#
通过 WCF 实现点对点文件共享
返回原文英文原文:Peer to Peer File Sharing Through WCF
Peer to Peer ConceptsIn this section, I am going to summarize the main concepts of P2P architecture, since this introduction is pretty important for coding a file sharing system. First, I am going to talk about the various types of Peer to Peer networks. There are two kinds of Peer to Peer Network.
Each peer beside its ID gets a name is called
For more information about NetShell and its commands for Peer To Peer Networking, see here and this article is pretty informative too. Namespaces: For taking advantage of .NET classes to work with peer, we need to use both |
译者信息
点对点的概念在本节,我将总述P2P架构的主要概念,因为这些介绍对于开发共享文件系统相当重要。 首先,我将要讨论不同类型的P2P网络。有两种不同类型的点对点网络:纯点对点网络和混合型P2P网络。看起来它们的名字已经解释了这两类网络,但我们仍需要明确这两种类型的不同。纯P2P网络是网络中的各个结点通过其它的结点工作,不存在客户端和服务器的区分,每个节点互相关联并一起工作,同时根据需要发挥着客户端和服务器的作用。混合型P2P网络是 虽然网络是由客户端和服务器组成的,但服务器仅用于响应由对等结点发出的获取信息的请求的。服务器不会存储除了总数之外的任何数据。例如,在P2P的共享 文件系统中,一个节点请求关于其它结点和当前共享文件存储位置的信息,服务器会响应它们的请求,给出共享文件的一些信息如文件大小、结点的名称、文件的扩 展名和可用的结点们。在我们讨论P2P网络时,我们遇到了一些表达和概念,它们对于理解P2P网络相当的重要。下面我将解释一些重要的概念,对它们进行总 结以便在本文中理解它们。
结点:网络中的每一台可以一起互相交互的计算机,称为结点。
“当我们在云里时,每个结点都应当通过唯一的编号识别。正如你所知道的,在使用互联网 时,我们是通过DNS识别每一台服务器的。但是在网格网络中不能使用DNS,因为结点实际上是动态的。结点原本就是动态的,我们不能使用静态的IP地址。 因此我们使用了另一种称作是对等结点命名解决方案的协议(PNRP)而不是DNS协议来解决结点编号的问题。”
每个结点除了它的编号之外会有一个称为“结点名称”。 结点名称可以被注册,不论名称是安全的或者不安全的。在私有网中安全的名称是推荐的;也建议在全球网络中使用安全的名称。不安全的网络可以看到以0.开头的结点名称,例如0.Peer1。安全的名称也可以做为数字签名。在.NET网络中你可以通过它的名称确定(解析)一个结点。
关于NetShell和它关于对等网络的命令的信息,请看这里,这篇文章的信息相当的充分。 命名空间:要使用.NET的类来使用结点,我们需要使用System.ServiceModel和System.Net.PeerToPeer这两个命名空间。 |
Code Survey (How Does It All Work)The code of this project has been divided into 5 main subprojects as follows:
So, let's talk about how these parts work together and then I'll describe each one in detail. At first, I should mention that this project is a Hybrid P2P Network. As I cited at the pristine lines, it means we have some nodes and a server (we name it Super Peer) who serves the nodes by storing and preparing some information concerning file's path and node's ID to facilitate the nodes collaboration. So, we have a server for taking on some tasks such as searching the files. Therefore, we need to start a Server that provides a WCF service in order for the other nodes be able to connect to it and get their desired information. This server can be a Windows Service or a Console server. However in this project it is a Console project, I believe it should run over a Windows Service. The another WCF service is run when peers should connect to each others for downloading the required files. So, we ought to have two WCF running services in a same time.
When me and my Colleague, decided to develop this project as an open
source application, we planned for making a reliable and flexible coding
style, hence, we divided this project into several layers and amortized
each task to a separated layer. I am going to talk about the codes of |
译者信息
代码概述 (系统是如何工作的)
|
Core Transfer Engine LayerThis layer undertakes all the tasks of Peer actions and also
transfers the requested files between peers. Then, in this project, we
expect to see some codes around Peers. This part is the heart of this
system. When a peer starts to work, first it should register itself as a
peer, then it should play the role of both server and client.
Afterwards, if any peer asks a file, first it should search the file and
when it receives the file's information (such as the destination peer
host name), it should use that information to connect to the peers and
then, download the file. The The public List<PeerInfo> Register()
{
List<PeerInfo> registerdPeer = new List<PeerInfo>();
foreach (var registration in registrations)
{
string timeStamp = string.Format("FreeFile Peer Created at : {0}",
DateTime.Now.ToShortTimeString());
registration.Comment = timeStamp;
try
{
registration.Start();
if (registerdPeer.FirstOrDefault(x => x.HostName ==
registration.PeerName.PeerHostName) == null)
{
PeerInfo peerInfo = new PeerInfo(registration.PeerName.PeerHostName,
registration.PeerName.Classifier, registration.Port);
peerInfo.Comment = registration.Comment;
registerdPeer.Add(peerInfo);
}
}
catch { }
}
this.CurrentPOeerRegistrationInfo = registerdPeer;
return registerdPeer;
}
The public List<PeerInfo> ResolveByPeerHostName(string peerHostName)
{
try
{
if (string.IsNullOrEmpty(peerHostName))
throw new ArgumentException("Cannot have a null or empty host peer name.");
PeerNameResolver resolver = new PeerNameResolver();
List<PeerInfo> foundPeers = new List<PeerInfo>();
var resolvedName = resolver.Resolve(new PeerName(peerHostName,
PeerNameType.Unsecured), Cloud.AllLinkLocal);
foreach (var foundItem in resolvedName)
{
foreach (var endPointInfo in foundItem.EndPointCollection)
{
PeerInfo peerInfo = new PeerInfo(foundItem.PeerName.PeerHostName,
foundItem.PeerName.Classifier,endPointInfo.Port);
peerInfo.Comment = foundItem.Comment;
foundPeers.Add(peerInfo);
}
}
return foundPeers;
}
catch (PeerToPeerException px)
{
throw new Exception(px.InnerException.Message);
}
}
}
After resolving, there are a list of peers who appear as an |
译者信息
核心传输引擎层(Core Transfer Engine Layer)这一层承担了一个结点行为的所有任务,同时也能够在结点间传输需要的文件。在本项目中,我们希望看到一些关于结点的代码。这部分是系统的核心部分。 当一个结点开始工作的时候,首先,它应该把自己注册为一个参与 结点,然后它应该同时扮演服务器和客户端的角色。然后,如果某个参与结点请求一个文件,首先要搜索这个文件,然后当它收到了这个文件的信息(比如目标结点 的主机名),它应该用那些信息连接到对应的结点然后下载文件。PNRPManager类是用来注册和解析结点用的。 Register()方法在云端注册此结点,并接收一个列表形式的PeerInfo作为输入参数 public List<PeerInfo> Register()
{
List<PeerInfo> registerdPeer = new List<PeerInfo>();
foreach (var registration in registrations)
{
string timeStamp = string.Format("FreeFile Peer Created at : {0}",
DateTime.Now.ToShortTimeString());
registration.Comment = timeStamp;
try
{
registration.Start();
if (registerdPeer.FirstOrDefault(x => x.HostName ==
registration.PeerName.PeerHostName) == null)
{
PeerInfo peerInfo = new PeerInfo(registration.PeerName.PeerHostName,
registration.PeerName.Classifier, registration.Port);
peerInfo.Comment = registration.Comment;
registerdPeer.Add(peerInfo);
}
}
catch { }
}
this.CurrentPOeerRegistrationInfo = registerdPeer;
return registerdPeer;
}
Start()方法注册结点,而Stop()方法注销某个云中的结点。为了获取一个结点的信息,结点会被解析。当一个结点解析完成,一些信息诸如结 点主机名(peer host name),标识符(Classifier),端口号(port)是可以访问的。ResolveByPeerHostName()方法可以通过主机名解析 一个结点并返回一个列表形式的PeerInfo。 public List<PeerInfo> ResolveByPeerHostName(string peerHostName)
{
try
{
if (string.IsNullOrEmpty(peerHostName))
throw new ArgumentException("Cannot have a null or empty host peer name.");
PeerNameResolver resolver = new PeerNameResolver();
List<PeerInfo> foundPeers = new List<PeerInfo>();
var resolvedName = resolver.Resolve(new PeerName(peerHostName,
PeerNameType.Unsecured), Cloud.AllLinkLocal);
foreach (var foundItem in resolvedName)
{
foreach (var endPointInfo in foundItem.EndPointCollection)
{
PeerInfo peerInfo = new PeerInfo(foundItem.PeerName.PeerHostName,
foundItem.PeerName.Classifier,endPointInfo.Port);
peerInfo.Comment = foundItem.Comment;
foundPeers.Add(peerInfo);
}
}
return foundPeers;
}
catch (PeerToPeerException px)
{
throw new Exception(px.InnerException.Message);
}
}
}
当解析结束后,得到了一系列结点,以EndPointCollection类的对象的形式出现。如果我们使用foreach循环,我们可以访问其中所有的结点作为终端结点。 |
|
sealed class FileTransferServiceHost
{
    public void DoHost(List<PeerInfo> peers)
    {
        Uri[] Uris = new Uri[peers.Count];

        string Address = string.Empty;
        for (int i = 0; i < peers.Count; i++)
        {
            Address = string.Format("net.tcp://{0}:{1}/TransferEngine",
              peers[i].HostName, peers[i].Port);
            Uris[i] = new Uri(Address);
        }

        FileTransferServiceClass currentPeerServiceProxy = new FileTransferServiceClass();
        ServiceHost _serviceHost = new ServiceHost(currentPeerServiceProxy, Uris);
        NetTcpBinding tcpBinding = new NetTcpBinding(SecurityMode.None);
        _serviceHost.AddServiceEndpoint(typeof(IFileTransferService), tcpBinding, "");

        _serviceHost.Open();
    }
}

[ServiceContractAttribute]
 interface IFileTransferService
{
    [OperationContractAttribute(IsOneWay = false)]
    byte[] TransferFileByHash(string fileName,string hash, long partNumber);

    [OperationContractAttribute(IsOneWay = false)]
    byte[] TransferFile(string fileName, long partNumber);
}
If a client (peer) wants to get access a method of the another peer, it should use the Channels to reach this ability. This part has been coded in [ServiceBehavior(ConcurrencyMode = ConcurrencyMode.Single,
InstanceContextMode = InstanceContextMode.Single, UseSynchronizationContext = false)]
class FileTransferServiceClientClass : System.ServiceModel.ClientBase<IFileTransferService>
{
public FileTransferServiceClientClass() :base()
{
}
public FileTransferServiceClientClass(string endpointConfigurationName) :
base(endpointConfigurationName)
{
}
public FileTransferServiceClientClass(string endpointConfigurationName, string remoteAddress) :
base(endpointConfigurationName, remoteAddress)
{
}
public FileTransferServiceClientClass(string endpointConfigurationName,
System.ServiceModel.EndpointAddress remoteAddress) :
base(endpointConfigurationName, remoteAddress)
{
}
public FileTransferServiceClientClass(System.ServiceModel.Channels.Binding binding,
System.ServiceModel.EndpointAddress remoteAddress) :
base(binding, remoteAddress)
{
}
public byte[] TransferFile(string fileName,string hash, long partNumber)
{
return base.Channel.TransferFileByHash(fileName, hash, partNumber);
}
public byte[] TransferFile(string fileName, long partNumber)
{
return base.Channel.TransferFile(fileName, partNumber);
}
}
This point can be useful to know that each instance of this application registers itself as a peer and then starts to setting up a WCF service using the void IFileProviderServer.SetupFileServer()
{
var peers = pnrpManager.Register();
if (peers == null || peers.Count == 0) throw new Exception("Host not registered!");
var fileTransferServiceHost = new FileTransferServiceHost();
fileTransferServiceHost.DoHost(peers);
}
|
译者信息
FileTransferServiceHost 类使每个点成为向另外的点提供所需文件的服务器主机。这个类使用 TCP 协议在各点间传输数据。DoHost() 方法得到一个基于节点主机名的地址,然后添加一个应用了 ServiceContract 属性的接口。因此每个点都向外部世界发布了一个服务以使其方法可通过服务被访问到。(在这种情况下,方法是 TransferFile 和 TransferFileByHash) sealed class FileTransferServiceHost
{
public void DoHost(List<PeerInfo> peers)
{
Uri[] Uris = new Uri[peers.Count];
string Address = string.Empty;
for (int i = 0; i < peers.Count; i++)
{
Address = string.Format("net.tcp://{0}:{1}/TransferEngine",
peers[i].HostName, peers[i].Port);
Uris[i] = new Uri(Address);
}
FileTransferServiceClass currentPeerServiceProxy = new FileTransferServiceClass();
ServiceHost _serviceHost = new ServiceHost(currentPeerServiceProxy, Uris);
NetTcpBinding tcpBinding = new NetTcpBinding(SecurityMode.None);
_serviceHost.AddServiceEndpoint(typeof(IFileTransferService), tcpBinding, "");
_serviceHost.Open();
}
}
[ServiceContractAttribute]
interface IFileTransferService
{
[OperationContractAttribute(IsOneWay = false)]
byte[] TransferFileByHash(string fileName,string hash, long partNumber);
[OperationContractAttribute(IsOneWay = false)]
byte[] TransferFile(string fileName, long partNumber);
}
如果一个客户端(点)想要访问到另一个点的方法,应使用Channel(通道)得到这个能力。这一部分已被编码在FileTransferServiceClientClass 类中,如下: [ServiceBehavior(ConcurrencyMode = ConcurrencyMode.Single,
InstanceContextMode = InstanceContextMode.Single, UseSynchronizationContext = false)]
class FileTransferServiceClientClass : System.ServiceModel.ClientBase<IFileTransferService>
{
public FileTransferServiceClientClass() :base()
{
}
public FileTransferServiceClientClass(string endpointConfigurationName) :
base(endpointConfigurationName)
{
}
public FileTransferServiceClientClass(string endpointConfigurationName, string remoteAddress) :
base(endpointConfigurationName, remoteAddress)
{
}
public FileTransferServiceClientClass(string endpointConfigurationName,
System.ServiceModel.EndpointAddress remoteAddress) :
base(endpointConfigurationName, remoteAddress)
{
}
public FileTransferServiceClientClass(System.ServiceModel.Channels.Binding binding,
System.ServiceModel.EndpointAddress remoteAddress) :
base(binding, remoteAddress)
{
}
public byte[] TransferFile(string fileName,string hash, long partNumber)
{
return base.Channel.TransferFileByHash(fileName, hash, partNumber);
}
public byte[] TransferFile(string fileName, long partNumber)
{
return base.Channel.TransferFile(fileName, partNumber);
}
}
这个应用程序的每个实例把自身登记作为一个节点,然后用 FileTransferServiceHost 开始建立一个 WCF 服务,如下: void IFileProviderServer.SetupFileServer()
{
var peers = pnrpManager.Register();
if (peers == null || peers.Count == 0) throw new Exception("Host not registered!");
var fileTransferServiceHost = new FileTransferServiceHost();
fileTransferServiceHost.DoHost(peers);
}
|
Download Manager LayerThis Layer pledges to manage all activities behind the downloading tasks such as Managing Download processes and exceptions, downloading files, slabbing the requested file into the several pieces and then downloading each part asynchronously, searching the file based on its hash id or its name and ultimately, making a shared folder and storing the downloaded file into it. The public List<Entities.File> Search(string searchPattern)
{
FileServer.FilesServiceClient fileServiceClient = new FileServer.FilesServiceClient();
List<Entities.File> filesList = new List<File>();
foreach (var file in fileServiceClient.SearchAvaiableFiles(searchPattern))
{
Entities.File currentFile = new File();
currentFile.FileName = file.FileName;
currentFile.FileSize = file.FileSize;
currentFile.FileType = file.FileType;
currentFile.PeerID = file.PeerID;
currentFile.PeerHostName = file.PeerHostName;
filesList.Add(currentFile);
}
return filesList;
}
The vital part of this layer is public void Download(Entities.File fileSearchResult)
{
//var action =new Action<object>(searchForSameFileBaseOnHash);
//Task searchForSameFileBaseOnHashTask = new Task(action, fileSearchResult);
//searchForSameFileBaseOnHashTask.Start();
var downloadAction = new Action<object>(StartDownload);
Task downloadActionTask = new Task(downloadAction, fileSearchResult);
downloadActionTask.Start();
}
const long FilePartSizeInByte = 10240;
private void StartDownload(object state)
{
Entities.File fileSearchResult = state as Entities.File;
//We need to apply multiThreading to use multi host to download different part of
//file concurrently max number of thread could be 5 thread per host in
//all of the application;
long partcount = fileSearchResult.FileSize / FilePartSizeInByte;
long mod = fileSearchResult.FileSize % FilePartSizeInByte;
if (mod > 0) partcount++;
downloadFilePart(new DownloadParameter {FileSearchResult=fileSearchResult,
Host = fileSearchResult.PeerHostName, Part = partcount });
}
As you observe, the |
译者信息
下载管理层 这一层保证了管理下载任务后边的所有活动,例如管理下载处理和异常,下载文件,把请求的文件分片,然后异步的下载各分片,基于哈希编号或者名称检索文件,共享文件夹,并把下载的文件存储到共享文件夹中。 这个search()类提供了搜索的引擎来查找跨服务的目标文件,这些服务运行在服务层。如我前边所讲述的,服务器发布了服务,这些服务提供了应用结点的一些公共的信息(例如文件名、结点主机名,文件类型)。在下边的段落中我将详细的讲述服务层的代码。 public List<Entities.File> Search(string searchPattern)
{
FileServer.FilesServiceClient fileServiceClient = new FileServer.FilesServiceClient();
List<Entities.File> filesList = new List<File>();
foreach (var file in fileServiceClient.SearchAvaiableFiles(searchPattern))
{
Entities.File currentFile = new File();
currentFile.FileName = file.FileName;
currentFile.FileSize = file.FileSize;
currentFile.FileType = file.FileType;
currentFile.PeerID = file.PeerID;
currentFile.PeerHostName = file.PeerHostName;
filesList.Add(currentFile);
}
return filesList;
}
这层代码核心的部分是FileTransferManager类,它管理了文件的传送过程。它由下载全部或部分文件的全部所需的方法构成。UI层调 用该类的Download()方法,这个方法启动任务,使用StartDownload方法开始它的动作。随后StartDownload方法被调用。通 过这个方法,文件的请求是基于它的端口号,这个端口号是基于一个常量10240生成的。 public void Download(Entities.File fileSearchResult)
{
//var action =new Action<object>(searchForSameFileBaseOnHash);
//Task searchForSameFileBaseOnHashTask = new Task(action, fileSearchResult);
//searchForSameFileBaseOnHashTask.Start();
var downloadAction = new Action<object>(StartDownload);
Task downloadActionTask = new Task(downloadAction, fileSearchResult);
downloadActionTask.Start();
}
const long FilePartSizeInByte = 10240;
private void StartDownload(object state)
{
Entities.File fileSearchResult = state as Entities.File;
//We need to apply multiThreading to use multi host to download different part of
//file concurrently max number of thread could be 5 thread per host in
//all of the application;
long partcount = fileSearchResult.FileSize / FilePartSizeInByte;
long mod = fileSearchResult.FileSize % FilePartSizeInByte;
if (mod > 0) partcount++;
downloadFilePart(new DownloadParameter {FileSearchResult=fileSearchResult,
Host = fileSearchResult.PeerHostName, Part = partcount });
}
如你所见,StartDownload方法调用downloadFilePart方法,这个方法调用TransferEngine类的GetFile方法,TransferEngine类是由factory类创建的。 |
|
So, let's take a glimpse over the public sealed class Factory
{
Factory()
{
Assembly transferEngineAssembly = Assembly.LoadFile(String.Format(
"E:\FreeFiles\FreeFiles.TransferEngine.WCFPNRP\bin\Debug\FreeFiles.TransferEngine.WCFPNRP.dll"));
var tnaTypes = transferEngineAssembly.GetTypes();
foreach (var item in tnaTypes)
{
if (item.GetInterface("ITransferEngineFactory") != null)
{
ITransferEngineFactory ITransferEngineFactory = Activator.CreateInstance(item) as ITransferEngineFactory;
this.transferEngine = ITransferEngineFactory.CreateTransferEngine();
this.fileProviderServer = this.transferEngine as IFileProviderServer;
break;
}
}
/* Create
*searchEngine;
*/
this.searchEngine = new Searchengine();
}..................................................................
In this class, I used a As it was mentioned, this layer is a pretty important component of this project and there are lots of issues that can be employed over it(For future releases). |
译者信息
所以,让我们瞥一下这个工厂类。这个类使用 TransferEngine 层的DLL制造所需引擎(如:搜索引擎或传输引擎)的一个新实例。它需要得到一个DLL文件的路径并加载它,然后利用它的方法。由于“两个类不能同时互相 引用”这种理性的原因,我们对一个类库使用这种访问。正如你看到的,它使用信道(channels)访问服务器的方法来下载文件。 public sealed class Factory
{
Factory()
{
Assembly transferEngineAssembly = Assembly.LoadFile(String.Format(
"E:\FreeFiles\FreeFiles.TransferEngine.WCFPNRP\bin\Debug\FreeFiles.TransferEngine.WCFPNRP.dll"));
var tnaTypes = transferEngineAssembly.GetTypes();
foreach (var item in tnaTypes)
{
if (item.GetInterface("ITransferEngineFactory") != null)
{
ITransferEngineFactory ITransferEngineFactory = Activator.CreateInstance(item) as ITransferEngineFactory;
this.transferEngine = ITransferEngineFactory.CreateTransferEngine();
this.fileProviderServer = this.transferEngine as IFileProviderServer;
break;
}
}
/* Create
*searchEngine;
*/
this.searchEngine = new Searchengine();
}..................................................................
在这个类中,我用一个字串作为 DLL 的路径,但这是错的,会弄出许多问题(例如,对于每个用户,我们必须根据实情重新设置文件路径,这太笨了)。那么,正确的方式是使用一个返回应用程序文件夹路径的方法。 如之前曾提到的,这个层是此项目的一个非常重要的组成部分,有很多可以采用它的衍生物(在未来的版本)。 |
Server LayerWelcome to the last explained layer in this article. If I want to explain this layer, I should say it is just a WCF service that provides some methods to search between files(shared across peers). This layer utilizes the Entity Framework as the ORM for unifying the way of querying over database. If you open the edmx file, you will see something as below which is a schema of the database construction:
Based on above design, each peer can be related with the several files (One to Many relationship) and it exactly is the stuff that we expect it. This construction is pretty simple but it will be pretty elaborate when we want to develop a more complex system (which is the main goal of this project in the next releases). Anyhow, as I said, this layer plays as a WCF service role. This vital role comes to realize across the public class FilesService
{
private FreeFilesEntitiesContext _freeFilesObjectContext=new FreeFilesEntitiesContext();
[OperationContract]
public void AddFiles(List<Entities.File> FilesList,Entities.Peer peer)
{
FileRepository fileRepository = new FileRepository
(_freeFilesObjectContext as FreeFilesServerConsole.IUnitOfWork);
this.AddPeer(externalPeerToEFPeer(peer));
fileRepository.AddFiles(externalFileToEFFile(FilesList));
SaveFile();
}
[OperationContract]
public void AddPeer(FreeFilesServerConsole.EF.Peer Peer)
{
FileRepository fileRepository = new FileRepository
(_freeFilesObjectContext as FreeFilesServerConsole.IUnitOfWork);
fileRepository.AddPeer(Peer);
}
[OperationContract]
public List<Entities.File> SearchAvaiableFiles(string fileName)
{
FileRepository fileRepository = new FileRepository
(_freeFilesObjectContext as FreeFilesServerConsole.IUnitOfWork);
return internalFileToEntityFile(fileRepository.SearchAvaiableFiles(fileName));
}
public void SaveFile()
{
_freeFilesObjectContext.Save();
}
.
.
.
.
The implementation of file searching (and the other methods related to file activities such as adding a file and its related peer) is observable through the class FileRepository:IFilesRepository
{
private FreeFilesEntitiesContext _freeFilesObjectContext;
public FileRepository(IUnitOfWork unitOfWork)
{
_freeFilesObjectContext = unitOfWork as FreeFilesEntitiesContext;
}
public List<FreeFilesServerConsole.EF.File> SearchAvaiableFiles(string fileName)
{
var filesList = from files in _freeFilesObjectContext.Files
join peers in _freeFilesObjectContext.Peers on files.PeerID equals peers.PeerID
where files.FileName.Contains(fileName)
select new {files,peers };
List<FreeFilesServerConsole.EF.File> List = new List<File>();
foreach (var item in filesList)
{
File file = new File();
file.FileName = item.files.FileName;
file.FileSize = item.files.FileSize;
file.FileType = item.files.FileType;
file.PeerHostName = item.peers.PeerHostName;
List.Add(file);
}
return List;
}
public void AddFiles(List<FreeFilesServerConsole.EF.File> FilesList)
{
//_freeFilesObjectContext = new FreeFilesEntitiesContext();
try
{
foreach (FreeFilesServerConsole.EF.File file in FilesList)
{
_freeFilesObjectContext.Files.AddObject(file);
}
}
catch (Exception exp)
{
throw new Exception(exp.InnerException.Message);
}
}
public void AddPeer(FreeFilesServerConsole.EF.Peer Peer)
{
//_freeFilesObjectContext = new FreeFilesEntitiesContext();
try
{
_freeFilesObjectContext.Peers.AddObject(Peer);
}
catch (Exception exp)
{
throw new Exception(exp.InnerException.Message);
}
}
public void Save()
{
_freeFilesObjectContext.Save();
}
}
As you see, this class uses the Unit Of Work pattern to gather all transactions in just one transaction. |
译者信息
服务器层欢迎进入到本文要解释的最后一层。解释服务器这一层,我想说它就是一个WCF服务,它提供了文件(点对点共享的文件)之间检索的一些方法。这一层使 用Entity Framework作为统一操作数据库的对象关系映射(ORM)。打开edmx文件,您将看到如下的数据库架构:
基于以上的设计,每一个节点可以关联多个文件(一对多的关系),这也恰恰是我们所期望的。这个结构非常简单,但是当我们要开发更复杂的系统的时候, 它会变得十分精巧(这是本项目后续版本要实现的主要目标)。不管怎样,就像我说的,这一层扮演着WCF服务的角色,这个重要的角色在 FilesService类中实现,如下: public class FilesService
{
private FreeFilesEntitiesContext _freeFilesObjectContext=new FreeFilesEntitiesContext();
[OperationContract]
public void AddFiles(List<Entities.File> FilesList,Entities.Peer peer)
{
FileRepository fileRepository = new FileRepository
(_freeFilesObjectContext as FreeFilesServerConsole.IUnitOfWork);
this.AddPeer(externalPeerToEFPeer(peer));
fileRepository.AddFiles(externalFileToEFFile(FilesList));
SaveFile();
}
[OperationContract]
public void AddPeer(FreeFilesServerConsole.EF.Peer Peer)
{
FileRepository fileRepository = new FileRepository
(_freeFilesObjectContext as FreeFilesServerConsole.IUnitOfWork);
fileRepository.AddPeer(Peer);
}
[OperationContract]
public List<Entities.File> SearchAvaiableFiles(string fileName)
{
FileRepository fileRepository = new FileRepository
(_freeFilesObjectContext as FreeFilesServerConsole.IUnitOfWork);
return internalFileToEntityFile(fileRepository.SearchAvaiableFiles(fileName));
}
public void SaveFile()
{
_freeFilesObjectContext.Save();
}
.
.
.
.
文件搜索(以及和文件操作相关的其他方法,如添加文件、添加文件所属的节点)的实现在FileRepository类中。 class FileRepository:IFilesRepository
{
private FreeFilesEntitiesContext _freeFilesObjectContext;
public FileRepository(IUnitOfWork unitOfWork)
{
_freeFilesObjectContext = unitOfWork as FreeFilesEntitiesContext;
}
public List<FreeFilesServerConsole.EF.File> SearchAvaiableFiles(string fileName)
{
var filesList = from files in _freeFilesObjectContext.Files
join peers in _freeFilesObjectContext.Peers on files.PeerID equals peers.PeerID
where files.FileName.Contains(fileName)
select new {files,peers };
List<FreeFilesServerConsole.EF.File> List = new List<File>();
foreach (var item in filesList)
{
File file = new File();
file.FileName = item.files.FileName;
file.FileSize = item.files.FileSize;
file.FileType = item.files.FileType;
file.PeerHostName = item.peers.PeerHostName;
List.Add(file);
}
return List;
}
public void AddFiles(List<FreeFilesServerConsole.EF.File> FilesList)
{
//_freeFilesObjectContext = new FreeFilesEntitiesContext();
try
{
foreach (FreeFilesServerConsole.EF.File file in FilesList)
{
_freeFilesObjectContext.Files.AddObject(file);
}
}
catch (Exception exp)
{
throw new Exception(exp.InnerException.Message);
}
}
public void AddPeer(FreeFilesServerConsole.EF.Peer Peer)
{
//_freeFilesObjectContext = new FreeFilesEntitiesContext();
try
{
_freeFilesObjectContext.Peers.AddObject(Peer);
}
catch (Exception exp)
{
throw new Exception(exp.InnerException.Message);
}
}
public void Save()
{
_freeFilesObjectContext.Save();
}
}
正如你所看到的,这个类使用工作单元模式(Unit Of Work)将所有的任务集合到一个任务中。 |
|
Indeed it comes with two important benefits: in-memory updates and unifying the various transactions in just one. For more details, I suggest you read this article since I found it pretty handy. Another considerable class is the public class ServiceInitializer : IServiceInitializer
{
private string _endPointAddress = string.Empty;
public ServiceInitializer()
{
_endPointAddress =
ConfigurationSettings.AppSettings["FileServiceEndPointAddress"].ToString();
}
public void InitializeServiceHost()
{
Uri[] baseAddresses = new Uri[]{
new Uri(_endPointAddress),
};
ServiceHost Host = new ServiceHost(typeof(FilesService),baseAddresses);
Host.AddServiceEndpoint(typeof(FilesService),
new BasicHttpBinding(),"");
ServiceMetadataBehavior smb = new ServiceMetadataBehavior();
smb.HttpGetEnabled = true;
Host.Description.Behaviors.Add(smb);
Host.Open();
}
}
This service can be available when you run the
Using The Code (How To Run and Debug This Application)Using this code is not as simple as you may have imagined since you should run it across at least 2 computers which are related together through a same network, however you will be able to run and test it if you read the below lines carefully. |
译者信息
事实上它有两个重要的优点:在内存中的更新和一次性统一了各种事务处理。更多的细节,建议您阅读这篇文章,我发现它相当的便捷。 另一个应当注意的类是ServiceInitializer.它管理了服务,使得服务对于外部结点而言是通过配置文件的值可以访问的。 public class ServiceInitializer : IServiceInitializer
{
private string _endPointAddress = string.Empty;
public ServiceInitializer()
{
_endPointAddress =
ConfigurationSettings.AppSettings["FileServiceEndPointAddress"].ToString();
}
public void InitializeServiceHost()
{
Uri[] baseAddresses = new Uri[]{
new Uri(_endPointAddress),
};
ServiceHost Host = new ServiceHost(typeof(FilesService),baseAddresses);
Host.AddServiceEndpoint(typeof(FilesService),
new BasicHttpBinding(),"");
ServiceMetadataBehavior smb = new ServiceMetadataBehavior();
smb.HttpGetEnabled = true;
Host.Description.Behaviors.Add(smb);
Host.Open();
}
}
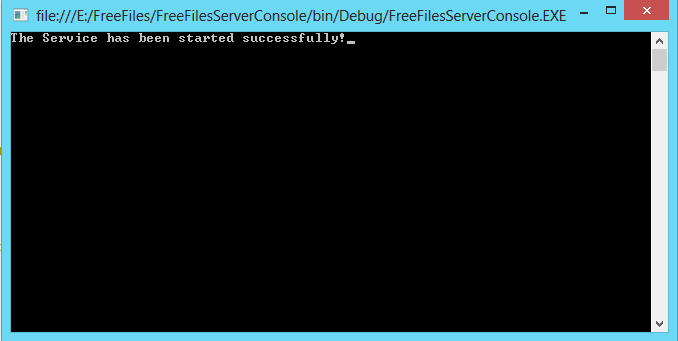
在你运行FreeFilesServerConsole项目时这个服务是可用的。你将会看到如下图所示的消息,它发布了WCF服务的开始状态,随后,你可以检索或者共享你所需的文件。
使用代码(如何运行和调试这个应用) 使用这些代码并不像你想像的那样简单,因为你应当在至少两台通过同一网络相互关联的电脑上运行它,如果你认真的阅读了下面的内容,你将可以运行和测试这些代码。 |
|
For running this application, first of all, you should be connected to a network and your firewall ought to be deactivated. Then, check your network and firewall. Afterwards, for running the code, follow the below steps:
I think there are no other important details to talk about it for running this application successfully, unless I have forgotten some tiny points. In case of any problem, you can ask your question in the comments part of this page. |
译者信息
为了运行这个应用,首先,你应当连接到网络并确保防火墙未启用。接着检进你的网络和防火墙。总之,为了运行代码,请参照如下的步骤:
我想为了成功的运行这个应用再没什么别的细节可以讲述了,除非我遗漏了一些很小的点。如果遇到任务问题,您可以在本文的评论中提出问题。 |
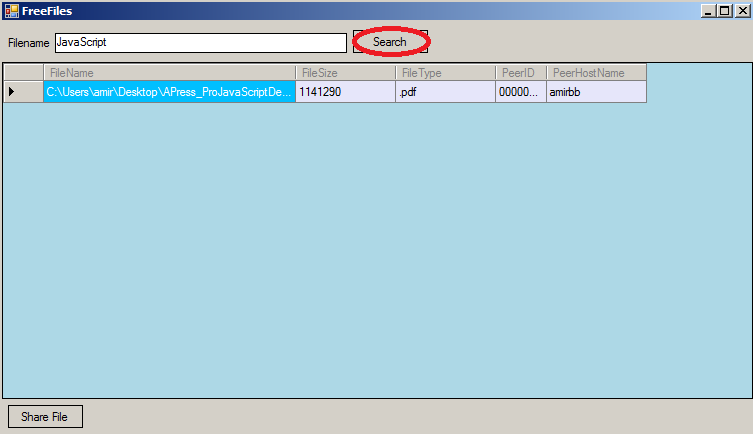
How Does the Current Application Look Like?The primitive version is pretty simple in both of its appearance and features. When you setup all parts of application, in kind there is a shared file, you can search it and see the results in a simple
You can share a desired file as well by clicking on the "Share File" button. The current sharing style is too simple. In the next version, one of the most momentous features is the ability to copy a bunch of files in a shared folder which is accessible to the others or the capability to share a folder not just one file. Nevertheless, the current appearance is just like this:
Moreover, the current appearance ought to change to a better one which is more handy and user friendly to the end user. |
译者信息
目前应用是什么样的呢?首个版本的外观和特征都相当的简单。在你启动应用的各个部分后,就会有一个共享的文件,你可以搜索,并看到网格视图列出的结果。
你可以通过单击共享文件按钮把指定的文件共享。目前共享的样式非常的简洁。在下一个版本中,最大的重要特征之一就是在共享文件夹中批量复制文件,这 个些在共享文件夹中的文件其它使用者是可以访问的;或者可以共享文件夹,而不是共享单一的文件。总之,目前这版的外观就是这样的:
此外,当前版本的外观应当更好一些,更加的 |