管理配置
springcloudConfigServer
- 共享配置
配置不在需要和应用程序一起打包和部署。这样的话,配置的变更或回滚就在不需要重新构建和重新部署应用了。配置甚至可以在运行时进行变更,无需重启应用。
共享通用配置的微服务管理自己的属性设置副本,并且能够管理共享的相同属性。如果需要对属性进行变更只需要在一个地方执行一次就可以应用到所有的微服务上
敏感配置可以进行加密处理,并且能够与应用代码分开进行维护。应用可以按需获取未加密的值,而不需要应用程序提供解密信息相关的代码。
SpringcloudconfigServer提供了中心化的配置功能,应用中的所有微服务均可以依赖该服务器来获取配置。因为它是中心化的,所以是一个一站式的配置商店,所有的服务都可以使用它,另外它还能够为特定服务提供专门的配置
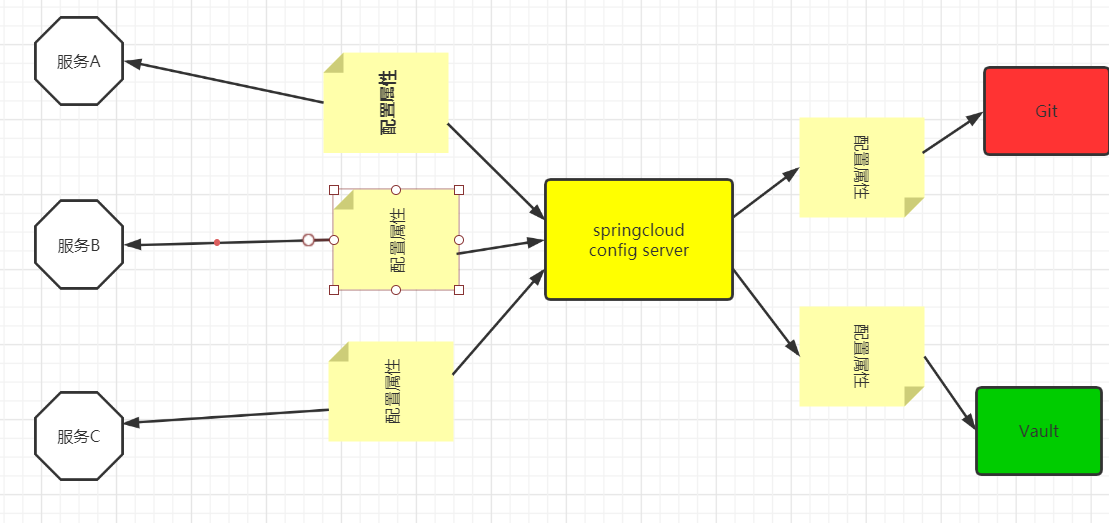
SpringcloudConfigServer通过支撑的Git仓库或Vault私密储存来为其他服务提供配置属性
启用配置服务器
这里我们将项目名称命名为config-server
        <dependency>
			<groupId>org.springframework.cloud</groupId>
			<artifactId>spring-cloud-config-server</artifactId>
		</dependency>
Config Server的版本是根据选择的Spring Cloud release train 确定的。在pom.xml文件中,必须配置Spring Cloud release train。这里使用springcloud的Finchley.SR1版本
           <dependency>
				<groupId>org.springframework.cloud</groupId>
				<artifactId>spring-cloud-dependencies</artifactId>
				<version>${spring-cloud.version}</version>
				<type>pom</type>
				<scope>import</scope>
			</dependency>
我们还必须启动spring cloud config server
@SpringBootApplication
@EnableConfigServer
public class ConfigServerApplication {
	public static void main(String[] args) {
		SpringApplication.run(ConfigServerApplication.class, args);
	}
}
我们必须编写application.yml文件 绑定git仓库的地址 这里的git仓库必须是公开的
server:
  port: 8888
spring:
  cloud:
    config:
      server:
        git:
          uri: https://github.com/habuma/tacocloud-config
这里存储config server客户端的配置application.yml文件
很重要的一点是我们此时编写的配置是针对Config Server本身的。它与Config Server 对外提供的配置是不同的。config Server 会对外提供从git或valut获取到的配置信息
- 我们可以模拟一个config client 也就是 config server 的客户端`
$ curl localhost:8888/application/default/master
{
    "name": "application",
    "profiles": [
        "default"
    ],
    "label": null,
    "version": "551620858a658c9f2696c7f543f1d7effbadaef4",
    "state": null,
    "propertySources": [
        {
            "name": "https://github.com/habuma/tacocloud-config/application.yml",
            "source": {
                "server.port": 0,
                "eureka.client.service-url.defaultZone": "http://localhost:8761/eureka/",
                "spring.data.mongodb.password": "93912a660a7f3c04e811b5df9a3cf6e1f63850cdcd4aa092cf5a3f7e1662fab7"
            }
        }
    ]
}
它会向Config Server的"application/default"路径发送Http Get 请求。这个请求可以由两部分或3部分组成,如图
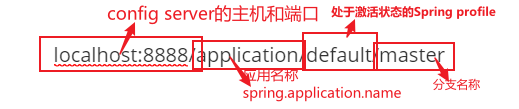
路径的第一部分,即"application"指的是发送请求的应用名称。待会讲到特定的应用配置可以根据应用名选择配置文件。
当没有分支的时候默认选择master分支
从git子路径下提供配置
有时候我们需要将文件放在子目录下,这时我们可以指定spring.cloud.config.server.git.search-paths属性,让Config server不再从根目录而是从"/config"目录下提供配置信息:
spring:
  cloud:
    config:
      server:
        git:
          uri: https://github.com/habuma/tacocloud-config
          search-paths: config
注意,该属性是一个复数形式,这意味这我们可以按照如下方式设置多个路径的配置
spring:
  cloud:
    config:
      server:
        git:
          uri: https://github.com/habuma/tacocloud-config
          search-paths: config,moreconfig
我们还可以使用通配符来搜索路径
spring:
  cloud:
    config:
      server:
        git:
          uri: https://github.com/habuma/tacocloud-config
          search-paths: config,more*
从git分支或标签下提供配置
如下
spring:
  cloud:
    config:
      server:
        git:
          uri: https://github.com/habuma/tacocloud-config
       # 指定分支名称
          default-label: sidework
按照这个配置形式,除非Config Server客户端指定,否则将会提供"sidework"分支下的配置
为git后端提供认证
Config Server检索出的配置信息,很可能被密码和用户绑定,如果是这样就必须设置git配置凭证
spring:
  cloud:
    config:
      server:
        git:
          uri: https://github.com/habuma/tacocloud-config
          password: zgrey
          username: 123456
提供特定应用和profile的属性
从客户端的角度来讲,消费特定应用和特定profile的配置属性与之前没有Config Server时并没有太大的差别。应用的名称可以根据spring.application.name来进行指定。激活profile可以通过spring.profiles.active属性进行设置(通常会通过名为SPRING_PROFILES_ACTIVE的环境变量进行设置)。
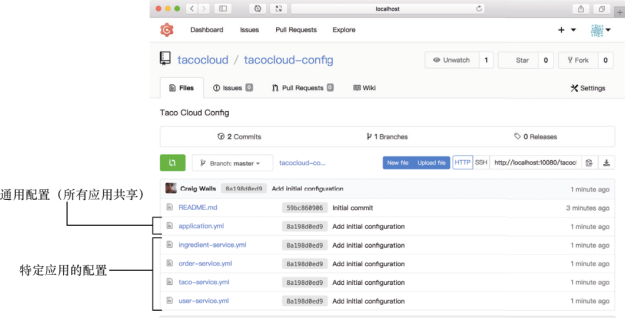
类似的,要提供面向特定应用和profile的属性,Config Server 本身也没有太多需要做的。真正比较重要的是,这些属性在支撑Git仓库中该如何进行存储
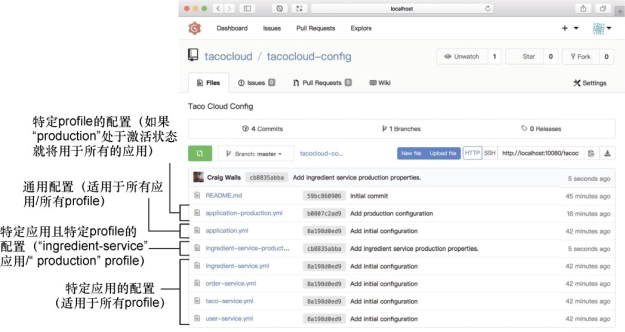
提供特定应用的属性
在微服务应用中我们建立了多个模块包括: ingredient-service、order-service、taco-service,我们可以根据每个服务的spring.application.name来指定它的名称。然后,我们就可以根据各个服务的名称在Config Server的git后端创建应用 的配置YAML文件
比如ingredient-service.yml,order-service.yml
注意不管服务的名称是什么,所有的应用都接受来自application.yml文件的配置。但是,在向Config server发送请求的时候,每个服务应用的spring.application.name的属性值会一同发送,如果存在匹配的属性文件,那么该文件将会一同返回,如果application.yml文件与特定文件中有冲突 优先选用特定文件的配置
$ http://localhost:8888/ingredient-client/default

{
    "name": "ingredient-client",
    "profiles": [
        "default"
    ],
    "label": null,
    "version": "551620858a658c9f2696c7f543f1d7effbadaef4",
    "state": null,
    "propertySources": [
        {
            "name": "https://github.com/habuma/tacocloud-config/ingredient-client.yml",
            "source": {
                "server.port": 8080
            }
        },
        {
            "name": "https://github.com/habuma/tacocloud-config/application.yml",
            "source": {
                "server.port": 0,
                "eureka.client.service-url.defaultZone": "http://localhost:8761/eureka/",
                "spring.data.mongodb.password": "93912a660a7f3c04e811b5df9a3cf6e1f63850cdcd4aa092cf5a3f7e1662fab7"
            }
        }
    ]
}
提供来自profile的属性
借助profile,我们可以声明多个配置。除了已经推送到Config Server Git 后端的默认application.yml文件之外,我们还可以推送另外一个名为applicaiton-production.yml的YAML文件
在应用从Config Server获取配置信息的时候,Config Server会识别哪个profile处于激活状态。如果活跃状态profile是production,那么会返回两个配置文件的信息(application.yml和application-production.yml)都将会返回,并且application-producation.yml中的属性会优先application.yml中的默认属性。
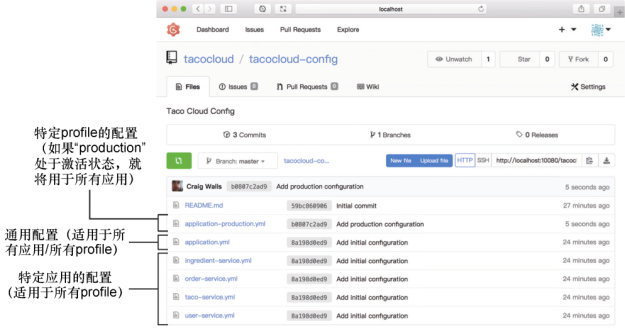
- 我们可以使用同样的命名约定指定适用于特定应用且特定profile的属性,也就是将属性文件命名为应用名加划线再加profile名的形式。例如,我们想要为名为ingredient-service的应用设置属性,而且这些属性只有当production profile 处于激活状态时才有效。在这种场景下,名为
ingredient-service-production.yml的文件可以包含特定应用且特定profile的属性,
保持配置属性的私密性
Config Server 提供的大多数配置可能并不是私密。但是,我们可能需要Config Server 提供一些包含敏感信息的属性,比如密码或安全token,在后端仓库中,他们最好保持私密。
Config Server 提供了两种方式来支持私密的配置属性。
- 在Git存储的属性文件中使用加密后的值
- 使用
HashhiCorp Vault作为Config Server 的后端存储,补充(或替代)Git
使用Git进行加密属性
除了提供非加密值以外,Config Server 也可以借助存储在Git中的属性文件提供加密值。处理存储在Git中的加密数据的关键在于一个密钥(key),即加密密钥(encryption key).
为了启动加密属性功能,我们使用一个加密密钥对属性进行加密,然后再将属性值提供给客户端之前,config Server进行解密。
Config Server 支持对称密钥和非对称密钥。
- 对称密钥
encrypt:
	key: s3cr3t
很重要的一点需要注意,这个属性要设置到bootstrap配置中(例如,bootstrap.properties或bootstrap.yml)。这样的话,在自动配置功能启用Config Server之前,这个属性就会加载和启用.
为了更加安全一些,我们可以让Config Server使用非对称的RSA密钥对或引用一个keystore.要创建这样的密钥,我们可以使用keytool命令行工具
keytool -genkey -alias ffzs-jwt -keyalg RSA -keysize 1024 -keystore ffzs-jwt.j
ks -validity 365 -keypass ffzs00 -storepass ffzs00

-- 然后在使用:
“keytool -importkeystore -srckeystore ffzs-jwt.jks -destkeystore ffzs-jwt.jks -deststoretype pkcs12" 迁移到行业标准格式 PKCS12。
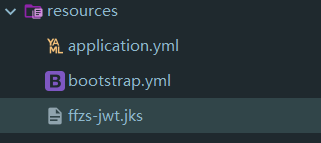
最后可以得到ffzs-jwt.jks文件
注意:****必须安装JAVA CRYPTOGRAPHY EXTENSION (JCE) UNLIMITED STRENGTH 包 https://blog.csdn.net/andyguan01_2/article/details/88343641
然后再bootstrap.yml文件中编写配置属性
encrypt:
  key-store:
    alias: ffzs-jwt
    location: classpath:ffzs-jwt.jks
    password: ffzs00
    secret: ffzs00
- Config Server 提供了一个"/encrypt"端口会帮助我们实现对数据进行加密。
$ curl localhost:8888/encrypt -d "123"

接下来我们可以将这个加密后的值复制到 git仓库的yml文件中
spring:
	data:
	  mongodb:
	    password:'{cipher}生成的密钥'
{cipher}会告送Config Server这是一个加密数据
{
    "name": "ingredient-client",
    "profiles": [
        "default"
    ],
    "label": null,
    "version": "a5e39748a2c392a730671cfe73127dd02dd8a23b",
    "state": null,
    "propertySources": [
        {
            "name": "https://try.gogs.io/ZGrey/zgrey/ingredient-client.yml",
            "source": {
                "server.port": 8080,
                "invalid.spring.data.mongodb.password": "123"
            }
        },
        {
            "name": "https://try.gogs.io/ZGrey/zgrey/application.yml",
            "source": {
                "server.port": 0,
                "eureka.client.service-url.defaultZone": "http://localhost:8761/eureka/",
                "invalid.spring.data.mongodb.password": "123"
            }
        }
    ]
}
我们可以看到,spring.data.mongodb.password的值是以解密后的形式提供的。默认情况下,Config Server提供的所有加密值只是再git仓库中进行加密的,他们对外提供时会解密。
如果想要让Config Server 以未解密的形式对外提供加密属性,那么可以将spring.cloud.config.server.encrypt.enable属性设置未false:
spring:
  cloud:
    config:
      server:
        git:
          uri: https://try.gogs.io/ZGrey/zgrey
          password: zjh123456
          username: zgrey
        encrypt:
          enabled: false
这样的话Config Server接受到的结果都是经过加密的,客户端需要自行进行解密
- 关于Vault暂时不记录
在运行时刷新配置属性
手动刷新
手动刷新: Config Server 客户端启用一个特殊的"/actuator/refresh"端点,对每个服务的这个端点发送HTTP POST请求将会强制配置
客户端从Config Server的后端检索最新的配置
自动配置: Git‘仓库上提交hook会触发所有Config Server客户端服务的刷新操作。这涉及Spring Cloud的另一个项目,名为Spring Cloud Bus,它能够用于Config Server 及其客户端之间的通信。
手动刷新
导入spring boot actuator.他是Spring Boot的基本元素之一,能够探查应用运行时的状况并且允许对运行时进行一些有限的操作,比如日志级别。
当我们将应用设置为Config Server 客户端的时候,自动配置功能会配置一个特殊的Actutor端点,用来刷新配置属性。为了使用该端点
,在项目的构建文件中除了Config Client依赖,我们需要添加依赖:
        <dependency>
            <groupId>org.springframework.boot</groupId>
            <artifactId>spring-boot-starter-actuator</artifactId>
        </dependency>
在Config Server客户端应用中添加Actuator之后,我们可以在任意时间发送HTTP POST请求到"/actuator/refresh",通知它从后端仓库刷新配置属性。
我们可以看一下他是如何实现的。
- 编写一个
GreetingProps
@Component
@ConfigurationProperties(prefix = "greeting")
public class GreetingProps {
    private String message;
    public String getMessage() {
        return message;
    }
    public void setMessage(String message) {
        this.message = message;
    }
}
- 编写一个
GreetingController
@RestController
@RequestMapping("/a")
@Slf4j
public class GreetingController {
    private final GreetingProps greetingProps;
    public GreetingController(GreetingProps greetingProps) {
        this.greetingProps = greetingProps;
    }

    @GetMapping("/hello")
    public String message(){
        log.info("message==> :"+greetingProps.getMessage());
        return greetingProps.getMessage();
    }
}
在git仓库中我们创建一个taco-service.yml文件,含有下面的配置
server:
  port: 8881
greeting:
  message: 'name'
config-server的配置文件 这里必须时bootstrap.yml文件
server:
  port: 8888
# Note that this configuration differs slightly from what is in chapter 14.
# Whereas the GitHub org/user was "tacocloud" in the book, that name doesn't
# actually exist in GitHub. Instead, the configuration shown here references
# my GitHub org/user where there is an actual "tacocloud-config" repository.
# You are welcome to continue using this repository as a source of configuration
# data, but if you want to play around and tweak the configuration, you'll
# need to setup your own configuration repository (or fork mine).
spring:
  cloud:
    config:
      server:
        git:
          uri: https://try.gogs.io/ZGrey/zgrey
          password: zjh123456
          username: zgrey
  application:
    name: config-server
config-client的配置文件 连接config-server
server:
  port: 8881
spring:
  cloud:
    config:
      uri: http://localhost:8888
  application:
    name: taco-service
将项目运行起来后 访问$ curl localhost:8881/hello

- 这时候我们修改
yml配置文件信息
然后请求端点
$ curl localhost:53419/actuator/refresh -X POST
["config.client.version","greeting.message"]
当我们再次向路径发送请求的时候 数据已经发生改变
无需重启应用
自动刷新配置
Config Server能够借助名为Spring cloud Bus的spring cloud 项目将配置变更自动通知到每个客户端,作为手动刷新应用中每个Config Server 客户端属性的替代方案。
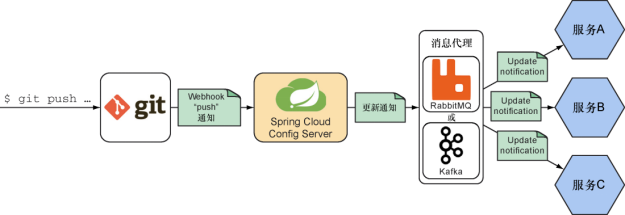
- 在配置Git仓库上创建一个
webhook,当Git仓库有任何变化(比如所有的推送)时都会通知Config Server。很多的Git实现都支持webhook,比如Github、GitLab、Bitbucket和Gogs - Config Server会对
webhookPost 请求做出响应,借助某种消息代理以消息的方式广播该变更 - 每个COnfig Server客户端应用订阅该通知,对通知消息做出响应,也就是会使Config Server中的新属性值刷新他们的环境
这样做的结果就是,在配置属性变更推送到后端的Git仓库之后,所有的Config Server客户端应用能够立即获取最新的配置属性值。
在使用Config Server的自动属性刷新功能时,会有多个部件发挥作用。
具体步骤如上图所示
创建
webhook

启用"/monitor"端点来处理请求
在Config Server中处理webhook更新
要启用Config Server的"/monitor"端点非常简单,我们只需要添加spring-cloud-config-monitor依赖到Config Server的配置文件中。
在Maven的pom.xml文件中,如下的依赖就会完成该项工作
		<dependency>
			<groupId>org.springframework.cloud</groupId>
			<artifactId>spring-cloud-config-monitor</artifactId>
		</dependency>
Spring cloud Stream是另一个Spring Cloud项目。借助它,我们能够创建通过底层绑定机制通信的服务,这种通信机制可能是RabbitMq或Kafka。服务在编写的时候并不会关心如何使用这些通信机制,只是接受流中的数据,对其进行处理,并返回到流中由下游的服务继续处理
"/monitor"端点使用Spring Cloud Stream 发布通知消息给参与的Config Server客户端。为了避免硬编码特定的消息实现,监控器会作为Spring Cloud Stream的原,发布消息到流中并让底层的绑定机制处理消息发送的特定功能。
如果使用Rabbitmq,就需要将Spring Cloud Stream RabbitMq绑定依赖添加到Config Server的构建文件中:
        <dependency>
			<groupId>org.springframework.cloud</groupId>
			<artifactId>spring-cloud-starter-stream-rabbit</artifactId>
		</dependency>
如果你更喜欢Kafka,那么需要添加如下的Spring Cloud Stream Kafka依赖:
		<dependency>
			<groupId>org.springframework.cloud</groupId>
			<artifactId>spring-cloud-starter-stream-kafka</artifactId>
		</dependency>
这样就具备自动刷新功能了
然后配置rabbitmq
spring:
    rabbitmq:
        port: 5672
        host: 192.168.204.128
        username: springtest
        password: 123
        virtual-host: /spring
在客户端启动自动刷新
在Config Server客户端启用属性的自动刷新比Config Server 本身会更加简单。我们更需要添加一些依赖:
 		<dependency>
            <groupId>org.springframework.cloud</groupId>
            <artifactId>spring-cloud-starter-bus-amqp</artifactId>
        </dependency>
这样会添加AMQpSpring Cloud Bus starter依赖到构建文件中
对应的设置客户端的rabbitmq配置就可以了
Config Server 及其客户端配置成了支持自动刷新。将他们启动起来,并对application.yml做一下修改,并将该文件提交到Git仓库的时候我们会立即看到它在客户端应用中生效。