一、Docker介绍
docker官网:https://www.docker.com/
Docker hub地址: https://hub.docker.com/
1、基本概念
Docker 是一个开源的应用容器引擎,基于 Go 语言 并遵从Apache2.0协议开源。Docker 可以让开发者打包他们的应用以及依赖包到一个轻量级、可移植的容器中,然后发布到任何流行的 Linux 机器上,也可以实现虚拟化。容器是完全使用沙箱机制,相互之间不会有任何接口(类似 iPhone 的 app),更重要的是容器性能开销极低。
2、 docker的优势
简化程序:
Docker 让开发者可以打包他们的应用以及依赖包到一个可移植的容器中,然后发布到任何流行的 Linux 机器上,便可以实现虚拟化。Docker改变了虚拟化的方式,使开发者可以直接将自己的成果放入Docker中进行管理。方便快捷已经是 Docker的最大优势,过去需要用数天乃至数周的 任务,在Docker容器的处理下,只需要数秒就能完成。
节省开支:
一方面,云计算时代到来,使开发者不必为了追求效果而配置高额的硬件,Docker 改变了高性能必然高价格的思维定势。Docker 与云的结合,让云空间得到更充分的利用。不仅解决了硬件管理的问题,也改变了虚拟化的方式。
3、与传统vm特性对比
作为一种轻量级的虚拟化方式,Docker在运行应用上跟传统的虚拟机方式相比具有显著优势:
Docker容器很快,启动和停止可以在秒级实现,这相比传统的虚拟机方式要快得多。
Docker容器对系统资源需求很少,一台主机上可以同时运行数千个Docker容器。
Docker通过类似Git的操作来方便用户获取、分发和更新应用镜像,指令简明,学习成本较低。
Docker通过Dockerfile配置文件来支持灵活的自动化创建和部署机制,提高工作效率。
Docker容器除了运行其中的应用之外,基本不消耗额外的系统资源,保证应用性能的同时,尽量减小系统开销。
Docker利用Linux系统上的多种防护机制实现了严格可靠的隔离。从1.3版本开始,Docker引入了安全选项和镜像签名机制,极大地提高了使用Docker的安全性。
|
特性
|
容器
|
虚拟机
|
|
启动速度
|
秒级
|
分钟级
|
|
硬盘使用
|
一般为MB
|
一般为GB
|
|
性能
|
接近原生
|
弱于原生
|
|
系统支持量
|
单机支持上千个容器
|
一般几十个
|
|
隔离性
|
安全隔离
|
完全隔离
|
- 基础架构

5、docker的技术基础
namespace,容器隔离的基础,保证A容器看不到B容器. 6个名空间:User(用户及用户组)【内核3.8以上】,Mnt(文件系统或挂载点),Network(网络IP、端口等),UTS(主机名和域名),IPC(进信号量、消息队列和共享内存,进程通信),Pid(进程号)
cgroups,容器资源统计和隔离。主要用到的cgroups子系统:cpu,blkio(块设备IO),devices(设备访问),freezer(挂起或恢复任务),memory(内存使用量及报告),perf_event(对cgroup中的任务进行统一新年测试),net_cls(cgroup中的任务创建的数据报文的类别标识符)
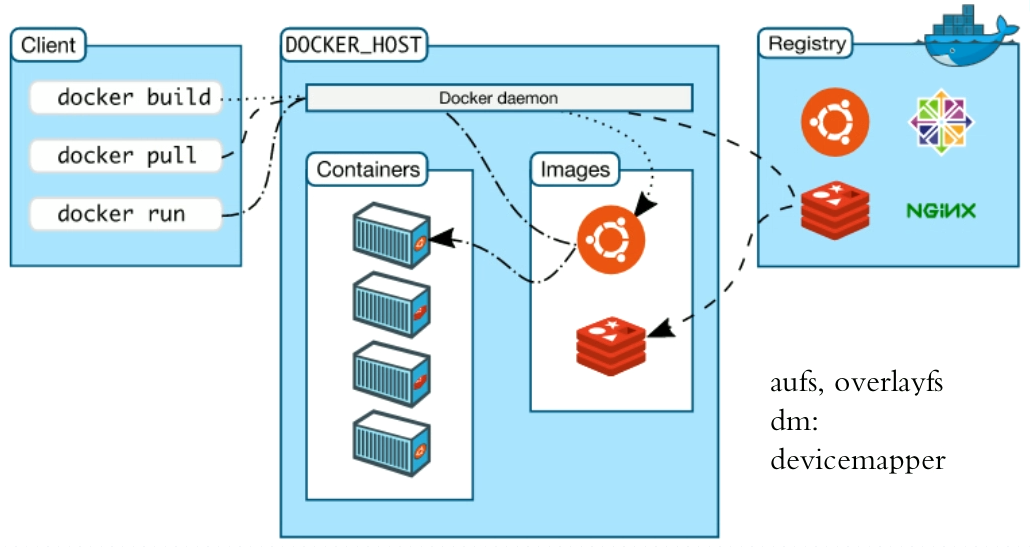
unionfs,典型:aufs/overlayfs,分层镜像实现的基础
6、docker组件
docker Client客户端————>向docker服务器进程发起请求,如:创建、停止、销毁容器等操作
docker Server服务器进程—–>处理所有docker的请求,管理所有容器
docker Registry镜像仓库——>镜像存放的中央仓库,可看作是存放二进制的scm(一般是dockerhub)
环境:
1、64位cpu
2、Linux kernel 3.10以上(Centos7以后)
#1、下载docker-ce的yum源
wget -O /etc/yum.repos.d/docker-ce.repo    https://mirrors.tuna.tsinghua.edu.cn/docker-ce/linux/centos/docker-ce.repo
sed -i "s#download.docker.com#mirrors.tuna.tsinghua.edu.cn/docker-ce#g" /etc/yum.repos.d/docker-ce.repo
yum makecache
#2、yum下载docker-ce
yum install docker-ce -y

#3、docker的配置文件
/etc/docker/daemon.json

#4、启动docker服务
systemctl  start docker

#5、    下载镜像
docker pull busyboxf
#6、    登录docker hub
docker login -u  [账号]
[root@CentOS7 ~]# docker login  -u [账号]
Password:
WARNING! Your password will be stored unencrypted in /root/.docker/config.json.
Configure a credential helper to remove this warning. See
https://docs.docker.com/engine/reference/commandline/login/#credentials-store

Login Succeeded
三、、Docker常用命令
-i                                  #以交互模式运行容器,通常与 -t 同时使用;
-t                                  #为容器重新分配一个伪输入终端,通常与 -i 同时使用;
-d                                  #后台运行容器,并返回容器ID;
--name="nginx-lb"                   #为容器指定一个名称;
--dns 8.8.8.8                       #指定容器使用的DNS服务器,默认和宿主一致;
--dns-search example.com            #指定容器DNS搜索域名,默认和宿主一致;
-h "mars"                           #指定容器的hostname;
-e username="ritchie"               #设置环境变量;
--env-file=[]                       #从指定文件读入环境变量;
--cpuset="0-2" or --cpuset="0,1,2"  #绑定容器到指定CPU运行;
-m                                  #设置容器使用内存最大值;
--net="bridge"                      #指定容器的网络连接类型支持bridge/host/none/container:<name|id> 四种类型;
--link=[]                           #添加链接到另一个容器;
--expose=[]                         # 开放一个端口或一组端口
-p                                  #端口映射,格式为:主机(宿主)端口:容器端口
--config=~/.docker                  #客户端配置文件的位置
  -D, --debug=false                 #启用Debug调试模式
  -H, --host=[]                     #守护进程的套接字(Socket)连接
  -h, --help=false                  #打印使用
  -l, --log-level=info              #设置日志级别
  -v, --version=false               #打印版本信息并退出
build                               #通过Dockerfile定制镜像
commit                              #提交当前容器为新的镜像
cp                                  #从容器中拷贝指定文件或者目录到宿主机中或者从宿主机拷贝到容器
create                              #创建一个新的容器,同run 但不启动容器
diff                                #查看docker容器变化
events                              #从docker服务获取容器实时事件
exec                                #在已存在的容器上运行命令
export                              #导出容器的内容流作为一个tar归档文件(对应import)
history                             #展示一个镜像形成历史
images                              #列出系统当前镜像
import                              #从tar包中的内容创建一个新的文件系统映像(对应export)
info                                #显示系统相关信息
inspect                             #查看容器详细信息
kill                                #kill指定docker容器
load                                #从一个tar包中加载一个镜像(对应save)
login                               #登陆docker Hub服务器
logout                              #从当前Docker registry退出
logs                                #输出当前容器日志信息[-f 是实时查看]
pause                               #暂停容器
port                                #查看映射端口对应的容器内部源端口
ps                                  #列出容器列表
pull                                #从docker镜像源服务器拉取指定镜像或者库镜像
push                                #上传指定镜像或者库镜像至docker源服务器
rename                              #重命名容器
restart                             #重启运行的容器
rm                                  #移除一个或者多个容器
rmi                                 #移除一个或多个镜像(无容器使用该镜像才可以删除,否则需要删除相关容器才可以继续或者-f强制删除)
run                                 #创建一个新的容器并运行一个命令
save                                #保存一个镜像为一个tar包(对应load)
search                              #在dockerhub中搜索镜像
start                               #启动容器
stats                               #统计容器使用资源
stop                                #停止容器
tag                                 #给源中镜像打标签
top                                 #查看容器中运行的进程信息
unpause                             #取消暂停容器
version                             #查看容器版本号
wait                                #截取容器停止时的退出状态值
四、docker卷存储(挂载目录)
Docker的卷挂载有2种方式
1、数据卷:-v /data,-v src:dst
2、数据卷容器:--volumes-from
1、    书卷 -v 的挂载方式
#将宿主机的/etc目录挂载到容器的/mnt目录

[root@CentOS7 ~]# docker run -it -v /etc/:/mnt/  busybox


2、数据卷容器:--volumes-from
##数据卷容器:--volumes-from(复制其它容器的卷)
[root@CentOS7 ~]# docker run -it --name v1 -v /mnt/:/mnt/   busybox
/ # ls /mnt/
logstash-6.2.3.rpm
/ # [root@CentOS7 ~]# docker ps
CONTAINER ID        IMAGE               COMMAND             CREATED             STATUS              PORTS               NAMES
70bb436cb5d8        busybox             "sh"                9 seconds ago       Up 8 seconds                            v1
[root@CentOS7 ~]# docker run -it --name v2  --volumes-from  v1 busybox
/ # ls /mnt/
logstash-6.2.3.rpm
五、docker网络
docker run创建Docker容器时,可以用–net选项指定容器的网络模式,Docker有以下4种网络模式:
bridge模式:使用–net =bridge指定,默认设置;
host模式:使用–net =host指定;
none模式:使用–net =none指定;
container模式:使用–net =container:NAMEorID指定。
1、 bridge模式
bridge模式是Docker默认的网络设置,此模式会为每一个容器分配Network Namespace、设置IP等,并将并将一个主机上的Docker容器连接到一个虚拟网桥上。当Docker server启动时,会在主机上创建一个名为docker0的虚拟网桥,此主机上启动的Docker容器会连接到这个虚拟网桥上。虚拟网桥的工作方式和物理交换机类似,这样主机上的所有容器就通过交换机连在了一个二层网络中。接下来就要为容器分配IP了,Docker会从RFC1918所定义的私有IP网段中,选择一个和宿主机不同的IP地址和子网分配给docker0,连接到docker0的容器就从这个子网中选择一个未占用的IP使用。如一般Docker会使用172.17.0.0/16这个网段,并将172.17.42.1/16分配给docker0网桥(在主机上使用ifconfig命令是可以看到docker0的,可以认为它是网桥的管理端口,在宿主机上作为一块虚拟网卡使用)。
使用host模式启动容器后可以发现,使用ip addr查看网络环境时,看到的都是宿主机上的信息。这种方式创建出来的容器,可以看到host上的所有网络设备。
容器中,对这些设备有全部的访问权限。因此docker提示我们,这种方式是不安全的。如果在隔离良好的环境中(比如租户的虚拟机中)使用这种方式,问题不大。
4、 container模式
这个模式指定新创建的容器和已经存在的一个容器共享一个Network Namespace,而不是和宿主机共享。新创建的容器不会创建自己的网卡,配置自己的IP,而是和一个指定的容器共享IP、端口范围等。同样,两个容器除了网络方面,其他的如文件系统、进程列表等还是隔离的。两个容器的进程可以通过lo网卡设备通信。
#1、宿主机端口映射到容器

-P (大写P)从宿主机的3万多端口开始映射 (随机)
docker run -it -P  nginx
[root@localhost~]#docker ps
CONTAINER ID        IMAGE               COMMAND                  CREATED             STATUS              PORTS                   NAMES
50bb17fcf9dd        nginx               "nginx -g 'daemon of…"   6 seconds ago       Up 5 seconds        0.0.0.0:32768->80/tcp   cranky_zhukovsky
#浏览器访问 宿主机ip:32768


#2、指定映射端口 -p(小p)
docker run -it -p 【宿主机端口】:【容器端口】
docker run -itd -p 80:80 nginx
[root@localhost~]#docker ps
CONTAINER ID        IMAGE               COMMAND                  CREATED             STATUS              PORTS                NAMES
ed6f6de58b09        nginx               "nginx -g 'daemon of…"   4 seconds ago       Up 3 seconds        0.0.0.0:80->80/tcp   unruffled_shirley
#浏览器访问 宿主机ip

3、共享网络名称空间
[root@CentOS7 ~]# docker run -it --name n1 busybox
/ # ip a
1: lo: <LOOPBACK,UP,LOWER_UP> mtu 65536 qdisc noqueue qlen 1
    link/loopback 00:00:00:00:00:00 brd 00:00:00:00:00:00
    inet 127.0.0.1/8 scope host lo
       valid_lft forever preferred_lft forever
48: eth0@if49: <BROADCAST,MULTICAST,UP,LOWER_UP,M-DOWN> mtu 1500 qdisc noqueue
    link/ether 02:42:ac:11:00:02 brd ff:ff:ff:ff:ff:ff
    inet 172.17.0.2/16 brd 172.17.255.255 scope global eth0
       valid_lft forever preferred_lft forever
/ #

[root@CentOS7 ~]# docker run -it --name n2 --network container:n1 busybox
/ # ip a
1: lo: <LOOPBACK,UP,LOWER_UP> mtu 65536 qdisc noqueue qlen 1
    link/loopback 00:00:00:00:00:00 brd 00:00:00:00:00:00
    inet 127.0.0.1/8 scope host lo
       valid_lft forever preferred_lft forever
48: eth0@if49: <BROADCAST,MULTICAST,UP,LOWER_UP,M-DOWN> mtu 1500 qdisc noqueue
    link/ether 02:42:ac:11:00:02 brd ff:ff:ff:ff:ff:ff
    inet 172.17.0.2/16 brd 172.17.255.255 scope global eth0
       valid_lft forever preferred_lft forever


##测试
/ # hostname
854a346a1ae5
/ # echo 123 > /tmp/index.html
/ # httpd  -h /tmp/
/ # wget -O - -q 127.0.0.1
123

##另一台
/ # hostname
854a346a1ae5
/ # wget -O - -q 127.0.0.1
123

#4、修改docker0的默认ip
修改配置文件/etc/docker/daemon.json

例如
systemctl  stop docker

[root@CentOS7 ~]# cat /etc/docker/daemon.json
{
"bip": "192.168.0.1/16"
}
[root@CentOS7 ~]# systemctl  daemon-reload
[root@CentOS7 ~]# systemctl  start docker
[root@CentOS7 ~]# ip a s docker0
3: docker0: <NO-CARRIER,BROADCAST,MULTICAST,UP> mtu 1500 qdisc noqueue state DOWN
    link/ether 02:42:8c:10:a3:65 brd ff:ff:ff:ff:ff:ff
    inet 192.168.0.1/16 brd 192.168.255.255 scope global docker0
       valid_lft forever preferred_lft forever
    inet6 fe80::42:8cff:fe10:a365/64 scope link
       valid_lft forever preferred_lft forever
六、构建docker容器的2种方式
#1、启动容器并在/tmp下创建index.html文件,然后退出
[root@localhost~]#docker run -it --name im1 busybox sh
/ # echo 'lalal' >/tmp/index.html
/ # exit
#2、    创建镜像
[root@localhost~]docker commit -p  im1 im1
sha256:ac4415503e78b162e7f03f16f0f0b3aa058ed57237b4315691eb15b8a27a7c97

#3、更改docker创建容器后默认的运行命令
docker commit -a [作者] -c "修改执行的命令"  运行的容器   生成的容器名
[root@localhost~]#docker commit -a "作者 <804266500@qq.com>" -c "CMD /bin/ls /tmp/" im1 im2
sha256:9b755a5afec2c92f077ad02c273de2ffaca541bce06ffed8d9e633853c07ed8d
#运行im2镜像测试
[root@localhost~]#docker run -it im2
index.html
2、DockerFile(docker镜像源码)
#dockefile文件的首之母必须大写
#.dockeringore目录是忽略的文件目录
Dockerfile语法详解:
#代表注释
FROM 必须是第一行(表明基于什么镜像制作)
LABEL maintainer=”作者信息" 作者信息
ENV 设置环境变量
VOLUME 挂载目录
RUN 代表需要执行的命令
WORKDIR 指定工作目录
ADD 拷贝本地文件到容器里(相对路径)支持url路径(网络资源)
COPY 拷贝文件夹到容器里 ##必须是build下的目录
EXPOSE 暴露端口
CMD [“nginx”] 它要启动的命令是nginx (就算是nginx服务)
ENTRYPOINT ENTRYPOINT的最佳用处是设置镜像的主命令,允许将镜像当成命令本身来运行(用CMD提供默认选项)。
ONBUILD ONBUILD 在dockerfile中构建一个触发器(别人后面构建镜像时执行的操作)
Dockerfile编写例子
[root@localhost~]#mkdir /img
[root@localhost~]#cd /img/
[root@localhostimg]#vim nginx.sh
[root@localhostimg]#cat  nginx.sh
#!/bin/sh
cat>/etc/nginx/conf.d/www.conf<<EOF
server {
    server_name $HOSTNAME;
    listen  ${PORT:-0.0.0.0:80};
    root ${NGINX_ROOT:-/usr/local/nginx/html};
    charset utf-8;

}
EOF
exec "$@"
[root@localhostimg]#chmod  +x nginx.sh
[root@localhostimg]#vim Dockerfile
[root@localhostimg]#cat  Dockerfile
FROM nginx:1.15.4-alpine
LABEL maintainer="zhang 1232@qq.com"

ENV NGINX_ROOT="/data/www/html/"
#定义NGINX_ROOT变量
ADD nginx.sh /bin/
#将nginx.sh脚本添加到容器中的/bin/目录下载

RUN  mkdir -p $NGINX_ROOT &&
     echo '9999' > ${NGINX_ROOT}index.html
#在容器中执行命令

EXPOSE 80/tcp
#开放80端口

HEALTHCHECK --start-period=3s CMD wget -O - -q http://${HOSTNAME}
#容器运行3s后开始检测 30s检查一次,超时时间30s,失败次数3次

ONBUILD ADD https://mirrors.aliyun.com/centos/RPM-GPG-KEY-beta /tmp/
#后面基于这个dockerfile制作好的容器为基础镜像,再次build时,将aliyun源上的文件添加到/tmp目录

CMD ["/usr/sbin/nginx","-g","daemon off;"]
#将这条命令档次参数传给ENTRYPOINT

ENTRYPOINT ["/bin/nginx.sh"]
#执行/bin/nginx.sh脚本
#Docker build构建镜像过程
[root@localhostimg]#docker build -t myimg:1.0 ./
Sending build context to Docker daemon  3.584kB
Step 1/10 : FROM nginx:1.15.4-alpine
1.15.4-alpine: Pulling from library/nginx
4fe2ade4980c: Already exists
82359930187f: Pull complete
dd73d113d335: Pull complete
4b94bac1a7e3: Pull complete
Digest: sha256:fd0361ff0882d63eec241705ba169d83c042bf27f8b568aedd131c2ab97246f0
Status: Downloaded newer image for nginx:1.15.4-alpine
 ---> 33c5c6e11024
Step 2/10 : LABEL maintainer="zhangbin 1232@qq.com"
 ---> Running in f1c88d7cda87
Removing intermediate container f1c88d7cda87
 ---> 4cceaf0eaac2
Step 3/10 : ENV NGINX_ROOT="/data/www/html/"
 ---> Running in 5c1363aedd8e
Removing intermediate container 5c1363aedd8e
 ---> c437cfebc3d8
Step 4/10 : ADD nginx.sh /bin/
 ---> 80072bb635cf
Step 5/10 : RUN  mkdir -p $NGINX_ROOT &&      echo '9999' > ${NGINX_ROOT}index.html
 ---> Running in 8153863c1e3e
Removing intermediate container 8153863c1e3e
 ---> e3423f795002
Step 6/10 : EXPOSE 80/tcp
 ---> Running in 9c774aad02a6
Removing intermediate container 9c774aad02a6
 ---> 4768345031f8
Step 7/10 : HEALTHCHECK --start-period=3s CMD wget -O - -q http://${HOSTNAME}
 ---> Running in 0fc235d2a345
Removing intermediate container 0fc235d2a345
 ---> da36e9bce34a
Step 8/10 : ONBUILD ADD https://mirrors.aliyun.com/centos/RPM-GPG-KEY-beta /tmp/
 ---> Running in f19b6f1865f7
Removing intermediate container f19b6f1865f7
 ---> 6e22946b4229
Step 9/10 : CMD ["/usr/sbin/nginx","-g","daemon off;"]
 ---> Running in 1e0207770aeb
Removing intermediate container 1e0207770aeb
 ---> 91e82dc16090
Step 10/10 : ENTRYPOINT ["/bin/nginx.sh"]
 ---> Running in 6524c3388c5d
Removing intermediate container 6524c3388c5d
 ---> ddcd2449914d
Successfully built ddcd2449914d

#查看镜像
[root@localhostimg]#docker image ls|grep myimg
myimg                          1.0                 ddcd2449914d        14 minutes ago      17.7MB

#运行镜像
[root@localhostimg]#docker run -it  --rm  -P  --name img01 myimg:1.0

#查看镜像
[root@localhostimg]#docker inspect img01|grep IPAddress
            "SecondaryIPAddresses": null,
            "IPAddress": "172.17.0.3",
                    "IPAddress": "172.17.0.3",
[root@localhostimg]#docker ps
CONTAINER ID        IMAGE               COMMAND                  CREATED              STATUS                        PORTS                    NAMES
e3b7af4d54e0        myimg:1.0           "/bin/nginx.sh /usr/…"   About a minute ago   Up About a minute (healthy)   0.0.0.0:32768->80/tcp    img01
##测试
[root@localhostimg]#echo 172.17.0.3  e3b7af4d54e0  >>/etc/hosts
[root@localhostimg]#curl  e3b7af4d54e0
9999
七、资源限制
Docker 基于 Linux 内核提供的 cgroups 功能,可以限制容器在运行时使用到的资源,比如内存、CPU、块 I/O、网络等。
测试
#下载测试镜像
[root@CentOS7 ~]# docker pull lorel/docker-stress-ng

#内存测试
[root@CentOS7 ~]# docker run --name stress -it --rm -m 100M lorel/docker-stress-ng:latest strees --cpu 1 --vm 90M
stress-ng: info: [1] defaulting to a 86400 second run per stressor
stress-ng: info: [1] dispatching hogs: 1 cpu, 90 vm
stress-ng: error: [89] stress-ng-vm: fork failed: errno=12: (Out of memory)
stress-ng: error: [70] stress-ng-vm: fork failed: errno=12: (Out of memory)
stress-ng: error: [162] stress-ng-vm: fork failed: errno=12: (Out of memory)


#cpu测试
[root@CentOS7 ~]# docker run --name stress -it --rm --cpus 1 lorel/docker-stress-ng:latest strees --cpu 4
stress-ng: info: [1] defaulting to a 86400 second run per stressor
stress-ng: info: [1] dispatching hogs: 4 cpu
八、docker私有仓库
1、官方提提供的镜像仓库
#1、下载registry镜像并修改docker的配置文件
[root@localhost~]#docker pull registry
Using default tag: latest
latest: Pulling from library/registry
d6a5679aa3cf: Pull complete
ad0eac849f8f: Pull complete
2261ba058a15: Pull complete
f296fda86f10: Pull complete
bcd4a541795b: Pull complete
Digest: sha256:5a156ff125e5a12ac7fdec2b90b7e2ae5120fa249cf62248337b6d04abc574c8
Status: Downloaded newer image for registry:latest
[root@localhost~]#vim /etc/docker/daemon.json
{
"insecure-registries":["10.0.0.200:5000"]
}

[root@localhost~]#systemctl  stop docker
[root@localhost~]#systemctl  daemon-reload
[root@localhost~]#systemctl  start dockder

#2、启动镜像
[root@localhost~]#docker run -d -p 5000:5000 --restart=always --name registry registry

#3、登录 docker login IP:端口
docker login 10.0.0.200:5000
账号:admin
密码:123456

[root@localhost~]#docker login 10.0.0.200:5000
Username: admin
Password:
WARNING! Your password will be stored unencrypted in /root/.docker/config.json.
Configure a credential helper to remove this warning. See
https://docs.docker.com/engine/reference/commandline/login/#credentials-store

Login Succeeded

#4、测试
#4.1. tag一个镜像
docker tag nginx 10.0.0.200:5000/test/mynginx:v2
#4.2.然后push上去
docker push 10.0.0.200:5000/test/mynginx:v2
#4.3.打开网页查看镜像
http://10.0.0.200:5000/v2/_catalog
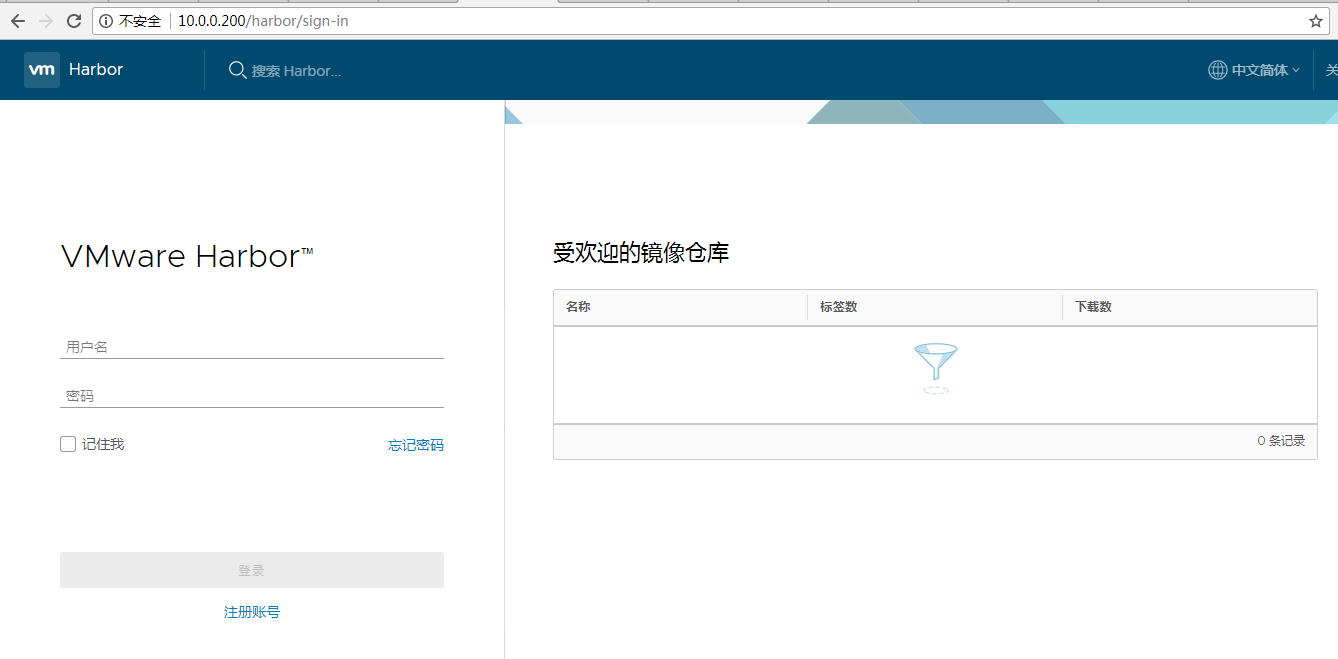
2、docker habor仓库
1.habor tar包下载地址
2.habor官方文档
3.解压
tar xf harbor-offline-installer-v1.2.0-rc3.tgz
4.修改harbor.cfg文件
cd harbor
把hostname改成这样 hostanme=ip(或解析的域名)
hostname = 172.16.1.200
其他可以不改
5.habor.cfg参数详解
[root@linux-node2 ~]# grep ^[a-Z] /usr/local/src/harbor/harbor.cfg
hostname = 192.168.56.12 #主机IP/主机名
ui_url_protocol = http #访问协议,支持http和https
email_identity =
email_server = smtp.163.com
email_server_port = 25
email_username = scjianlin@163.com
email_password = xxxx
email_from = admin <scjianlin@163.com>
email_ssl = false
harbor_admin_password = Harbor12345
auth_mode = db_auth #认证方式,默认是 db_auth ,既mysql数据库存储认证,这里还支持 ldap 以及 本地文件存储方式。
ldap_url = ldaps://ldap.mydomain.com
ldap_basedn = ou=people,dc=mydomain,dc=com
ldap_uid = uid
ldap_scope = 3
db_password = root123
self_registration = on
use_compressed_js = on
max_job_workers = 3
token_expiration = 30
verify_remote_cert = on
customize_crt = on
crt_country = CN
crt_state = State
crt_location = CN
crt_organization = organization
crt_organizationalunit = organizational unit
crt_commonname = example.com
crt_email = example@example.com
project_creation_restriction = everyone
[root@linux-node2 ~]#
[root@linux-node2 harbor]# ./prepare #运行脚本跟新配置
loaded secret key
Clearing the configuration file: ./common/config/ui/env
Clearing the configuration file: ./common/config/ui/app.conf
Clearing the configuration file: ./common/config/ui/private_key.pem
Clearing the configuration file: ./common/config/db/env
Clearing the configuration file: ./common/config/jobservice/env
Clearing the configuration file: ./common/config/jobservice/app.conf
Clearing the configuration file: ./common/config/registry/config.yml
Clearing the configuration file: ./common/config/registry/root.crt
Clearing the configuration file: ./common/config/nginx/nginx.conf
Generated configuration file: ./common/config/nginx/nginx.conf
Generated configuration file: ./common/config/ui/env
Generated configuration file: ./common/config/ui/app.conf
Generated configuration file: ./common/config/registry/config.yml
Generated configuration file: ./common/config/db/env
Generated configuration file: ./common/config/jobservice/env
Generated configuration file: ./common/config/jobservice/app.conf
Generated configuration file: ./common/config/ui/private_key.pem
Generated configuration file: ./common/config/registry/root.crt
The configuration files are ready, please use docker-compose to start the service.
#执行完毕后会在当前目录生成一个docker-compose.yml文件,用于配置数据目录等配置信息:
#官方安装并启动harbor:
6.执行./install.sh 然后慢慢等待
./install.sh

7.打开网页验证 ip