目录
helm入门
1.helm介绍
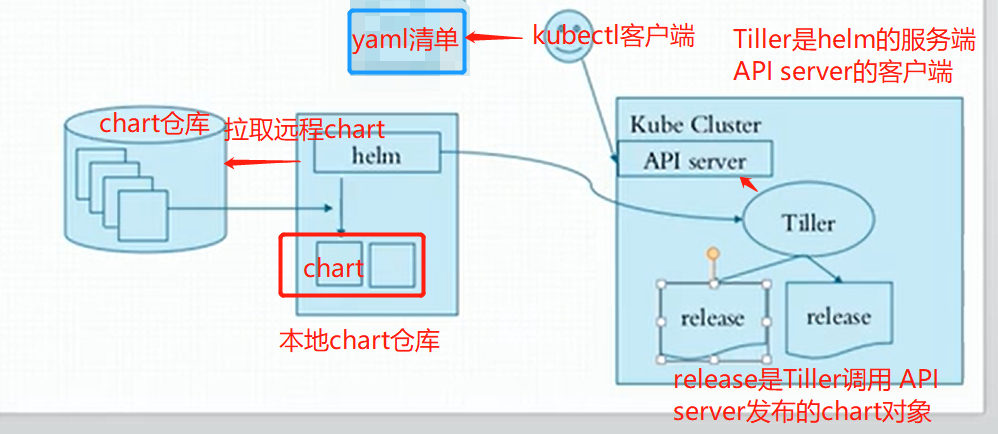
Helm相当于linux环境下的yum包管理工具,helm也是go语言开发的。
helm是一k8s中的一个命令行客户端工具,helm是tiller的客户端,tiller是一个守护进程,接收helm的请求
helm把请求交给tiller,tiler和apiserver交互,由apiserver负责完成创建,我们用哪个chart需要下载到本地,基于本地这个chart部署实例,这个部署的实例叫做release
chart:一个helm程序包,比方说我们部署nginx,需要deployment的yaml,需要service的yaml,这两个清单文件就是一个helm程序包,在k8s中把这些yaml清单文件叫做chart图表
vlues.yaml文件为模板中的文件赋值,可以实现我们自定义安装
如果是chart开发者需要自定义模板,如果是chart使用者只需要修改values.yaml即可
config
release

总结:
helm把kubernetes资源打包到一个chart中,制作并完成各个chart和chart本身依赖关系并利用chart仓库实现对外分发,而helm还可实现可配置的对外发布,通过values.yaml文件完成可配置的发布,如果chart版本更新了,helm自动支持滚更更新机制,还可以一键回滚,但是不是适合在生产环境使用,除非具有定义自制chart的能力
helm属于kubernetes一个项目:
2.helm核心术语
Chart: 一个helm程序包;
repository:存放chart图表的仓库,https/http服务器;提供部署k8s应用程序需要的那些yaml清单文件
release:特定的chart部署于目标集群上的一个实例;
Chart-->Config(value.yaml清单)->Release

程序架构:
  helm:客户端,管理本地的Chart仓库,管理Chart,与Tiller服务器交互,发送Chart,实例安装、查询、卸载等操作
  Tiller:服务端,接收helm发来的Charts与Config,合并生成release;

chart--->通过values.yaml这个文件赋值-->生成release实例
3.helm下载和安装
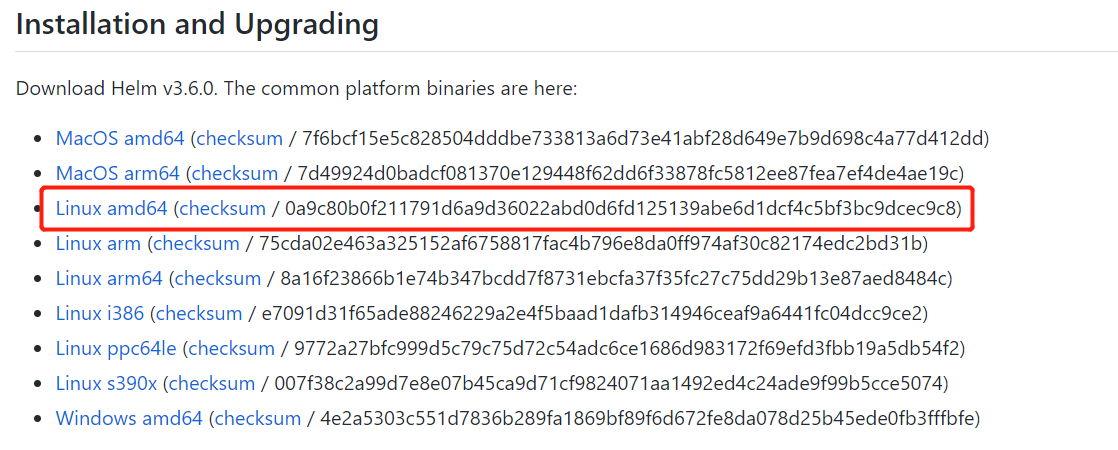
helm与k8s集群适配版本说明,由于当前k8s集群是1.22版本,需要安装3.7+版本的helm
Helm3.6下载地址
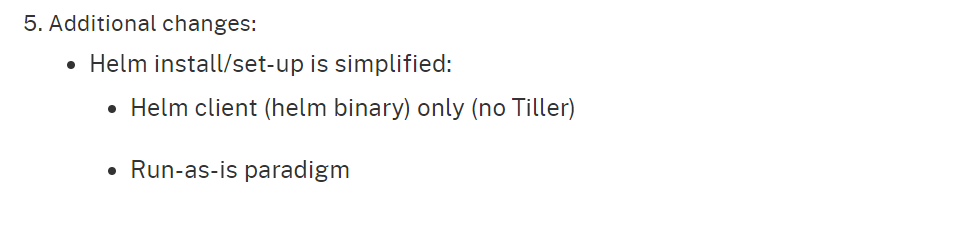
helm v2和helm v3的区别官方文档有说明,以及如何从v2迁移到v3版本,helm v3版本不再使用tiller服务端,只有helm客户端二进制。
3.1以helm3.6为测试实例
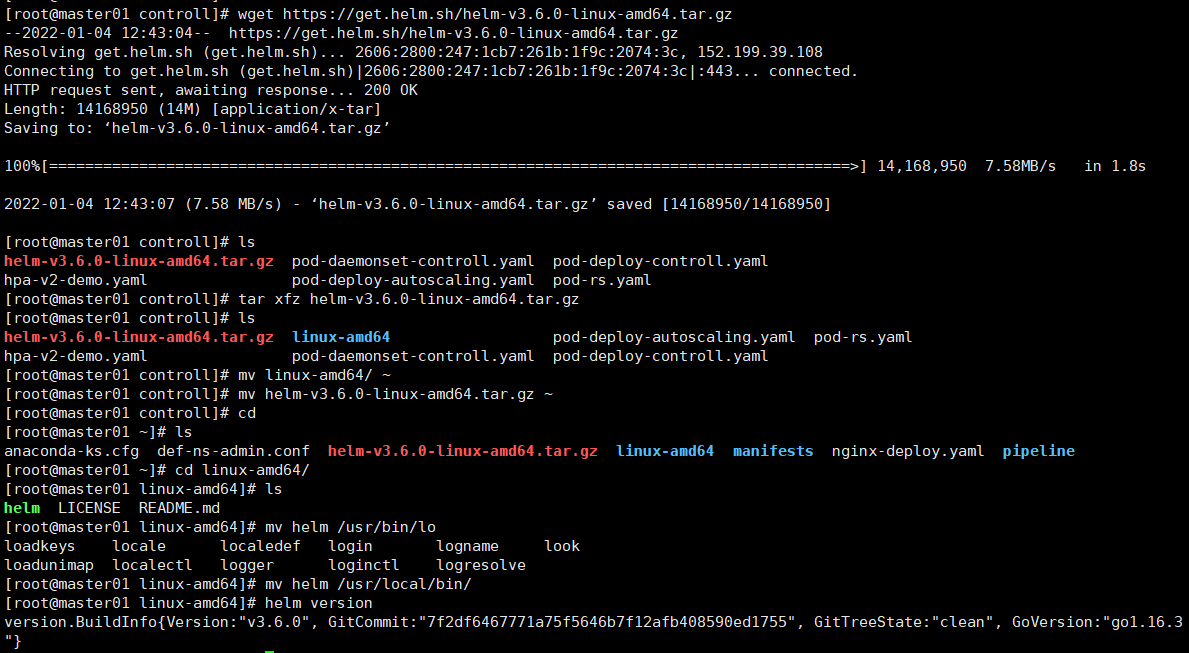
wget https://get.helm.sh/helm-v3.6.0-linux-amd64.tar.gz
tar xfz helm-v3.6.0-linux-amd64.tar.gz
cd linux-amd64/
mv helm /usr/local/bin/
# 查看helm版本
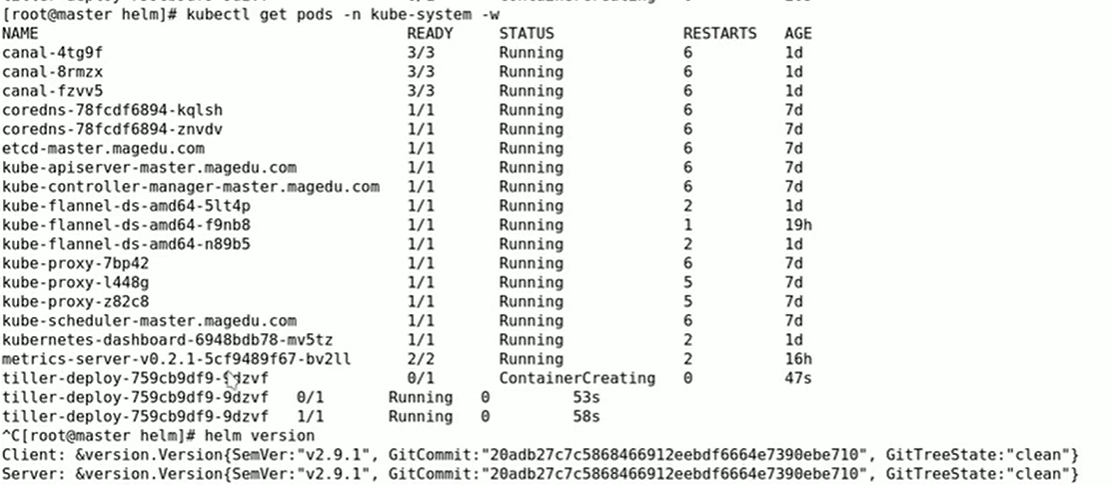
helm version
'''
version.BuildInfo{Version:"v3.6.0", GitCommit:"7f2df6467771a75f5646b7f12afb408590ed1755", GitTreeState:"clean", GoVersion:"go1.16.3"}
'''
3.2以helm3.7.2为例
和3.1安装方法一样
helm --help # 查看具体使用
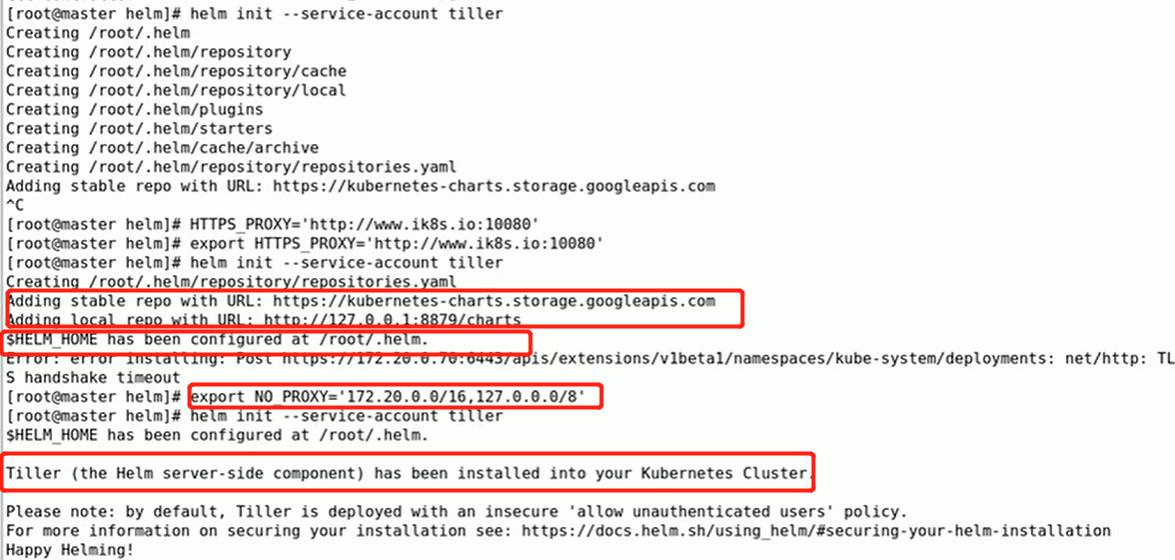
在使用helm之前要确保k8s集群上有tiller可以用,使用 helm init就可以自动生成tiller;只要制定好获取的k8s集群。helm第一次init的时候,需要联系到apiserver,让apiserver指挥着安装tiller pod,所以意味着helm需要apiserver的认证,获取管理员权限。在运行helm,helm会获取当前系统上 kubectl的配置文件(~/.kube/config),此配置文件可以让helm像kubectl一样充当apiserver的客户端,在k8s集群之上完成初始化、进行应用程序的部署和安装。
tiller运行在k8s集群之上,需要获取集群的管理权限,否则无法完成应用程序的安装和卸载等管理操作。在启用RBAC的k8s集群上,需要设置RBAC的配置,通常依赖的用户名就叫做tiller,是个服务账号(ServiceAccount),如果想让Tiller拥有很大的管理权限的话,需要让它使用ClusterRoleBinding绑定在ClusterAdmin(k8s集群自带的角色)这个ClusterRole角色上。
helm v2版本在集群上部署Tiller
给Tiller 创建账号(ServiceAccount)并绑定到集群cluster-admin的角色ClusterRole,参考gitlab Tiller rbac
1.创建整个集群级别的tiller
可以管理所有名称空间内的资源
cat tiller-rbac-config.yaml:

apiVersion: v1
kind: ServiceAccount
metadata:
  name: tiller
  namespace: kube-system
---
apiVersion: rbac.authorization.k8s.io/v1
kind: ClusterRoleBinding
metadata:
  name: tiller
roleRef:
  apiGroup: rbac.authorization.k8s.io
  kind: ClusterRole
  name: cluster-admin
subjects:
  - kind: ServiceAccount
    name: tiller
    namespace: kube-system

kubectl create -f rbac-config.yaml
helm init --service-account tiller --history-max 200
2.创建某个名称空间级别的tiller
只能管理SA账号所在的名称空间的资源对象
kubectl create namespace tiller-world
kubectl create serviceaccount tiller --namespace tiller-world


cat role-tiller.yaml

kind: Role
apiVersion: rbac.authorization.k8s.io/v1
metadata:
  name: tiller-manager
  namespace: tiller-world
rules:
- apiGroups: ["", "batch", "extensions", "apps"]
  resources: ["*"]
  verbs: ["*"]

kubectl create -f role-tiller.yaml

cat rolebinding-tiller.yaml
kind: RoleBinding
apiVersion: rbac.authorization.k8s.io/v1
metadata:
  name: tiller-binding
  namespace: tiller-world
subjects:
- kind: ServiceAccount
  name: tiller
  namespace: tiller-world
roleRef:
  kind: Role
  name: tiller-manager
  apiGroup: rbac.authorization.k8s.io

kubectl create -f rolebinding-tiller.yaml
helm init --service-account tiller --tiller-namespace tiller-world
3.创建当名称前空间tiller账号管理另一个名称空间资源对象
kubectl create namespace myorg-system
kubectl create serviceaccount tiller --namespace myorg-system

# Define a Role that allows Tiller to manage all resources in myorg-users like in role-tiller.yaml
cat role-tiller.yaml
kind: Role
apiVersion: rbac.authorization.k8s.io/v1
metadata:
  name: tiller-manager
  namespace: myorg-users
rules:
- apiGroups: ["", "batch", "extensions", "apps"]
  resources: ["*"]
  verbs: ["*"]

kubectl create -f role-tiller.yaml

# Bind the service account to that role. In rolebinding-tiller.yaml,
cat rolebinding-tiller.yaml
kind: RoleBinding
apiVersion: rbac.authorization.k8s.io/v1
metadata:
  name: tiller-binding
  namespace: myorg-users
subjects:
- kind: ServiceAccount
  name: tiller
  namespace: myorg-system
roleRef:
  kind: Role
  name: tiller-manager
  apiGroup: rbac.authorization.k8s.io

kubectl create -f rolebinding-tiller.yaml

# We'll also need to grant Tiller access to read configmaps in myorg-system so it can store release information. In role-tiller-myorg-system.yaml:
cat role-tiller-myorg-system.yaml
kind: Role
apiVersion: rbac.authorization.k8s.io/v1
metadata:
  namespace: myorg-system
  name: tiller-manager
rules:
- apiGroups: ["", "extensions", "apps"]
  resources: ["configmaps"]
  verbs: ["*"]

kubectl create -f role-tiller-myorg-system.yaml

# And the respective role binding. In rolebinding-tiller-myorg-system.yaml:
cat rolebinding-tiller-myorg-system.yaml
kind: RoleBinding
apiVersion: rbac.authorization.k8s.io/v1
metadata:
  name: tiller-binding
  namespace: myorg-system
subjects:
- kind: ServiceAccount
  name: tiller
  namespace: myorg-system
roleRef:
  kind: Role
  name: tiller-manager
  apiGroup: rbac.authorization.k8s.io


kubectl create -f rolebinding-tiller-myorg-system.yaml
4.Deploy Helm in a namespace, talking to Tiller in another namespace
#In this example, we will assume Tiller is running in a namespace called tiller-world and that the Helm client is running in a namespace called helm-world. By default, Tiller is running in the kube-system namespace.

cat helm-user.yaml

apiVersion: v1
kind: ServiceAccount
metadata:
  name: helm
  namespace: helm-world
---
apiVersion: rbac.authorization.k8s.io/v1
kind: Role
metadata:
  name: tiller-user
  namespace: tiller-world
rules:
- apiGroups:
  - ""
  resources:
  - pods/portforward
  verbs:
  - create
- apiGroups:
  - ""
  resources:
  - pods
  verbs:
  - list
---
apiVersion: rbac.authorization.k8s.io/v1
kind: RoleBinding
metadata:
  name: tiller-user-binding
  namespace: tiller-world
roleRef:
  apiGroup: rbac.authorization.k8s.io
  kind: Role
  name: tiller-user
subjects:
- kind: ServiceAccount
  name: helm
  namespace: helm-world


kubectl create -f helm-user.yaml
serviceaccount "helm" created
role "tiller-user" created
rolebinding "tiller-user-binding" created
chart实例创建
1. helm create xiaochao
tree xiaochao
创建一个chart实例
helm create xianchao
tree xianchao
xiaochao
├── charts
├── Chart.yaml
├── templates
│   ├── deployment.yaml
│   ├── _helpers.tpl
│   ├── ingress.yaml
│   ├── NOTES.txt
│   ├── service.yaml
│   └── tests
│       └── test-connection.yaml
└── values.yaml

3 directories, 8 files

Chart.yaml  用来描述当前chart有哪属性信息,存放当前程序包的元数据信息,包的名字,版本等,跟部署k8s应用无关系,只是记录chart的信息的
templates   模板,定义k8s的yaml文件,大量调用go语言的语法,跟ansible的playbook一样,ansible的playbook也可以使用模板
README.md  帮助手册
values.yaml    为模板中的每一个属性提供值的
cd  xiaochao
helm install   .   使用刚才创建的chart部署k8s应用
kubectl get pods  可以看到通过helm成功安装了pod应用

2. helm list 查看有哪些release
3. helm package 打包chart
helm package xianchao
ls 可看到生成了一个tgz安装包
xianchao-0.1.0.tgz
生成的tgz包可以发送到任意服务器上,通过helm fetch就可以获取该chart

4. helm delete 删除指定的release(helm  list查看到的),同时删除了部署在kubernetes上的服务
5. helm repo list 查看chart库
NAME  	URL
stable	https://kubernetes-charts.storage.googleapis.com
local 	http://127.0.0.1:8879/charts

上面命令执行之后如果报错:
Error: Couldn't load repositories file (/root/.helm/repository/repositories.yaml).
You might need to run `helm init` (or `helm init --client-only` if tiller is already installed)
需要按照如下方法安装:
mkdir /root/.helm/repository/
把repositories.yaml文件拷贝到这个目录下就可以了
cat repositories.yaml

apiVersion: v1
generated: 2021-10-13T21:52:41.714422328-04:00
repositories:
- caFile: ""
  cache: /root/.helm/repository/cache/bitnami-index.yaml
  certFile: ""
  keyFile: ""
  name: bitnami
  password: ""
  url: https://charts.bitnami.com/bitnami
  username: ""
- caFile: ""
  cache: /root/.helm/repository/cache/stable-index.yaml
  certFile: ""
  keyFile: ""
  name: stable
  password: ""
  url: https://cnych.github.io/kube-charts-mirror
  username: ""
- caFile: ""
  cache: /root/.helm/repository/cache/local-repo-index.yaml
  certFile: ""
  keyFile: ""
  name: local-repo
  password: ""
  url: http://172.16.0.1:8879
  username: ""
- caFile: ""
  cache: /root/.helm/repository/cache/local-index.yaml
  certFile: ""
  keyFile: ""
  name: local
  password: ""
  url: http://127.0.0.1:8879/charts
  username: ""
6. helm repo add stable https://**** 添加repo,执行完毕后输入helm repo update进行更新
helm repo add bitnami https://charts.bitnami.com/bitnami
helm repo add stable https://kubernetes.oss-cn-hangzhou.aliyuncs.com/charts
helm repo update   更新chart仓库

执行helm repo add bitnami https://charts.bitnami.com/bitnami报错,解决如下
mkdir /root/.helm/repository/cache
把bitnami-index.yaml  local-index.yaml  local-repo-index.yaml  stable-index.yaml文件蠢到这个目录即可

7. 查找chart
#helm search ###输出所有的chart
#helm search mysql  ###搜索mysql chart
#helm inspect bitnami/mysql  ###查看指定chart的详细信息

也可以helm search redis   搜索redis
helm search jenkins
helm inspect stable/jenkins   可以查看helm部署jenkins的详细信息

部署memcache
helm search memcached
helm install  --name memcached stable/memcached

执行之后显示如下
NAME:   memcached                             #名字
LAST DEPLOYED: Mon Oct  9 22:35:54 2021   #部署时间
NAMESPACE: default             #名称空间
STATUS: DEPLOYED               #状态是deploy状态

    RESOURCES:
==> v1/Pod(related)      #pod
NAME         READY  STATUS   RESTARTS  AGE
memcached-0  0/1    Pending  0         <invalid>

==> v1/Service                  #service
NAME       TYPE       CLUSTER-IP  EXTERNAL-IP  PORT(S)    AGE
memcached  ClusterIP  None        <none>       11211/TCP  <invalid>

==> v1beta1/PodDisruptionBudget          #回收机制,不用管
NAME       MIN AVAILABLE  MAX UNAVAILABLE  ALLOWED DISRUPTIONS  AGE
memcached  2              N/A              0                    <invalid>

==> v1beta1/StatefulSet
NAME       READY  AGE
memcached  0/3    <invalid>


NOTES:
Memcached can be accessed via port 11211 on the following DNS name from within your cluster:
memcached.default.svc.cluster.local

If you'd like to test your instance, forward the port locally:

  export POD_NAME=$(kubectl get pods --namespace default -l "app=memcached" -o jsonpath="{.items[0].metadata.name}")
  kubectl port-forward $POD_NAME 11211

In another tab, attempt to set a key:

  $ echo -e 'set mykey 0 60 5\r\nhello\r' | nc localhost 11211

You should see:

  STORED

# 部署rabbitmq
查看chart详细信息
helm  inspect   stable/rabbitmq-ha
helm fetch stable/rabbitmq-ha    #把chart的压缩包下载到本地
解压,进到解压路径
helm  install ./
在创建一个service.yaml
cat  service.yaml
apiVersion: v1
kind: Service
metadata:
  name: rabbitmq-management
  labels:
    app: rabbitmq-ha
spec:
  ports:
  - port: 15672
    name: http
  selector:
    app: rabbitmq-ha
  type: NodePort # Or LoadBalancer in production w/ proper security
kubectl apply -f service.yaml
kubectl  get  svc
rabbitmq-management                 NodePort    10.105.1.137   <none>        15672:30241/TCP               3m58s
在浏览器输入网址登录到rabbitmq的管理节点中
http://192.168.85.140:30241/
用户名:   management
密码:    E9R3fjZm4ejFkVFE
加密密码:
kubectl get secret --namespace default hipster-tarsier-rabbitmq-ha -o jsonpath="{.data.rabbitmq-password}" | base64 --decode


删除刚才创建的release
helm delete  release名字

8.helm template语法
可以通过如下命令获取渲染后的yaml文件
cd  rabbitmq-ha
helm install --debug --dry-run ./
chart官方仓库及helm常用命令
helm 的chart的官方站点:
https://hub.kubeapps.com/
另外,还有:https://artifacthub.io/
chart版本类型:
  stable: 稳定版
  incubator:类似prerelease,或者canary,还不太稳定。
常用命令
helm常用命令:
  release管理:
    install # 创建一个release实例
    delete # 删除一个release
    upgrade [RELEASE] [CHART] [flags] # 升级一个版本
    rollback [flags] [RELEASE] [REVISION] # 回滚一个版本
    list # 查看有哪些release
    history # 查看release的历史信息
  chart管理:
    create
    fetch:从远程仓库下载一个chart
    get
    inspect # 查看chart的详细信息
    package:打包一个chart
    verify
    lint:chart语法检查