智能指针是在 <memory> 标头文件中的 std 命名空间中定义的。 它们对 RAII 或“获取资源即初始化”编程惯用法至关重要。 此习惯用法的主要目的是确保资源获取与对象初始化同时发生,从而能够创建该对象的所有资源并在某行代码中准备就绪。
实际上,RAII 的主要原则是为将任何堆分配资源(例如,动态分配内存或系统对象句柄)的所有权提供给其析构函数包含用于删除或释放资源的代码以及任何相关清理代码的堆栈分配对象。
大多数情况下,当初始化原始指针或资源句柄以指向实际资源时,会立即将指针传递给智能指针。 在现代 C++ 中,原始指针仅用于范围有限的小代码块、循环或者性能至关重要且不会混淆所有权的 Helper 函数中。
下面的示例将原始指针声明与智能指针声明进行了比较。
void UseRawPointer()
{
    // Using a raw pointer -- not recommended.
    Song* pSong = new Song(L"Nothing on You", L"Bruno Mars");

    // Use pSong...

    // Don't forget to delete!
    delete pSong;
}


void UseSmartPointer()
{
    // Declare a smart pointer on stack and pass it the raw pointer.
    unique_ptr<Song> song2(new Song(L"Nothing on You", L"Bruno Mars"));

    // Use song2...
    wstring s = song2->duration_;
    //...

} // song2 is deleted automatically here.
如示例所示,智能指针是你在堆栈上声明的类模板,并可通过使用指向某个堆分配的对象的原始指针进行初始化。 在初始化智能指针后,它将拥有原始的指针。 这意味着智能指针负责删除原始指针指定的内存。
智能指针析构函数包括要删除的调用,并且由于在堆栈上声明了智能指针,当智能指针超出范围时将调用其析构函数,尽管堆栈上的某处将进一步引发异常。
通过使用熟悉的指针运算符(-> 和 *)访问封装指针,智能指针类将重载这些运算符以返回封装的原始指针。
C++ 智能指针思路类似于在语言(如 C#)中创建对象的过程:创建对象后让系统负责在正确的时间将其删除。 不同之处在于,单独的垃圾回收器不在后台运行;按照标准 C++ 范围规则对内存进行管理,以使运行时环境更快速更有效。
重要事项:请始终在单独的代码行上创建智能指针,而绝不在参数列表中创建智能指针,这样就不会由于某些参数列表分配规则而发生轻微泄露资源的情况
下面的示例演示了如何使用标准模板库中的 unique_ptr 智能指针类型将指针封装到大型对象。
class LargeObject
{
public:
    void DoSomething(){}
};

void ProcessLargeObject(const LargeObject& lo){}
void SmartPointerDemo()
{
    // Create the object and pass it to a smart pointer
    std::unique_ptr<LargeObject> pLarge(new LargeObject());

    //Call a method on the object
    pLarge->DoSomething();

    // Pass a reference to a method.
    ProcessLargeObject(*pLarge);

} //pLarge is deleted automatically when function block goes out of scope.
此示例演示如何使用智能指针执行以下关键步骤。
-
将智能指针声明为一个自动(局部)变量。(不要对智能指针本身使用
new或malloc表达式。) -
在类型参数中,指定封装指针的指向类型。
-
在智能指针构造函数中将原始指针传递至
new对象。(某些实用工具函数或智能指针构造函数可为你执行此操作。) -
使用重载的
->和*运算符访问对象。 -
允许智能指针删除对象。
智能指针的设计原则是在内存和性能上尽可能高效。 例如,unique_ptr 中的唯一数据成员是封装的指针。 这意味着,unique_ptr 与该指针的大小完全相同,不是四个字节就是八个字节。
使用重载了 * 和 -> 运算符的智能指针访问封装指针的速度不会明显慢于直接访问原始指针的速度。
智能指针具有通过使用“点”表示法访问的成员函数。 例如,一些 STL 智能指针具有释放指针所有权的重置成员函数。 如果你想要在智能指针超出范围之前释放其内存将很有用,这会很有用,如以下示例所示:
void SmartPointerDemo2()
{
    // Create the object and pass it to a smart pointer
    std::unique_ptr<LargeObject> pLarge(new LargeObject());

    //Call a method on the object
    pLarge->DoSomething();

    // Free the memory before we exit function block.
    pLarge.reset();

    // Do some other work...

}
智能指针通常提供直接访问其原始指针的方法。 STL 智能指针拥有一个用于此目的的 get 成员函数,CComPtr 拥有一个公共的 p 类成员。
通过提供对基础指针的直接访问,你可以使用智能指针管理你自己的代码中的内存,还能将原始指针传递给不支持智能指针的代码。
void SmartPointerDemo4()
{
    // Create the object and pass it to a smart pointer
    std::unique_ptr<LargeObject> pLarge(new LargeObject());

    //Call a method on the object
    pLarge->DoSomething();

    // Pass raw pointer to a legacy API
    LegacyLargeObjectFunction(pLarge.get());
}
智能指针的类型
C++ 标准库智能指针
使用这些智能指针作为将指针封装为纯旧 C++ 对象 (POCO) 的首选项。
unique_ptr
只允许基础指针的一个所有者。 除非你确信需要 shared_ptr,否则请将该指针用作 POCO 的默认选项。 可以移到新所有者,但不会复制或共享。替换已弃用的 auto_ptr。 与 boost::scoped_ptr 比较。 unique_ptr 小巧高效;大小等同于一个指针且支持 rvalue 引用,从而可实现快速插入和对 STL 集合的检索。 头文件:<memory>。
unique_ptr 不共享它的指针。 它无法复制到其他 unique_ptr,无法通过值传递到函数,也无法用于需要副本的任何标准模板库 (STL) 算法。 只能移动unique_ptr。 这意味着,内存资源所有权将转移到另一 unique_ptr,并且原始 unique_ptr 不再拥有此资源。 我们建议你将对象限制为由一个所有者所有,因为多个所有权会使程序逻辑变得复杂。 因此,当需要智能指针用于纯 C++ 对象时,可使用 unique_ptr,而当构造 unique_ptr 时,可使用make_unique Helper 函数。
下图演示了两个 unique_ptr 实例之间的所有权转换。

unique_ptr 在 STL 的 <memory> 标头中定义。 它与原始指针一样有效,并可用于 STL 容器。 将 unique_ptr 实例添加到 STL 容器很有效,因为通过 unique_ptr 的移动构造函数,不再需要进行复制操作。
示例1:
以下示例演示如何创建 unique_ptr 实例并在函数之间传递这些实例。
unique_ptr<Song> SongFactory(const std::wstring& artist, const std::wstring& title)
{
    // Implicit move operation into the variable that stores the result.
    return make_unique<Song>(artist, title);
}

void MakeSongs()
{
    // Create a new unique_ptr with a new object.
    auto song = make_unique<Song>(L"Mr. Children", L"Namonaki Uta");

    // Use the unique_ptr.
    vector<wstring> titles = { song->title };

    // Move raw pointer from one unique_ptr to another.
    unique_ptr<Song> song2 = std::move(song);

    // Obtain unique_ptr from function that returns by value.
    auto song3 = SongFactory(L"Michael Jackson", L"Beat It");
}
这些示例说明了 unique_ptr 的基本特征:可移动,但不可复制。“移动”将所有权转移到新 unique_ptr 并重置旧 unique_ptr。
unique_ptr 实例并在向量中使用这些实例。void SongVector()
{
vector<unique_ptr<Song>> songs;
// Create a few new unique_ptr<Song> instances
// and add them to vector using implicit move semantics.
songs.push_back(make_unique<Song>(L"B'z", L"Juice"));
songs.push_back(make_unique<Song>(L"Namie Amuro", L"Funky Town"));
songs.push_back(make_unique<Song>(L"Kome Kome Club", L"Kimi ga Iru Dake de"));
songs.push_back(make_unique<Song>(L"Ayumi Hamasaki", L"Poker Face"));
// Pass by const reference when possible to avoid copying.
for (const auto& song : songs)
{
wcout << L"Artist: " << song->artist << L" Title: " << song->title << endl;
}
}
在 range for 循环中,注意 unique_ptr 通过引用来传递。 如果你尝试通过此处的值传递,由于删除了 unique_ptr 复制构造函数,编译器将引发错误。
以下示例演示如何初始化类成员 unique_ptr。
class MyClass
{
private:
    // MyClass owns the unique_ptr.
    unique_ptr<ClassFactory> factory;
public:

    // Initialize by using make_unique with ClassFactory default constructor.
    MyClass() : factory ( make_unique<ClassFactory>())
    {
    }

    void MakeClass()
    {
        factory->DoSomething();
    }
};
可使用 make_unique 将 unique_ptr 创建到数组,但无法使用 make_unique 初始化数组元素。
// Create a unique_ptr to an array of 5 integers.
	auto p = make_unique<int[]>(5);

	// Initialize the array.
	for (int i = 0; i < 5; ++i)
	{
		p[i] = i;
		wcout << p[i] << endl;
	}
shared_ptr
采用引用计数的智能指针。 如果你想要将一个原始指针分配给多个所有者(例如,从容器返回了指针副本又想保留原始指针时),请使用该指针。 直至所有 shared_ptr 所有者超出了范围或放弃所有权,才会删除原始指针。 大小为两个指针;一个用于对象,另一个用于包含引用计数的共享控制块。 头文件:<memory>。
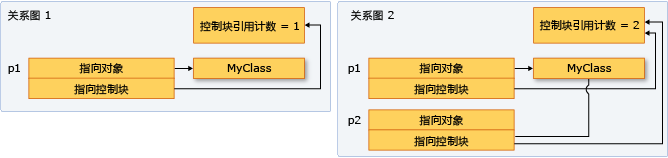
shared_ptr 的类型是C + +标准库中一个聪明的指针,是为多个拥有者管理内存中对象的生命周期而设计的。 在你初始化一个 shared_ptr 后,你可以复制它,把函数参数的值递给它,并把它分配给其它 shared_ptr 实例。 所有实例指向同一个对象,并共享访问一个“控制块”,即每当一个新的shared_ptr 被添加时,递增和递减引用计数,超出范围,则复位。 当引用计数到达零时,控制块删除内存资源和自身。
下图显示了指向一个内存位置的几个 shared_ptr 实例。
shared_ptr。 make_shared异常安全。 它使用同一调用分配的内存控制块和资源从而减少构造开销。 如果你不使用 make_shared,那么在把它传递给 shared_ptr 的构造函数之前,你必须使用一个明确的新表达式创建的对象。 下面的例子显示了在新对象中声明和初始化一个 shared_ptr 的各种方式。// Use make_shared function when possible.
auto sp1 = make_shared<Song>(L"The Beatles", L"Im Happy Just to Dance With You");
// Ok, but slightly less efficient.
// Note: Using new expression as constructor argument
// creates no named variable for other code to access.
shared_ptr<Song> sp2(new Song(L"Lady Gaga", L"Just Dance"));
// When initialization must be separate from declaration, e.g. class members,
// initialize with nullptr to make your programming intent explicit.
shared_ptr<Song> sp5(nullptr);
//Equivalent to: shared_ptr<Song> sp5;
//...
sp5 = make_shared<Song>(L"Elton John", L"I'm Still Standing");
下面的示例演示如何声明和初始化一个已经被分配了另一个 shared_ptr 的对象共享所有权的 shared_ptr 的实例。 假设 sp2 是一个初始化的shared_ptr。
//Initialize with copy constructor. Increments ref count.
    auto sp3(sp2);

    //Initialize via assignment. Increments ref count.
    auto sp4 = sp2;

    //Initialize with nullptr. sp7 is empty.
    shared_ptr<Song> sp7(nullptr);

    // Initialize with another shared_ptr. sp1 and sp2
    // swap pointers as well as ref counts.
    sp1.swap(sp2);
当您使用算法复制元素时,shared_ptr 的也是很有用的标准模板库(STL)。 你可以把元素包装在 shared_ptr 里,然后将其复制到其他容器,只要你需要它,底层的内存始终是有效的。 以下示例演示如何使用 replace_copy_if 算法来创建一个 shared_ptr 的实例以及如何在一个向量上进行使用。
vector<shared_ptr<Song>> v;

    v.push_back(make_shared<Song>(L"Bob Dylan", L"The Times They Are A Changing"));
    v.push_back(make_shared<Song>(L"Aretha Franklin", L"Bridge Over Troubled Water"));
    v.push_back(make_shared<Song>(L"Thal�a", L"Entre El Mar y Una Estrella"));

    vector<shared_ptr<Song>> v2;
    remove_copy_if(v.begin(), v.end(), back_inserter(v2), [] (shared_ptr<Song> s)
    {
        return s->artist.compare(L"Bob Dylan") == 0;
    });

    for (const auto& s : v2)
    {
        wcout << s->artist << L":" << s->title << endl;
    }
dynamic_pointer_cast, static_pointer_cast 和 const_pointer_cast 来转换shared_ptr。 这些函数的操作类似 dynamic_cast, static_cast和 const_cast。 下面的示例演示如何测试在基类的 shared_ptr 向量中的每个元素的派生类,,然后复制元素,并显示它们的信息。vector<shared_ptr<MediaAsset>> assets;
assets.push_back(shared_ptr<Song>(new Song(L"Himesh Reshammiya", L"Tera Surroor")));
assets.push_back(shared_ptr<Song>(new Song(L"Penaz Masani", L"Tu Dil De De")));
assets.push_back(shared_ptr<Photo>(new Photo(L"2011-04-06", L"Redmond, WA", L"Soccer field at Microsoft.")));
vector<shared_ptr<MediaAsset>> photos;
copy_if(assets.begin(), assets.end(), back_inserter(photos), [] (shared_ptr<MediaAsset> p) -> bool
{
// Use dynamic_pointer_cast to test whether
// element is a shared_ptr<Photo>.
shared_ptr<Photo> temp = dynamic_pointer_cast<Photo>(p);
return temp.get() != nullptr;
});
for (const auto& p : photos)
{
// We know that the photos vector contains only
// shared_ptr<Photo> objects, so use static_cast.
wcout << "Photo location: " << (static_pointer_cast<Photo>(p))->location_ << endl;
}
示例5:
你可以用下列方法把 shared_ptr 传递给另一个函数:
-
向
shared_ptr传递值。 调用复制构造函数,递增引用计数,并把被调用方当做所有者。 还有就是在这次操作中有少量的开销,这很大程度上取决于你传递了多少shared_ptr对象。 当调用方和被调用方之间的代码协定 (隐式或显式) 要求被调用方是所有者,使用此选项。 -
通过引用或常量引用来传递
shared_ptr。 在这种情况下,引用计数不增加,并且只要调用方不超出范围,被调用方就可以访问指针。 或者,被调用方可以决定创建一个基于引用的shared_ptr,从而成为一个共享所有者。 当调用者并不知道被被调用方,或当您必须传递一个shared_ptr,并希望避免由于性能原因的复制操作,请使用此选项。 -
通过底层的指针或引用底层的对象。 这使得被调用方使用对象,但不使共享所有权或扩展生存期。 如果被调用方从原始指针创建一个
shared_ptr,则新的shared_ptr是独立于原来的,且没有控制底层的资源。 当调用方和被调用方之间的协定中明确规定调用者保留shared_ptr生存期的所有权,则使用此选项。 -
当您决定如何传递一个
shared_ptr时,确定被调用方是否有共享基础资源的所有权。 一个“所有者”就是只要它需要就可以使用底层资源的对象或函数。 如果调用方必须保证被调用方可以在其(函数)生存期以外扩展指针的生存期,请使用第一个选项。 如果您不关心被调用方是否扩展生存期,则通过引用传递并让被调用方复制它。 -
如果不得不允许帮助程序函数访问底层指针,并且您知道帮助程序函数将使用指针且在调用函数返回前先返回,则该函数不必共享底层指针的所有权。 仅仅是在调用方的
shared_ptr的生存期内允许访问指针。 在这种情况下,通过引用来传递shared_ptr,通过原始指针或引用的基本对象都是安全的。 通过此方式提供一个小的性能改进,并且还有助于表示程序的意图。 -
有时,例如在一个
std:vector<shared_ptr<T>>中,您可能必须对传递每个shared_ptr给lambda表达式体或命名函数对象。 如果lambda或函数没有存储指针,则通过引用传递shared_ptr,以避免调用拷贝构造函数的每个元素。
weak_ptr
结合 shared_ptr 使用的特例智能指针。 weak_ptr 提供对一个或多个 shared_ptr 实例拥有的对象的访问,但不参与引用计数。 如果你想要观察某个对象但不需要其保持活动状态,请使用该实例。 在某些情况下,需要断开 shared_ptr 实例间的循环引用。 头文件:<memory>。
有时对象必须存储一种方法,用来在不引起引用计数增加的情况下访问 shared_ptr 的基础对象。 通常,当您在 shared_ptr 实例之间循环引用时,就会出现此情况。
最佳的设计能够尽可能地避免指针具有共享所有权。 但是,如果您必须具有共享的 shared_ptr 实例所有权,请避免在实例之间进行循环引用。 如果循环引用不可避免,甚至由于某种原因而更为可取,请使用 weak_ptr 为一个或多个所有者提供对其他 shared_ptr 的弱引用。 使用 weak_ptr,您可以创建连接到现有相关实例组的 shared_ptr,但仅当基础内存资源有效时才行。 weak_ptr 本身并不参与引用计数,因此,它无法阻止引用计数转到为零。 但是,您可以使用 weak_ptr 来尝试获取 shared_ptr 的新副本,通过使用该副本进行初始化。 如果内存已被删除,则会引发 bad_weak_ptr 异常。 如果内存仍有效,则新的共享指针会递增引用计数,并确保只要 shared_ptr 变量保持在范围内,内存就有效。
weak_ptr 以确保正确删除循环依赖关系对象的实例。 检查示例时,假定它是仅在考虑备用解决方案后才创建的。Controller 对象表示设备处理的某个方面,并且能独立运行。 每个控制器必须能够在任何时间查询其他控制器的状态,因此,每个控制器包含私有vector<weak_ptr<Controller>>。 由于每个向量包含一个循环引用,因此使用 weak_ptr 实例而不是 shared_ptr。#include <iostream>
#include <memory>
#include <string>
#include <vector>
#include <algorithm>
using namespace std;
class Controller
{
public:
int Num;
wstring Status;
vector<weak_ptr<Controller>> others;
explicit Controller(int i) : Num(i) , Status(L"On")
{
wcout << L"Creating Controller" << Num << endl;
}
~Controller()
{
wcout << L"Destroying Controller" << Num << endl;
}
// Demonstrates how to test whether the
// pointed-to memory still exists or not.
void CheckStatuses() const
{
for_each(others.begin(), others.end(), [] (weak_ptr<Controller> wp)
{
try
{
auto p = wp.lock();
wcout << L"Status of " << p->Num << " = " << p->Status << endl;
}
catch (bad_weak_ptr b)
{
wcout << L"Null object" << endl;
}
});
}
};
void RunTest()
{
vector<shared_ptr<Controller>> v;
v.push_back(shared_ptr<Controller>(new Controller(0)));
v.push_back(shared_ptr<Controller>(new Controller(1)));
v.push_back(shared_ptr<Controller>(new Controller(2)));
v.push_back(shared_ptr<Controller>(new Controller(3)));
v.push_back(shared_ptr<Controller>(new Controller(4)));
// Each controller depends on all others not being deleted.
// Give each controller a pointer to all the others.
for (int i = 0 ; i < v.size(); ++i)
{
for_each(v.begin(), v.end(), [v,i] (shared_ptr<Controller> p)
{
if(p->Num != i)
{
v[i]->others.push_back(weak_ptr<Controller>(p));
wcout << L"push_back to v[" << i << "]: " << p->Num << endl;
}
});
}
for_each(v.begin(), v.end(), [](shared_ptr<Controller>& p)
{
wcout << L"use_count = " << p.use_count() << endl;
p->CheckStatuses();
});
}
int main()
{
RunTest();
wcout << L"Press any key" << endl;
char ch;
cin.getline(&ch, 1);
}
创建 Controller0
创建 Controller1
创建 Controller2
创建 Controller3
创建 Controller4
push_back 到 v[0]: 1
push_back 到 v[0]: 2
push_back 到 v[0]: 3
push_back 到 v[0]: 4
push_back 到 v[1]: 0
push_back 到 v[1]: 2
push_back 到 v[1]: 3
push_back 到 v[1]: 4
push_back 到 v[2]: 0
push_back 到 v[2]: 1
push_back 到 v[2]: 3
push_back 到 v[2]: 4
push_back 到 v[3]: 0
push_back 到 v[3]: 1
push_back 到 v[3]: 2
push_back 到 v[3]: 4
push_back 到 v[4]: 0
push_back 到 v[4]: 1
push_back 到 v[4]: 2
push_back 到 v[4]: 3
use_count = 1
1 的状态 = 打开
2 的状态 = 打开
3 的状态 = 打开
4 的状态 = 打开
use_count = 1
0 的状态 = 打开
2 的状态 = 打开
3 的状态 = 打开
4 的状态 = 打开
use_count = 1
0 的状态 = 打开
1 的状态 = 打开
3 的状态 = 打开
4 的状态 = 打开
use_count = 1
0 的状态 = 打开
1 的状态 = 打开
2 的状态 = 打开
4 的状态 = 打开
use_count = 1
0 的状态 = 打开
1 的状态 = 打开
2 的状态 = 打开
3 的状态 = 打开
正在销毁 Controller0
正在销毁 Controller1
正在销毁 Controller2
正在销毁 Controller3
正在销毁 Controller4
按任意键 作为练习,将向量 others 修改为 vector<shared_ptr<Controller>>,然后在输出中,注意当 TestRun 返回时,未调用析构函数。