Harbor 是一个开源镜像仓库,可通过基于角色的访问控制来保护镜像,新版本的Harbor还增加了扫描镜像中的漏洞并将镜像签名为受信任。
作为CNCF孵化项目,Harbor提供合规性,性能和互操作性,以帮助你跨Kubernetes和Docker等云原生计算平台持续,安全地管理镜像。
Harbor组件均以Docker容器方式启动,因此,你可以将其部署在任何支持Docker的Linux发行版上。
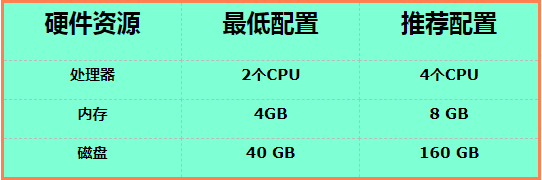
硬件要求
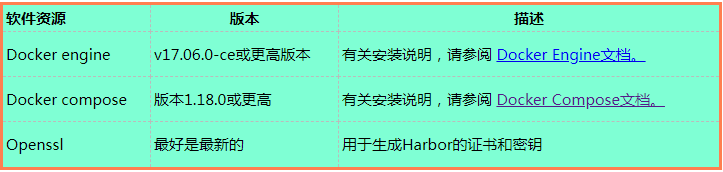
软件要求
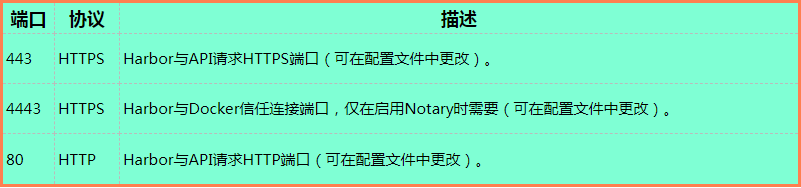
网络端口
下载地址
https://github.com/goharbor/harbor/releases
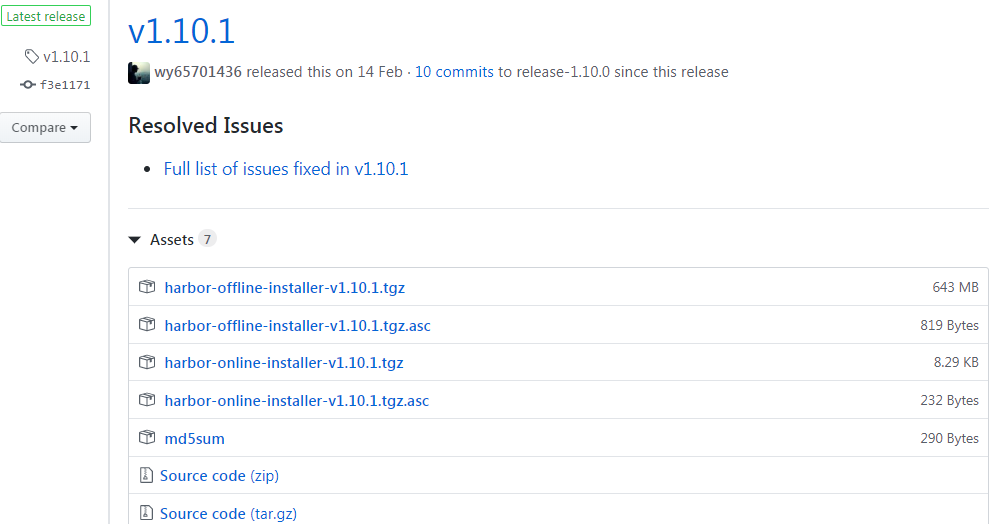
Harbor官方分别提供了在线版(不含组件镜像,相对较小)和离线版(包含组件镜像,相对较大)。
由于github下载非常非常的慢,本文底部已提供最新离线版包(harbor-offline-installer-v1.10.1.tgz)。
创建 https 证书
# 创建证书目录,并赋予权限
mkdir -p /data/cert && chmod -R 777 /data/cert && cd /data/cert
# 生成私钥,需要设置密码
openssl genrsa -des3 -out harbor.key 2048

# 生成CA证书,需要输入密码
openssl req -sha512 -new
    -subj "/C=CN/ST=JS/L=WX/O=zwx/OU=jhmy/CN=hub.jhmy.com"
    -key harbor.key
    -out harbor.csr

# 备份证书
cp harbor.key harbor.key.org

# 退掉私钥密码,以便docker访问(也可以参考官方进行双向认证)
openssl rsa -in harbor.key.org -out harbor.key

# 使用证书进行签名
openssl x509 -req -days 365 -in harbor.csr -signkey harbor.key -out harbor.crt
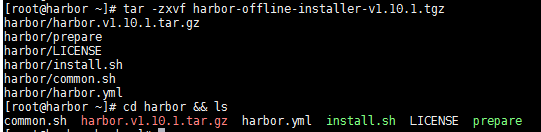
部署安装
-
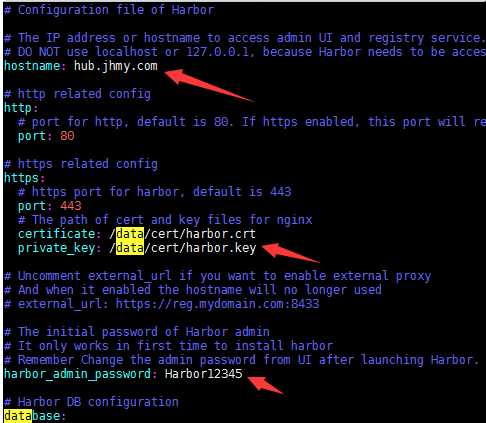
编辑harbor.yml,修改hostname、https证书路径、admin密码
-
运行install.sh即可,可带参数(--with-notary)
流程:检查环境 -> 导入镜像 -> 准备环境 -> 准备配置(含移除旧版本)-> 开始启动
[root@hub harbor]# ./install.sh

[Step 0]: checking if docker is installed ...
Note: docker version: 19.03.8

[Step 1]: checking docker-compose is installed ...
Note: docker-compose version: 1.23.1

[Step 2]: loading Harbor images ...
Loaded image: goharbor/clair-adapter-photon:v1.0.1-v1.10.1
Loaded image: goharbor/harbor-jobservice:v1.10.1
Loaded image: goharbor/redis-photon:v1.10.1
Loaded image: goharbor/notary-server-photon:v0.6.1-v1.10.1
Loaded image: goharbor/clair-photon:v2.1.1-v1.10.1
Loaded image: goharbor/harbor-log:v1.10.1
Loaded image: goharbor/registry-photon:v2.7.1-patch-2819-2553-v1.10.1
Loaded image: goharbor/notary-signer-photon:v0.6.1-v1.10.1
Loaded image: goharbor/chartmuseum-photon:v0.9.0-v1.10.1
Loaded image: goharbor/harbor-registryctl:v1.10.1
Loaded image: goharbor/nginx-photon:v1.10.1
Loaded image: goharbor/harbor-migrator:v1.10.1
Loaded image: goharbor/prepare:v1.10.1
Loaded image: goharbor/harbor-portal:v1.10.1
Loaded image: goharbor/harbor-core:v1.10.1
Loaded image: goharbor/harbor-db:v1.10.1

[Step 3]: preparing environment ...

[Step 4]: preparing harbor configs ...
prepare base dir is set to /root/harbor
Clearing the configuration file: /config/log/logrotate.conf
Clearing the configuration file: /config/log/rsyslog_docker.conf
Clearing the configuration file: /config/nginx/conf.d/notary.upstream.conf
Clearing the configuration file: /config/nginx/conf.d/notary.server.conf
Clearing the configuration file: /config/nginx/nginx.conf
Clearing the configuration file: /config/core/env
Clearing the configuration file: /config/core/app.conf
Clearing the configuration file: /config/registry/config.yml
Clearing the configuration file: /config/registry/root.crt
Clearing the configuration file: /config/registryctl/env
Clearing the configuration file: /config/registryctl/config.yml
Clearing the configuration file: /config/db/env
Clearing the configuration file: /config/jobservice/env
Clearing the configuration file: /config/jobservice/config.yml
Clearing the configuration file: /config/notary/server-config.postgres.json
Clearing the configuration file: /config/notary/server_env
Clearing the configuration file: /config/notary/signer_env
Clearing the configuration file: /config/notary/signer-config.postgres.json
Clearing the configuration file: /config/notary/notary-signer.crt
Clearing the configuration file: /config/notary/notary-signer.key
Clearing the configuration file: /config/notary/notary-signer-ca.crt
Clearing the configuration file: /config/notary/root.crt
Generated configuration file: /config/log/logrotate.conf
Generated configuration file: /config/log/rsyslog_docker.conf
Generated configuration file: /config/nginx/nginx.conf
Generated configuration file: /config/core/env
Generated configuration file: /config/core/app.conf
Generated configuration file: /config/registry/config.yml
Generated configuration file: /config/registryctl/env
Generated configuration file: /config/db/env
Generated configuration file: /config/jobservice/env
Generated configuration file: /config/jobservice/config.yml
loaded secret from file: /secret/keys/secretkey
Generated configuration file: /compose_location/docker-compose.yml
Clean up the input dir

# 如果已安装harbor将会自动移除
Note: stopping existing Harbor instance ...
Stopping nginx             ... done
Stopping harbor-jobservice ... done
Stopping harbor-core       ... done
Stopping redis             ... done
Stopping harbor-portal     ... done
Stopping registry          ... done
Stopping harbor-db         ... done
Stopping harbor-log        ... done
Removing nginx             ... done
Removing harbor-jobservice ... done
Removing harbor-core       ... done
Removing redis             ... done
Removing harbor-portal     ... done
Removing registry          ... done
Removing harbor-db         ... done
Removing registryctl       ... done
Removing harbor-log        ... done
Removing network harbor_harbor


[Step 5]: starting Harbor ...
Creating network "harbor_harbor" with the default driver
Creating harbor-log ... done
Creating harbor-portal ... done
Creating registry      ... done
Creating redis         ... done
Creating harbor-db     ... done
Creating registryctl   ... done
Creating harbor-core   ... done
Creating harbor-jobservice ... done
Creating nginx             ... done
✔ ----Harbor has been installed and started successfully.----

应用配置
# 配置镜像仓库地址(推荐配置域名)
vim/etc/docker/daemon.json
{
"insecure-registries": ["serverip"]
}

# 下载测试镜像
docker pull hello-world

# 给镜像重新打标签
docker tag hello-world serverip/hello-world:latest

# 登录进行上传
docker login serverip
docker push serverip/hello-world:latest
客户端配置证书
1、访问,https://配置的ip或域名(若nginx的443配置了其他端口需要加上对应端口号)
2、# docker login xxxx
若报错x509: certificate signed by unknown authority:
需要把之前制作的ca证书添加到信任(因为是自签名证书):
# mkdir –p /etc/docker/certs.d/serverip
# cp ca.crt /etc/docker/certs.d/serverip/ca.crt
# systemc restart docker.service
注意:
每一个客户端都需要复制上面的ca.crt到Docker相应目录,然后重启Docker,这里的ca.crt就是harbor.crt,cp harbor.crt ca.crt。
其他说明
- 新版本的harbor使用的是pg数据库,如果你是很老的版本,可能使用的还是mysql,所以需要手动暂停老服务。
并且需要备份并删除/data/database文件夹,否则新版本pg将无法解析老的mysql数据,而导致安装失败,对于两个数据库数据转换是个麻烦事。


链接: https://pan.baidu.com/s/1IKhBILaocDJkUveG-rXgVQ 提取码: 7bts
作者:Leozhanggg
出处:https://www.cnblogs.com/leozhanggg/p/12554399.html
本文版权归作者和博客园共有,欢迎转载,但未经作者同意必须保留此段声明,且在文章页面明显位置给出原文连接,否则保留追究法律责任的权利。