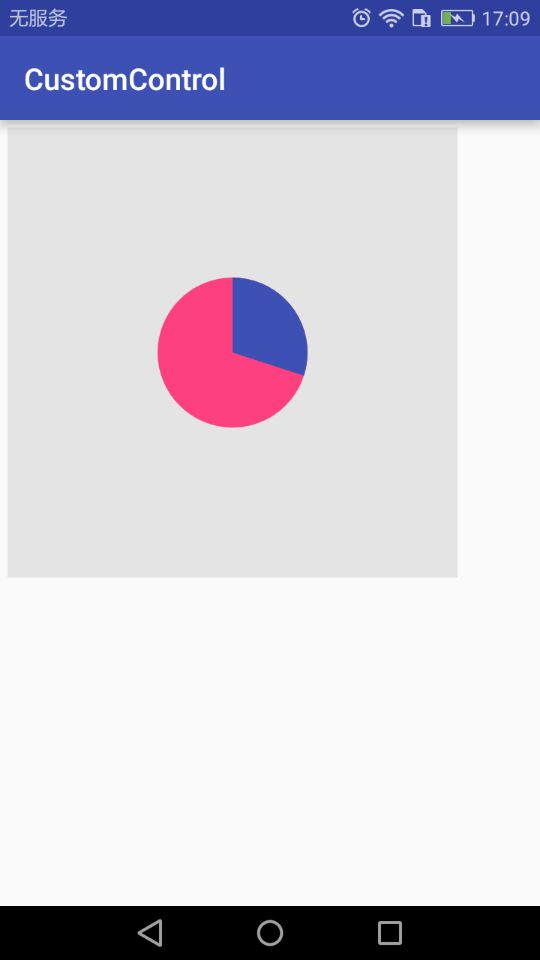
上篇介绍了自定义控件的一个简单案例,本篇文章主要介绍如何给自定义控件自定义一些属性。
Android 中使用自定义属性的一般步骤:
- 定义declare-styleable,添加attr
- 使用TypedArray获取自定义属性
- 设置到View上
自定义属性都存在于/value/attr.xml文件中,以如下格式存在
<resource>
<declare-styleable name="自定义属性名称">

<attr name="属性名称" format="属性种类"/>

......

</declare-styleable>

</resource>
format属性值:
-
reference:引用资源
-
string:字符串
-
Color:颜色
-
boolean:布尔值
-
dimension:尺寸值
-
float:浮点型
-
integer:整型
-
fraction:百分数
-
enum:枚举类型
-
flag:位或运算
代码说话:
<?xml version="1.0" encoding="utf-8"?>
<resources>
    <declare-styleable name="CircularAttrsView">
        <!--圆形绘制的位置-->
        <attr name="circular_circle_gravity">
            <flag name="left" value="0"/>
            <flag name="top" value="1"/>
            <flag name="center" value="2"/>
            <flag name="right" value="3"/>
            <flag name="bottom" value="4"/>
        </attr>

        <attr name="circular_circle_radius" format="dimension"/><!--圆形半径-->
        <attr name="circular_circle_progress" format="integer"/><!--当前进度值-->
        <attr name="circular_progress_color" format="color"/><!--进度显示颜色-->
        <attr name="circular_background_color" format="color"/><!--圆形背景色-->
    </declare-styleable>
</resources>
使用属性
<com.zhangqie.customcontrol.demo2.CircularAttrsView
        android:layout_width="300dp"
        android:layout_height="300dp"
        android:background="#e4e4e4"
        zq:circular_background_color="@color/colorAccent"
        zq:circular_circle_gravity="center"
        zq:circular_circle_progress="30"
        zq:circular_progress_color="@color/colorPrimary"
        zq:circular_circle_radius="50dp"
        android:layout_margin="5dp"
        android:padding="10dp"
        />
上面zq:这个可以随便去,只有相同就行
接下来就是获取属性,并使用或设置属性
public class CircularAttrsView extends View {


    /****
     * 有三个参数的构造函数中第三个参数是默认的Style,
     * 这里的默认的Style是指它在当前Application或Activity所用的Theme中的默认Style,且只有在明确调用的时候才会生效,
     */

    private final static String TAG = CircularAttrsView.class.getName();

    private Paint mPaint;
    private int backgroundColor = Color.GRAY;
    private int progressColor = Color.BLUE;
    private float radius;
    private float progress;

    private float centerX = 0;
    private float centerY = 0;
    public static final int LEFT = 0;
    public static final int TOP = 1;
    public static final int CENTER = 2;
    public static final int RIGHT = 3;
    public static final int BOTTOM = 4;

    private int gravity = CENTER;

    private RectF rectF;


    public CircularAttrsView(Context context) {
        super(context);
        init();
    }

    public CircularAttrsView(Context context, AttributeSet attrs) {
        super(context, attrs);
        initParams(context,attrs);
    }

    public CircularAttrsView(Context context, AttributeSet attrs, int defStyleAttr) {
        super(context, attrs, defStyleAttr);
        initParams(context,attrs);
    }


    private void init(){
        mPaint = new Paint();
        mPaint.setAntiAlias(true);
    }

    private void initParams(Context context,AttributeSet attrs){
        mPaint = new Paint();
        mPaint.setAntiAlias(true);
        rectF = new RectF();
        /***
         * 每一个属性集合编译之后都会对应一个styleable对象,通过styleable对象获取TypedArray typedArray,
         * 然后通过键值对获取属性值,这点有点类似SharedPreference的取法。
         */
        TypedArray typedArray = context.obtainStyledAttributes(attrs, R.styleable.CircularAttrsView);
        if (typedArray != null){
            backgroundColor = typedArray.getColor(R.styleable.CircularAttrsView_circular_background_color,Color.GRAY);
            progressColor = typedArray.getColor(R.styleable.CircularAttrsView_circular_progress_color,Color.BLUE);
            radius = typedArray.getDimension(R.styleable.CircularAttrsView_circular_circle_radius,0);
            progress = typedArray.getInt(R.styleable.CircularAttrsView_circular_circle_progress,0);
            gravity = typedArray.getInt(R.styleable.CircularAttrsView_circular_circle_gravity,CENTER);
            Log.e(TAG,backgroundColor+"--"+progressColor+"--"+radius+"--"+progress+"--"+gravity);
            typedArray.recycle();
        }
    }

    /****
     * 测量-Measure过程是计算视图大小
     *
     * @param widthMeasureSpec
     * @param heightMeasureSpec
     */
    @Override
    protected void onMeasure(int widthMeasureSpec, int heightMeasureSpec) {
        super.onMeasure(widthMeasureSpec, heightMeasureSpec);

        //根据提供的测量值(格式)提取模式(三个模式之一)
        //MeasureSpec有3种模式分别是UNSPECIFIED, EXACTLY和AT_MOST,
        int widthMode = MeasureSpec.getMode(widthMeasureSpec);  //取出宽度的测量模式
        int widthSize = MeasureSpec.getSize(widthMeasureSpec);//获取View的大小(宽度的确切数值)

        int heightMode = MeasureSpec.getMode(heightMeasureSpec);
        int heightSize = MeasureSpec.getSize(heightMeasureSpec);

        Log.i(TAG,"onMeasure---widthMode--->"+widthMode);
        switch (widthMode){
            case MeasureSpec.EXACTLY:

                break;
            case MeasureSpec.AT_MOST:

                break;
            case MeasureSpec.UNSPECIFIED:

              break;
        }
        Log.i(TAG,"onMeasure--widthSize--->"+ widthSize);
        Log.i(TAG,"onMeasure--heightMode-->"+ heightMode);
        Log.i(TAG,"onMeasure--heightSize-->"+heightSize);

        int width = getWidth();
        int height = getHeight();
        Log.e(TAG, "onDraw---->" + width + "*" + height);

        centerX = width / 2;
        centerY = width / 2;
        switch (gravity){
            case LEFT:
                centerX = radius + getPaddingLeft();
                break;
            case TOP:
                centerY = radius + getPaddingTop();
                break;
            case CENTER:
                break;
            case RIGHT:
                centerX = width - radius - getPaddingRight();
                break;
            case BOTTOM:
                centerY = height - radius - getPaddingBottom();
                break;
        }

        float left = centerX - radius;
        float top = centerY - radius;
        float right = centerX + radius;
        float bottom = centerY + radius;
        rectF.set(left,top,right,bottom);
    }


    /***
     * 确定View的大小(这个函数在视图大小发生改变时调用。)
     *
     * 宽度,高度,上一次宽度,上一次高度。
     * 只需关注 宽度(w), 高度(h) 即可,这两个参数就是View最终的大小。
     * @param w
     * @param h
     * @param oldw
     * @param oldh
     */
    @Override
    protected void onSizeChanged(int w, int h, int oldw, int oldh) {
        super.onSizeChanged(w, h, oldw, oldh);
        Log.i(TAG,"onSizeChanged");
    }

    /****
     * 布局-Layout过程用于设置视图在屏幕中显示的位置,onLayout一般只会在自定义ViewGroup中才会使用
     *
     * 确定布局的函数是onLayout,它用于确定子View的位置,在自定义ViewGroup中会用到,他调用的是子View的layout函数。
     *
     * @param changed
     * @param left
     * @param top
     * @param right
     * @param bottom
     */
    @Override
    protected void onLayout(boolean changed, int left, int top, int right, int bottom) {
        super.onLayout(changed, left, top, right, bottom);
        Log.i(TAG,"onLayout");
    }


    /***
     * 绘制-draw过程主要用于利用前两步得到的参数,将视图显示在屏幕上,到这里也就完成了整个的视图绘制工作
     * @param canvas
     */
    @Override
    protected void onDraw(Canvas canvas) {
        super.onDraw(canvas);
        mPaint.setColor(backgroundColor);
        // FILL填充, STROKE描边,FILL_AND_STROKE填充和描边
        mPaint.setStyle(Paint.Style.FILL_AND_STROKE);


        canvas.drawCircle(centerX,centerY,radius,mPaint);//画圆
        mPaint.setColor(progressColor);

        double percent = progress * 1.0 / 100;
        int angle = (int)(percent * 360);
        //根据进度画圆弧
        canvas.drawArc(rectF,270,angle,true,mPaint);
    }
}
效果图:(居中的,可以通过 zq:circular_circle_gravity="center" 来设置显示的位置)
