现在的APP开发,通常会提供APP的换肤功能,网上流传的换肤代码和实现手段过于复杂,我把原作者的代码重新整理抽取出来,转换成Eclipse项目,重新整理成正确、可直接运行的项目.
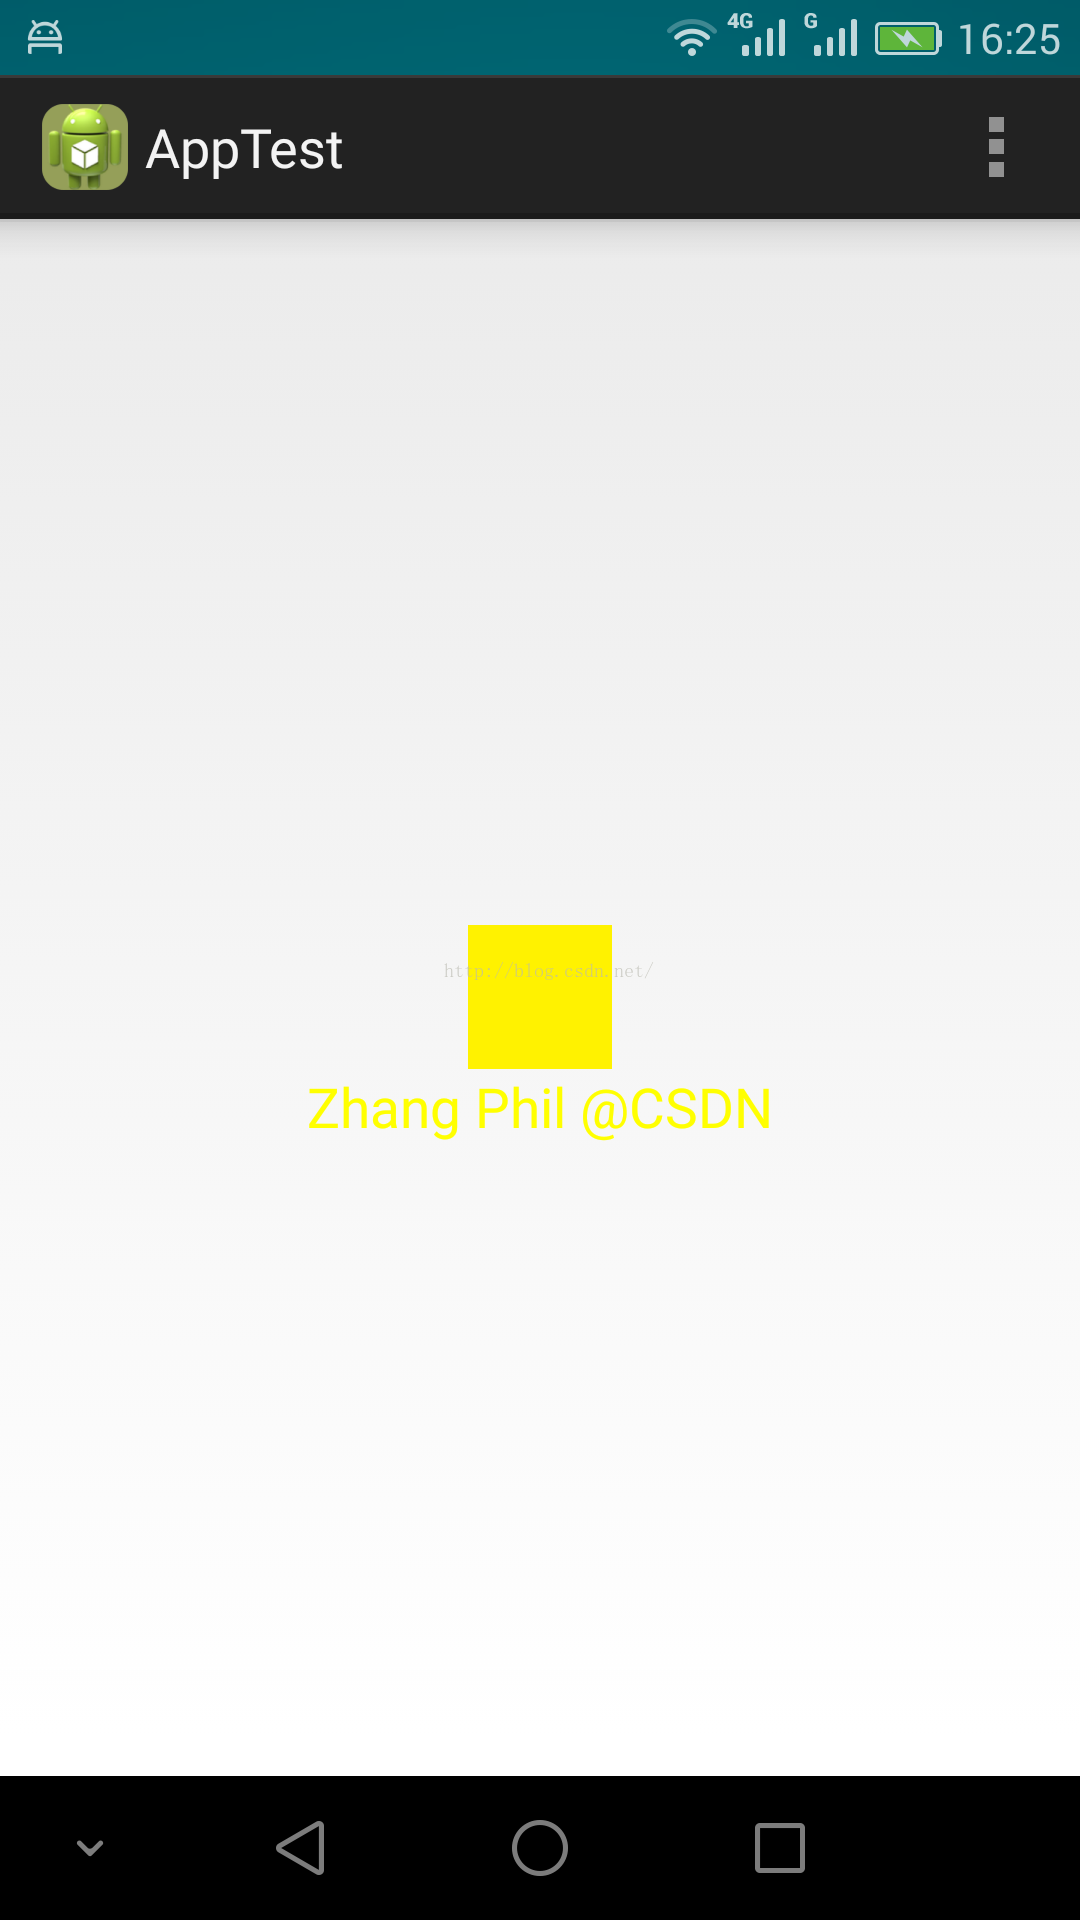
代码运行结果如图。
假设默认是黄色皮肤:
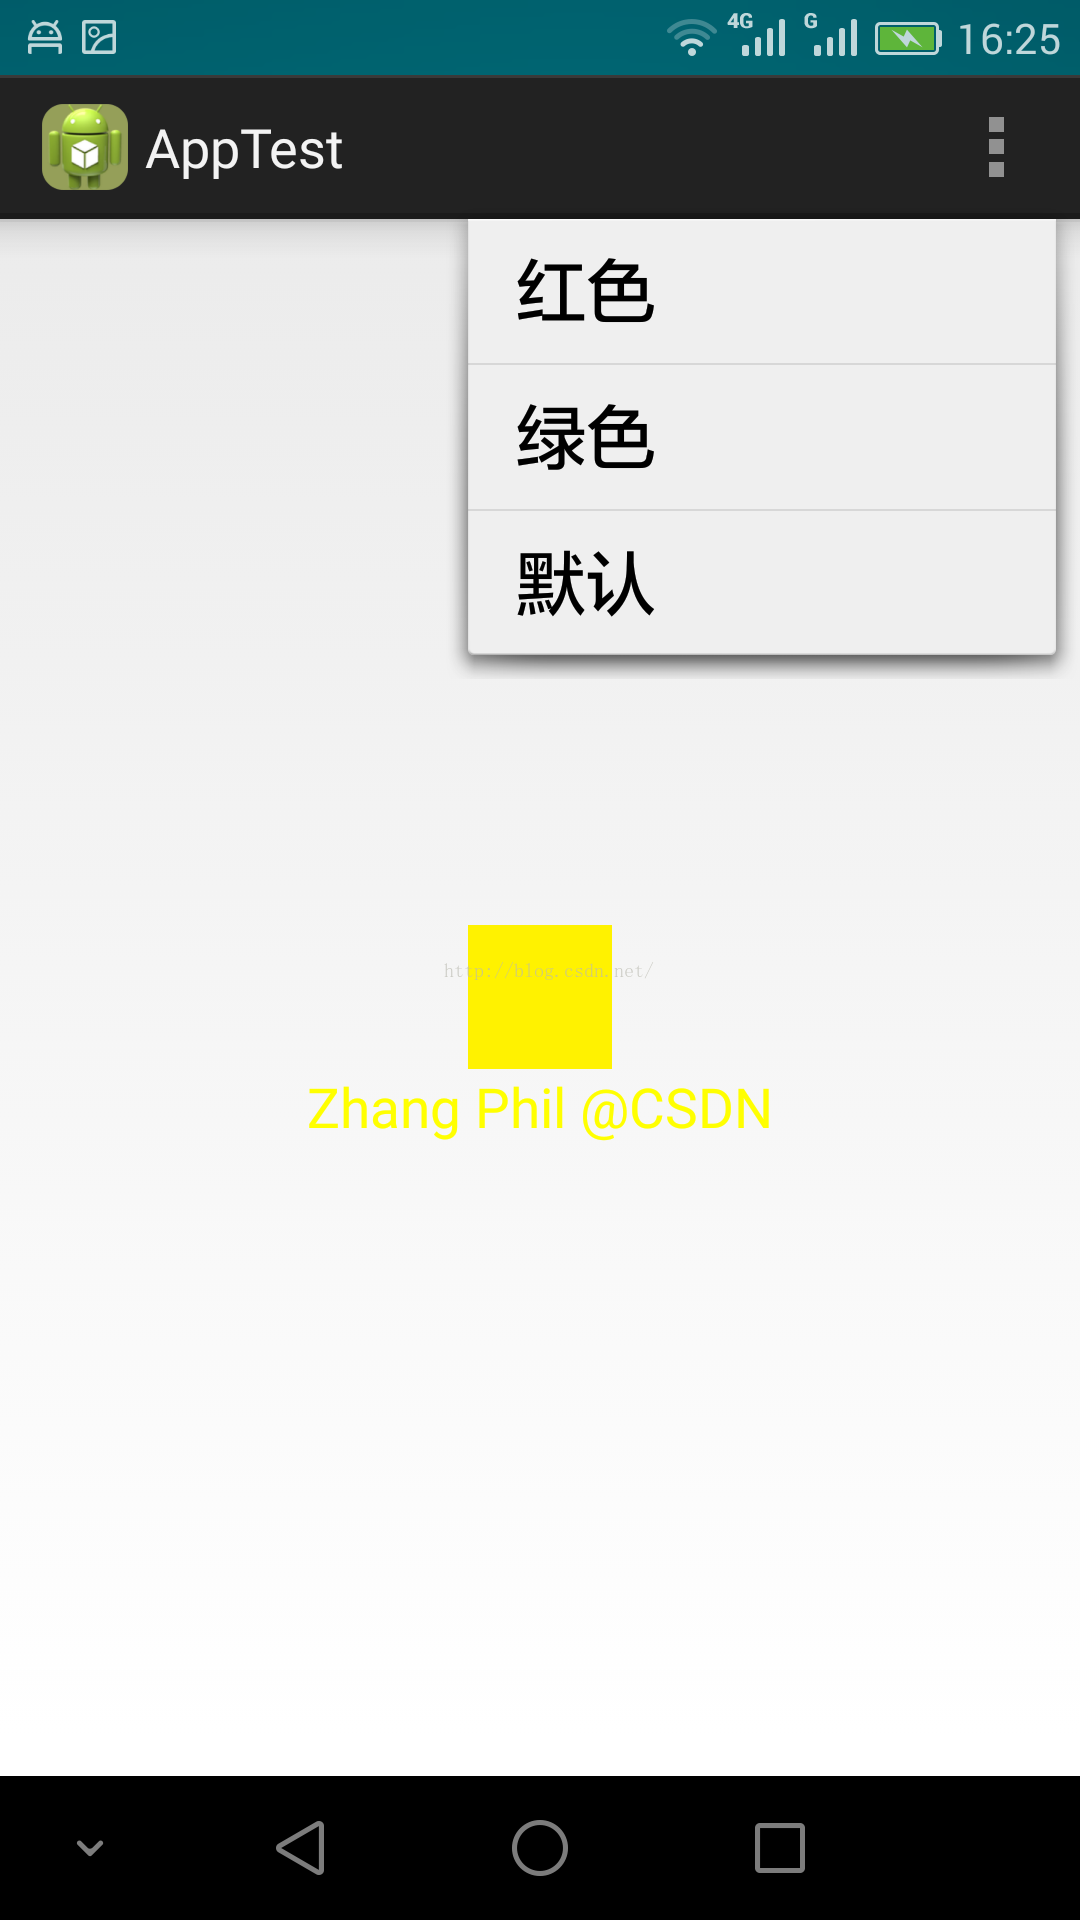
换肤成红色:

换肤成绿色:

使用方式:
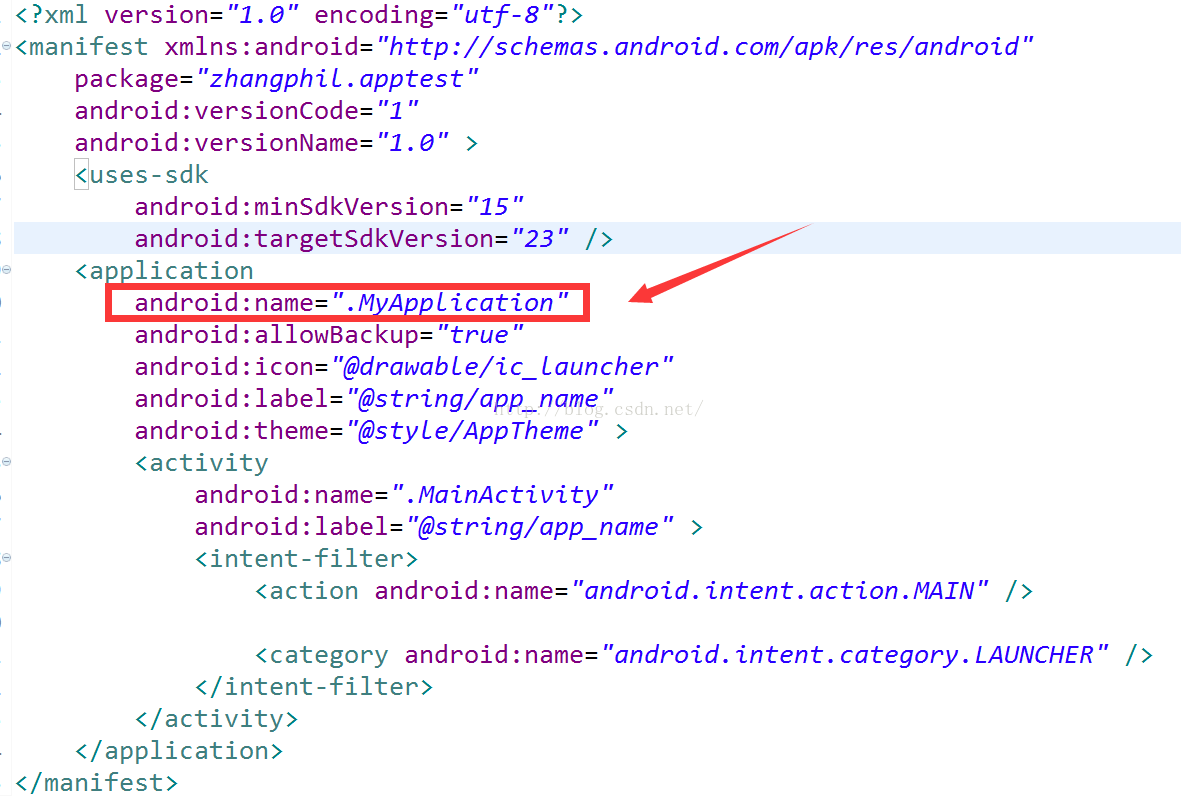
1,首先要自定义一个Application,在AppTest中就是MyApplication。完成初始化。
 1 package zhangphil.apptest;
 2
 3 import com.zhy.changeskin.SkinManager;
 4
 5 import android.app.Application;
 6
 7 public class MyApplication extends Application {
 8     @Override
 9     public void onCreate() {
10         super.onCreate();
11         SkinManager.getInstance().init(this);
12     }
13 }
2,把这个MyApplication写到Androidmanifest.xml里面:
3,在打算实现换肤的activity里面的onCreate()和onDestory()里面添加相应的“注册”和“注销”代码:
 1 @Override
 2     protected void onCreate(Bundle savedInstanceState) {
 3         super.onCreate(savedInstanceState);
 4         ...
 5         SkinManager.getInstance().register(this);
 6         ...
 7     }
 8
 9     @Override
10     protected void onDestroy(){
11         super.onDestroy();
12         SkinManager.getInstance().unregister(this);
13     }
本例完整的MainActivity.Java代码:
 1 package zhangphil.apptest;
 2
 3 import com.zhy.changeskin.SkinManager;
 4
 5 import android.app.Activity;
 6 import android.os.Bundle;
 7 import android.view.Menu;
 8 import android.view.MenuItem;
 9
10 public class MainActivity extends Activity {
11
12     @Override
13     protected void onCreate(Bundle savedInstanceState) {
14         super.onCreate(savedInstanceState);
15
16         SkinManager.getInstance().register(this);
17
18         setContentView(R.layout.activity_main);
19     }
20
21     @Override
22     protected void onDestroy(){
23         super.onDestroy();
24         SkinManager.getInstance().unregister(this);
25     }
26
27     @Override
28     public boolean onCreateOptionsMenu(Menu menu) {
29         getMenuInflater().inflate(R.menu.main, menu);
30         return true;
31     }
32
33     @Override
34     public boolean onOptionsItemSelected(MenuItem item) {
35         int id = item.getItemId();
36         if (id == R.id.red_skin) {
37             SkinManager.getInstance().changeSkin("red");
38             return true;
39         }
40
41         if (id == R.id.green_skin) {
42             SkinManager.getInstance().changeSkin("green");
43             return true;
44         }
45
46         if (id == R.id.default_skin) {
47             SkinManager.getInstance().changeSkin("default");;
48             return true;
49         }
50
51         return super.onOptionsItemSelected(item);
52     }
53 }
以上完成后,剩下的就是比较繁琐和稍微需要理解的难点。
以Android ImageView为例,假设要对某一个ImageView实现一键换肤功能,在本例是要将ImageView的src图片换成相应的皮肤颜色,那么首先需要准备几套以一个共同前缀名和不同后缀名组成的图片资源,本例是:

相同的前缀名是skin_img ,不同的后缀名是 green,red,default,后缀名至关重要,后面将以后缀名换肤。中间用连词符“_”连接起来。
然后在ImageView里面添加tag字段属性。Tag字段属性有三部分组成,以本例的ImageView为例,第一部分skin是固定的,不用管。接着就是上面的前缀 skin_img,第三部分是作为ImageView的src为靶子换肤。
1 <ImageView
2         android:id="@+id/image"
3         android:layout_width="wrap_content"
4         android:layout_height="wrap_content"
5         android:layout_centerInParent="true"
6         android:tag="skin:skin_img:src"
7         android:src="@drawable/skin_img_default"/>
TextView类似于ImageView,TextView的字段tag也是三段,第一部分skin不用管,第二部分仍然是需要设置的颜色的前缀,第三部分是修改的TextView的属性textColor为标靶。TextView的配置代码:
<TextView
        android:id="@+id/text"
        android:layout_width="wrap_content"
        android:layout_height="wrap_content"
        android:layout_below="@id/image"
        android:layout_centerHorizontal="true"
        android:text="Zhang Phil @CSDN"
        android:tag="skin:text_color:textColor"
        android:textColor="@color/text_color_default" />
colors.xml定义的相关属性:
1 <?xml version="1.0" encoding="utf-8"?>
2 <resources>
3     <color name="text_color_red">#ff0000</color>
4     <color name="text_color_green">#00ff00</color>
5     <color name="text_color_default">#ffff00</color>
6 </resources>
本例的换肤在menu菜单里面触发,就直接以之前定义的ImageView和TextView的不同后缀名:
 1 @Override
 2     public boolean onOptionsItemSelected(MenuItem item) {
 3         int id = item.getItemId();
 4         if (id == R.id.red_skin) {
 5             SkinManager.getInstance().changeSkin("red");
 6             return true;
 7         }
 8
 9         if (id == R.id.green_skin) {
10             SkinManager.getInstance().changeSkin("green");
11             return true;
12         }
13
14         if (id == R.id.default_skin) {
15             SkinManager.getInstance().changeSkin("default");;
16             return true;
17         }
18
19         return super.onOptionsItemSelected(item);
20     }
更为全面的说明不如直接看我写的AppTest这个项目代码,项目源代码例子我尽量写的比较简单。
新的github链接地址:https://github.com/zhangphil/Android-ChangeSkin