1、微信开放能力:微信支付、微信登录、二维码生成、分享
3、flex的一个特性
只要父元素设定了display:flex,子元素就是失去块元素属性
举个例子:
<view>
    <view class="chunck t1">t1</view>
    <view class="chunck t2">t2</view>
    <view class="chunck t3">t3</view>
</view>
效果:
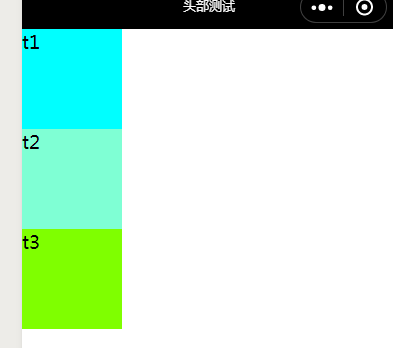
父元素加了display:flex
.container{
    display: flex;
}

<view class="container">
    <view class="chunck t1">t1</view>
    <view class="chunck t2">t2</view>
    <view class="chunck t3">t3</view>
</view>
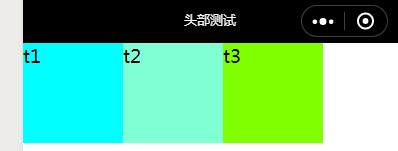
4、微信小程序里的绝对路径和相对路径
新建一个组件,将其引入
{
  "usingComponents": {
    "v-like": "components/like/index"
  }
}
<view class="container">
    <v-like></v-like>
</view>
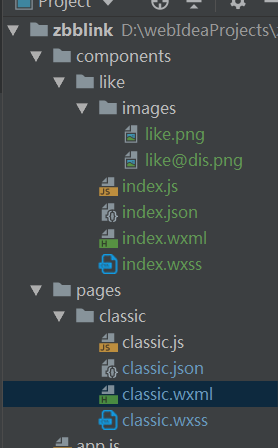
这时会报错

原因:这时使用的是相对路径,引入的组件是相对于classic的
解决办法:
第一种:
{
  "usingComponents": {
    "v-like": "../../components/like/index"
  }
}
找到正确的路径
第二种:使用绝对路径
{
  "usingComponents": {
    "v-like": "/components/like/index"
  }
}
这俩种都可以,看自己喜欢哪个
5、const不能改变,说的是内存地址不能改变
const config = {
  name: 'zb'
}

config = 2 // 报错

config.name = 'zb1' // 没有报错
修改config里的属性值不会报错,因为没有改变内存地址
但是赋值为2,修改了内存地址,所以报错
6、自定义事件 https://developers.weixin.qq.com/miniprogram/dev/framework/custom-component/events.html
this.triggerEvent('myevent', myEventDetail, myEventOption)
使用triggerEvent定义
myevent是事件名
myEventDetail 是属性

例子:
 // 激活
      let behavior = this.properties.like?'like':'cancel'
      this.triggerEvent('like',{
        behavior: behavior
      })


  <v-like bind:like="onLike" like="{{classic.like_status}}" count="{{classic.fav_nums}}"></v-like>
onLike:function(event) {
  console.log(event)
},

自定义事件时传入的参数,会出现在detail中
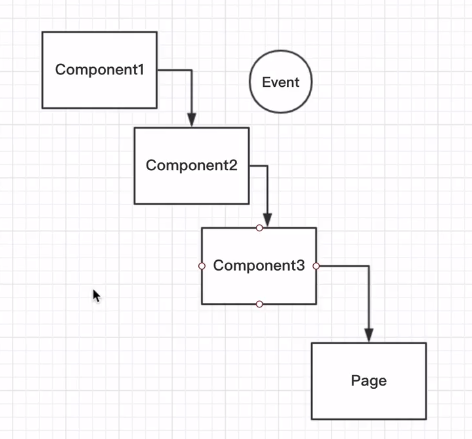
自定义的组件把事件一层一层传递,直到page
7、组件的生命周期 https://developers.weixin.qq.com/miniprogram/dev/framework/custom-component/lifetimes.html
要想输出定义的properties和data里的属性,可以在attached里输出
8、不要在属性的observer里面操作这个属性
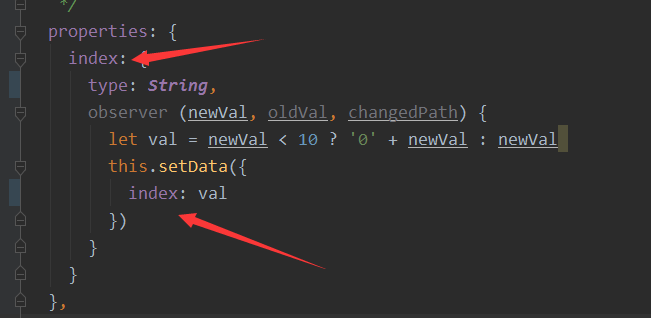
这是错误的,会报下面的错误
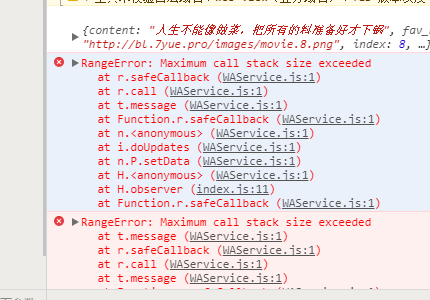
9、
align-items: baseline;
保证元素基于底部对齐

10、纯粹回调、Promise与async、await
纯粹callback回调:回调地狱 return 只是一种代码风格 看着复杂 不代表不能实现功能
promise:代码风格比纯粹的callback好 多个异步等待合并 promise也可以传递callback,但是不需要层层传递callback,因为promise没有剥夺函数的return能力
最佳的异步处理方案async、await : ES2017提出的 小程序不支持
Promise是一个对象,而不是函数
因为在面向对象思想里,对象是可以保存状态的,而函数不可以保存(闭包函数可以保存)
promise的精髓是用对象的形式保存了异步调用的结果
promise作为一个对象,是可以赋值给一个变量的,而且这个变量可以在我们的代码中到处传递,不需要附带任何的回调函数。只有在需要的时候才要传入回调函数
const promise = new Promise((resolve, reject) => {
      wx.getSystemInfo({
        success:(res) => {
          resolve(res)
        },
        fail: (error) => [
          reject(error)
        ]
      })
    })
    promise.then((res) => {
      console.log(res)
    },(error) => {
      console.log(error)
    })
11.、我们使用flex布局的时候,会出现各种奇怪的问题,原因就是因为没有设置宽度和高度,所以我们最好给用到的div设置宽为100%
12、真机预览小程序:点击微信开发工具的预览按钮,扫描生成的二维码。如果要请求后端的接口,就在手机上点击右上角的三个点,点击打开调试,然后重新打开小程序
13、behaviors 类似于vuex中的mixins 把多个组件都用到的属性和方法抽取出来放到这个文件里
https://developers.weixin.qq.com/miniprogram/dev/framework/custom-component/behaviors.html
Behavior文件
let classicBeh = Behavior({
  properties: {
    img: {
      type: String
    },
    content: {
      type: String
    }
  },
  data: {

  },
  methods: {

  }
})

export { classicBeh }
import { classicBeh } from '../classic-beh'

Component({

  behaviors: [classicBeh],

  /**
   * 组件的属性列表
   */
  properties: {
  },
备注:
1、一个组件可以引入多个behavios文件
2、如果多个behavios文件里有相同的properties和data,取最后一个behavios文件里的
3、如果组件里有相同的properties和data,组件里的覆盖behavios文件里的
4、如果组件和properties文件里都有attached,按次序执行
14、在使用缓存的时候,可能会出现很多奇怪的问题,有可能是缓存引起的,就算是重新编译或者重启微信开发工具也不行,这时候就要清除缓存
15、使用@import引入样式文件
16、https://developers.weixin.qq.com/miniprogram/dev/reference/wxml/conditional.html#wx:if vs hidden
如何让自定义组件支持hidden
我们在自定义组件上直接写hiddern=""是没有效果的
但是在<view>上写却可以
所以我们可以把hidden传递给自定义组件,在自定义组件的<view>上写hiddern=""
wx;if true或false的时候,会执行完整的生命周期,消耗资源多
hidden 只会显示和隐藏 初始化以后不会再执行完整的生命周期
hidden的一个特点:不能触发组件生命周期的detached
17、微信小程序的音乐API BackgroundAudioManager
使用实例
const mMgr = wx.getBackgroundAudioManager()

mMgr.src = this.properties.src // 设置src 自动播放
mMgr.title = this.properties.title //必须
切换组件的时候,停止音乐播放
解决方案一:
在组件的detached生命周期中调用 mMgr.stop()
这种方法有个问题:只要一切换音乐播放就会停止
解决方案二:
通过判断当前播放的src和当前组件传进来的src,如果一致:按钮为暂停按钮,反之为播放按钮
if (mMgr.src === this.properties.src) {
        this.setData({
          playing: true
        })
      }
18、promise的正确用法
我们调用promise方法以后,如果要继续调用其他的promise方法,一般这样写
bookModel.getHotList()
      .then(res => {
        console.log(res)
        bookModel.getMyBookCount()
          .then((res) => {
            console.log(res)
            bookModel.getMyBookCount()
              .then(res => {
                console.log(res)
              })
          })
      })
上面这种方法不好,类似于回调地狱
推荐使用下面的方法
bookModel.getHotList()
      .then(res => {
        console.log(res)
        return bookModel.getMyBookCount()
      })
      .then(res => {
        console.log(res)
        return bookModel.getMyBookCount()
      })
      .then(res => {
        console.log(res)
      })
调用promise方法后返回出去,这样就可以使用then进行下一个操作
19、从别的页面跳转到相应页面,url中携带的参数,都在生命周期onLoad里的options中
20、微信小程序中的slot https://developers.weixin.qq.com/miniprogram/dev/framework/custom-component/wxml-wxss.html#组件wxml的slot
<!-- 组件模板  slot使用name进行区分 -->
<view class="wrapper">
  <slot name="before"></slot>
  <view>这里是组件的内部细节</view>
  <slot name="after"></slot>
</view>

<!-- 引用组件的页面模板 -->
<view>
  <component-tag-name>
    <!-- 这部分内容将被放置在组件 <slot name="before"> 的位置上 -->
    <view slot="before">这里是插入到组件slot name="before"中的内容</view>
    <!-- 这部分内容将被放置在组件 <slot name="after"> 的位置上 -->
    <view slot="after">这里是插入到组件slot name="after"中的内容</view>
  </component-tag-name>
</view>
备注:如果要使用slot,一定要在定义slot的组件js页面假如
options: {
    multipleSlots: true // 在组件定义时的选项中启用slot支持
  },
文档里说的是多slot的时候需要加这个,测试中发现,一个或多个都需要用slot
21、微信小程序可以从父组件传递自定义的样式
外部样式类
/* 组件 custom-component.js */
Component({
  externalClasses: ['my-class']
})

<!-- 组件 custom-component.wxml -->
<custom-component class="my-class">这段文本的颜色由组件外的 class 决定</custom-component>
22、wxs 语法类似于es5语法 定义以后 可以在wxml中使用
https://developers.weixin.qq.com/miniprogram/dev/reference/wxs/01wxs-module.html
23、input组件有个特殊的方法 bindconfirm 用键盘输入完成后会触发
24、编程思想:有些数据能前端处理的,就不要麻烦后端
25、微信小程序分为逻辑层和视图层,数据从逻辑层发送到视图层,需要用到setData
这需要消耗资源,如果视图层用不到的话,可以使用this.data改变data里定义的值
26、open-data和getUserInfo的区别
都可以获取用户信息
open-data 不需要授权,直接展示用户信息 如果只是为了展示信息 可以用open-data
getUserInfo 需要授权,可以通过Js获取用户信息
27、授权组件
https://developers.weixin.qq.com/miniprogram/dev/component/button.html

<!--button原生组件,open-type需要设置为getUserInfo,getuserinfo方法用来获取用户信息-->
<button
  bind:getuserinfo="onGetUserInfo"
  open-type="{{openType}}"
  plain="{{true}}" // 按钮是否镂空,背景透明
  class="container"
>
  <slot name="img"></slot>
</button>
需要从父组件传递的属性时openType
父组件使用
josn引入
"usingComponents": {
    "v-button": "/components/image-button/index"
  }


<v-button
    wx:if="{{!authorized}}"
    bind:getuserinfo="onGetUserInfo"
    open-type="getUserInfo"  // 表示传给v-button的值是open-type
    class="avatar-position"
  >
    <image slot="img" class="avatar" src="/images/my/my.png" />
  </v-button>
俩种方式:
使用wx.navigateToMiniProgram
wx.navigateToMiniProgram({
      appId: 'xxxxxxxxxxxxxxxxxx', // 要跳转的小程序的appid
      path: 'page/index/index', // 跳转的目标页面
      extarData: {
        open: 'auth'
      },
      success(res) {
        // 打开成功
      }
})
使用navigator组件
<navigator class="nav" target="miniProgram" app-id="wx8ffc97ad5bcccc89" open-type="navigate">
  <image class="vendor" src="/images/my/vendor.png"></image>
</navigator>
注意:从小程序A内跳转到小程序B内有一个前提条件:A和B必须被同一个公众号关联
29、分享功能 https://developers.weixin.qq.com/miniprogram/dev/component/button.html
<button
  open-type="share"
>
  分享
</button>
可以使用button组件完成分享功能,open-type设置为share
<button
open-type="share"
>
分享
</button>