keras提供了多种ImageNet预训练模型,前面的文章都采用resnet50,这里改用Xception预训练模型进行迁移学习。
import os

from keras import layers,models,optimizers
from keras.applications.xception import Xception,preprocess_input
from keras.layers import *
from keras.models import Model
定义模型:
base_model = Xception(weights='imagenet', include_top=False, input_shape=(150, 150, 3))
x = base_model.output
x = GlobalAveragePooling2D()(x)
x = Dense(1024)(x)
x = BatchNormalization()(x)
x = Activation('relu')(x)
x = Dropout(0.2)(x)
x = Dense(256)(x)
x = BatchNormalization()(x)
x = Activation('relu')(x)
x = Dropout(0.2)(x)
predictions = Dense(1, activation='sigmoid')(x)

model = Model(inputs=base_model.input, outputs=predictions)

optimizer = optimizers.RMSprop(lr=1e-4)

def get_lr_metric(optimizer):
    def lr(y_true, y_pred):
        return optimizer.lr

    return lr

lr_metric = get_lr_metric(optimizer)

model.compile(loss='binary_crossentropy', optimizer=optimizer, metrics=['acc',lr_metric])
准备训练数据:
from keras.preprocessing.image import ImageDataGenerator

batch_size = 64

train_datagen = ImageDataGenerator(
    rotation_range=90,
    width_shift_range=0.2,
    height_shift_range=0.2,
    shear_range=0.2,
    zoom_range=0.2,
    horizontal_flip=True,
    vertical_flip=True,
    preprocessing_function=preprocess_input)

test_datagen = ImageDataGenerator(preprocessing_function=preprocess_input)


train_generator = train_datagen.flow_from_directory(
        # This is the target directory
        train_dir,
        # All images will be resized to 150x150
        target_size=(150, 150),
        batch_size=batch_size,
        # Since we use binary_crossentropy loss, we need binary labels
        class_mode='binary')

validation_generator = test_datagen.flow_from_directory(
        validation_dir,
        target_size=(150, 150),
        batch_size=batch_size,
        class_mode='binary')
训练模型:
from keras.callbacks import ReduceLROnPlateau,EarlyStopping

early_stop = EarlyStopping(monitor='val_loss', patience=13)

reduce_lr = ReduceLROnPlateau(monitor='val_loss', patience=7, mode='auto', factor=0.2)

callbacks = [early_stop,reduce_lr]

history = model.fit_generator(
      train_generator,
      steps_per_epoch=train_generator.samples//batch_size,
      epochs=100,
      validation_data=validation_generator,
      validation_steps=validation_generator.samples//batch_size,
        callbacks=callbacks)
训练32轮后提前结束:
Epoch 1/100
281/281 [==============================] - 152s 542ms/step - loss: 0.2750 - acc: 0.8793 - lr: 1.0000e-04 - val_loss: 0.1026 - val_acc: 0.9665 - val_lr: 1.0000e-04
Epoch 2/100
281/281 [==============================] - 144s 513ms/step - loss: 0.1547 - acc: 0.9388 - lr: 1.0000e-04 - val_loss: 0.1355 - val_acc: 0.9673 - val_lr: 1.0000e-04
Epoch 3/100
281/281 [==============================] - 143s 510ms/step - loss: 0.1204 - acc: 0.9531 - lr: 1.0000e-04 - val_loss: 0.0791 - val_acc: 0.9788 - val_lr: 1.0000e-04
......
Epoch 30/100
281/281 [==============================] - 142s 504ms/step - loss: 0.0103 - acc: 0.9964 - lr: 4.0000e-06 - val_loss: 0.0702 - val_acc: 0.9842 - val_lr: 4.0000e-06
Epoch 31/100
281/281 [==============================] - 141s 503ms/step - loss: 0.0111 - acc: 0.9961 - lr: 4.0000e-06 - val_loss: 0.0667 - val_acc: 0.9842 - val_lr: 4.0000e-06
Epoch 32/100
281/281 [==============================] - 142s 504ms/step - loss: 0.0123 - acc: 0.9954 - lr: 4.0000e-06 - val_loss: 0.0710 - val_acc: 0.9847 - val_lr: 4.0000e-06

测试数据也要进行preprocess_input处理:
def get_input_xy(src=[]):
    pre_x = []
    true_y = []

    class_indices = {'cat': 0, 'dog': 1}

    for s in src:
        input = cv2.imread(s)
        input = cv2.resize(input, (150, 150))
        input = cv2.cvtColor(input, cv2.COLOR_BGR2RGB)
        pre_x.append(preprocess_input(input))

        _, fn = os.path.split(s)
        y = class_indices.get(fn[:3])
        true_y.append(y)

    pre_x = np.array(pre_x)

    return pre_x, true_y


def plot_sonfusion_matrix(cm, classes, normalize=False, title='Confusion matrix', cmap=plt.cm.Blues):
    plt.imshow(cm, interpolation='nearest', cmap=cmap)
    plt.title(title)
    plt.colorbar()
    tick_marks = np.arange(len(classes))
    print(tick_marks, type(tick_marks))
    plt.xticks(tick_marks, classes, rotation=45)
    plt.yticks([-0.5,1.5], classes)

    print(cm)
    ok_num = 0
    for k in range(cm.shape[0]):
        print(cm[k,k]/np.sum(cm[k,:]))
        ok_num += cm[k,k]

    print(ok_num/np.sum(cm))

    if normalize:
        cm = cm.astype('float') / cm.sum(axis=1)[:, np.newaxis]

    thresh = cm.max() / 2.0
    for i, j in itertools.product(range(cm.shape[0]), range(cm.shape[1])):
        plt.text(j, i, cm[i, j], horizontalalignment='center', color='white' if cm[i, j] > thresh else 'black')

    plt.tight_layout()
    plt.ylabel('True label')
    plt.xlabel('Predict label')
测试图片:
dst_path = r'D:BaiduNetdiskDownloadlarge'
test_dir = os.path.join(dst_path, 'test')
test = os.listdir(test_dir)

images = []

# 获取每张图片的地址,并保存在列表images中
for testpath in test:
    for fn in os.listdir(os.path.join(test_dir, testpath)):
        if fn.endswith('jpg'):
            fd = os.path.join(test_dir, testpath, fn)
            images.append(fd)

# 得到规范化图片及true label
pre_x, true_y = get_input_xy(images)

# 预测
predictions = model.predict(pre_x)
pred_y = [1 if predication[0] > 0.5 else 0 for predication in predictions]
# pred_y=np.argmax(predictions,axis=1)

# 画混淆矩阵
confusion_mat = confusion_matrix(true_y, pred_y)
plot_sonfusion_matrix(confusion_mat, classes=range(2))
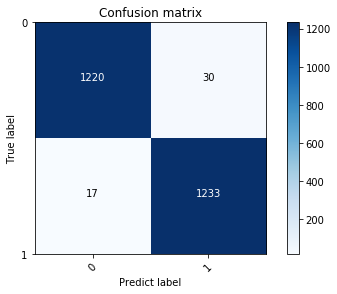
测试结果为98.1%:
[[1220   30]
 [  17 1233]]
0.976
0.9864
0.9812
猫的准确度为97.6%,狗的为98.6%,总的准确度为98.1%。混淆矩阵图:
