Veins入门教程——教你如何下手研究
目录
注意:写着写着发现要讲的实在太多了,实在没精力了,后面就只会提重点了,可能显得虎头蛇尾,但本文只是提点入门,最重要的还是自己去琢磨,不可能一篇博客就包教会。还有学之前先学会C++。
Veins是一款用于车载移动环境下无线通信仿真的开源框架,其对于车载无线网的底层结构,如物理层、MAC层等基于802.11p协议已基本开发完善,因此在此基础上进行二次开发,如改进MAC层协议或者路由协议等研究都是非常便携的。甚至如果是进行应用层上的研究,如车联网环境下的车辆自动驾驶、编队行驶、路径规划、信号灯区域协调等则更加方便,因为底层的结构可以直接使用,不必再浪费时间精力在这些并不是需要主要研究但却又对仿真结果影响重大的部分。
Veins的好处很多,一旦掌握可以节省大量的开发时间,得到更加准确的仿真实验结果,为自己的理论提供更加权威可靠的支持。但是Veins的相关教程却寥寥无几,除了官网上的一份运行其内置示例的教程外很难再寻找到其他相关教程,因此很多人打开Veins后面对密密麻麻的C++代码难以下手,望而却步。博主因为学业所需对其进行过一段时间的研究,真是万分痛苦!在此将自己的研究经验经过整理得到一份入门级教程奉献给大家,愿大家都能早日脱离苦海。
看教程之前先确定自己已经把官网上的内置示例的教程运行成功了。
废话少说!
首先在OMNeT++的IDE左侧有如下图所示的窗口,打开veins的项目(博主拿二次开发过的程序在讲解,可能会比纯净版多出一些文件,大家不要在意),veins内置的示例就在文件夹examples内:
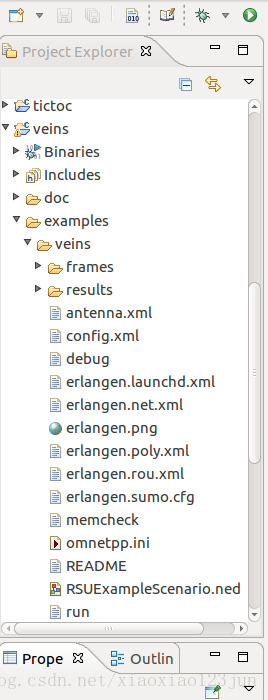
- antenna.xml:对车辆天线做出配置,不用管;
- config.xml:配置物理层无线电传播相关参数,如示例中将信号路径衰落的模型配置为“SmiplePathlossModel”,障碍物引起的信号衰落模型设置为“SimpleObstacleShadowing”,一般使用默认的即可;
 1 <?xml version="1.0" encoding="UTF-8"?>
 2 <root>
 3     <AnalogueModels>
 4         <AnalogueModel type="SimplePathlossModel">
 5             <parameter name="alpha" type="double" value="2.0"/>
 6             <parameter name="carrierFrequency" type="double" value="5.890e+9"/>
 7         </AnalogueModel>
 8         <AnalogueModel type="SimpleObstacleShadowing">
 9             <parameter name="carrierFrequency" type="double" value="5.890e+9"/>
10             <obstacles>
11                 <type id="building" db-per-cut="9" db-per-meter="0.4" />
12             </obstacles>
13         </AnalogueModel>
14     </AnalogueModels>
15     <Decider type="Decider80211p">
16         <!-- The center frequency on which the phy listens-->
17         <parameter name="centerFrequency" type="double" value="5.890e9"/>
18     </Decider>
19 </root>
- debug:调试信息,不用管;
- erlangen.launchd.xml:建立与SUMO的通信,不能更改;
- erlangen.net.xml: SUMO路网文件,跑自己的仿真时需要替换,至于如何生成请参考SUMO官网文档;
- erlangen.poly.xml:如果SUMO路网文件是由地图转化而来的,如从OpenStreetMap导入的,则路网文件中还将包含所选地区的建筑物的信息,通过SUMO提供的OpenStreetMap Web接口便可生成记录这些建筑物形状、大小和位置信息的配置文件,作为config.xml内信号衰落模型的输入;如果不考虑建筑物对于信号传播的影响则无需此文件,当然config.xml内的信号衰落模型的配置也要删去;
 1 <?xml version="1.0" encoding="UTF-8"?>
 2 <root>
 3     <AnalogueModels>
 4         <AnalogueModel type="SimplePathlossModel">
 5             <parameter name="alpha" type="double" value="2.0"/>
 6             <parameter name="carrierFrequency" type="double" value="5.890e+9"/>
 7         </AnalogueModel>
 8     </AnalogueModels>
 9     <Decider type="Decider80211p">
10         <!-- The center frequency on which the phy listens-->
11         <parameter name="centerFrequency" type="double" value="5.890e9"/>
12     </Decider>
13 </root>
- erlangen.rou.xml:交通流文件,如何生成也请查阅SUMO官网文档,不再赘述;
- erlangen.sumo.cfg: SUMO运行文件,可对运行时长等运行参数进行配置;
- omnetpp.ini:
OMNeT++运行文件,后文重点讲解; - RSUExampleScnario.ned: OMNeT++类似于积木,一个工程项目是由多个ned文件互相嵌套组合而成的。veins作为一个基于OMNeT++的框架,其便是由层次分明的ned文件组合而成的,如果学过面向对象编程的话可能会容易理解一些,这些ned文件就类似一个个类。但是OMNeT++中更为特殊,因为ned文件只是定义了组件的结构,比如定义一辆车,ned只是描述了它包含几个对外通信的接口,这些接口的参数之类的,具体的功能还需要与ned文件同名的C++文件进行定义,比如用这些接口选择与谁进行通信,专业点就叫路由。对于OMNet++独特的ned网络语言大家还是踏踏实实看OMNeT++官方手册学习吧。一开始可能找不到头绪,所以建议大家去听听这个OMNeT++基础讲解的视频课程(要学的东西是不是很多?是不是很烦?)。这里的RSUExampleScnario.ned定义了OMNeT++中最大的结构——网络(network),可以看到在omnetpp.ini中的[General]部分对于本次仿真所运行的网络定义为RSUExampleScenario;
 1 [General]
 2 cmdenv-express-mode = true
 3 cmdenv-autoflush = true
 4 cmdenv-status-frequency = 1s
 5 **.cmdenv-log-level = info
 6
 7 ned-path = .
 8 image-path = ../../images
 9
10 network = RSUExampleScenario
讲解omnetpp.ini!(挑关键的)
- network:非常关键的参数,需要替换成自己的network级ned文件;
- sim-time-limit: 网络仿真时间限制,注意与SUMO生成的交通流运行时长对应;
- RSU SETTINGS: 对RSUExampleScnario.ned中的路侧单元ned中的参数做出设置。其中最重要的就是
applType,它指定了RSU的应用层,也就是RSU会做什么。其实RSU也是一个ned文件,比network级低,它是由另外几个更低级的ned组成的,包括作为应用层的ned(appl),作为MAC层的ned(nic),作为移动驱动的ned(mobility)。applType指定的就是应用层的ned,而应用层ned的功能又由其同名且在同一个文件夹的C++文件定义,这样RSU的功能也就确定了,做应用层研究的要改变的就是这个应用层的ned与对应的C++文件。至于后面那些参数都是对于应用层ned中的一些参数做出设置,比如.rsu[*].appl.beaconUserPriority = 7就是令所有RSU应用层的信标优先级为7,这个就不要再问了,做车联网的这个还不懂就别玩了。
 1 ##########################################################
 2 #                       RSU SETTINGS                     #
 3 #                                                        #
 4 #                                                        #
 5 ##########################################################
 6 *.rsu[0].mobility.x = 2000
 7 *.rsu[0].mobility.y = 2000
 8 *.rsu[0].mobility.z = 3
 9
10 *.rsu[*].applType = "TraCIDemoRSU11p"
11 *.rsu[*].appl.headerLength = 80 bit
12 *.rsu[*].appl.sendBeacons = true
13 *.rsu[*].appl.dataOnSch = false
14 *.rsu[*].appl.beaconInterval = 1s
15 *.rsu[*].appl.beaconUserPriority = 7
16 *.rsu[*].appl.dataUserPriority = 5

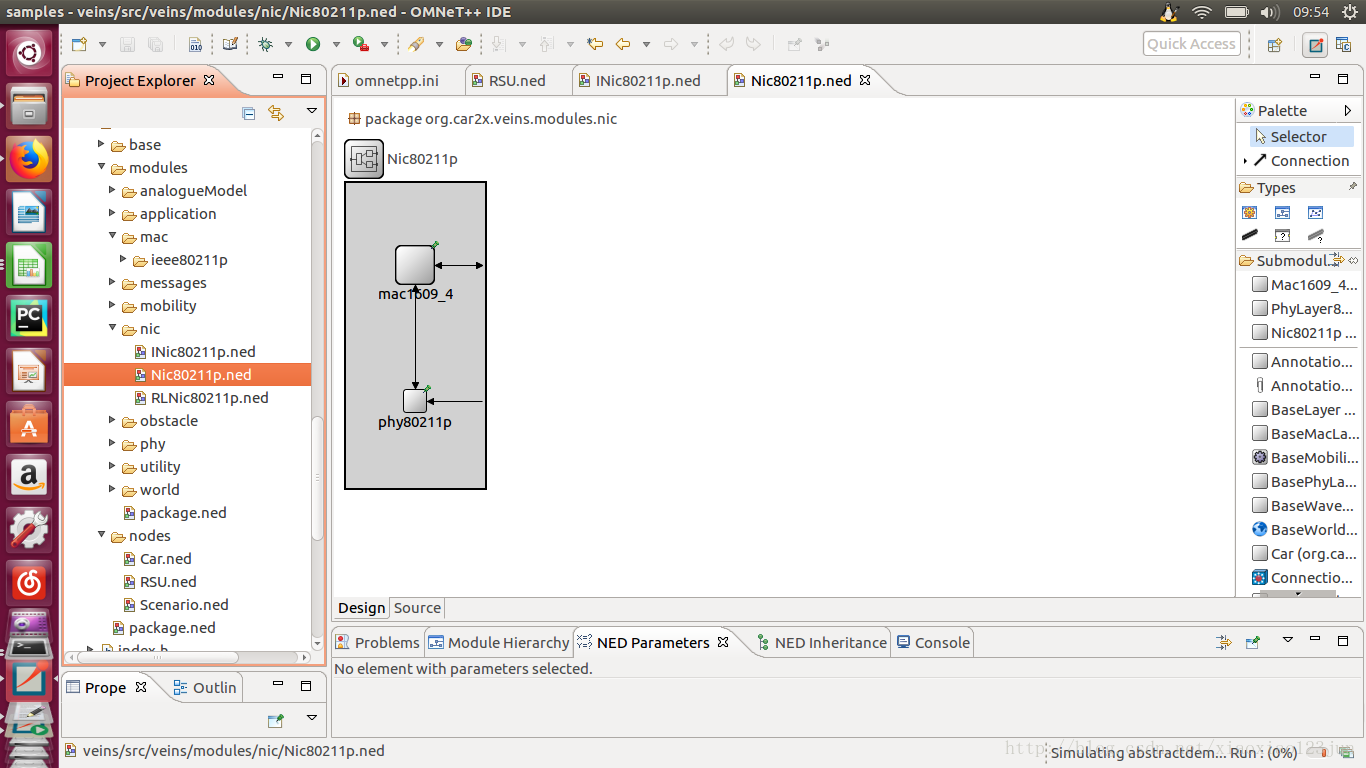
- 11p specific parameters NIC-Settings:对MAC层ned(nic)相关参数做出设置,nic包含两个子ned(mac1609_4和phy80211p)。至于connectionManager基本保持不变,如果要研究信号传播范围的影响的话,需要改变maxInterfDist;
 1 ##########################################################
 2 #            11p specific parameters                     #
 3 #                                                        #
 4 #                    NIC-Settings                        #
 5 ##########################################################
 6 *.connectionManager.sendDirect = true
 7 *.connectionManager.maxInterfDist = 2600m
 8 *.connectionManager.drawMaxIntfDist = false
 9
10 *.**.nic.mac1609_4.useServiceChannel = false
11
12 *.**.nic.mac1609_4.txPower = 20mW
13 *.**.nic.mac1609_4.bitrate = 6Mbps
14 *.**.nic.phy80211p.sensitivity = -89dBm
15
16 *.**.nic.phy80211p.useThermalNoise = true
17 *.**.nic.phy80211p.thermalNoise = -110dBm
18
19 *.**.nic.phy80211p.decider = xmldoc("config.xml")
20 *.**.nic.phy80211p.analogueModels = xmldoc("config.xml")
21 *.**.nic.phy80211p.usePropagationDelay = true
22
23 *.**.nic.phy80211p.antenna = xmldoc("antenna.xml", "/root/Antenna[@id='monopole']")
- WaveAppLayer: 对移动节点(车辆)的应用层做出设置,和RSU一个道理;
1 ##########################################################
2 #                    WaveAppLayer                        #
3 ##########################################################
4 *.node[*].applType = "TraCIDemo11p"
5 *.node[*].appl.headerLength = 80 bit
6 *.node[*].appl.sendBeacons = true
7 *.node[*].appl.dataOnSch = false
8 *.node[*].appl.beaconInterval = 1s
- Mobility: 对移动节点的移动模块做出设置。其中accidentCount、accidentStart、accidentDuration这三个参数是对移动节点发生事故的事件做出设置,这是veins的examples演示的功能(事故预警消息的传播),我们用不到直接令accidentCount=0即可。
 1 ##########################################################
 2 #                      Mobility                          #
 3 ##########################################################
 4 *.node[*].veinsmobilityType.debug = true
 5 *.node[*].veinsmobility.x = 0
 6 *.node[*].veinsmobility.y = 0
 7 *.node[*].veinsmobility.z = 1.895
 8 *.node[*0].veinsmobility.accidentCount = 1
 9 *.node[*0].veinsmobility.accidentStart = 75s
10 *.node[*0].veinsmobility.accidentDuration = 50s
讲解RSUExampleScnario.ned!
这里只挑最重要的讲,其余的自己看ned文件的import、extends往上慢慢捋就行。
看代码可以发现RSUExampleScnario内加入了一个RSU单元。
 1 import org.car2x.veins.nodes.RSU;
 2 import org.car2x.veins.nodes.Scenario;
 3
 4 network RSUExampleScenario extends Scenario
 5 {
 6     submodules:
 7         rsu[1]: RSU {
 8             @display("p=150,140;i=veins/sign/yellowdiamond;is=vs");
 9         }
10 }
那么下面官网上的示例动图里的移动节点是怎么加入的呢?
其实是通过TraCIScenarioManagerLaunchd.ned这个模块加入的
 1 package org.car2x.veins.modules.mobility.traci;
 2
 3 //
 4 // Extends the TraCIScenarioManager for use with sumo-launchd.py and SUMO.
 5 //
 6 // Connects to a running instance of the sumo-launchd.py script
 7 // to automatically launch/kill SUMO when the simulation starts/ends.
 8 //
 9 // All other functionality is provided by the TraCIScenarioManager.
10
11 simple TraCIScenarioManagerLaunchd
12 {
13     parameters:
14         @display("i=block/network2");
15         @class(Veins::TraCIScenarioManagerLaunchd);
16         bool debug = default(false);  // emit debug messages?
17         double connectAt @unit("s") = default(0s);  // when to connect to TraCI server (must be the initial timestep of the server)
18         double firstStepAt @unit("s") = default(-1s);  // when to start synchronizing with the TraCI server (-1: immediately after connecting)
19         double updateInterval @unit("s") = default(1s);  // time interval of hosts' position updates
20         string moduleType = default("org.car2x.veins.nodes.Car");  // module type to be used in the simulation for each managed vehicle
21         string moduleName = default("node");  // module name to be used in the simulation for each managed vehicle
22         // module displayString to be used in the simulation for each managed vehicle
23         // display strings key-value pairs needs to be protected with single quotes, as they use an = sign as the type mappings. For example
24         // <pre>
25         // *.manager.moduleDisplayString = "'i=block/process'"
26         // *.manager.moduleDisplayString = "a='i=block/process' b='i=misc/sun'"
27         // </pre>
28         //
29         // moduleDisplayString can also be left empty:
30         // <pre>
31         // *.manager.moduleDisplayString = ""
32         // </pre>
33         string moduleDisplayString = default("*='i=veins/node/car;is=vs'");
34         string host = default("localhost");  // sumo-launchd.py server hostname
35         int port = default(9999);  // sumo-launchd.py server port
36         xml launchConfig; // launch configuration to send to sumo-launchd.py
37         int seed = default(-1); // seed value to set in launch configuration, if missing (-1: current run number)
38         bool autoShutdown = default(true);  // Shutdown module as soon as no more vehicles are in the simulation
39         int margin = default(25);  // margin to add to all received vehicle positions
40         string roiRoads = default("");  // which roads (e.g. "hwy1 hwy2") are considered to consitute the region of interest, if not empty
41         string roiRects = default("");  // which rectangles (e.g. "0,0-10,10 20,20-30,30) are considered to consitute the region of interest, if not empty. Note that these rectangles have to use TraCI (SUMO) coordinates and not OMNeT++. They can be easily read from sumo-gui.
42         double penetrationRate = default(1); //the probability of a vehicle being equipped with Car2X technology
43         int numVehicles = default(0);
44         bool useRouteDistributions = default(false);
45         int vehicleRngIndex = default(0); // index of the RNG stream to be used, all random numbers concerning the managed vehicles
46 }
其中下面一行代码定义了RSUExampleScnario.ned这个network中加入的移动节点。往上一层层捋就很容易发现,RSUExampleScnario继承自Scnario,Scnario又import了TraCIScenarioManagerLaunchd。
1 string moduleType = default("org.car2x.veins.nodes.Car");
到此为止,入门结束,剩下的具体功能实现请进入src/veins/nodes文件夹,仔细琢磨其中的ned文件并一层层往上捋即可。最后再啰嗦一句,ned定义结构,同名C++文件定义功能,明白这一点其实就没问题了。