一 Python GIL(Global Interpreter Lock) 全局解释器锁
如果一个主机是单核,此时同时启动10个线程,由于CPU执行了上下文的切换,让我们宏观上看上去它们是并行的,但实际上在微观上它们永远是串行的。如果一个主机有四核,代表它可以真真正正同时执行4个任务,而不是假象。但是在Python中,无论你有多少核,它永远都是假象,实际上它永远同一时间只能执行一个线程。这是Python在开发之初的一个设计缺陷。因为Python是1989年就诞生了,当时主机只有一个核,它的创始人没有考虑多核的问题。
In CPython, the global interpreter lock, or GIL, is a mutex that prevents multiple native threads from executing Python bytecodes at once. This lock is necessary mainly because CPython’s memory management is not thread-safe. (However, since the GIL exists, other features have grown to depend on the guarantees that it enforces.)
上面的核心意思就是,无论你启多少个线程,你有多少个cpu, Python在执行的时候会淡定的在同一时刻只允许一个线程运行。
首先需要明确的一点是GIL并不是Python的特性,它是在实现Python解析器(CPython)时所引入的一个概念。就好比C++是一套语言(语法)标准,但是可以用不同的编译器来编译成可执行代码。有名的编译器例如GCC,INTEL C++,Visual C++等。Python也一样,同样一段代码可以通过CPython,PyPy,Psyco等不同的Python执行环境来执行。像其中的JPython就没有GIL。然而因为CPython是大部分环境下默认的Python执行环境。所以在很多人的概念里CPython就是Python,也就想当然的把GIL归结为Python语言的缺陷。所以这里要先明确一点:GIL并不是Python的特性,Python完全可以不依赖于GIL。
这篇文章透彻的剖析了GIL对python多线程的影响,强烈推荐看一下:http://www.dabeaz.com/python/UnderstandingGIL.pdf
二 线程锁之LockRlock信号量
线程锁(互斥锁Mutex)
一个进程下可以启动多个线程,多个线程共享父进程的内存空间,也就意味着每个线程可以访问同一份数据,此时,如果2个线程同时要修改同一份数据,会出现什么状况?


 1 import threading
 2 import time
 3
 4 def run(n):
 5     global num #在每个线程中都获取这个全局变量
 6     num+=1 #对此公共变量进行+1操作
 7     time.sleep(2)
 8
 9 num = 0  #设定一个共享变量
10 t_objs = []
11
12 for i in range(100):
13     t = threading.Thread(target=run,args=("t%s" %i,))
14     t.start()
15     t_objs.append(t)
16
17 for t in t_objs:  #等待所有线程执行完毕
18     t.join()
19
20 print("num:",num)
正常来讲,这个num结果应该是100, 但在Ubuntu python 2.7上多运行几次,会发现,最后打印出来的num结果不总是0,为什么每次运行的结果不一样呢? 哈,很简单,假设你有A,B两个线程,此时都 要对num 进行加1操作, 由于2个线程是并发同时运行的,所以2个线程很有可能同时拿走了num=0这个初始变量交给cpu去运算,当A线程去处完的结果是1,但此时B线程运算完的结果也是1,两个线程同时CPU运算的结果再赋值给num变量后,结果就都是1。那怎么办呢? 很简单,每个线程在要修改公共数据时,为了避免自己在还没改完的时候别人也来修改此数据,可以给这个数据加一把锁, 这样其它线程想修改此数据时就必须等待你修改完毕并把锁释放掉后才能再访问此数据。
*注:不要在3.x上运行,不知为什么,3.x上的结果总是正确的,可能是自动加了锁
加锁版本
import threading
import time

def run(n):
    lock.acquire() #2.获取锁
    global num
    num+=1
    lock.release() #3.释放锁
    time.sleep(2) #注意不要抱sleep放在线程锁,否则就真的变成串行了

num = 0
lock = threading.Lock() #1.生成一个锁的实例
t_objs = []

for i in range(50):
    t = threading.Thread(target=run,args=("t%s" %i,))
    t.start()
    t_objs.append(t)

for t in t_objs:
    t.join()

print("num:",num)
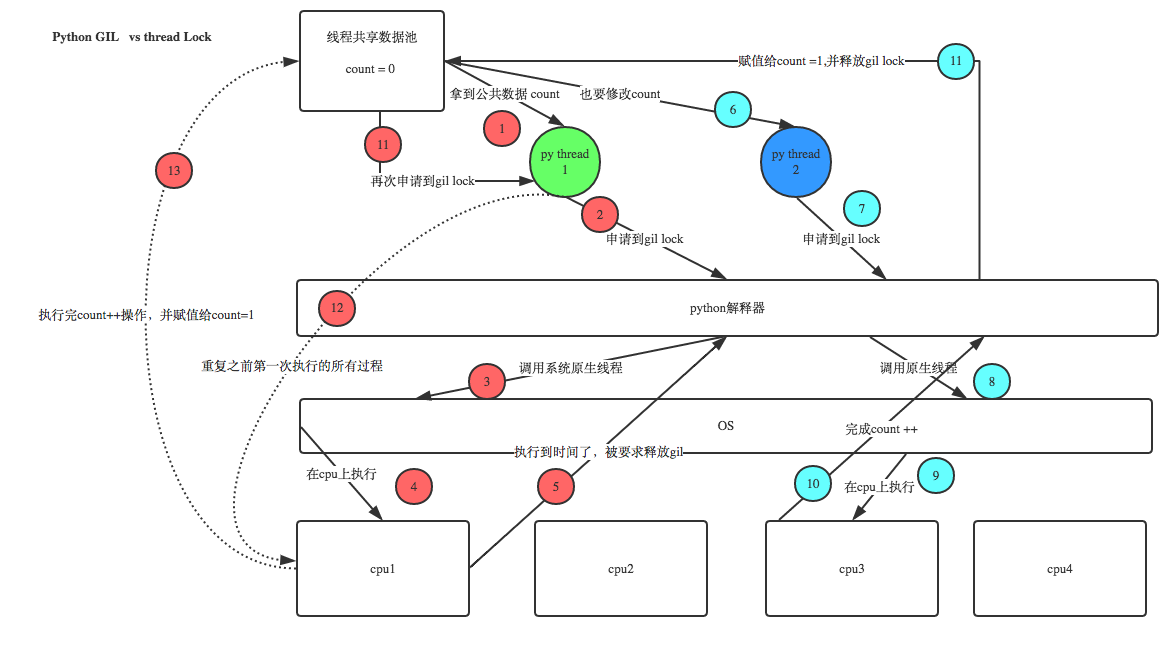
GIL VS Lock
之前说过了,Python已经有一个GIL来保证同一时间只能有一个线程来执行了,为什么这里还需要lock? 注意啦,这里的lock是用户级的lock,跟那个GIL没关系 ,具体我们通过下图来看一下就明白了。
那你又问了, 既然用户程序已经自己有锁了,那为什么C python还需要GIL呢?加入GIL主要的原因是为了降低程序的开发的复杂度,比如现在的你写python不需要关心内存回收的问题,因为Python解释器帮你自动定期进行内存回收,你可以理解为python解释器里有一个独立的线程,每过一段时间它起wake up做一次全局轮询看看哪些内存数据是可以被清空的,此时你自己的程序 里的线程和 py解释器自己的线程是并发运行的,假设你的线程删除了一个变量,py解释器的垃圾回收线程在清空这个变量的过程中的clearing时刻,可能一个其它线程正好又重新给这个还没来及得清空的内存空间赋值了,结果就有可能新赋值的数据被删除了,为了解决类似的问题,python解释器简单粗暴的加了锁,即当一个线程运行时,其它人都不能动,这样就解决了上述的问题, 这可以说是Python早期版本的遗留问题。
RLock(递归锁)
当你的程序中有多处需要用到锁,甚至锁中还嵌套着锁时,就不要用线程锁,因为很容易会造成程序卡死,因为程序在很多锁中很容易找不到出来的路。这时你就需要用到递归锁。
递归锁说白了就是在一个大锁中还要再包含子锁。
import threading, time

def run1():
    print("grab the first part data")
    lock.acquire()
    global num
    num += 1
    lock.release()
    return num

def run2():
    print("grab the second part data")
    lock.acquire()
    global num2
    num2 += 1
    lock.release()
    return num2

def run3():
    lock.acquire()
    res = run1()
    print('--------between run1 and run2-----')
    res2 = run2()
    lock.release()
    print(res, res2)

if __name__ == '__main__':

    num, num2 = 0, 0
    lock = threading.RLock() #生成递归锁的实例
    for i in range(10):
        t = threading.Thread(target=run3)
        t.start()

while threading.active_count() != 1:
    print(threading.active_count())
else:
    print('----all threads done---')
    print(num, num2)
Semaphore(信号量)
互斥锁 同时只允许一个线程更改数据,而Semaphore是同时允许一定数量的线程更改数据。
####如下程序,可以直观的看到,每次都有5个线程同时运行
####信号量用途:连接池等

import threading, time

def run(n):
    semaphore.acquire()
    time.sleep(2)
    print("run the thread: %s
" % n)
    semaphore.release()

semaphore = threading.BoundedSemaphore(5)  # 生成信号量实例,最多允许5个线程同时运行

for i in range(20):
    t = threading.Thread(target=run, args=(i,))
    t.start()

while threading.active_count() != 1:
    pass # print(threading.active_count())
else:
    print('----all threads done---')
三 Event
事件是一个简单的同步对象。
事件代表一个内部标志位,线程可以等待标志位被设置,或者自己设置或清除标志位。
如果标志位被设置,则wait方法不会执行任何操作。
如果标志位被清除,则wait方法将被阻塞,直到标志位被再次设置。
允许多个线程等待同一事件。
event = threading.Event() #客户端线程可以等待标志位被设置
event.wait() #服务器线程可以设置或重置标志位
event.set()
event.clear()
event.is_set()
通过Event来实现两个或多个线程间的交互,下面是一个红绿灯的例子,即起动一个线程做交通指挥灯,生成几个线程做车辆,车辆行驶按红灯停,绿灯行的规则。
import threading, time
def light():
count = 0
while True:
if count < 5 :
event.set() # 标志位设置,绿灯亮
print("33[42;1mgreen light is on...�33[0m")
elif count >= 5 and count < 10:
event.clear() #标志位清空,红灯亮
print("33[41;1mred light is on...�33[0m")
else:
print("33[42;1mgreen light is on...�33[0m")
count = 0
time.sleep(1)
count +=1
def car(name):
while True:
if event.is_set():
print("[%s] running..." % name)
time.sleep(1)
else:
print("[%s] sees red light,waiting..." % name)
event.wait() #如果标志位被清除,则wait方法将被阻塞,直到标志位被再次设置。
print("green light is on,%s start going..." % name)
if __name__ == '__main__':
event = threading.Event()
Light = threading.Thread(target=light)
Light.start()
for i in range(3):
t = threading.Thread(target=car,args=(i,))
t.start()
这里还有一个event使用的例子,员工进公司门要刷卡, 我们这里设置一个线程是“门”, 再设置几个线程为“员工”,员工看到门没打开,就刷卡,刷完卡,门开了,员工就可以通过。
import threading import time import random def door(): door_open_time_counter = 0 while True: if door_swiping_event.is_set(): print("�33[32;1mdoor opening....,count:%s�33[0m" %door_open_time_counter) door_open_time_counter +=1 else: print("�33[31;1mdoor closed...�33[0m") door_open_time_counter = 0 #清空计时器 door_swiping_event.wait() if door_open_time_counter >= 3:#门开了已经3s了,该关了 door_swiping_event.clear() time.sleep(0.5) def staff(n): print("staff [%s] is comming..." % n ) while True: if door_swiping_event.is_set(): print("[%s] see door is opened, passing....." % n) break else: print("before set ",door_swiping_event.is_set()) print("staff [%s] sees door got closed, swipping the card....." % n) door_swiping_event.set() print("after set ",door_swiping_event.is_set()) time.sleep(0.5) door_swiping_event = threading.Event() #设置事件 door_thread = threading.Thread(target=door) door_thread.start() for i in range(3): p = threading.Thread(target=staff,args=(i,)) time.sleep(random.randrange(3)) p.start()
Timer
This class represents an action that should be run only after a certain amount of time has passed
Timers are started, as with threads, by calling their start() method. The timer can be stopped (before its action has begun) by calling thecancel() method. The interval the timer will wait before executing its action may not be exactly the same as the interval specified by the user.
from threading import Timer

def hello():
    print("hello, world")

t = Timer(5.0, hello)
t.start()  # after 5 seconds, "hello, world" will be printed
# t.cancel()