今天来给我们的项目增加API网关,使用Ocelot。 它是系统暴露在外部的一个访问入口,这个有点像代理访问的家伙,就像一个公司的门卫承担着寻址、限制进入、安全检查、位置引导、等等功能。同时我们还要在网关中集成了Identity Server(Identity Server在项目中的使用见上一篇文章),当网关需要请求认证信息的时候会与Identity Server服务器进行交互来完成。多说也无益,直接上项目吧。
-
新建一个空的.netcore项目,命名为Zhengwei.Gateway新建好后引入Ocelot包,我们之前项目中已有Zhengwei.Identity和Zhengwei.Use.Api,项目结构图如下:

-
在上图中我们看到一个Ocelot.json文件,里面设置了所有对当前这个网关的配置。它会接收所有的客户端请求,并路由到对应的下游服务器进行处理,再将请求结果返回。而这个上下游请求的对应关系也被称之为路由。配置如下:
{
  "GlobalConfiguration": {
    "BaseUrl": "http://localhost"
  },
  "ReRoutes": [
    {
      "DownstreamPathTemplate": "/api/users",
      "DownstreamScheme": "http",
      "DownstreamHostAndPorts": [
        {
          "Host": "localhost",
          "Port": "33545"
        }
      ],
      "UpstreamPathTemplate": "/users",
      "UpstreamHttpMethod": [ "Get" ],
      "AuthenticationOptions": {
        "AuthenticationProviderKey": "zhengwei",
        "AllowedScopes": []
      }
    },
    {
      "DownstreamPathTemplate": "/connect/token",
      "DownstreamScheme": "http",
      "DownstreamHostAndPorts": [
        {
          "Host": "localhost",
          "Port": "1110"
        }
      ],
      "UpstreamPathTemplate": "/connect/token",
      "UpstreamHttpMethod": [ "Post" ]

    }

  ]

}
其中,DownstreamPathTemplate是下游服务。DownstreamScheme是下游服务http schema。DownstreamHostAndPorts是下游服务的地址,如果使用LoadBalancer的话这里可以填多项。UpstreamPathTemplate: 上游也就是用户输入的请求Url模板。UpstreamHttpMethod: 上游请求http方法,可使用数组
从配置文件中我们可以看出本来通过http://localhost:33545/api/users访问的use api现在可以通过http://localhost: 4157/api/users来访问,本来通过http://localhost: 1110/connect/token来访问的现在可以通过http://localhost: 4157/connect/token来访问,http://localhost: 4157是网关项目的地址。
3、在项目启动时来引入我们的配置文件Ocelot.json吧,写在Program.cs文件中,代码如下:
public class Program
    {
        public static void Main(string[] args)
        {
            BuildWebHost(args).Run();
        }

        public static IWebHost BuildWebHost(string[] args) =>
            WebHost.CreateDefaultBuilder(args)
                .ConfigureAppConfiguration((webhost,builder)=>{
                    builder.SetBasePath(webhost.HostingEnvironment.ContentRootPath)
                           .AddJsonFile("Ocelot.json");
        })
                .UseStartup<Startup>()
                .UseUrls("http://+:80")
                .Build();
    }
4、 在Startup.cs文件中加入我们的认证服务吧,注意这里的authenticationProviderKey=“zhengwei”,要与我们Ocelot.json文件中的"AuthenticationProviderKey": "zhengwei"一致,代码如下:
public class Startup
    {
        public Startup(IConfiguration configuration)
        {
            Configuration = configuration;
        }

        public IConfiguration Configuration { get; }

        // This method gets called by the runtime. Use this method to add services to the container.
        public void ConfigureServices(IServiceCollection services)
        {
            var authenticationProviderKey = "zhengwei";

            services.AddAuthentication()
                .AddIdentityServerAuthentication(authenticationProviderKey, options=> {
                    options.Authority = "http://localhost:1110/";
                    options.ApiName = "gateway_api";
                    options.SupportedTokens = SupportedTokens.Both;
                    options.ApiSecret = "secret";
                    options.RequireHttpsMetadata = false;
                });
            services.AddOcelot();
        }

        // This method gets called by the runtime. Use this method to configure the HTTP request pipeline.
        public void Configure(IApplicationBuilder app, IHostingEnvironment env)
        {
            if (env.IsDevelopment())
            {
                app.UseDeveloperExceptionPage();
            }

            app.UseOcelot();
        }
    }
5、一切就序,那我们就开始测试吧,右键解决方案---》属性-->多个项目启动----》操作中将三个项目都设置为启动,关闭后点击启动,启动好后,打开postman,输入网址http://localhost:4157/users
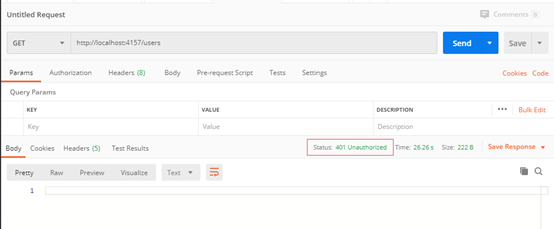
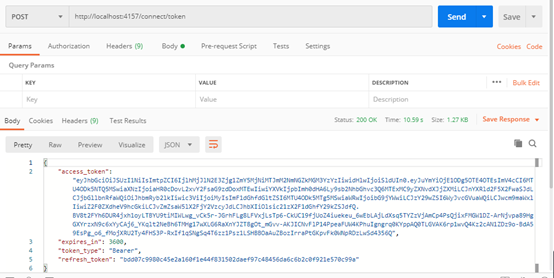
可惜,给我们返回的验证吗是401未认证,然来是我们没有提交对应的token.那就先获取token值吧。输入网址:http://localhost:4157/connect/token,得到如下的返回值,其中access_token就是我们要的token值,复制下来吧。
6、复制下我们的token后,再次请求http://localhost:4157/users前要加入参数,在Headers中输入key: Authorization 输入对应的值:bearer + 复制过来的access_token,再次请求,会获取到useapi接口正常返回的值了。如下图

至此,我们的ocelot和Identity Server在我们的项目中集成完毕。