今天和大家分享 使用 web方式发布 webService 服务端、客户端
1.首先创建 一个web工程(增加Maven依赖)
2.增加Maven依赖包,如下:
 1         <!-- spring core -->
 2         <dependency>
 3             <groupId>org.springframework</groupId>
 4             <artifactId>spring-core</artifactId>
 5             <version>2.5.5</version>
 6         </dependency>
 7
 8         <!-- spring beans -->
 9         <dependency>
10             <groupId>org.springframework</groupId>
11             <artifactId>spring-beans</artifactId>
12             <version>2.5.5</version>
13         </dependency>
14
15         <!-- spring context -->
16         <dependency>
17             <groupId>org.springframework</groupId>
18             <artifactId>spring-context</artifactId>
19             <version>2.5.5</version>
20         </dependency>
21
22         <!-- spring web -->
23         <dependency>
24             <groupId>org.springframework</groupId>
25             <artifactId>spring-web</artifactId>
26             <version>2.5.5</version>
27         </dependency>
28
29         <dependency>
30             <groupId>commons-logging</groupId>
31             <artifactId>commons-logging</artifactId>
32             <version>1.1</version>
33         </dependency>
34
35         <dependency>
36             <groupId>javax.xml</groupId>
37             <artifactId>jaxb-api</artifactId>
38             <version>2.1</version>
39             <type>pom</type>
40         </dependency>
41
42         <dependency>
43             <groupId>javax.xml</groupId>
44             <artifactId>jaxb-impl</artifactId>
45             <version>2.1</version>
46         </dependency>
47
48         <dependency>
49             <groupId>xfire</groupId>
50             <artifactId>saaj-api</artifactId>
51             <version>1.3</version>
52         </dependency>
53
54         <dependency>
55             <groupId>xfire</groupId>
56             <artifactId>saaj-impl</artifactId>
57             <version>1.3</version>
58         </dependency>
59
60         <dependency>
61             <groupId>wsdl4j</groupId>
62             <artifactId>wsdl4j</artifactId>
63             <version>1.6.2</version>
64         </dependency>
65
66         <dependency>
67             <groupId>org.apache.cxf</groupId>
68             <artifactId>cxf-rt-frontend-jaxws</artifactId>
69             <version>2.2.3</version>
70         </dependency>
71         <dependency>
72             <groupId>org.apache.cxf</groupId>
73             <artifactId>cxf-rt-transports-http</artifactId>
74             <version>2.2.3</version>
75         </dependency>
76         <dependency>
77             <groupId>org.apache.cxf</groupId>
78             <artifactId>cxf-rt-transports-http-jetty</artifactId>
79             <version>2.2.3</version>
80         </dependency>
3. 编写HelloWorld 接口类 代码如下:
 1 package net.cc.service;
 2
 3 import javax.jws.WebParam;
 4 import javax.jws.WebService;
 5
 6 /**
 7  * @author test
 8  * @create 2013-11-26下午10:21:13
 9  */
10 @WebService
11 public interface HelloWorld {
12
13     String sayHello(@WebParam(name = "userName") String userName);
14
15 }
说明:
@webService 说明这是一个webService
@webParam 说明参数名称
4. 编写实现类 如下:
 1 package net.cc.service;
 2
 3 import javax.jws.WebParam;
 4 import javax.jws.WebService;
 5
 6 /**
 7  * @author test
 8  * @create 2013-11-26下午10:22:53
 9  */
10 @WebService(serviceName = "HelloWorld")
11 public class HelloWorldImpl implements HelloWorld {
12
13     @Override
14     public String sayHello(@WebParam(name = "userName") String userName) {
15         // TODO Auto-generated method stub
16         System.out.println("客户端提交信息: " + userName);
17         return "say Hello " + userName;
18     }
19 }
说明:
@webService(serviceName = “HelloWorld”) 让Apache cxf知道是哪个接口来创建的WSDL
5. 编写spring xml文件 如下:
 1 <?xml version="1.0" encoding="UTF-8"?>
 2 <beans xmlns="http://www.springframework.org/schema/beans"
 3     xmlns:xsi="http://www.w3.org/2001/XMLSchema-instance" xmlns:jaxws="http://cxf.apache.org/jaxws"
 4     xsi:schemaLocation="http://www.springframework.org/schema/beans
 5         http://www.springframework.org/schema/beans/spring-beans.xsd
 6         http://cxf.apache.org/jaxws
 7         http://cxf.apache.org/schemas/jaxws.xsd">
 8
 9     <jaxws:endpoint id="ProjectManager" implementor="net.cc.service.HelloWorldImpl"
10         address="http://192.168.1.105:7890/HelloWorld" />
11
12 </beans>
说明:
implementor 表示 实现类 路径
address 表示需要发布的wsdl地址
6.编写 myListener 类 如下:
 1 package net.cc.servlet;
 2
 3 import javax.servlet.ServletContextEvent;
 4 import javax.servlet.ServletContextListener;
 5
 6 import org.springframework.context.support.ClassPathXmlApplicationContext;
 7
 8
 9 /**
10  * @author test
11  * @create 2013-11-26下午10:41:53
12  */
13 public class myListener implements ServletContextListener {
14
15     @Override
16     public void contextDestroyed(ServletContextEvent arg0) {
17         // TODO Auto-generated method stub
18
19     }
20
21     @Override
22     public void contextInitialized(ServletContextEvent arg0) {
23         // TODO Auto-generated method stub
24         System.out.println("启动Tomcat...");
25         ClassPathXmlApplicationContext act = new ClassPathXmlApplicationContext(
26                 "/net/cc/service/spring-beans.xml");
27
28     }
29
30 }
说明:
实现 ServletContextListener 目的是为了在Tomcat启动时自动加载
使用 ClassPathXmlApplicationContext 去加载刚才写的 spring-beans.xml 文件
7. 在当前项目中web.xml文件 增加如下代码:
1     <listener>
2         <listener-class>net.cc.servlet.myListener</listener-class>
3     </listener>
说明:
实现 ServletContextListener 接口的类路径
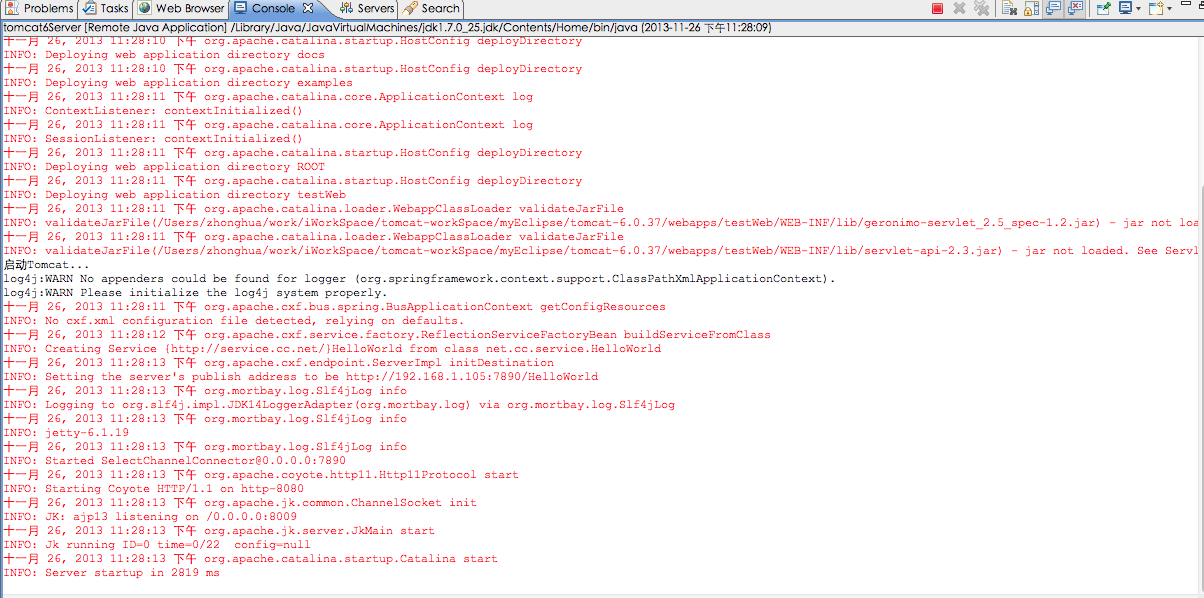
8 tomcat 启动截图:
9 访问web界面 截图:

完成。。。。。。。。。。