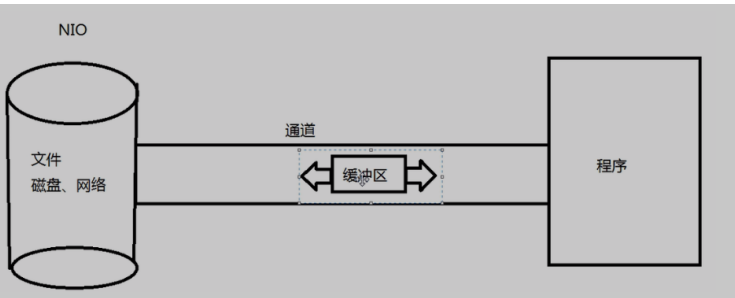
NIO
- java NIO简介
Java NIO 简介 是从java1.4版本开始引入的一个新的IO AP可以替代标准java IO API
NIO与原来的IO有同样的作用和目的,但是使用方式完全不同,NIO支持面向缓冲区的,基于通道的IO操作,NIO将以更加高效的方式进行文件的读与写操作。
2Java NIO 与IO的主要区别
|
IO |
NIO |
|
面向流 |
面向缓冲区 |
|
阻塞IO |
非阻塞 |
|
无 |
选择器 |
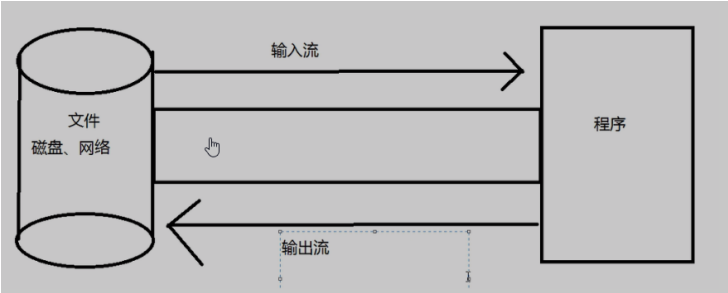
传统IO
NIO 通道负责连接,缓冲区负责数据的传输。
  /**
     *  Buffer(缓冲区)用于存储数据 本质就是数组,存储不同数据类型的数据
     *  根据数据类型不同(boolean 除外),提供了相应类型的缓冲区。
     *  ByteBuffer
     *  CharBuffer
     *  ShortBuffer
     *  IntBuffer
     *  LongBuffer
     *  FloatBuffer
     *  DoubleBuffer
     *  上述缓冲区的管理方式几乎一致,通过allocate()获取缓冲区
     * 缓冲区中存取数据的两个核心方法
     * put() 存入数据到缓冲区中
     * get() 获取缓冲区中的数据
     * 缓存区中的四个核心属性
     *     private int mark = -1; 标记,表示记录当前position 的位置 可以通过reset()恢复到mark的位置
     *     private int position = 0;位置,缓存区中正在操作数据的位置
     *     private int limit;  界限,表示缓冲区中可以操作数据的大小 (limit后面的数据我们是不能就进行读写的)
     *     private int capacity; 容量:表示缓存区中组最大存储数据的容量,一旦声明不可改变
     *    0<=mark<= position<=limit<=capacity
     *
     * 直接缓冲区与非直接缓冲区
     * 非直接缓冲区:通过allocate()方法分配缓冲区,将缓冲区建立子字JVM的内存中
     *
     * 直接缓冲区:通过allocateDirect()方法分配直接缓冲区。将缓冲区建立在物理内存中,可以提高效率
     */
 @Test
    public void test01(){
        /*创建直接缓冲区*/
        ByteBuffer bytebuffer = ByteBuffer.allocate(1024);//给缓冲区设置一个大小
     //   ByteBuffer bytebufferD = ByteBuffer.allocateDirect(1024);//给缓冲区设置一个大小,直接缓冲区

        /*判断是不是直接缓冲区*/
        System.out.println(bytebuffer.isDirect());

        System.out.println("==================allocated");

       System.out.println(bytebuffer.position());
       System.out.println(bytebuffer.capacity());
       System.out.println(bytebuffer.limit());

        //利用put()存入数据到缓冲区中
        String str = "aynu";
        bytebuffer.put(str.getBytes());

       System.out.println("================put=================");

        System.out.println(bytebuffer.position());
        System.out.println(bytebuffer.capacity());
        System.out.println(bytebuffer.limit());


        System.out.println("===================flip==================");
        //切换到读取数据的模式
        bytebuffer.flip();


        System.out.println(bytebuffer.position());
        System.out.println(bytebuffer.capacity());
        System.out.println(bytebuffer.limit());

        //利用get()方法读取缓冲区中的数据
        System.out.println("===============get=====================");
         byte[] dst =  new byte[bytebuffer.limit()];
         bytebuffer.get(dst);
         System.out.println(new String(dst,0,dst.length));

        System.out.println(bytebuffer.position());
        System.out.println(bytebuffer.capacity());
        System.out.println(bytebuffer.limit());

        //rewind 可重复读数据
        System.out.println("==================rewind===================");
        bytebuffer.rewind();
        System.out.println(bytebuffer.position());
        System.out.println(bytebuffer.capacity());
        System.out.println(bytebuffer.limit());


        //clear()清空缓冲区 但是缓冲区的数据还在,但是处于被遗忘状态,就是核心属性都变成了最初状态
        System.out.println("================clear==================");
        bytebuffer.clear();

        System.out.println(bytebuffer.position());
        System.out.println(bytebuffer.capacity());
        System.out.println(bytebuffer.limit());

        //可以取出数据
        System.out.println((char) bytebuffer.get());

    }
执行结果


false
==================allocated
0
1024
1024
================put=================
4
1024
1024
===================flip==================
0
1024
4
===============get=====================
aynu
4
1024
4
==================rewind===================
0
1024
4
================clear==================
0
1024
1024
a

Process finished with exit code 0
  @Test
    public void   test02(){
        String str  ="abced";

        //设置缓冲区大小
        ByteBuffer buffer = ByteBuffer.allocate(1024);

        //存放数据
        buffer.put(str.getBytes());

        //切换到读数据的模式
        buffer.flip();

        /*创建一个数组将读取的数据保存到这个里面*/
        byte[] bytes = new byte[buffer.limit()];
        buffer.get(bytes,0,2);
        //将读取到的数据组委字符串输出来
        System.out.println(new String (bytes,0,2));

        System.out.println("基本属性的大小");
        System.out.println("position1========"+buffer.position());


        /*通过mark 进行标记*/
        buffer.mark();
        buffer.get(bytes,2,2);
        System.out.println(new String(bytes,2,2));
        System.out.println("position2========"+buffer.position());


        //reset() 重置,恢复到mark的位置
        buffer.reset();
        System.out.println("position3========"+buffer.position());


        //判断缓冲区中是否还有剩余的数据
        if(buffer.hasRemaining()){

            //获取缓冲区中可以操作的数量
            System.out.println(buffer.remaining());
        }
    }
ab
基本属性的大小
position1========2
ce
position2========4
position3========2
3

Process finished with exit code 0
====================================================================
import java.nio.Buffer;
import java.nio.ByteBuffer;

/**
 * Description: NIOproject-01
 * Created by lenovo on 2019/4/22 15:01
 */
public class TestNio {

   public static void main (String[] args){

       String str ="zhulina";
       //创建缓冲区
       ByteBuffer buffer = ByteBuffer.allocate(1024);

       //将数据存放到缓存区中
       buffer.put(str.getBytes());

       //转换为读取模式
       buffer.flip(); //一定要写在前面否则会错哦

       //读取数据
       byte[] b= new byte[buffer.limit()];


       //读取缓冲区的数据
       buffer.get(b);

       //将数据打印在控制台,我并没有读取缓冲区的数据
       System.out.println(new String(b,0,b.length).toString());


   }
}
===================================================================
3.缓冲区(Buffer)和通道
Java NIO系统的核心在于 通道(channel)和缓冲区(buffer。通道表示打开到IO设备(例如:文件,套接字)的而连接。若需要使用NIO系统,需要获取用于连接IO设备的通道以 及用于容纳数据的缓冲区,然后操作缓冲区,对数据进行处理。
简言之,channel负责传输,buffer负责存储。
缓冲区(buffer)
一个用于特定基本数据类型的容器,有java.nio包定义的,所有缓冲区都是buffer抽象类的子类。
JavaNIO 中的Buffer主要用于与NIO通道进行交互,数据是从通道读入缓冲区,从缓冲区写入通道中的。
4.文件通道
5.NIO的非阻塞时式网络通信
选择器
SockerChannel ,ServerSockertChannel ,DatagramChannel
6.管道
7.Java NIO2(Path,Paths与Files)
测试用例1:
TestNioSocket
import org.junit.Test;

import java.io.File;
import java.io.IOException;
import java.net.InetSocketAddress;
import java.nio.ByteBuffer;
import java.nio.channels.FileChannel;
import java.nio.channels.ServerSocketChannel;
import java.nio.channels.SocketChannel;
import java.nio.channels.WritableByteChannel;
import java.nio.file.Paths;
import java.nio.file.StandardOpenOption;
import java.util.WeakHashMap;

/**
 * Description: NIOproject-01
 * Created by lenovo on 2019/4/23 21:25
 */
public class MyTest {


    @Test
    public void Client() throws IOException {
       /*建立网络通道*/
        SocketChannel socketChannel = SocketChannel.open(new InetSocketAddress("127.0.0.1", 9988));

        /*建立文件通道*/
        FileChannel fileChannel = FileChannel.open(Paths.get("E:\sturts2\NIOproject-01\src\main\webapp\1.txt"), StandardOpenOption.READ);

        /*建立缓冲区*/
        ByteBuffer buffer = ByteBuffer.allocate(1024);

        /*将通道中的数据读入到缓冲区中*/
        while (fileChannel.read(buffer)!=-1){
            buffer.flip();
            socketChannel.write(buffer);
            buffer.clear();

        }
    //    socketChannel.shutdownOutput();
        /*写上一个客户端的响应*/

        int len =0;

       /* while ((len=buffer.limit())!=-1){
            buffer.flip();
            System.out.println("客户端"+ new String(buffer.array(),0,len));

            buffer.clear();

        }*/
        socketChannel.close();
        fileChannel.close();

    }

    @Test
    public void Server() throws IOException {
        ServerSocketChannel serverSocketChannel = ServerSocketChannel.open();

        FileChannel fileChannel = FileChannel.open(Paths.get("E:\sturts2\NIOproject-01\src\main\webapp\2.txt"),  StandardOpenOption.WRITE);

        /*绑定连接*/
        serverSocketChannel.bind(new InetSocketAddress(9988));

        /*建立缓冲区*/
        ByteBuffer buffer = ByteBuffer.allocate(1024);

        /*获取客户端的通道*/
        SocketChannel acceptChannel = serverSocketChannel.accept();


        while (acceptChannel.read(buffer)!=-1){
            buffer.flip();
            fileChannel.write(buffer);
            buffer.clear();
        }
        /*建立一个响应*/
/*
        int len=0;
        while ((len= buffer.limit())!=-1){

            buffer.flip();
           System.out.println("客户端给出的响应"+new String(buffer.array(),0,len));
            buffer.clear();

        }*/
        serverSocketChannel.close();
        fileChannel.close();
        acceptChannel.close();


    }

}
import com.sun.org.apache.bcel.internal.generic.Select;
import org.junit.Test;

import java.io.IOException;
import java.net.InetSocketAddress;
import java.nio.ByteBuffer;
import java.nio.channels.*;
import java.util.Date;
import java.util.Iterator;
import java.util.Scanner;

/**
 *使用NIO完成网络通信的三个核心
 * 1.通道(Channel)负责连接
 *
 *java.nio.channels.Channel接口
 *    |--SelectableChannel
 *        |---SocketChannel
 *        |---ServerSocketChannel
 *        |---DatagramChannel
 *
 *        |---Pipe>SinkChannel
 *        |---PipeSourceChannel
 *
 *
 * 2.缓冲区(Buffer) 负责数据的存取
 *
 *
 * 3.选择器(Selector)是SelectableChannel的多路复用 。用于监控SelectableChannel的IO状况
 *
 *
 *
 */

public class TestNonBlockingNio {
//客户端
    @Test
    public void Client() throws IOException {

        //获取通道
        SocketChannel sChannel = SocketChannel.open(new InetSocketAddress("127.0.0.1", 9898));

        //切换非阻塞模式
        sChannel.configureBlocking(false);

        //3.分配制定大小的缓冲区
        ByteBuffer buf = ByteBuffer.allocate(1024);

        //4.发送数据给服务端
        Scanner scan = new Scanner(System.in);

        while (scan.hasNext()){
            String str = scan.next();
            buf.put((new Date().toString()+"
"+str).getBytes());
            buf.flip();
            sChannel.write(buf);
            buf.clear();

        }


        //5.关闭通道
        sChannel.close();


    }
//服务端
    @Test
    public void Server() throws IOException {
         //1.获取通道
         ServerSocketChannel ssChannel = ServerSocketChannel.open();

         //2.切换非阻塞模
        ssChannel.configureBlocking(false);

        //3.绑定连接
        ssChannel.bind(new InetSocketAddress(9898));

        //4.获取选择器
        Selector selector = Selector.open();

        //5.将通道注册到选择器上面,并且指定 监听接受事件
        ssChannel.register(selector, SelectionKey.OP_ACCEPT);

        //6.轮询式的获取选择器上已经准备就绪的事件
        while (selector.select()>0){
            //获取当前选择器中所有注册的选择键(已就绪的监听事件)
            Iterator<SelectionKey> it = selector.selectedKeys().iterator();

            while (it.hasNext()){
                //8.获取准备就绪的事件
                SelectionKey sk = it.next();

                //9.判断是什么事件准备就绪
                if (sk.isAcceptable()){
                    //10若接收就绪获取客户端连接

                    SocketChannel sChannel = ssChannel.accept();

                  //11.切换非阻塞模式
                    sChannel.configureBlocking(false);

                    //12.将该通道注册到选择器上
                    sChannel.register(selector,SelectionKey.OP_READ);

                }else if(sk.isReadable()){
                    //13.获取当前选择器上 ’读就绪‘ 状态的通道

                    SocketChannel sChannel = (SocketChannel) sk.channel();

                    //14.读取数据
                    ByteBuffer buf = ByteBuffer.allocate(1024);

                    int len=0;

                    while ((len =sChannel.read(buf))>0){
                          buf.flip();
                          System.out.println(new String(buf.array(),0,len));
                          buf.clear();

                    }
                }
                //15.取消选择键selectorkey
                it.remove();


            }


        }


    }


}
import org.junit.Test;

import java.io.IOException;
import java.net.InetSocketAddress;
import java.nio.ByteBuffer;
import java.nio.channels.DatagramChannel;
import java.nio.channels.SelectionKey;
import java.nio.channels.Selector;
import java.util.Date;
import java.util.Iterator;
import java.util.Scanner;

/**
 * Description: NIOproject-01
 * Created by lenovo on 2019/4/23 11:09
 */
public class TestNonBlokingNio2 {
    @Test
    public void send() throws IOException {
        DatagramChannel dc = DatagramChannel.open();

        dc.configureBlocking(false);

        ByteBuffer buf = ByteBuffer.allocate(1024);

        Scanner scanner = new Scanner(System.in);

        while (scanner.hasNext()){
            String str = scanner.next();
            buf.put((new Date().toString()+":
"+str).getBytes());
            buf.flip();
            dc.send(buf,new InetSocketAddress("127.0.0.1",9898));
            buf.clear();
        }
        dc.close();
    }

    @Test
    public void review() throws IOException {
        DatagramChannel dc = DatagramChannel.open();

        dc.configureBlocking(false);

        dc.bind(new InetSocketAddress(9898));

        Selector selector = Selector.open();

        while (selector.select()>0){
            Iterator<SelectionKey> it = selector.selectedKeys().iterator();

            while (it.hasNext()){

                SelectionKey sk = it.next();

                if (sk.isReadable()){
                    ByteBuffer buf = ByteBuffer.allocate(1024);

                    dc.receive(buf);
                    buf.flip();

                    System.out.println(new String(buf.array(),0,buf.limit()));
                    buf.clear();


                }
            }

it.remove();


        }


    }
}
import org.junit.Test;

import java.io.IOException;
import java.net.InetSocketAddress;
import java.nio.ByteBuffer;
import java.nio.channels.FileChannel;
import java.nio.channels.ServerSocketChannel;
import java.nio.channels.SocketChannel;
import java.nio.file.Paths;
import java.nio.file.StandardOpenOption;

/**
 * Description: NIOproject-01
 * Created by lenovo on 2019/4/22 21:58
 */
public class TestBlockNio2 {

//客户端
    @Test
    public void Client() throws IOException {
        SocketChannel sChannel = SocketChannel.open(new InetSocketAddress("127.0.0.1", 9898));

        FileChannel inChannel = FileChannel.open(Paths.get("1.png"), StandardOpenOption.READ);

        ByteBuffer buf = ByteBuffer.allocate(1024);

        while (inChannel.read(buf)!=-1){
            buf.flip();
            sChannel.write(buf);
            buf.clear();
        }
        sChannel.shutdownOutput();


        //接收服务端的反馈
         int len =0;
        while ((len= sChannel.read(buf)) !=-1){
            buf.flip();
            System.out.println(new String(buf.array(),0,len));
            buf.clear();
        }
        inChannel.close();
        sChannel.close();


    }

//服务端
    @Test
    public void Server() throws IOException {

        ServerSocketChannel ssChannel = ServerSocketChannel.open();

        FileChannel outChannel = FileChannel.open(Paths.get("1.png"), StandardOpenOption.WRITE, StandardOpenOption.CREATE);
        ssChannel.bind(new InetSocketAddress(9988));
        SocketChannel sChannel = ssChannel.accept();

        ByteBuffer buf = ByteBuffer.allocate(1024);
        while (sChannel.read(buf)!=-1){
            buf.flip();
            outChannel.write(buf);
            buf.clear();
        }
        //发送反馈给客户端

        buf.put("服务端接收数据成功".getBytes());
        buf.flip();
        sChannel.write(buf);

        sChannel.close();
        ssChannel.close();
        outChannel.close();


    }
}
import org.junit.Test;

import java.io.*;
import java.nio.ByteBuffer;
import java.nio.CharBuffer;
import java.nio.MappedByteBuffer;
import java.nio.channels.FileChannel;
import java.nio.charset.CharacterCodingException;
import java.nio.charset.Charset;
import java.nio.charset.CharsetDecoder;
import java.nio.charset.CharsetEncoder;
import java.nio.file.Path;
import java.nio.file.Paths;
import java.nio.file.StandardOpenOption;
import java.security.PublicKey;
import java.util.Map;
import java.util.Set;
import java.util.SortedMap;

/**
 * Channel 用于源节点与目标节点的连接,在java NIO 中负责缓冲区数据的传输,Channel本身不存储数据,因此需要配合
 * 缓冲区进行传输
 * 二.通道的主要实现类
 *     fillChannel
 *     socketChannel
 *     serverSocketChannel
 *     DatagramChannel
 *
 *  三.获取通道
 *   1.java 针对支持通道的类提供了 getChannel()方法
 *   本地IO
 *   FileInputStream/FileOutPutStream
 *   RandomAccessFile
 *
 *   网络 IO
 *   Socket
 *   ServerSocker
 *   DatagramSocket
 *   2.在jdk 1.7中的NIO.2 针对各个通道提供了静态方法 open()
 *   在jdk 1.7 中的NIO.2 的files  工具类的newByteChannel()
 * 四 通道之间的数据传输
 * transferForm()
 * transferTo()
 *
 * 五分散(scatter)与聚集(Gather)
 * 分散读取(scattering reads):将通道中的数据分散到多个缓冲区中
 * 聚集写入(Gathering Writes):将多个缓冲区中的数据聚集到同道中
 *
 *六字符集
 * 编码 字符串---》字节数组
 * 解码 字节数组---》字符串
 */
public class TestChannel {

    @Test
    public void Test01()  {

        //1.利用通道完成文件的复制(非直接缓冲区)

        FileInputStream fileInputStream = null;
        FileOutputStream fileOutputStream = null;
        FileChannel inputchannel = null;
        FileChannel outChannel = null;
        try {
            fileInputStream = new FileInputStream("E:\sturts2\NIOproject-01\src\main\webapp\1.png");
            fileOutputStream = new FileOutputStream("E:\sturts2\NIOproject-01\src\main\webapp\2.png");

            //获取通道
            inputchannel = fileInputStream.getChannel();
            outChannel = fileOutputStream.getChannel();

            //分配指定大小缓冲区
            ByteBuffer buffer = ByteBuffer.allocate(1024);


            //将通道中的数据存放入缓冲区中
            while (inputchannel.read(buffer)!=-1){
                //切换到读取数据的模式
                buffer.flip();

                //将缓存区中的数据写入到通道中
                outChannel.write(buffer);

                buffer.clear();//清空缓存区

            }
        } catch (IOException e) {
            e.printStackTrace();
        } finally {
            if (inputchannel!=null) {

                try {
                    inputchannel.close();
                } catch (IOException e) {
                    e.printStackTrace();
                }
            }
                if (outChannel!=null){

                    try {
                        outChannel.close();
                    } catch (IOException e) {
                        e.printStackTrace();
                    }
                }
                if (fileInputStream!=null){

                    try {
                        fileInputStream.close();
                    } catch (IOException e) {
                        e.printStackTrace();
                    }
                }
                if (fileOutputStream!=null){

                    try {
                        fileOutputStream.close();
                    } catch (IOException e) {
                        e.printStackTrace();
                    }
                }

        }

    }
    @Test
    public void Test02(){
    //使用直接缓冲区完成文件的复制(内存映射文件)
        long start = System.currentTimeMillis();


        FileChannel inChannel = null;
        FileChannel outChannel = null;
        try {
            inChannel = FileChannel.open(Paths.get("E:\sturts2\NIOproject-01\src\main\webapp\1.png"), StandardOpenOption.READ);
            outChannel = FileChannel.open(Paths.get("E:\sturts2\NIOproject-01\src\main\webapp\3.png"), StandardOpenOption.WRITE, StandardOpenOption.READ,StandardOpenOption.CREATE);

            //内存映射文件
            MappedByteBuffer inmapBuffer = inChannel.map(FileChannel.MapMode.READ_ONLY, 0, inChannel.size());
            MappedByteBuffer outmapBuffer = outChannel.map(FileChannel.MapMode.READ_WRITE, 0, inChannel.size());

            //直接对缓冲区进行数据的读写操作
            byte[] dst = new byte[inmapBuffer.limit()];
            inmapBuffer.get(dst);
            outmapBuffer.put(dst);
        } catch (IOException e) {
            e.printStackTrace();
        } finally {
            if (inChannel!=null){

                try {
                    inChannel.close();
                } catch (IOException e) {
                    e.printStackTrace();
                }
            }
            if (outChannel!=null){

                try {
                    outChannel.close();
                } catch (IOException e) {
                    e.printStackTrace();
                }

            }
        }
     long end =   System.currentTimeMillis();
        System.out.println("耗费时间为"+(end-start));

    }

    //通道之间的数据传输(直接缓冲区)
    @Test
    public void test03() throws IOException {

    FileChannel inChannel = FileChannel.open(Paths.get(""), StandardOpenOption.READ);
    FileChannel outChannel = FileChannel.open(Paths.get(""), StandardOpenOption.READ, StandardOpenOption.WRITE, StandardOpenOption.CREATE);

  //  inChannel.transferTo(0,inChannel.size(),outChannel);
    outChannel.transferFrom(inChannel,0,inChannel.size());

    inChannel.close();
    outChannel.close();
}
/*分散和聚集*/
   @Test
   public void test04() throws IOException {

       RandomAccessFile raf1 = new RandomAccessFile("1.txt", "rw");

       //获取通道
       FileChannel channel = raf1.getChannel();

       //分配指定大小的缓冲区
       ByteBuffer buf1 = ByteBuffer.allocate(100);
       ByteBuffer buf2 = ByteBuffer.allocate(1024);

       //3.分散读取
       ByteBuffer[] bufs = {buf1,buf2};
       long read = channel.read(bufs);

       for(ByteBuffer byteBuffer: bufs){
           byteBuffer.flip();//切换到读操作
       }
       System.out.println(new String(bufs[0].array(),0,bufs[0].limit()));
       System.out.println("=================================");
       System.out.println(new String(bufs[1].array(),0,bufs[1].limit()));

       //4.聚集写入
       RandomAccessFile raf2 = new RandomAccessFile("2.txt", "rw");
       FileChannel channel1 = raf2.getChannel();
       channel1.write(bufs);


   }

      @Test
      public void test05(){
       //字符集
          Map<String, Charset> map = Charset.availableCharsets();

          Set<Map.Entry<String, Charset>> entries = map.entrySet();

          for (Map.Entry<String,Charset> entry: entries
               ) {
              System.out.println(entry.getKey()+"="+entry.getValue());
          }


      }
      @Test
      public void  Test06() throws CharacterCodingException {
          Charset charset = Charset.forName("GBK");

          //获取编码器
          CharsetEncoder encoder = charset.newEncoder();

          //获取解码器
          CharsetDecoder decoder1 = charset.newDecoder();

          //指定缓冲区大小
          CharBuffer buffer = CharBuffer.allocate(1024);
           buffer.put("中国");
           buffer.flip();

           //编码
          ByteBuffer encode = encoder.encode(buffer);

          for(int i=0;i<4;i++){
              System.out.println(encode.get());

          }

         //解码
          encode.flip();
          CharBuffer decode2 = decoder1.decode(encode);
          System.out.println(decode2.toString());

          System.out.println("=================================");

        //  Charset charset1 = Charset.forName("UTF-8");
          Charset charset1 = Charset.forName("GBK");
          encode.flip();
          CharBuffer decode3 = charset1.decode(encode);
          System.out.println(decode3.toString());


      }


}
import org.junit.Test;

import java.nio.ByteBuffer;

/**
 * Description: NIOproject-01
 * Created by lenovo on 2019/4/22 15:07
 */
public class TestNio {
    /**
     *  Buffer(缓冲区)用于存储数据 本质就是数组,存储不同数据类型的数据
     *  根据数据类型不同(boolean 除外),提供了相应类型的缓冲区。
     *  ByteBuffer
     *  CharBuffer
     *  ShortBuffer
     *  IntBuffer
     *  LongBuffer
     *  FloatBuffer
     *  DoubleBuffer
     *  上述缓冲区的管理方式几乎一致,通过allocate()获取缓冲区
     * 缓冲区中存取数据的两个核心方法
     * put() 存入数据到缓冲区中
     * get() 获取缓冲区中的数据
     * 缓存区中的四个核心属性
     *     private int mark = -1; 标记,表示记录当前position 的位置 可以通过reset()恢复到mark的位置
     *     private int position = 0;位置,缓存区中正在操作数据的位置
     *     private int limit;  界限,表示缓冲区中可以操作数据的大小 (limit后面的数据我们是不能就进行读写的)
     *     private int capacity; 容量:表示缓存区中组最大存储数据的容量,一旦声明不可改变
     *    0<=mark<= position<=limit<=capacity
     *
     * 直接缓冲区与非直接缓冲区
     * 非直接缓冲区:通过allocate()方法分配缓冲区,将缓冲区建立子字JVM的内存中
     *
     * 直接缓冲区:通过allocateDirect()方法分配直接缓冲区。将缓冲区建立在物理内存中,可以提高效率
     */


    @Test
    public void test01(){
        /*创建直接缓冲区*/
        ByteBuffer bytebuffer = ByteBuffer.allocate(1024);//给缓冲区设置一个大小
     //   ByteBuffer bytebufferD = ByteBuffer.allocateDirect(1024);//给缓冲区设置一个大小,直接缓冲区

        /*判断是不是直接缓冲区*/
        System.out.println(bytebuffer.isDirect());

        System.out.println("==================allocated");

       System.out.println(bytebuffer.position());
       System.out.println(bytebuffer.capacity());
       System.out.println(bytebuffer.limit());

        //利用put()存入数据到缓冲区中
        String str = "aynu";
        bytebuffer.put(str.getBytes());

       System.out.println("================put=================");

        System.out.println(bytebuffer.position());
        System.out.println(bytebuffer.capacity());
        System.out.println(bytebuffer.limit());


        System.out.println("===================flip==================");
        //切换到读取数据的模式
        bytebuffer.flip();


        System.out.println(bytebuffer.position());
        System.out.println(bytebuffer.capacity());
        System.out.println(bytebuffer.limit());

        //利用get()方法读取缓冲区中的数据
        System.out.println("===============get=====================");
         byte[] dst =  new byte[bytebuffer.limit()];
         bytebuffer.get(dst);
         System.out.println(new String(dst,0,dst.length));

        System.out.println(bytebuffer.position());
        System.out.println(bytebuffer.capacity());
        System.out.println(bytebuffer.limit());

        //rewind 可重复读数据
        System.out.println("==================rewind===================");
        bytebuffer.rewind();
        System.out.println(bytebuffer.position());
        System.out.println(bytebuffer.capacity());
        System.out.println(bytebuffer.limit());


        //clear()清空缓冲区 但是缓冲区的数据还在,但是处于被遗忘状态,就是核心属性都变成了最初状态
        System.out.println("================clear==================");
        bytebuffer.clear();

        System.out.println(bytebuffer.position());
        System.out.println(bytebuffer.capacity());
        System.out.println(bytebuffer.limit());

        //可以取出数据
        System.out.println((char) bytebuffer.get());

    }
    @Test
    public void   test02(){
        String str  ="abced";

        //设置缓冲区大小
        ByteBuffer buffer = ByteBuffer.allocate(1024);

        //存放数据
        buffer.put(str.getBytes());

        //切换到读数据的模式
        buffer.flip();

        /*创建一个数组将读取的数据保存到这个里面*/
        byte[] bytes = new byte[buffer.limit()];
        buffer.get(bytes,0,2);
        //将读取到的数据组委字符串输出来
        System.out.println(new String (bytes,0,2));

        System.out.println("基本属性的大小");
        System.out.println("position1========"+buffer.position());


        /*通过mark 进行标记*/
        buffer.mark();
        buffer.get(bytes,2,2);
        System.out.println(new String(bytes,2,2));
        System.out.println("position2========"+buffer.position());


        //reset() 重置,恢复到mark的位置
        buffer.reset();
        System.out.println("position3========"+buffer.position());


        //判断缓冲区中是否还有剩余的数据
        if(buffer.hasRemaining()){

            //获取缓冲区中可以操作的数量
            System.out.println(buffer.remaining());
        }
    }

}