数据结构
- 栈:一种遵从先进后出 (LIFO) 原则的有序集合;新添加的或待删除的元素都保存在栈的末尾,称作栈顶,另一端为栈底。在栈里,新元素都靠近栈顶,旧元素都接近栈底。
- 队列:与上相反,一种遵循先进先出 (FIFO / First In First Out) 原则的一组有序的项;队列在尾部添加新元素,并从头部移除元素。最新添加的元素必须排在队列的末尾。
- 链表:存储有序的元素集合,但不同于数组,链表中的元素在内存中并不是连续放置的;每个元素由一个存储元素本身的节点和一个指向下一个元素的引用(指针/链接)组成。
- 集合:由一组无序且唯一(即不能重复)的项组成;这个数据结构使用了与有限集合相同的数学概念,但应用在计算机科学的数据结构中。
- 字典:以 [键,值] 对为数据形态的数据结构,其中键名用来查询特定元素,类似于 Javascript 中的
Object。 - 散列:根据关键码值(Key value)直接进行访问的数据结构;它通过把关键码值映射到表中一个位置来访问记录,以加快查找的速度;这个映射函数叫做散列函数,存放记录的数组叫做散列表。
- 树:由 n(n>=1)个有限节点组成一个具有层次关系的集合;把它叫做“树”是因为它看起来像一棵倒挂的树,也就是说它是根朝上,而叶朝下的,基本呈一对多关系,树也可以看做是图的特殊形式。
- 图:图是网络结构的抽象模型;图是一组由边连接的节点(顶点);任何二元关系都可以用图来表示,常见的比如:道路图、关系图,呈多对多关系。
栈
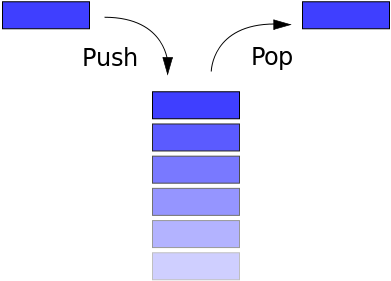
生活中常见的Stack的例子比如一摞书,你最后放上去的那本你之后会最先拿走;又比如浏览器的访问历史,当点击返回按钮,最后访问的网站最先从历史记录中弹出。
Stack一般具备以下方法:
- push:将一个元素推入栈顶
- pop:移除栈顶元素,并返回被移除的元素
- peek:返回栈顶元素
- isEmpty(): 栈中是否有元素
- clear(): 移除栈中所有元素
- size:返回栈中元素的个数
以对象形式实现栈
    <script type="text/javascript">
        function Stack() {
            this.count = 0;
            this.storage = {};
            //将一个元素推入栈顶
            this.push = function (value) {
                this.storage[this.count] = value;
                this.count++;
            }
            //移除栈顶元素,并返回被移除的元素
            this.pop = function () {
                if (this.count === 0) {
                    return undefined;
                }
                this.count--;
                var result = this.storage[this.count];
                delete this.storage[this.count];
                return result;
            }
            //返回栈顶元素
            this.peek = function () {
                return this.storage[this.count - 1];
            }
            //栈中是否有元素
            this.isEmpty = function () {
                //使用es6语法判断对象中属性长度
                //return Object.keys(this.storage).length==0;
                return this.count==0;
            }
            //移除栈中所有元素
            this.clear = function () {
                this.count = 0
                //return this.storage={};
            }
            //返回栈中元素的个数
            this.size = function () {
                return this.count;
            }
        }


        var newStack = new Stack();
        newStack.push("第一个元素");
        newStack.push("第二个元素");
        newStack.push("第三个元素");
        console.log("打印栈中元素个数:" + newStack.size());
        console.log("打印栈中栈顶元素:" + newStack.peek());
        console.log("打印栈中移除元素:" + newStack.pop());
        console.log("移除栈顶元素后再次打印栈中栈顶元素:" + newStack.peek());
        console.log("判断栈中是否有元素:" + newStack.isEmpty());
        console.log("移除栈中所有元素:" + newStack.clear());
        console.log("移除后判断栈中是否有元素:" + newStack.isEmpty());
        console.log("打印栈中移除元素:" + newStack.pop());
    </script>
以数组形式实现栈
    <script type="text/javascript">
        function Stack() {
            //保存栈内元素的数组
            this.dataStore = [];
            //top用来记录栈顶位置,初始化为0
            this.top = 0;

            this.push = function (element) {
                this.dataStore[this.top++] = element;   // 先在top位置加入元素,之后top加1
            }
            this.pop = function () {
                // top先减1,然后返回top位置的元素
                return this.dataStore[--this.top];
            }
            this.peek = function peek() {
                return this.dataStore[this.top - 1];
            }


            this.isEmpty = function clear() {
                return this.top ==0;
            }

            this.clear = function clear() {
                this.top = 0;
            }

            this.length = function length() {
                return this.top;
            }
        }
        var newStack = new Stack();
        newStack.push("第一个元素");
        newStack.push("第二个元素");
        newStack.push("第三个元素");
        console.log("打印栈中元素个数:" + newStack.length());
        console.log("打印栈中栈顶元素:" + newStack.peek());
        console.log("打印栈中移除元素:" + newStack.pop());
        console.log("移除栈顶元素后再次打印栈中栈顶元素:" + newStack.peek());
        console.log("判断栈中是否有元素:" + newStack.isEmpty());
        console.log("移除栈中所有元素:" + newStack.clear());
        console.log("移除后判断栈中是否有元素:" + newStack.isEmpty());
    </script>
Queue(队列)
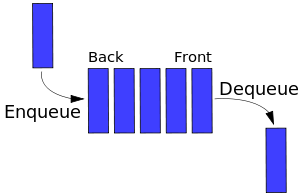
Queue和Stack有一些类似,不同的是Stack是先进后出,而Queue是先进先出。Queue在生活中的例子比如排队上公交,排在第一个的总是最先上车;又比如打印机的打印队列,排在前面的最先打印。
Queue一般具有以下常见方法:
- enqueue:入列,向队列尾部增加一个元素
- dequeue:出列,移除队列头部的一个元素并返回被移除的元素
- front:获取队列的第一个元素
- isEmpty:判断队列是否为空
- size:获取队列中元素的个数
Javascript中的Array已经具备了Queue的一些特性,所以我们可以借助Array实现一个Queue类型:
    <script type="text/javascript">
        function Queue() {
            var collection = [];
            //返回队列所有元素
            this.print = function () {
                return collection;
            }
            //入列,向队列尾部增加一个元素
            this.enqueue = function (element) {
                collection.push(element);
            }
            //出列,移除队列头部的一个元素并返回被移除的元素
            this.dequeue = function () {
                return collection.shift();
            }
            //获取队列的第一个元素
            this.front = function () {
                return collection[0];
            }
            //判断队列是否为空
            this.isEmpty = function () {
                return collection.length === 0;
            }
            //清除队列
            this.clear = function () {
                items = [];
            };
            //获取队列中元素的个数
            this.size = function () {
                return collection.length;
            }
        }
        var newQueue= new Queue();
        newQueue.enqueue("第一个元素");
        newQueue.enqueue("第二个元素");
        newQueue.enqueue("第三个元素");
        console.log("打印队列中元素个数:" + newQueue.size());
        console.log("打印队列中第一个元素:" + newQueue.front());
        console.log("打印队列中所有元素:" + newQueue.print());
        console.log("打印队列中移除元素:" + newQueue.dequeue());
        console.log("移除队列元素后再次打印队列中所有元素:" + newQueue.print());
        console.log("判断队列中是否有元素:" + newQueue.isEmpty());
        console.log("移除队列中所有元素:" + newQueue.clear());
        console.log("移除后判断队列中是否有元素:" + newQueue.isEmpty());
    </script>
Priority Queue(优先队列)
Queue还有个升级版本,给每个元素赋予优先级,优先级高的元素入列时将排到低优先级元素之前。区别主要是enqueue方法的实现:
    <script type="text/javascript">
        function PriorityQueue() {
            var collection = [];
            //返回队列所有元素
            this.print = function () {
                return collection;
            }
            //入列,向队列尾部增加一个元素
            this.enqueue = function (element) {
                collection.push(element);
            }
            //出列,移除队列头部的一个元素并返回被移除的元素
            this.dequeue = function () {
                return collection.shift();
            }
            //获取队列的第一个元素
            this.front = function () {
                return collection[0];
            }
            //判断队列是否为空
            this.isEmpty = function () {
                return collection.length === 0;
            }
            //清除队列
            this.clear = function () {
                items = [];
            };
            //获取队列中元素的个数
            this.size = function () {
                return collection.length;
            }
            //优先队列
            this.priorityEnqueue = function (element) {
                if (this.isEmpty()) {
                    collection.push(element);
                } else {
                    var added = false;
                    for (var i = 0; i < collection.length; i++) {
                        if (element[1] < collection[i][1]) {
                            collection.splice(i, 0, element);
                            added = true;
                            break;
                        }
                    }
                    if (!added) {
                        collection.push(element);
                    }
                }
            }
        }
        var newQueue = new PriorityQueue();
        newQueue.enqueue("第一个元素");
        newQueue.enqueue("第二个元素");
        newQueue.enqueue("第三个元素");
        console.log("打印队列中元素个数:" + newQueue.size());
        console.log("打印队列中第一个元素:" + newQueue.front());
        console.log("打印队列中所有元素:" + newQueue.print());
        console.log("打印队列中移除元素:" + newQueue.dequeue());
        console.log("移除队列元素后再次打印队列中所有元素:" + newQueue.print());
        console.log("判断队列中是否有元素:" + newQueue.isEmpty());
        console.log("移除队列中所有元素:" + newQueue.clear());
        console.log("移除后判断队列中是否有元素:" + newQueue.isEmpty());

        newQueue.priorityEnqueue(['gannicus', 3]);
        newQueue.priorityEnqueue(['spartacus', 1]);
        newQueue.priorityEnqueue(['crixus', 2]);
        newQueue.priorityEnqueue(['oenomaus', 4]);

        console.log("优先队列中所有元素:" + newQueue.print());

    </script>
Linked List(链表)
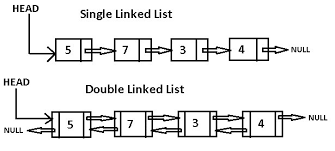
链表是一种链式数据结构,链上的每个节点包含两种信息:节点本身的数据和指向下一个节点的指针。链表和传统的数组都是线性的数据结构,存储的都是一个序列的数据,但也有很多区别,如下表:
| 比较维度 | 数组 | 链表 |
|---|---|---|
| 内存分配 | 静态内存分配,编译时分配且连续 | 动态内存分配,运行时分配且不连续 |
| 元素获取 | 通过Index获取,速度较快 | 通过遍历顺序访问,速度较慢 |
| 添加删除元素 | 因为内存位置连续且固定,速度较慢 | 因为内存分配灵活,只有一个开销步骤,速度更快 |
| 空间结构 | 可以是一维或者多维数组 | 可以是单向、双向或者循环链表 |
一个单向链表通常具有以下方法:
- size:返回链表中节点的个数
- head:返回链表中的头部元素
- add:向链表尾部增加一个节点
- remove:删除某个节点
- indexOf:返回某个节点的index
- elementAt:返回某个index处的节点
- addAt:在某个index处插入一个节点
- removeAt:删除某个index处的节点
单向链表的Javascript实现:
    <script type="text/javascript">
        /**
     * 链表中的节点
     */
        function Node(element) {
            // 节点中的数据
            this.element = element;
            // 指向下一个节点的指针
            this.next = null;
        }

        function LinkedList() {
            var length = 0;
            var head = null;
            //返回链表中节点的个数
            this.size = function () {
                return length;
            }
            //返回链表中的头部元素
            this.head = function () {
                return head;
            }
            //向链表尾部增加一个节点
            this.add = function (element) {
                var node = new Node(element);
                if (head == null) {
                    head = node;
                } else {
                    var currentNode = head;

                    while (currentNode.next) {
                        currentNode = currentNode.next;
                    }

                    currentNode.next = node;
                }
                length++;
            }
            //删除某个节点
            this.remove = function (element) {
                var currentNode = head;
                var previousNode;
                if (currentNode.element === element) {
                    head = currentNode.next;
                } else {
                    while (currentNode.element !== element) {
                        previousNode = currentNode;
                        currentNode = currentNode.next;
                    }
                    previousNode.next = currentNode.next;
                }
                length--;
            }

            this.isEmpty = function () {
                return length === 0;
            }

            //返回链表所有节点
            this.value = function () {
                var currentNode = head;
                var nodeList = [];
                if (currentNode==null) {
                    return undefined
                } else {
                    while (currentNode.next) {
                        nodeList.push(currentNode.element);
                        currentNode = currentNode.next;
                    }
                    nodeList.push(currentNode.element);
                }
                return nodeList;
            }

            //返回某个节点的index
            this.indexOf = function (element) {
                var currentNode = head;
                var index = -1;
                while (currentNode) {
                    index++;
                    if (currentNode.element === element) {
                        return index;
                    }
                    currentNode = currentNode.next;
                }

                return -1;
            }
            //返回某个index处的节点
            this.elementAt = function (index) {
                var currentNode = head;
                var count = 0;
                while (count < index) {
                    count++;
                    currentNode = currentNode.next;
                }
                return currentNode.element;
            }
            //在某个index处插入一个节点
            this.addAt = function (index, element) {
                var node = new Node(element);
                var currentNode = head;
                var previousNode;
                var currentIndex = 0;

                if (index > length) {
                    return false;
                }

                if (index === 0) {
                    node.next = currentNode;
                    head = node;
                } else {
                    while (currentIndex < index) {
                        currentIndex++;
                        previousNode = currentNode;
                        currentNode = currentNode.next;
                    }
                    node.next = currentNode;
                    previousNode.next = node;
                }
                length++;
            }
            //删除某个index处的节点
            this.removeAt = function (index) {
                var currentNode = head;
                var previousNode;
                var currentIndex = 0;
                if (index < 0 || index >= length) {
                    return null;
                }
                if (index === 0) {
                    head = currentIndex.next;
                } else {
                    while (currentIndex < index) {
                        currentIndex++;
                        previousNode = currentNode;
                        currentNode = currentNode.next;
                    }
                    previousNode.next = currentNode.next;
                }
                length--;
                return currentNode.element;
            }
        }

        var newLinkedList = new LinkedList();
        newLinkedList.indexOf("第一个节点");
        newLinkedList.add("第一个节点");
        newLinkedList.add("第二个节点");
        newLinkedList.add("第三个节点");
        newLinkedList.add("第四个节点");
        newLinkedList.add("第五个节点");
        newLinkedList.add("第六个节点");
        newLinkedList.add("第七个节点");
        newLinkedList.add("第八个节点");
        console.log("打印链表中所有元素:" + newLinkedList.value());
        newLinkedList.remove("第一个节点");
        newLinkedList.remove("第三个节点");
        console.log("打印删除后链表中所有元素:" + newLinkedList.value());
    </script>
单链表
talk is easy, show the code, 下面用 JavaScript 实现一个相对完整的单链表,并提供以下方法供调用:
- push(element) // 链表尾部插入节点
- pop() // 链表尾部删除节点
- shift() // 删除头部节点、
- unshift(element) // 插入头部节点
- find(index) // 查找指定位置节点
- insert(element, index) // 指定位置插入节点
- edit(element, index) // 修改指定位置节点
- delete(index) // 链表删除指定位置节点
- cycle() // 使链表首尾成环
function initList() {
    class Node {
        constructor(item) {
            this.element = item
        }
    }
    class List {
        constructor() {
            this.head = null
            this.size = 0
            this.last = null
        }
        /**
        * 链表查找元素
        * @param index 查找的位置
        */
        find(index) {
            let current = this.head
            for (let i = 0; i < index; i++) {
                current = current.next
            }
            return current
        }
        /**
        * 链表尾部插入元素
        * @param element 插入的元素
        */
        push(element) {
            let newNode = new Node(element)
            if (this.size === 0) {
                this.head = newNode
                this.head.next = null
                this.last = this.head
            } else {
                this.last.next = newNode
                this.last = newNode
                newNode.next = null
            }
            this.size += 1
        }
        /**
        * 链表尾部删除元素
        * @param element 删除的位置
        */
        pop(element) {
            this.last.next = null
        }
        /**
        * 链表头部删除元素
        */
        shift() {
            if (this.size === 0)
                return
            this.head = this.head.next
            if (this.size === 1)
                this.last = null
            this.size -= 1
        }
        /**
        * 链表头部插入元素
        * @param element 插入的元素
        */
        unshift(element) {
            let newNode = new Node(element)
            newNode.next = this.head
            this.head = newNode
            if (this.size === 0)
                this.last = this.head
            this.size += 1
        }
        /**
        * 链表插入元素
        * @param element 插入的位置, index 插入的位置
        */
        insert(element, index) {
            if (index < 0 || index > this.size) {
                console.error('超出链表节点范围')
                return
            }
            let newNode = new Node(element)
            if (this.size === 0) {
                // 空链表
                newNode.next = null
                this.head = newNode
                this.last = newNode
            } else if (index === 0) {
                // 插入头部
                newNode.next = this.head
                this.head = newNode
            } else if (index == this.size) {
                //插入尾部
                newNode.next = null
                this.last.next = newNode
                this.last = newNode
            } else {
                // 中间插入
                let preNode = this.find(index - 1)
                newNode.next = preNode.next
                preNode.next = newNode
            }
            this.size += 1
        }
        /*
        *链表编辑元素
        * @param element 编辑的元素,index 元素位置
        */
        edit(element, index) {
            let current = this.find(index)
            current.element = element
        }
        /*
        *链表删除元素
        * @param index 删除元素位置
        */
        delete(index) {
            let current = this.find(index)
            if (index === 0) {
                // 删除头节点
                this.head = this.head.next
            } else if (index === ((this.size) - 1)) {
                // 删除尾节点
                let preNode = this.find(index - 1)
                preNode.next = null
            } else {
                // 删除中间节点
                let preNode = this.find(index - 1)
                let nextNode = preNode.next.next
                let removeNode = preNode.next
                preNode.next = nextNode
            }
            this.size -= 1
        }
        /*
        *链表使首尾成环
        */
        cycle() {
            this.last.next = this.head
        }
    }
    return new List()
}

let list = initList()
双向链表
双向链表的特点就是添加了指向上一个节点的指针(prev),比较单链表来说,稍微复杂一些,也更强大,这里把上面的单链表修改一下。
function initList() {
    class Node {
        constructor(item) {
            this.element = item
            this.next = null
            this.prev = null
        }
    }
    class List {
        constructor() {
            this.head = null
            this.size = 0
            this.last = null
        }
        /**
        * 链表查找元素
        * @param index 查找的位置
        */
        find(index) {
            let current = this.head
            for (let i = 0; i < index; i++) {
                current = current.next
            }
            return current
        }
        /**
        * 链表尾部插入元素
        * @param element 插入的元素
        */
        push(element) {
            let newNode = new Node(element)
            if (this.size === 0) {
                this.head = newNode
                this.head.next = null
                this.last = this.head
            } else {
                this.last.next = newNode
                newNode.next = null
                newNode.prev = this.last
                this.last = newNode
            }
            this.size += 1
        }
        /**
        * 链表尾部删除元素
        * @param element 删除的位置
        */
        pop() {
            if (this.size === 0)
                return
            if (this.size === 1) {
                this.head = null
                this.last = null
            } else {
                this.last.prev.next = null
                this.last = this.last.prev
            }
            this.size -= 1
        }
        /**
        * 链表头部删除元素
        */
        shift() {
            if (this.size === 0)
                return
            if (this.size === 1) {
                this.head = null
                this.last = null
            } else {
                this.head = this.head.next
                this.head.prev = null
            }
            this.size -= 1
        }
        /**
        * 链表头部插入元素
        * @param element 插入的元素
        */
        unshift(element) {
            let newNode = new Node(element)
            if (this.size === 0) {
                this.head = newNode
                this.head.next = null
                this.last = this.head
            } else {
                this.head.prev = newNode
                newNode.next = this.head
                this.head = newNode
            }
            this.size += 1
        }
        /**
        * 链表插入元素
        * @param element 插入的位置, index 插入的位置
        */
        insert(element, index) {
            if (index < 0 || index > this.size) {
                console.error('超出链表节点范围')
                return
            }
            let newNode = new Node(element)
            if (this.size === 0) {
                // 空链表
                this.head = newNode
                this.head.next = null
                this.last = this.head
            } else if (index === 0) {
                // 插入头部
                this.head.pre = newNode
                newNode.next = this.head
                this.head = newNode
            } else if (index == this.size - 1) {
                //插入尾部
                newNode.next = null
                newNode.prev = this.last
                this.last.next = newNode
                this.last = newNode
            } else {
                // 中间插入
                let prevNode = this.find(index - 1)
                newNode.next = prevNode.next
                prevNode.next = newNode
                newNode.prev = prevNode
                newNode.next.prev = newNode
            }
            this.size += 1
        }
        /*
        *链表编辑元素
        * @param element 编辑的元素,index 元素位置
        */
        edit(element, index) {
            let current = this.find(index)
            current.element = element
        }
        /*
        *链表删除元素
        * @param index 删除元素位置
        */
        delete(index) {
            let current = this.find(index)
            if (index === 0) {
                // 删除头节点
                this.head = this.head.next
                this.prev = null
            } else if (index === ((this.size) - 1)) {
                // 删除尾节点
                let preNode = this.find(index - 1)
                preNode.next = null
            } else {
                // 删除中间节点
                let preNode = this.find(index - 1)
                let nextNode = preNode.next.next
                let removeNode = preNode.next
                preNode.next = nextNode
                nextNode.prev = preNode
            }
            this.size -= 1
        }
        /*
        *链表使首尾成环
        */
        cycle() {
            this.last.next = this.head
            this.head.prev = this.last
        }
    }
    return new List()
}
let list = new initList()
循环链表
循环链表可以是单链表也可以是双向链表,它的特点是最后一个节点的 next 指针指向的是 head 节点
而不是 null,上面代码已经提供了 cycle 方法来实现。
判断链表有环
主要有这些方法:
-
遍历链表,使每一个节点与之前节点比较,若有重复则为有环链表
-
定义一个 Map 对象,遍历链表到每一个节点,若 Map 中没有次节点 ID,则将节点 ID 为 key, 存入 Map ,每个节点判断一次,如果某个节点的 ID存在,证明链表成环
-
双指针法,举个例子来说,两个人在操场跑步,速度不同时,总会在某些时刻相遇,就是因为跑到是圆的(环),利用这个原理,定义一个循环和两个指向头节点的指针,一个每次移动一个节点,一个移动两个节点,如果是成环的链表,某个时刻必然会遇到同一个节点。
链表在前端开发中的应用
-
链表的特性表明其擅长修改,不擅查找,所以对于需要大量修改的操作,可以考虑用链表实现,但是前端往往处理的数据量不会大,所以这种场景的实际意义不是很大,个人感觉在框架的底层优化上,使用较多,业务开发中,数组够用。
-
链表因为是随机存储的,所以比较省内存,但是对动态语言 JavaScript 解释器来说,有自动的垃圾回收机制来管理内存,所以链表的这个优势就不明显了。
-
链表特殊的结构,感觉适合做轮播图(双向循环链表)、双向导航列表等
Set(集合)

集合是数学中的一个基本概念,表示具有某种特性的对象汇总成的集体。在ES6中也引入了集合类型Set,Set和Array有一定程度的相似,不同的是Set中不允许出现重复的元素而且是无序的。
一个典型的Set应该具有以下方法:
- values:返回集合中的所有元素
- size:返回集合中元素的个数
- has:判断集合中是否存在某个元素
- add:向集合中添加元素
- remove:从集合中移除某个元素
- union:返回两个集合的并集
- intersection:返回两个集合的交集
- difference:返回两个集合的差集
- subset:判断一个集合是否为另一个集合的子集
使用Javascript可以将Set进行如下实现,为了区别于ES6中的Set命名为MySet:
        function MySet() {
            var collection = [];
            this.has = function (element) {
                return (collection.indexOf(element) !== -1);
            }

            this.values = function () {
                return collection;
            }

            this.size = function () {
                return collection.length;
            }

            this.add = function (element) {
                if (!this.has(element)) {
                    collection.push(element);
                    return true;
                }
                return false;
            }

            this.remove = function (element) {
                if (this.has(element)) {
                    index = collection.indexOf(element);
                    collection.splice(index, 1);
                    return true;
                }
                return false;
            }

            this.union = function (otherSet) {
                var unionSet = new MySet();
                var firstSet = this.values();
                var secondSet = otherSet.values();
                firstSet.forEach(function (e) {
                    unionSet.add(e);
                });
                secondSet.forEach(function (e) {
                    unionSet.add(e);
                });
                return unionSet;
            }

            this.intersection = function (otherSet) {
                var intersectionSet = new MySet();
                var firstSet = this.values();
                firstSet.forEach(function (e) {
                    if (otherSet.has(e)) {
                        intersectionSet.add(e);
                    }
                });
                return intersectionSet;
            }

            this.difference = function (otherSet) {
                var differenceSet = new MySet();
                var firstSet = this.values();
                firstSet.forEach(function (e) {
                    if (!otherSet.has(e)) {
                        differenceSet.add(e);
                    }
                });
                return differenceSet;
            }

            this.subset = function (otherSet) {
                var firstSet = this.values();
                return firstSet.every(function (value) {
                    return otherSet.has(value);
                });
            }
        }
最后,推荐大家使用Fundebug,一款很好用的BUG监控工具~
Hash Table(哈希表/散列表)
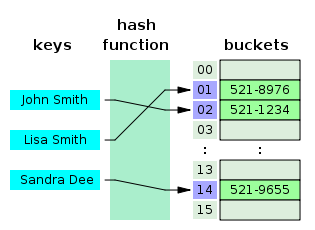
Hash Table是一种用于存储键值对(key value pair)的数据结构,因为Hash Table根据key查询value的速度很快,所以它常用于实现Map、Dictinary、Object等数据结构。如上图所示,Hash Table内部使用一个hash函数将传入的键转换成一串数字,而这串数字将作为键值对实际的key,通过这个key查询对应的value非常快,时间复杂度将达到O(1)。Hash函数要求相同输入对应的输出必须相等,而不同输入对应的输出必须不等,相当于对每对数据打上唯一的指纹。
一个Hash Table通常具有下列方法:
- put()增加元素
- remove()移除元素
- get()获取元素
简易版本的Hash Table的Javascript实现
class HashTable{
    constructor(){
        this.table = []         // 散列表
    }
    /* 散列函数1:冲突相对比较 */
    loseloseHashCode(key){      // 通过ASCII码转换生成key
        let hash = 0
        for (let i = 0; i< key.length; i++) {
           hash += key[i].charCodeAt()      // 计算key的ASCII码,当使用2个不同的键值,通过散列函数生成一致的散列键值,这样会发生哈希碰撞,导致数据覆盖
        }
        return hash%37         // loseloseHashCode方法计算关键码的公式,即 ASCII码取余37
    }
    /* 新增元素 */
    put(key,value){
        const position = this.loseloseHashCode(key)       // 元素在散列表里的地址
        this.table[position] = value
    }
    /* 移除元素 */
    remove(key){
        this.table[this.loseloseHashCode(key)] = undefined
    }
    /* 获取元素 */
    get(key){
        return this.table[this.loseloseHashCode(key)]
    }
}
function betterHash (str, arr) {
    var H = 37;
    var total = 0;
    for (var i = 0; i < str.length; i++) {
        total += H * total + str.chatCodeAt(i);
    }
    total = total % arr.length;
    return parseInt(total);
}
function get (key) {
    return this.table[this.betterHash(key, this.table)];
}
质数37是一个比较好的数字适合我们的哈希算法来参与哈希键值运算,并且使生成的键值在哈希表中均匀分布。
以对象实现哈希表
    // 创建构造函数HashTable
    function HashTable() {
        // 初始化哈希表的记录条数size
        var size = 0;

        // 创建对象用于接受键值对
        var res = {};

        // 添加关键字,无返回值
        this.add = function (key, value) {

            //判断哈希表中是否存在key,若不存在,则size加1,且赋值
            if (!this.containKey(key)) {
                size++;
            }

            // 如果之前不存在,赋值; 如果之前存在,覆盖。
            res[key] = value;
        };

        // 删除关键字, 如果哈希表中包含key,并且delete返回true则删除,并使得size减1
        this.remove = function (key) {
            if (this.containKey(key) && (delete res[key])) {
                size--;
            }
        };

        // 哈希表中是否包含key,返回一个布尔值
        this.containKey = function (key) {
            return (key in res);
        };

        // 哈希表中是否包含value,返回一个布尔值
        this.containValue = function (value) {

            // 遍历对象中的属性值,判断是否和给定value相等
            for (var prop in res) {
                if (res[prop] === value) {
                    return true;
                }
            }
            return false;
        };

        // 根据键获取value,如果不存在就返回null
        this.getValue = function (key) {
            return this.containKey(key) ? res[key] : null;
        };

        // 获取哈希表中的所有value, 返回一个数组
        this.getAllValues = function () {
            var values = [];
            for (var prop in res) {
                values.push(res[prop]);
            }
            return values;
        };

        // 根据值获取哈希表中的key,如果不存在就返回null
        this.getKey = function (value) {
            for (var prop in res) {
                if (res[prop] === value) {
                    return prop;
                }
            }

            // 遍历结束没有return,就返回null
            return null;
        };

        // 获取哈希表中所有的key,返回一个数组
        this.getAllKeys = function () {
            var keys = [];
            for (var prop in res) {
                keys.push(prop);
            }
            return keys;
        };

        // 获取哈希表中记录的条数,返回一个数值
        this.getSize = function () {
            return size;
        };

        // 清空哈希表,无返回值
        this.clear = function () {
            size = 0;
            res = {};
        };
    }
Tree(树)
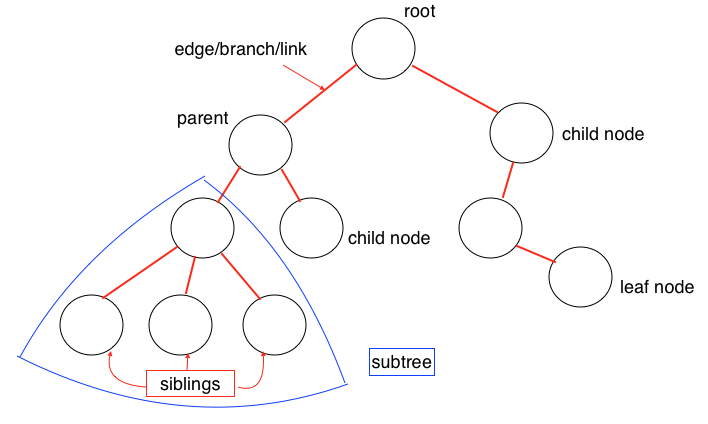
Tree的数据结构和自然界中的树极其相似,有根、树枝、叶子,如上图所示。Tree是一种多层数据结构,与Array、Stack、Queue相比是一种非线性的数据结构,在进行插入和搜索操作时很高效。在描述一个Tree时经常会用到下列概念:
-
Root(根):代表树的根节点,根节点没有父节点
-
Parent Node(父节点):一个节点的直接上级节点,只有一个
-
Child Node(子节点):一个节点的直接下级节点,可能有多个
-
Siblings(兄弟节点):具有相同父节点的节点
-
Leaf(叶节点):没有子节点的节点
-
Edge(边):两个节点之间的连接线
-
Path(路径):从源节点到目标节点的连续边
-
Height of Node(节点的高度):表示节点与叶节点之间的最长路径上边的个数
-
Height of Tree(树的高度):即根节点的高度
-
Depth of Node(节点的深度):表示从根节点到该节点的边的个数
-
Degree of Node(节点的度):表示子节点的个数
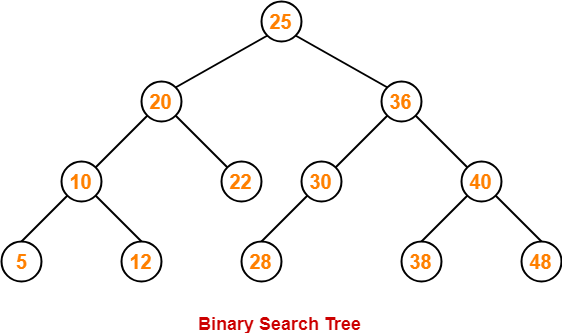
以二叉查找树为例,展示树在Javascript中的实现。在二叉查找树中,即每个节点最多只有两个子节点,而左侧子节点小于当前节点,而右侧子节点大于当前节点,如图所示:
二叉查找树应该具有以下常用方法:
- add:向树中插入一个节点
- findMin:查找树中最小的节点
- findMax:查找树中最大的节点
- find:查找树中的某个节点
- isPresent:判断某个节点在树中是否存在
- remove:移除树中的某个节点
以下是二叉查找树的Javascript实现:
        class Node {
            constructor(data, left = null, right = null) {
                this.data = data;
                this.left = left;
                this.right = right;
            }
        }

        class BST {
            constructor() {
                this.root = null;
            }

            add(data) {
                const node = this.root;
                if (node === null) {
                    this.root = new Node(data);
                    return;
                } else {
                    const searchTree = function (node) {
                        if (data < node.data) {
                            if (node.left === null) {
                                node.left = new Node(data);
                                return;
                            } else if (node.left !== null) {
                                return searchTree(node.left);
                            }
                        } else if (data > node.data) {
                            if (node.right === null) {
                                node.right = new Node(data);
                                return;
                            } else if (node.right !== null) {
                                return searchTree(node.right);
                            }
                        } else {
                            return null;
                        }
                    };
                    return searchTree(node);
                }
            }

            findMin() {
                let current = this.root;
                while (current.left !== null) {
                    current = current.left;
                }
                return current.data;
            }

            findMax() {
                let current = this.root;
                while (current.right !== null) {
                    current = current.right;
                }
                return current.data;
            }

            find(data) {
                let current = this.root;
                while (current.data !== data) {
                    if (data < current.data) {
                        current = current.left
                    } else {
                        current = current.right;
                    }
                    if (current === null) {
                        return null;
                    }
                }
                return current;
            }

            isPresent(data) {
                let current = this.root;
                while (current) {
                    if (data === current.data) {
                        return true;
                    }
                    if (data < current.data) {
                        current = current.left;
                    } else {
                        current = current.right;
                    }
                }
                return false;
            }

            remove(data) {
                const removeNode = function (node, data) {
                    if (node == null) {
                        return null;
                    }
                    if (data == node.data) {
                        // node没有子节点
                        if (node.left == null && node.right == null) {
                            return null;
                        }
                        // node没有左侧子节点
                        if (node.left == null) {
                            return node.right;
                        }
                        // node没有右侧子节点
                        if (node.right == null) {
                            return node.left;
                        }
                        // node有两个子节点
                        var tempNode = node.right;
                        while (tempNode.left !== null) {
                            tempNode = tempNode.left;
                        }
                        node.data = tempNode.data;
                        node.right = removeNode(node.right, tempNode.data);
                        return node;
                    } else if (data < node.data) {
                        node.left = removeNode(node.left, data);
                        return node;
                    } else {
                        node.right = removeNode(node.right, data);
                        return node;
                    }
                }
                this.root = removeNode(this.root, data);
            }
        }
测试一下:
const bst = new BST();
|
打印结果:
1
|
二叉树的遍历,遍历方式:
前序遍历:先遍历根结点,然后左子树,再右子树
中序遍历:先遍历左子树,然后根结点,再右子树
后续遍历:先遍历左子树,然后右子树,再根结点
//前序遍历
function ProOrderTraverse(biTree) {
    if (biTree == null) return;
    console.log(biTree.data);
    ProOrderTraverse(biTree.lChild);
    ProOrderTraverse(biTree.rChild);
}

//中序遍历
function InOrderTraverse(biTree) {
    if (biTree == null) return;
    InOrderTraverse(biTree.lChild);
    console.log(biTree.data);
    InOrderTraverse(biTree.rChild);
}

//后续遍历
function PostOrderTraverse(biTree) {
    if (biTree == null) return;
    PostOrderTraverse(biTree.lChild);
    PostOrderTraverse(biTree.rChild);
    console.log(biTree.data);
}
二叉树的非递归遍历
深度优先遍历(主要利用栈的先进后出)
广度优先遍历(主要利用队列的先进先出)
//深度优先非递归
function DepthFirstSearch(biTree) {
    let stack = [];
    stack.push(biTree);

    while (stack.length != 0) {
        let node = stack.pop();
        console.log(node.data);
        if (node.rChild) {
            stack.push(node.rChild);
        }
        if (node.lChild) {
            stack.push(node.lChild);
        }

    }

}


//广度优先非递归
function BreadthFirstSearch(biTree) {
    let queue = [];
    queue.push(biTree);
    while (queue.length != 0) {
        let node = queue.shift();
        console.log(node.data);
        if (node.lChild) {
            queue.push(node.lChild);
        }
        if (node.rChild) {
            queue.push(node.rChild);
        }
    }

}
Trie(字典树,读音同try)
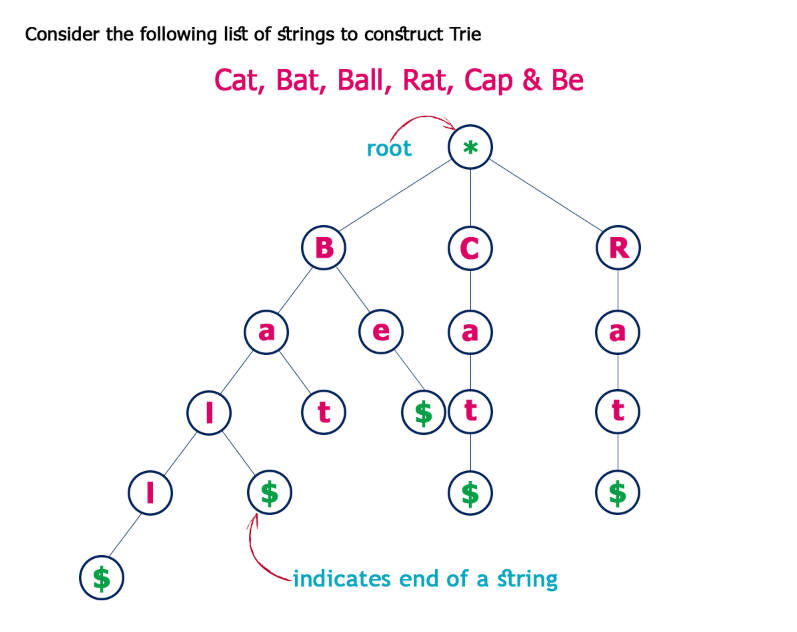
Trie也可以叫做Prefix Tree(前缀树),也是一种搜索树。Trie分步骤存储数据,树中的每个节点代表一个步骤,trie常用于存储单词以便快速查找,比如实现单词的自动完成功能。 Trie中的每个节点都包含一个单词的字母,跟着树的分支可以可以拼写出一个完整的单词,每个节点还包含一个布尔值表示该节点是否是单词的最后一个字母。
Trie一般有以下方法:
- add:向字典树中增加一个单词
- isWord:判断字典树中是否包含某个单词
- print:返回字典树中的所有单词
        /**
         * Trie的节点
         */
        function Node() {
            this.keys = new Map();
            this.end = false;
            this.setEnd = function () {
                this.end = true;
            };
            this.isEnd = function () {
                return this.end;
            }
        }

        function Trie() {
            this.root = new Node();

            this.add = function (input, node = this.root) {
                if (input.length === 0) {
                    node.setEnd();
                    return;
                } else if (!node.keys.has(input[0])) {
                    node.keys.set(input[0], new Node());
                    return this.add(input.substr(1), node.keys.get(input[0]));
                } else {
                    return this.add(input.substr(1), node.keys.get(input[0]));
                }
            }

            this.isWord = function (word) {
                let node = this.root;
                while (word.length > 1) {
                    if (!node.keys.has(word[0])) {
                        return false;
                    } else {
                        node = node.keys.get(word[0]);
                        word = word.substr(1);
                    }
                }
                return (node.keys.has(word) && node.keys.get(word).isEnd()) ? true : false;
            }

            this.print = function () {
                let words = new Array();
                let search = function (node = this.root, string) {
                    if (node.keys.size != 0) {
                        for (let letter of node.keys.keys()) {
                            search(node.keys.get(letter), string.concat(letter));
                        }
                        if (node.isEnd()) {
                            words.push(string);
                        }
                    } else {
                        string.length > 0 ? words.push(string) : undefined;
                        return;
                    }
                };
                search(this.root, new String());
                return words.length > 0 ? words : null;
            }
        }
Graph(图)
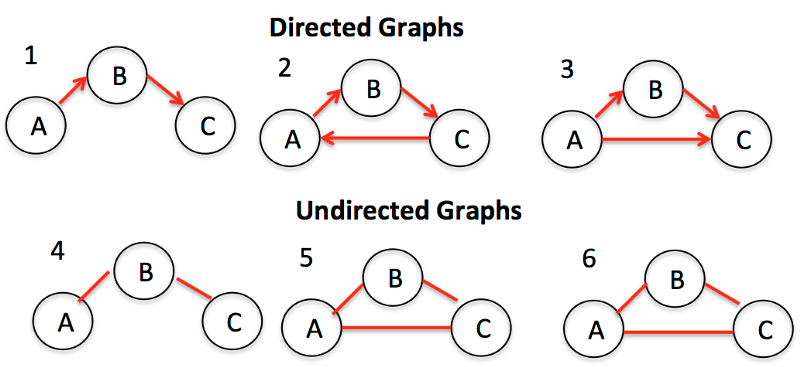
Graph是节点(或顶点)以及它们之间的连接(或边)的集合。Graph也可以称为Network(网络)。根据节点之间的连接是否有方向又可以分为Directed Graph(有向图)和Undrected Graph(无向图)。Graph在实际生活中有很多用途,比如:导航软件计算最佳路径,社交软件进行好友推荐等等。
Graph通常有两种表达方式:
Adjaceny List(邻接列表):
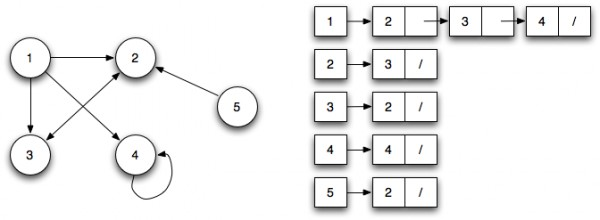
邻接列表可以表示为左侧是节点的列表,右侧列出它所连接的所有其他节点。
和 Adjacency Matrix(邻接矩阵):
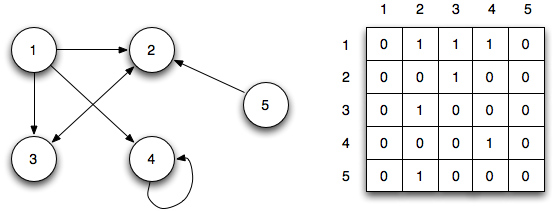
邻接矩阵用矩阵来表示节点之间的连接关系,每行或者每列表示一个节点,行和列的交叉处的数字表示节点之间的关系:0表示没用连接,1表示有连接,大于1表示不同的权重。
访问Graph中的节点需要使用遍历算法,遍历算法又分为广度优先和深度优先,主要用于确定目标节点和根节点之间的距离,
图的相关术语
1.有一条边相连的顶点叫相邻顶点;
2.一个顶点的度就是该顶点的相邻顶点数;
3.路径指顶点组成的连续序列;
4.简单路径没有重复顶点;
5.有向图和无向图
图的表示
邻接矩阵
array[i][j] ===1代表i节点和j节点相邻,否则不相邻
邻接表
相当于把每个节点的相邻节点一一列举出来。
关联矩阵
形式和邻接矩阵一样,只是把邻接矩阵的直接维度换成对应的边,适用于边比顶点多的情况。
创建图类
接下来就采用邻接表的方式创建上面的图并且采用字典来表示:
创建字典类
        function Dictionary() {
            var items = {};

            //set(key,value)向字典里添加新元素,这里主要用来添加边
            this.set = function (key, value) {
                items[key] = value;
            }
            //has(key)如果存在就返回true,否则false
            this.has = function (key) {
                return key in items;
            }
            //get(key)通过key查找特定的数值并返回,这里主要用来查找顶点对应的边数组
            this.get = function (key) {
                return this.has(key) ? items[key] : undefined;
            }
        }
创建图类
        function Graph() {
            var vertices = [];    //用来储存顶点
            var adjList = new Dictionary();    //用来储存边

            //创建initializeColor用来初始化各个顶点的颜色,为遍历过程中的标记做准备
            var initializeColor = function () {
                var color = [];
                for (var i = 0; i < vertices.length; i++) {
                    color[vertices[i]] = 'white';
                }
                return color;
            }

            //addVertex(key)用来添加顶点
            this.addVertex = function (v) {
                vertices.push(v);
                adjList.set(v, []);
            }

            //addEdge(key,value)用来添加边v-w
            this.addEdge = function (v, w) {
                adjList.get(v).push(w);
                adjList.get(w).push(v);
            }

            //toString()把邻接表转化成字符串的形式,便于输出显示
            this.toString = function () {
                var s = '';
                for (var i = 0; i < vertices.length; i++) {
                    s += vertices[i] + '->';
                    var neighbors = adjList.get(vertices[i]);
                    for (var j = 0; j < neighbors.length; j++) {
                        s += neighbors[j] + ' ';
                    }
                    s += '
';
                }
                return s;
            }
        }
创建实例
        var graph = new Graph();
        var myVertices = ['A', 'B', 'C', 'D', 'E', 'F', 'G', 'H', 'I'];
        //添加顶点
        for (var i = 0; i < myVertices.length; i++) {
            graph.addVertex(myVertices[i]);
        }

        //逐一加入边
        graph.addEdge('A', 'B');
        graph.addEdge('A', 'C');
        graph.addEdge('A', 'D');
        graph.addEdge('C', 'G');
        graph.addEdge('C', 'D');
        graph.addEdge('D', 'G');
        graph.addEdge('D', 'H');
        graph.addEdge('B', 'E');
        graph.addEdge('B', 'F');
        graph.addEdge('E', 'I');
        console.log(graph.toString());
输出的结果为:
A->B C D
B->A E F
C->A G D
D->A C G H
E->B I
F->B
G->C D
H->D
I->E
图的遍历
广度优先遍历
采用队列的方式,先添加节点的先被探索;
采用三种颜色来反应节点的状态:
白色:还没被访问;
灰色:被访问但未被探索;
黑色:被访问且探索过;
思路:
首先搜索节点A,探索A节点的相邻节点B,C,D,把其加入队列中,再逐一出队列进行探索,从而实现广度遍历。
添加bfs方法
//广度优先遍历,在Graph()类中添加以下方法
        this.bfs = function (v, callback) {
            var color = initializeColor();    //初始化节点,都标记为白色
            var queue = [];    //创建队列用来顶点的入队;
            queue.push(v);    //访问的节点入队列
            while (!queue.length == 0) {    //如果队列非空就执行以下
                var u = queue.shift();    //节点出队列
                var neighbors = adjList.get(u); //探索节点对应的边
                color[u] = 'grey';    //把搜索过的节点变成灰色
                for (var i = 0; i < neighbors.length; i++) {
                    var w = neighbors[i];
                    if (color[w] === 'white') {    //如果探索到的子节点是白色就逐一变灰并入队列
                        color[w] = 'grey';
                        queue.push(w);
                    }
                }
                color[u] = 'black';    //节点完成搜索和探索的过程,直接变黑
                if (callback) {
                    callback(u);    //回调函数,可以用来输出
                }
            }
        }
创建bfs实例
//bfs实例
        function printNode(value) {
            console.log('Visited vertex:' + value);
        }
        graph.bfs(myVertices[0], printNode);
bfs输出结果
Visited vertex:A
Visited vertex:B
Visited vertex:C
Visited vertex:D
Visited vertex:E
Visited vertex:F
Visited vertex:G
Visited vertex:H
Visited vertex:I
使用BFS寻找最短路径
this.BFS = function (v) {
            var color = initializeColor(),
                queue = [],
                d = [],    //用来储存从v到u的距离
                pred = [];    //用来储存节点的前溯点
            queue.push(v);

            for (var i = 0; i < vertices.length; i++) {
                d[vertices[i]] = 0;    //初始化
                pred[vertices[i]] = null;
            }

            while (!queue.length == 0) {
                var u = queue.shift();
                var neighbors = adjList.get(u);
                color[u] = 'grey';
                for (i = 0; i < neighbors.length; i++) {
                    var w = neighbors[i];
                    if (color[w] === 'white') {
                        color[w] = 'grey';
                        d[w] = d[u] + 1;    //从头节点到w的距离
                        pred[w] = u;
                        queue.push(w);
                    }
                }
                color[u] = 'black';
            }
            return {
                distance: d,
                predecessers: pred
            }
        }
创建BFS实例
        //BFS实例
        var shortestPathA = graph.BFS(myVertices[0]);//需要输入头节点myVertices[0]
        //console.log(shortestPathA);

        //搜索路径BFS
        var fromVertex = myVertices[0];
        for (var i = 1; i < myVertices.length; i++) {
            var toVertex = myVertices[i];
            var path = [];    //path用来储存路径
            for (var v = toVertex; v !== fromVertex; v = shortestPathA.predecessers[v]) {
                path.push(v);
            }
            path.push(fromVertex);
            var s = path.pop();
            while (!path.length == 0) {
                s += '-' + path.pop();
            }
            console.log(s)
        }
BFS输出结果
A-B
A-C
A-D
A-B-E
A-B-F
A-C-G
A-D-H
A-B-E-I
深度优先遍历
采用栈的方式,先添加节点的先被探索;
由递归实现。
思路:
从节点A开始,探索到A的相邻节点B,C,D压入栈中(这里的代码采用for循环,所以没有实质上的栈,但是用栈更容易理解),接着搜索B,探索到B的相邻节点E,F压入栈中,以此递归。
添加dfs方法
this.dfs = function (callback) {
            var color = initializeColor();
            for (var i = 0; i < vertices.length; i++) {
                if (color[vertices[i]] === 'white') {
                    dfsVisit(vertices[i], color, callback)//调用递归函数
                }
            }
        }

        var dfsVisit = function (u, color, callback) {
            color[u] = 'grey';
            if (callback) {
                callback(u);
            }
            var neighbors = adjList.get(u);
            for (var i = 0; i < neighbors.length; i++) {
                var w = neighbors[i];
                if (color[w] === 'white') {
                    dfsVisit(w, color, callback);
                }
            }
            color[u] = 'black';
        }
创建dfs实例
graph.dfs(printNode);
dfs输出结果
Visited vertex:A
Visited vertex:B
Visited vertex:E
Visited vertex:I
Visited vertex:F
Visited vertex:C
Visited vertex:G
Visited vertex:D
Visited vertex:H