实现功能
需求:在类的成员属性使用@Autowirde注解注入容器中的对象。
实现思路
要实现这个功能。我们首先要思考一个问题:类与类的关系是在调用的建立的,还是说在创建对象的时候就就将建立了?
---我实现的方案是,在在程序启动后,所有对象创建后直接就将对象的属性和属性之间的关系创建了。接下来我就用这个思路来实现,将根据@Autowirde建立对象与对象之间的关系。
为什么一定要对象全部创建后再实现对象与对象直接的关系呢?
这个是逻辑问题,如果对象没有创建完就建立对象与对象之间的关系,人家都还没有创建,你怎么引用呢?对吧。所有一定在所有对象创建完后建立对象与对象的关系。
实现步骤
1.Context接口增加一个方法。用于通过Map的和属性名对象或者对象的类型与属性的类型对象,给属性匹配对象。定义如代码的说明
1      /**
2       * 根据类的类型以及设置的对象名返回容器对象
3       * 如果传入的类型容器中有对应key的对象,而且返回类型是兼容的,直接返回对应的对象。
4       * 如果传入的类型容器中有没有对应key的对象,那么判断传入的类型是否和容器的对象的找到唯一配置的。
5       * 如果传入类型唯一匹配,返回对象。如果没有或者配配多个对象,都报一个RuntimeException异常
6       * @param classType
7       * @return
8       */
9      Object getObject(Class<?> classType,String key);
2.在ContextImpl容器实现类实现这个方法
 1 @Override
 2     public Object getObject(Class<?> classType, String key) {
 3         // 1.判断是否有对应key的对象
 4         Object object = objects.get(key);
 5         // 2.如果有,而且类型也兼容。直接返回该对象。
 6         if (object != null && classType.isAssignableFrom(object.getClass())) {
 7             return object;
 8         } else {
 9             // 3.如果没有对应key的对象,那么就在容器里检索,是否有兼容类型的对象。
10             Collection<Object> values = objects.values();
11             Iterator<Object> iterator = values.iterator();
12             int count = 0;
13             Object currentObject = null;
14             while (iterator.hasNext()) {
15                 Object nextObject = iterator.next();
16                 //判断classType是否是nextObject.getClass()的兼容类型。
17                 boolean from = classType.isAssignableFrom(nextObject.getClass()) ;
18                 if (from) {
19                     //如果发现有对象,计数加1
20                     count++;
21                     //并将对象赋予当前对象
22                     currentObject = nextObject;
23                 }
24             }
25             // 如果兼容类型的对象只有一个,返回这个对象。如果大于一个,返回null
26             if (count == 1) {
27                 return currentObject;
28             } else {
29                 //如果发现一个类型容器中有多个异常,抛异常
30                 throw new RuntimeException("容器中找不到对应的对象或者找到的对象不是唯一的!请确认是否一个接口继承了多个类");
31             }
32
33         }
34
35     }
3.在AbstractApplicationContext容器操作类实现属性的注入方法 autowired()
 1 /**
 2      * 给对象的属性注入关联的对象
 3      * @throws IllegalArgumentException
 4      * @throws IllegalAccessException
 5      */
 6     private void autowired() throws IllegalArgumentException, IllegalAccessException {
 7         // 1.获得容器
 8         Context context = contexts.get();
 9         // 2.获得容器中的所有对象。
10         Map<String, Object> objects = context.getObjects();
11         // 3.获得容器中所有的对象值
12         Collection<Object> values = objects.values();
13         // 4.获得对象的迭代器
14         Iterator<Object> iterator = values.iterator();
15         while (iterator.hasNext()) {
16             Object object = iterator.next();
17             // 5.获得对象的表结构
18             Class<? extends Object> classType = object.getClass();
19             // 6.获得字段的结构
20             Field[] fields = classType.getDeclaredFields();
21             for (int i = 0; i < fields.length; i++) {
22                 // autowired获得注解
23                 Autowired autowired = fields[i].getAnnotation(Autowired.class);
24                 if (autowired != null) {
25                     Class<?> fieldType = fields[i].getType();
26                     String fieldName = fields[i].getName();
27                     // 如果容器里面有对应的对象
28                     Object fieldObject = context.getObject(fieldType, fieldName);
29                     // 允许访问私有方法
30                     if (fieldObject != null) {
31                         // 属性是私有的也可以访问
32                         fields[i].setAccessible(true);
33                         // 将属性值赋予这个对象的属性
34                         fields[i].set(object, fieldObject);
35                     }
36
37                 }
38             }
39         }
40     }
4. 在AbstractApplicationContext构造方法最后调用属性注入方法autowired,注意标红处
 1 public AbstractApplicationContext(Class<?> classType) {
 2         try {
 3             // 判断配置类是否有Configuration注解
 4             Configuration annotation = classType.getDeclaredAnnotation(Configuration.class);
 5             if (annotation != null) {
 6                 // 获得组件扫描注解
 7                 ComponentScan componentScan = classType.getDeclaredAnnotation(ComponentScan.class);
 8                 // 获得包名
 9                 this.basePackage = componentScan.basePackages();
10                 // 根据包名获得类全限制名
11                 // Set<String> classNames =
12                 // PackageUtils.getClassName(this.basePackage[0], true);
13                 // 将扫描一个包,修改为多个包
14                 Set<String> classNames = PackageUtils.getClassNames(this.basePackage, true);
15                 // 通过类名创建对象
16                 Iterator<String> iteratorClassName = classNames.iterator();
17                 while (iteratorClassName.hasNext()) {
18
19                     String className = iteratorClassName.next();
20                     // System.out.println(className);
21
22                     // 通过类全名创建对象
23                     Class<?> objectClassType = Class.forName(className);
24                     /*
25                      * 判断如果类权限名对应的不是接口,并且包含有@Component|@Controller|@Service|
26                      *
27                      * @Repository 才可以创建对象
28                      */
29                     if (this.isComponent(objectClassType)) {
30                         Object instance = objectClassType.newInstance();
31                         // 修改为,默认对象支持首字符小写
32                         String objectName = null;
33                         // 获得组件注解的name属性值
34                         String componentName = this.getComponentOfName(objectClassType);
35
36                         if (componentName == null) {
37                             // 如果组件注解的name属性没有值,使用默认命名对象
38                 objectName = NamingUtils.firstCharToLower(instance.getClass().getSimpleName());
39                         } else {
40                             // 如果组件注解的name属性有值,使用自定义命名对象
41                             objectName = componentName;
42                         }
43                         this.getContext().addObject(objectName, instance);
44                     }
45
46                 }
47             }
48             //1.注入对象到属性中。
49             autowired();
50         } catch (InstantiationException e) {
51             e.printStackTrace();
52         } catch (IllegalAccessException e) {
53             e.printStackTrace();
54         } catch (ClassNotFoundException e) {
55             e.printStackTrace();
56         }
57
58     }
测试代码
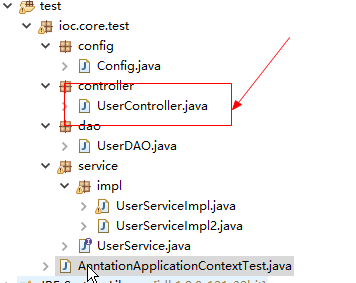
测试类目录结构

1.修改UserController代码,增加注入UserService的代码
 1 package ioc.core.test.controller;
 2
 3 import ioc.core.annotation.Autowired;
 4 import ioc.core.annotation.stereotype.Controller;
 5 import ioc.core.test.service.UserService;
 6
 7 @Controller
 8 public class UserController {
 9
10     /**
11      * 通过@Autowired可以注入UserService的对象。
12      */
13     @Autowired
14     private UserService userServiceImpl;
15
16     public void login(){
17         System.out.println("-登录Controller-");
18         userServiceImpl.login();
19     }
20
21 }
2.调用UserController 对象
 1 package ioc.core.test;
 2
 3 import org.junit.Test;
 4
 5 import ioc.core.impl.AnntationApplicationContext;
 6 import ioc.core.test.config.Config;
 7 import ioc.core.test.controller.UserController;
 8
 9 public class AnntationApplicationContextTest {
10
11     @Test
12     public void login(){
13         try {
14             AnntationApplicationContext context=new AnntationApplicationContext(Config.class);
15              UserController userController = context.getBean("userController", UserController.class);
16              userController.login();
17             System.out.println(context.getContext().getObjects());
18
19         } catch (Exception e) {
20             e.printStackTrace();
21         }
22     }
23
24 }
3.输出结果
同时输出了UserController的内容和UserService的内容
