使用webpack
webpack是一款模块化的打包工具,它认为所有的文件都是模块,包括js,css等等,版本为2.x推荐学习,1.x版本已废弃,不建议使用。
目前,facebook官方就是使用webpack搭建react的开发环境,关于webpack的详尽知识可以在webpack官网学习。这里将介绍如何使用webpack搭建react的开发环境。
第一步:安装全局webpack
npm install webpack -g
安装之后,我们可以通过使用 webpack --version看检查webpack是否安装成功,使用webpack --help来查看相关命令。
说明: 一般有一个"-"表示缩略形式,有两个"-"即"--"为完整形式。因此 webpack --version 一般可以用web -v代替,同理,webpack --help 可以使用webpack -h来代替(但并不全是!)。
第二步:新建learn_webpack文件夹
mkdir learn_webpack
在任意目录下建立文件夹learn_webpack。
第三步:创建子文件
在learn_webpack文件夹下建立index.html和index.js,js文件写document.write("hello world");即可。
html内容如下(因为我们一会要将index.js向等会新建的目录dist中的bundle.js中打包,即最终全在bundle.js目录下!!!):


<!DOCTYPE html>
<html>
<head>
    <title>index</title>
</head>
<body>
<script src="dist/bundle.js"></script>
</body>
</html>
js内容如下:
document.write("hello world");
第四步:webpack执行--打包index.js文件
webpack ./index.js ./dist/bundle.js
这就是使用webpack将当前目录下的index.js打包到新建的dist的bundle.js中,注意:dist和bundle.js是在我们执行命令之后被自动创建的。
注:dist的全称是distribution。 在某些框架中,因为开发和发布是的内容或者代码形式是不一样的(比如利用Grunt压缩等等),这时候就需要一个存放最终发布版本的代码,这就是dist文件夹的用处。
这时我们就可以看到在当前目录下已经有了dist文件,dist文件中有一个bundle.js文件,打开文件,内容如下:
/******/ (function(modules) { // webpackBootstrap
/******/     // The module cache
/******/     var installedModules = {};

/******/     // The require function
/******/     function __webpack_require__(moduleId) {

/******/         // Check if module is in cache
/******/         if(installedModules[moduleId])
/******/             return installedModules[moduleId].exports;

/******/         // Create a new module (and put it into the cache)
/******/         var module = installedModules[moduleId] = {
/******/             i: moduleId,
/******/             l: false,
/******/             exports: {}
/******/         };

/******/         // Execute the module function
/******/         modules[moduleId].call(module.exports, module, module.exports, __webpack_require__);

/******/         // Flag the module as loaded
/******/         module.l = true;

/******/         // Return the exports of the module
/******/         return module.exports;
/******/     }


/******/     // expose the modules object (__webpack_modules__)
/******/     __webpack_require__.m = modules;

/******/     // expose the module cache
/******/     __webpack_require__.c = installedModules;

/******/     // identity function for calling harmony imports with the correct context
/******/     __webpack_require__.i = function(value) { return value; };

/******/     // define getter function for harmony exports
/******/     __webpack_require__.d = function(exports, name, getter) {
/******/         if(!__webpack_require__.o(exports, name)) {
/******/             Object.defineProperty(exports, name, {
/******/                 configurable: false,
/******/                 enumerable: true,
/******/                 get: getter
/******/             });
/******/         }
/******/     };

/******/     // getDefaultExport function for compatibility with non-harmony modules
/******/     __webpack_require__.n = function(module) {
/******/         var getter = module && module.__esModule ?
/******/             function getDefault() { return module['default']; } :
/******/             function getModuleExports() { return module; };
/******/         __webpack_require__.d(getter, 'a', getter);
/******/         return getter;
/******/     };

/******/     // Object.prototype.hasOwnProperty.call
/******/     __webpack_require__.o = function(object, property) { return Object.prototype.hasOwnProperty.call(object, property); };

/******/     // __webpack_public_path__
/******/     __webpack_require__.p = "";

/******/     // Load entry module and return exports
/******/     return __webpack_require__(__webpack_require__.s = 0);
/******/ })
/************************************************************************/
/******/ ([
/* 0 */
/***/ (function(module, exports) {

document.write("hello world");

/***/ })
/******/ ]);
此时在浏览器中打开index.html就可以发现 hello world显示在屏幕上了。这就说明你已经成功的利用Webpack把index.js打包并编译到了bundle.js.是不是很简单?
第五步:定义一个配置文件
上面的过程只是对webpack的功能做了一个简单的介绍,但你有没有发现比较麻烦呢? 因为我们在打包时都要使用webpack ./index.js ./dist/bundle.js,这是非常麻烦的。
现在我们再learn_webpack目录下建立一个配置文件,即webpack.config.js,实际上每个项目下都应该包含一个webpack.config.js,用来告诉Webpack需要做些什么。内容如下:
module.exports = {
  entry: "./index.js",
  output: {
    path: __dirname+"/dist",
    filename: "bundle.js"
  }
}
其中entry即入口,告诉webpack应该先到这里来,将它打包,output是出口,输出文件,输出路径path中__dirname表示项目目录direction,/dist表示建立dist文件夹。然后将打包完成的bundle.js放进去。注意:entry处一定是./index.js,因为是当前目录,否则会报错:找不到index.js文件。
第六步:使用配置文件
为了使用配置文件帮助我们做事,我现在先将之前创建的dist删除,然后执行命令:
webpack
这时,我们就可以发现,在learn_webpack目录下多了dist文件夹,并且有了bundle.js,打开index.html可以显示hello world。
注:必须要有webpack.config.js配置文件才能使用webpack这条命令来执行。否则报错:

这里说的很清楚,必须要在当前目录下有webpack.config.js才能执行命令。
第七步:加载多个文件
但是如果我们再index.html需要使用多个js文件呢?
比如我需要添加index_2.js,内容为alert("good"); 还要添加index_3.js,内容为console.log("index_3.js is added");
在learn_webpack目录下创建好了之后,再将配置文件修改如下所示:
module.exports = {
    entry: ["./index.js","./index_2.js","./index_3.js"],
    output: {
        path: __dirname + "/dist",
        filename: "bundle.js"
    }
}
即,原本entry处为entry:"./index.js",现在因为需要加载三个文件,这是就将这三个文件放在一个数组中。
执行:
webpack
打开html,可以验证现在三个js文件都已经被打包到bundle.js中了。此时bundle.js内容如下:
/******/ (function(modules) { // webpackBootstrap
/******/     // The module cache
/******/     var installedModules = {};

/******/     // The require function
/******/     function __webpack_require__(moduleId) {

/******/         // Check if module is in cache
/******/         if(installedModules[moduleId])
/******/             return installedModules[moduleId].exports;

/******/         // Create a new module (and put it into the cache)
/******/         var module = installedModules[moduleId] = {
/******/             i: moduleId,
/******/             l: false,
/******/             exports: {}
/******/         };

/******/         // Execute the module function
/******/         modules[moduleId].call(module.exports, module, module.exports, __webpack_require__);

/******/         // Flag the module as loaded
/******/         module.l = true;

/******/         // Return the exports of the module
/******/         return module.exports;
/******/     }


/******/     // expose the modules object (__webpack_modules__)
/******/     __webpack_require__.m = modules;

/******/     // expose the module cache
/******/     __webpack_require__.c = installedModules;

/******/     // identity function for calling harmony imports with the correct context
/******/     __webpack_require__.i = function(value) { return value; };

/******/     // define getter function for harmony exports
/******/     __webpack_require__.d = function(exports, name, getter) {
/******/         if(!__webpack_require__.o(exports, name)) {
/******/             Object.defineProperty(exports, name, {
/******/                 configurable: false,
/******/                 enumerable: true,
/******/                 get: getter
/******/             });
/******/         }
/******/     };

/******/     // getDefaultExport function for compatibility with non-harmony modules
/******/     __webpack_require__.n = function(module) {
/******/         var getter = module && module.__esModule ?
/******/             function getDefault() { return module['default']; } :
/******/             function getModuleExports() { return module; };
/******/         __webpack_require__.d(getter, 'a', getter);
/******/         return getter;
/******/     };

/******/     // Object.prototype.hasOwnProperty.call
/******/     __webpack_require__.o = function(object, property) { return Object.prototype.hasOwnProperty.call(object, property); };

/******/     // __webpack_public_path__
/******/     __webpack_require__.p = "";

/******/     // Load entry module and return exports
/******/     return __webpack_require__(__webpack_require__.s = 3);
/******/ })
/************************************************************************/
/******/ ([
/* 0 */
/***/ (function(module, exports) {

document.write("hello world");

/***/ }),
/* 1 */
/***/ (function(module, exports) {

alert("good");

/***/ }),
/* 2 */
/***/ (function(module, exports) {

console.log("index_3.js is added");

/***/ }),
/* 3 */
/***/ (function(module, exports, __webpack_require__) {

__webpack_require__(0);
__webpack_require__(1);
module.exports = __webpack_require__(2);


/***/ })
/******/ ]);
可以看到,三个js文件中的内容作为函数表达式被放在了一个数组里,然后执行。
第八步:多个文件输入,多个文件输出
在上面的过程中,是输入多个文件,输出一个文件,但是希望输入多个文件,也输出多个文件呢?
这时:我们需要把entry写成entry: {a:'main.js',b:'xx.js'}的形式,filename里面需写成[name].文件名.js,filename里面的[name]为entry中的键。
第九步:监听变化,自动打包
当我们在不停的对代码进行变动的时候,为了不修改一次然后又手动去进行打包一次。可以使用webpack的watch功能。watch就是实时监听的功能,在vue中也这样的,有一个watch属性,这样就可以实时监控对象属性的变化。
即执行命令 :
webpack --watch
或者是:
webpack -w
这时,只要我们再index.js或index_1.js或者是index_2.js中修改js,再打开浏览器刷新,就会发现之前的修改已经生效!
并且每当我们修改之后再保存,它都会记录下来我们做了什么事情!!!
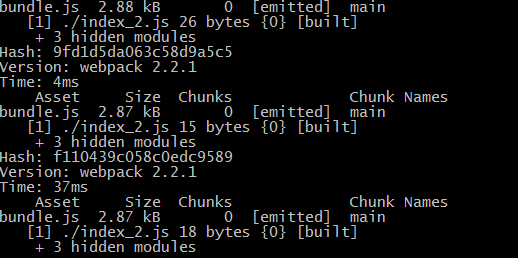
如上所示:我增加字符和删除字符时,他就会记住当前的字符数,由 26到15到18......
如果不希望继续监控,可以使用ctrl+c退出监控。
另外一个实行自动监控的方法就是:在webpack.config.js中把watch的属性值直接修改为true---添加一个名值对 watch:true即可(注:我这样使用未能成功,不知何故 直接添加一个键值对,目前是可行的)。
第十步:使用Babel
babel不是一门语言,而是一个编译器,它可以将es6的语法转化为es5的语法,这样代码就可以在各个浏览器上无阻碍的跑了。
先使用管理员身份运行cmd,(注意:之前使用gitbash都能成功,但是这里必须使用cmd管理员身份运行)然后再安装babel
npm install babel-cli -g
安装结束之后,使用babel --version 检测是否安装成功。
然后再gitbash下,在当前目录下执行下面命令:
npm install webpack babel-loader babel-core babel-preset-es2015 --save-dev
执行安装之后,要将之前的webpack.config.js中修改如下:
module.exports = {
    entry: ["./index.js","./index_2.js","./index_3.js"],
    output: {
        path: __dirname + "/dist",
        filename: "bundle.js"
    } ,
    module: {
        loaders: [
          {
            test: /.jsx?$/,
            loader: 'babel-loader',
            exclude: /node_modules/,
            query: {
              presets: ['es2015']
            }
          }
        ]
    }
}
即添加了一个module,其中loaders即我们安装的babel,test即正则表达式,负责将jsx或js的文件通过babel-loader转化为ES5,现在就可以正常的运行代码es6语法的代码了。exclude为指定应该被忽略的文件,我们在这儿指定了/node_modules/。
第十一步:结合使用React
首先,因为我们要使用 React。
npm install react --save
npm install react-dom --save
Babel针对React的所有的预设插件
npm install babel-preset-react --save-dev
由于我们增加了预设插件,所以需要对webpack.config.js进行修改。
query: {
presets: ['es2015','react']
}
这里实际上还是很好理解的,目前,webpack.config.js 的代码如下所示:
module.exports = {
    entry: ["./index.js"],
    output: {
        path: __dirname + "/dist",
        filename: "bundle.js"
    },
    watch: true,
    module: {
        loaders: [
            test: /.jsx?$/,
            loader: 'babel-loader',
            exclude: /node_modules/,
            query: {
                presets: ['es2015', 'react']
            }
        ]
    }
}
也就是说明了入口文件和出口文件,然后watch所有文件的变化,自动打包,接着我们使用了babel-loader模块进行转译, 不包含node_modules下的文件,接着query的意思就是查询 es2015 的代码和react代码进行编译。
现在建立一个hello.js的文件。内容如下:
import React from "react";

class Hello extends React.Component{
  render() {
    return (
      <div>
          Hello, World!
      </div>
    )
  }
}

export default Hello;
然后将index.js内容修改如下:
import React from "react";
import ReactDOM from "react-dom";
import Hello from "./hello";


ReactDOM.render(
  <Hello />,
  document.querySelector('#app')
);
注意: Hello 是在hello.js中的组件的名称,引入这个组件之后,我们就可以使用了。
注意: 由于这是在引入一个组件,所以不需要在webpack.config.js中配置这些选项。
如果直接运行上面的文件,我们很有可能得到下面的错误提示:
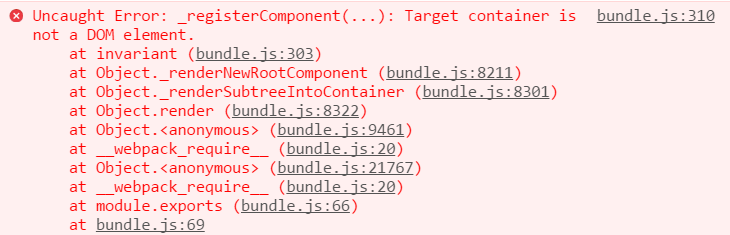
这句话是说 document.querySelector('#app') 这个元素不是一个DOM元素,可是在html中我们的确设置了啊,这是因为html中的文件如下所示:
<!DOCTYPE html>
<html lang="en">
<head>
    <meta charset="UTF-8">
    <title>index</title>
    <script src="./dist/bundle.js"></script>
</head>
<body>
    <div id="app"></div>
</body>
</html>
即我将js文件放在了顶部,那么js文件就会阻塞dom的渲染,所以当js完成之后,<div id='app'></div>还没有渲染出来,所以我们就找不到这个dom元素了。
解决方法有二
- 将script元素放在</body>上面
- 在index.js中的render语句外面添加 window.onload = function () {}
这两种方法都是行之有效的。
如下所示:
<!DOCTYPE html>
<html lang="en">
<head>
    <meta charset="UTF-8">
    <title>index</title>
</head>
<body>
    <div id="app"></div>
    <script src="./dist/bundle.js"></script>
</body>
</html>
如上所示: 我们需要将script元素放在app的下面,因为执行script中的js时,需要从dom中来寻找,如果div在下面,那么就会报错提示找不到。
注意: 我们再遇到问题的时候最好上 stackoverflow , 我们遇到的问题他们基本上都已经遇到过了, 所以去查找就好。
http://www.cnblogs.com/chenguangliang/p/5856701.html
webpack -h 可以查看webpack的相关命令
http://www.cnblogs.com/sloong/p/5584684.html
第十二步
除了上面的基本问题,我们还可以添加一些其他文件,比如 .gitignore 文件,这样,在我们使用git工具的时候,可以选择哪些文件不被提交,比如说 node_modules/ 下的文件很大,一般我们都是通过 npm install 来安装这些文件的, 所以要写在其中,另外, 我们如果使用src、dist这种打包生成文件的方式时,我们也一般都不会将 dist 文件上传,一般就是通过如下方式:
node_modules/
dist/
当然,这只是最基本的方式,更多应该根据具体问题具体分析。