写在前面:
1、我们使用的是Hadoop2.2.0,Spark 1.0。
2、这里使用的样例是经典的求pai程序来演示这个开发过程。
3、我们暂时使用java程序来开发,按照需要后面改用scala来开发。
4、我们使用的IDE是IntelliJ IDEA,采用maven来做项目管理。
一、项目创建
1.1 运行IDE,通过下面命令 ~/idea-IC-133.696/idea.sh
1.2 创建一个maven项目。

1.2 新建的项目添加库文件。
1) scala中lib的安装路径,如我们的路径在/usr/share/scala/lib
2) spark的lib文件,比如我们的文件在~/spark-1.0.0/assembly/target/scala-2.10/spark-assembly-1.0.0-hadoop2.2.0.jar
我们需要在IDE中添加这两个库文件。
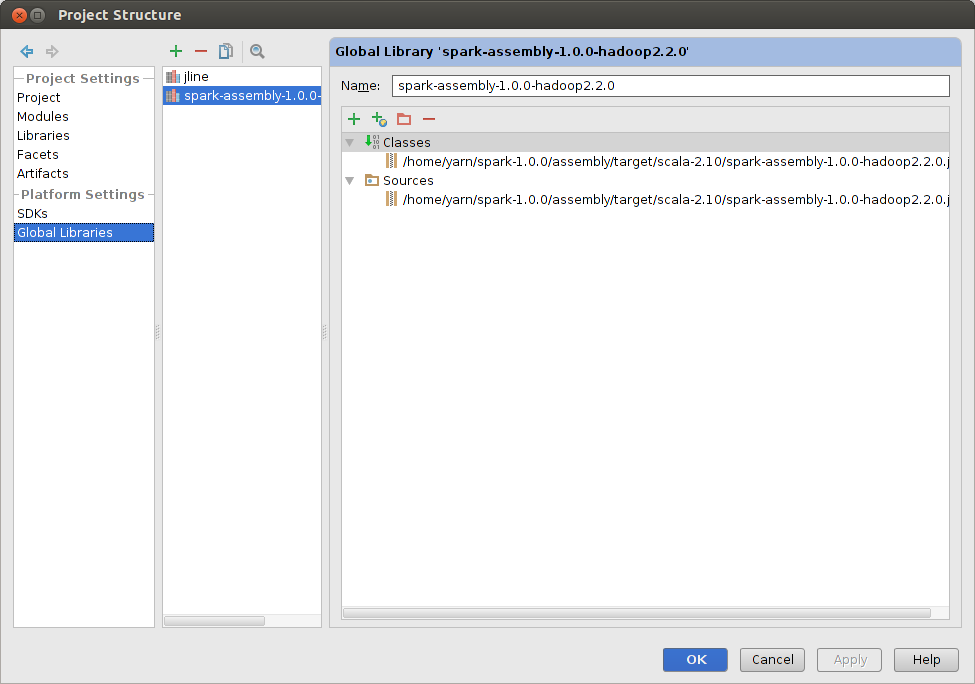
1)按ctrl+alt+shift+s快捷键,选中global libraries,出现如下窗口,把上面两个目录添加进去,最后如下。

二、代码编写
 1 /*
 2  * Licensed to the Apache Software Foundation (ASF) under one or more
 3  * contributor license agreements.  See the NOTICE file distributed with
 4  * this work for additional information regarding copyright ownership.
 5  * The ASF licenses this file to You under the Apache License, Version 2.0
 6  * (the "License"); you may not use this file except in compliance with
 7  * the License.  You may obtain a copy of the License at
 8  *
 9  *    http://www.apache.org/licenses/LICENSE-2.0
10  *
11  * Unless required by applicable law or agreed to in writing, software
12  * distributed under the License is distributed on an "AS IS" BASIS,
13  * WITHOUT WARRANTIES OR CONDITIONS OF ANY KIND, either express or implied.
14  * See the License for the specific language governing permissions and
15  * limitations under the License.
16  */
17 import org.apache.spark.SparkConf;
18 import org.apache.spark.api.java.JavaRDD;
19 import org.apache.spark.api.java.JavaSparkContext;
20 import org.apache.spark.api.java.function.Function;
21 import org.apache.spark.api.java.function.Function2;
22 import org.apache.spark.util.FloatVector;
23
24 import java.util.ArrayList;
25 import java.util.List;
26
27 public final class GPUPi {
28
29
30   public static void main(String[] args) throws Exception {
31     SparkConf sparkConf = new SparkConf().setAppName("JavaSparkPi");
32     JavaSparkContext jsc = new JavaSparkContext(sparkConf);
33     int slices = (args.length == 1) ? Integer.parseInt(args[0]) : 2;
34     int n = slices;
35     int t = 100000000;
36     List<Integer> l = new ArrayList<Integer>(n);
37     for (int i = 0; i < n; i++) {
38       l.add(t);
39     }
40       String s = "./pi " + new Integer(n / slices).toString();
41     int count = jsc.parallelize(l, slices)
42             .pipe(s)
43             .map(
44               new Function<String, Integer>() {
45                   @Override
46                   public Integer call(String line) {
47                       return Integer.parseInt(line);
48                   }
49               }
50       ).reduce(new Function2<Integer, Integer, Integer>() {
51           @Override
52           public Integer call(Integer integer, Integer integer2) {
53               return integer + integer2;
54           }
55       });
56     System.out.println("Pi is roughly " + 4.0 * count / n / t);
57   }
58 }
这段代码通过RDDPipe,调用一个外部程序来计算,最后通过reduce+操作,获得几个外部程序的计算结果,这样一个接口,可以使得外部程序完全独立,和spark不会有太大的关系,甚至可以在外部程序中使用cuda等来加速。
这里需要说明一下pipe接口,这是因为在spark1.0中,我们依然没有在example样例中看到演示这个接口的任何代码。pipe接受一个cmd指令,然后在外部执行它,如“./pi"就是执行一个叫pi的可执行文件,所不同的是,这个外部程序所有的输入流都是由spark中的RDD传送给他的,同时,外部程序的输出,会形成一个新的RDD。
我们对应的c语言代码如下:
#include <stdio.h>
#include <stdlib.h>
#include <time.h>

int main(int argc, char *argv[]) {
    int num = 0, count = 0,t;
    double z = RAND_MAX;
    z = z * z;
    t = atoi(argv[1]);
    for(int i = 0; i < t; i++){
        scanf("%d",&num);
        for(int j = 0; j < num; j++){
            double x = rand();
            double y = rand();
            if(x * x + y * y <= z){
                count++;
            }
        }
    }
    printf("%d
",count);
    return 0;
}
三、编译
由于项目已经采用maven来管理了,这里也就使用maven来打包了。命令是mvn package,这样就会在target目录下生成gpu-1.0-SNAPSHOT.jar文件。
四、作业提交。
mvn package
spark-submit
--class GPUPi
--master yarn-cluster
--executor-memory 2G
--num-executors 4
--files /home/yarn/cuda-workspace/pi/Release/pi
target/gpu-1.0-SNAPSHOT.jar 4
--files把可执行文件pi发送到每一台机器上面。
--master指定执行的模式,一般都是选yarn-cluster模式,让spark跑在yarn上面,其他可以参考文档说明。