Spring的事务管理
作为企业级应用程序框架, Spring 在不同的事务管理 API 之上定义了一个抽象层. 而应用程序开发人员不必了解底层的事务管理 API, 就可以使用 Spring 的事务管理机制。
Spring 既支持编程式事务管理, 也支持声明式的事务管理。
编程式事务管理: 将事务管理代码嵌入到业务方法中来控制事务的提交和回滚. 在编程式管理事务时, 必须在每个事务操作中包含额外的事务管理代码。
声明式事务管理: 大多数情况下比编程式事务管理更好用. 它将事务管理代码从业务方法中分离出来, 以声明的方式来实现事务管理. 事务管理作为一种横切关注点, 可以通过 AOP 方法模块化. Spring 通过 Spring AOP 框架支持声明式事务管理。
事务本来就是数据库中的概念,在DAO层。但一般情况下,需要将事务提升到业务层,即Service层。这样做是为了能够使用事务的特性来管理具体的业务。
在Spring中通常可以通过以下三种方式来实现对事务的管理。
(1)使用Spring的事务代理工厂管理事务
(2)使用Spring的事务注解管理事务
(3)使用AspectJ的AOP配置管理事务
1. Spring事务管理API
Spring 从不同的事务管理 API 中抽象了一整套的事务机制. 开发人员不必了解底层的事务 API, 就可以利用这些事务机制. 有了这些事务机制, 事务管理代码就能独立于特定的事务技术了。
Spring 的核心事务管理抽象是PlatformTransactionManager接口,管理封装了一组独立于技术的方法,无论似乎用Spring的哪种事务管理策略(编程式或声明式),事务管理器都是必须的。
Spring的事务管理,主要用到两个事务相关的接口。
(1)平台事务管理器接口:PlatformTransactionManager。其主要用于完成事务的提交、回滚,及获取事务的状态信息。
A:常用的两个实现类
PlatformTransactionManager接口有两个常用的实现类:
- DataSourceTransactionManager:使用Spring JDBC或iBatis进行持久化数据时使用。
- HibernateTransactionManager:使用Hibernate进行持久化数据时使用。
- JtaTransactionManager:在JavaEE应用服务器上用JTA进行事务管理。
(2)事务定义接口:TransactionDefinition
事务定义接口TransactionDefinition中定义了事务描述相关的四类常量:事务隔离级别、事务传播行为、事务默认超时时限,是否只读操作。
A:定义了五个事务隔离界别常量
这些常量均是以ISOLATION开头。即形如ISOLATION_XXX。
DEFAULT:采用DB默认的事务隔离级别。MySQL的默认为REPEATABLE_READ;Oracle默认为READ_COMMITTED。【ISOLATION_DEFAULT】
READ_UNCOMMITTED:读未提交。未解决任何并发问题。【ISOLATION_READ_UNCOMMITTED】
READ_COMMITTED:读已提交。解决脏读,存在不可重复读与幻读。【ISOLATION_READ_COMMITTED】
REPEATABLE_READ:可重复读。解决脏读、不可重复读,存在幻读。【ISOLATION_PEPEATABLE_READ】
SERIALIZABLE:串行化,不存在并发问题。【ISOLATION_SERIALIZABLE】
B:定义了七个事务传播行为常量
所谓事务传播行为,处于不同事务中的方法在相互调用时,执行期间事务的维护情况。如:A事务中的方法doSome()调用B事务中的方法doOther()。在调用执行期间事务的维护情况,就称为事务传播行为。事务传播行为是加在方法上的。
事务传播行为常量都是以PROPAGATION_开头,形如PROPAGETION_XXX。
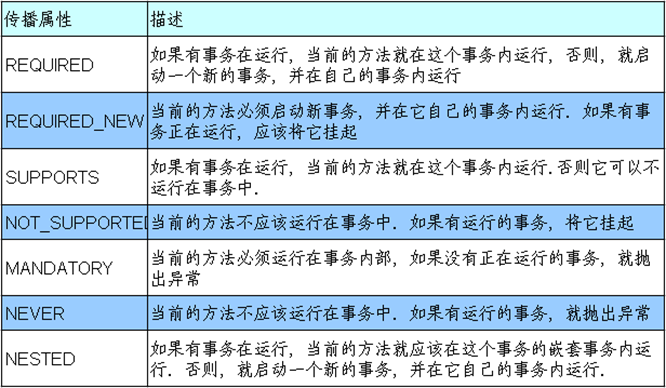
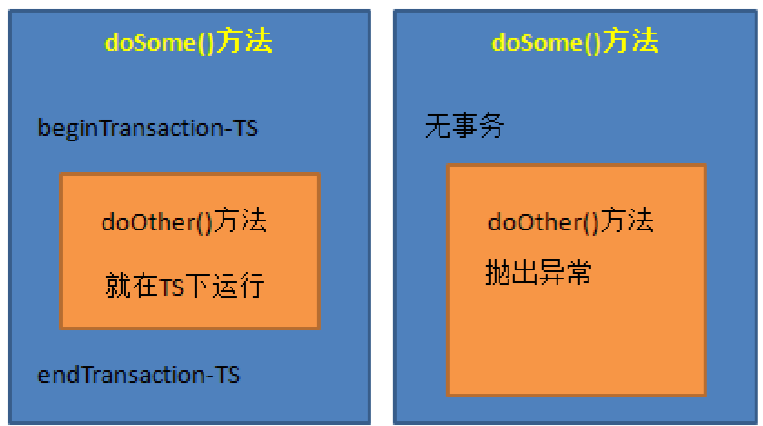
(1)REQUIRED:指定的方法必须在事务内执行,若当前存在事务,就加入到当前事务中;若当前没有事务,则创建一个新的事务。这种传播行为是最常见的选择,也是Spring默认的事务传播行为。
如该传播行为加在doOther()方法上。若doSome()方法在调用doOther()方法时就是在事务内运行的,则doOther()方法的执行也加入到该事务内执行。若doSome()方法在调用doOther()方法时没有在事务内执行,则doOther()方法会创建一事务,并在其中执行。

(2)SUPPORTS:指定的方法支持当前事务,但若当前没有事务,也可以以非事务方式执行

(3)MANDATORY:指定的方法必须在当前事务内执行,若当前没有事务,则直接抛出异常。
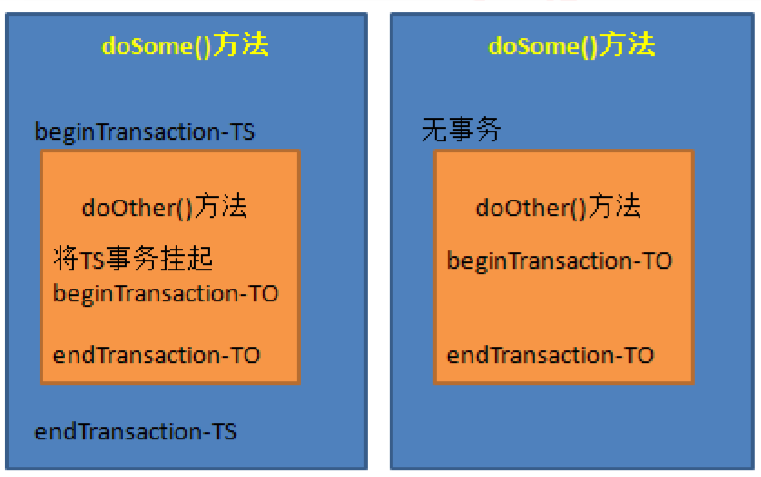
(4)REQUIRES_NEW:总是新建一个事务,若当前存在事务,就将当前事务挂起,直到新事物执行完毕。
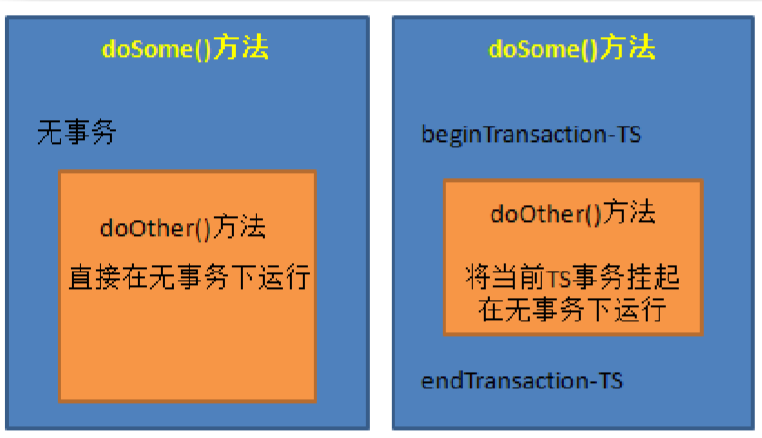
(5)NOT_SUPPORTED:指定的方法不能在事务环境中执行,若当前存在事务,就将当前事务挂起。
(6)NEVER:指定的方法不能在事务环境下执行,若当前存在事务,就之际抛出异常。
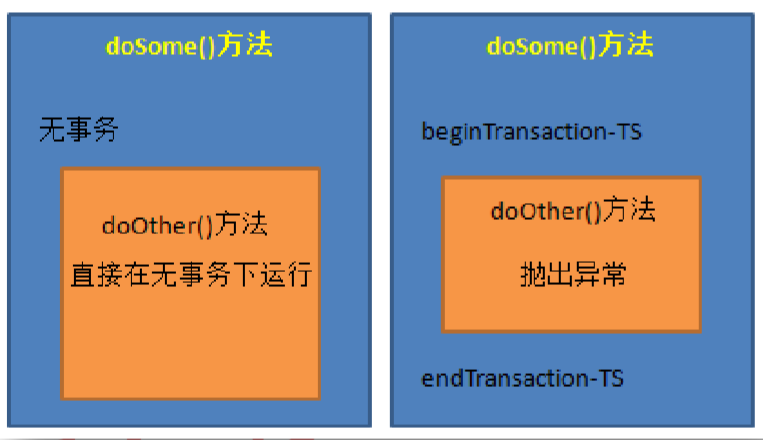
(7)NESTED:指定的方法必须在事务内执行。若当前存在事务,则在嵌套事务内执行:若当前没有事务,则创建一个新事物。
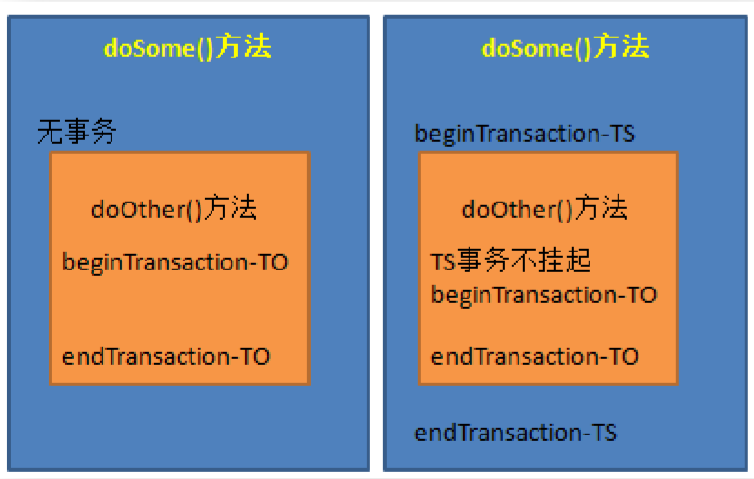
总结:

C:定义了默认事务超时时限
事务在强制回滚之前可以保持多久. 这样可以防止长期运行的事务占用资源。
常量TIMEOUT_DEFAULT定义了事务底层默认的超时时限,及不支持事务超时时限设置的none值。
注意:事务的超时时限起作用的条件比较多,且超时的时间计算点比较复杂。所以,该值一般就使用默认值即可。
D:是否只读
表示这个事务只读取数据但不更新数据, 这样可以帮助数据库引擎优化事务
2. Spring使用事务的步骤
事务环境的准备
1)准备数据库表
create table t_account(
    id int auto_increment,
    name varchar(255),
    money double
);
2)编写DAO层及其实现类
public interface AccountDao{
    // 价钱
    void increaseMoney(Integer id,Double money);
    // 减钱
    void decreaseMoney(Integer id,Double money);
}
public AccountDaoImpl extends JdbcDaoSupport implements AccountDao{
    @Override
    public void increaseMoney(Integer id,Double money){
        this.getJdbcTemplate().update("update t_account set money=money+? where id=? ",money,id);
    }
    @Override
    public void decreaseMoney(Integer id,Double money){
        this.getJdbcTemplate().update("update t_account set money=money-? where id=? ",money,id);
    }
}
3)编写Service层及其实现类
public interface AccountService{
    // 转账方法
    void transfer(Integer from,Integer to,Double money);
}
public class AccountServiceImpl implements AccountService{
    private AccountDao ad;
    public void setAd(AccountDao ad){
        this.ad = ad;
    }
    @Override
    public void transfer(Integer from,Integer to,Double money){
        // 减钱
        ad.decreaseMoney(from,money);
        // 加钱
        ad.increaseMoney(to,money);
    }
}
4)Spring配置文件的编写
<!-- 1.指定spring读取db.properties配置 -->
<context:property-placeholder location="classpath:db.properties"  />

<!-- 2.配置连接池 -->
<bean name="dataSource" class="com.mchange.v2.c3p0.ComboPooledDataSource" >
	<property name="jdbcUrl" value="${jdbc.jdbcUrl}" ></property>
	<property name="driverClass" value="${jdbc.driverClass}" ></property>
	<property name="user" value="${jdbc.user}" ></property>
	<property name="password" value="${jdbc.password}" ></property>
</bean>
<!-- 3.注入DAO对象 -->
<bean name="accountDao" class="com.zhy.dao.AccountDaoImpl" >
	<property name="dataSource" ref="dataSource" ></property>
</bean>

<!-- 4.配置Service对象 -->
<bean name="accountService" class="com.zhy.service.AccountServiceImpl" >
	<property name="ad" ref="accountDao" ></property>
</bean>
5)编写测试类
@Runwith(SpringJUnit4ClassRunner.class)
@ContextConfiguration("classpath:applicationContext.xml")
public class Demo{
    @Resource(name="accountService");
    private AccountService as;
    @Test
    public void fun(){
        as.transfer(1,2,100d);
    }
}
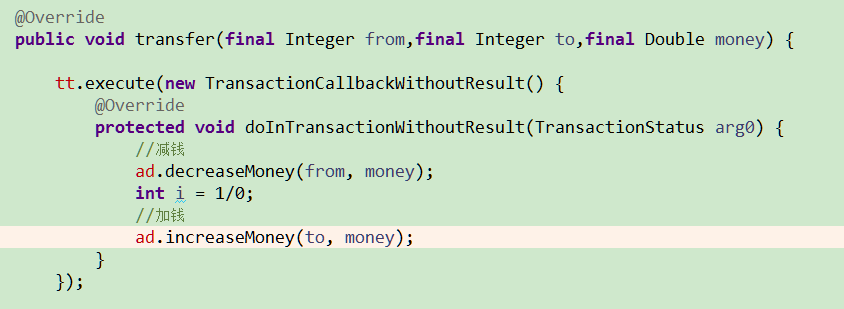
(1)编码式【观光即可】
1)导包:beans,context.core,expression,aop,2个日志相关,数据库连接驱动,C3P0数据库,jdbc,tx,test
2)将核心事务管理器配置到spring容器

3)配置TransactionTemplate模板

4)将事务模板注入Service

5)在Service中调用模板
(2)XML配置【AOP】
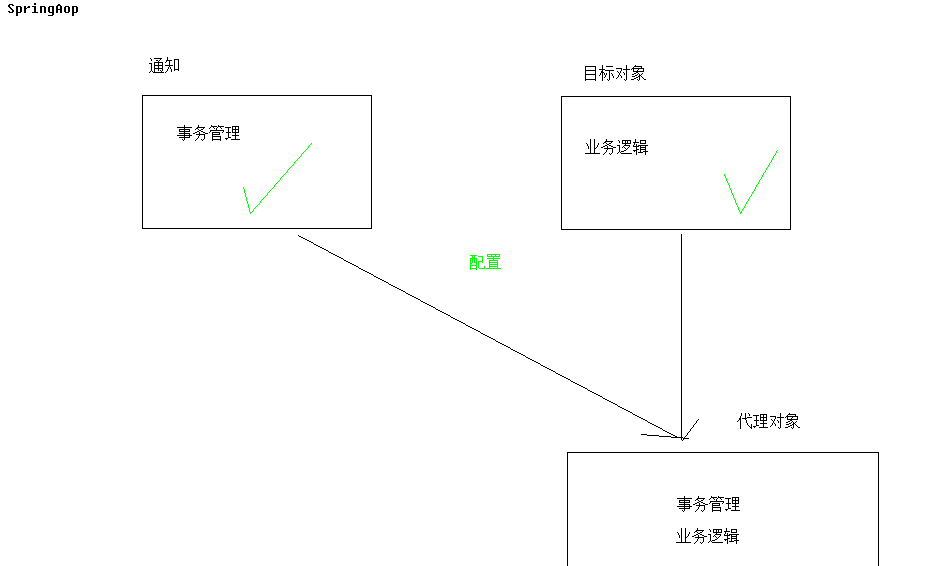
原理就是将通知切入到目标对象中,生成代理对象。
1)导包:beans,context.core,expression,aop,2个日志相关,数据库连接驱动,C3P0数据库,jdbc,tx,test
2)导入新的约束:beans:最基本;context:读取properties配置;aop:配置aop;tx:配置事务通知
3)配置通知
<!-- 配置事务通知 -->
<tx:advice id="txAdvice" transaction-manager="transactionManager" >
	<tx:attributes>
		<!-- 以方法为单位,指定方法应用什么事务属性
			isolation:隔离级别
			propagation:传播行为
			read-only:是否只读
		 -->
		<tx:method name="save*" isolation="REPEATABLE_READ" propagation="REQUIRED" read-only="false" />
		<tx:method name="persist*" isolation="REPEATABLE_READ" propagation="REQUIRED" read-only="false" />
		<tx:method name="update*" isolation="REPEATABLE_READ" propagation="REQUIRED" read-only="false" />
		<tx:method name="modify*" isolation="REPEATABLE_READ" propagation="REQUIRED" read-only="false" />
		<tx:method name="delete*" isolation="REPEATABLE_READ" propagation="REQUIRED" read-only="false" />
		<tx:method name="remove*" isolation="REPEATABLE_READ" propagation="REQUIRED" read-only="false" />
		<tx:method name="get*" isolation="REPEATABLE_READ" propagation="REQUIRED" read-only="true" />
		<tx:method name="find*" isolation="REPEATABLE_READ" propagation="REQUIRED" read-only="true" />
		<tx:method name="transfer" isolation="REPEATABLE_READ" propagation="REQUIRED" read-only="false" />
	</tx:attributes>
</tx:advice>
4)配置将通知织入目标
<!-- 配置织入 -->
<aop:config  >
	<!-- 配置切点表达式 -->
	<aop:pointcut expression="execution(* cn.itcast.service.*ServiceImpl.*(..))" id="txPc"/>
	<!-- 配置切面 : 通知+切点
		 	advice-ref:通知的名称
		 	pointcut-ref:切点的名称
	 -->
	<aop:advisor advice-ref="txAdvice" pointcut-ref="txPc" />
</aop:config>
(3)注解配置【AOP】
1)导包:beans,context.core,expression,aop,2个日志相关,数据库连接驱动,C3P0数据库,jdbc,tx,test
2)导入新的约束
3)开启注解管理事务
将XML配置的配置通知和配置切入去掉,该换用开启注解的设置。
<!-- 1. 指定spring读取db.properties配置 -->
<context:property-placeholder location="classpath:db.properties"  />
<!-- 2. 事务核心管理器,封装了所有事务操作. 依赖于连接池 -->
<bean name="transactionManager" class="org.springframework.jdbc.datasource.DataSourceTransactionManager" >
	<property name="dataSource" ref="dataSource" ></property>
</bean>
<!-- 3. 事务模板对象 -->
<bean name="transactionTemplate" class="org.springframework.transaction.support.TransactionTemplate" >
	<property name="transactionManager" ref="transactionManager" ></property>
</bean>
<!-- 4.将连接池 -->
<bean name="dataSource" class="com.mchange.v2.c3p0.ComboPooledDataSource" >
	<property name="jdbcUrl" value="${jdbc.jdbcUrl}" ></property>
	<property name="driverClass" value="${jdbc.driverClass}" ></property>
	<property name="user" value="${jdbc.user}" ></property>
	<property name="password" value="${jdbc.password}" ></property>
</bean>
<!-- 5.Dao-->
<bean name="accountDao" class="cn.itcast.dao.AccountDaoImpl" >
	<property name="dataSource" ref="dataSource" ></property>
</bean>
<!-- 6.Service-->
<bean name="accountService" class="cn.itcast.service.AccountServiceImpl" >
	<property name="ad" ref="accountDao" ></property>
	<property name="tt" ref="transactionTemplate" ></property>
</bean>
<!-- 7. 开启使用注解管理aop事务 -->
<tx:annotation-driven/>
4)使用注解
在方法上添加@Transactional注解即可
@Transactional(isolation=Isolation.REPEATABLE_READ,propagation=Propagation.REQUIRED,readOnly=true)
public class AccountServiceImpl implements AccountService {
	private AccountDao ad ;
	private TransactionTemplate tt;
	@Override
@Transactional(isolation=Isolation.REPEATABLE_READ,propagation=Propagation.REQUIRED,readOnly=false)
	public void transfer(final Integer from,final Integer to,final Double money) {
				//减钱
				ad.decreaseMoney(from, money);
				int i = 1/0;
				//加钱
				ad.increaseMoney(to, money);
	}
	public void setAd(AccountDao ad) {
		this.ad = ad;
	}
	public void setTt(TransactionTemplate tt) {
		this.tt = tt;
	}
}