1.1 关于Caffeine Cache
Google Guava Cache是一种非常优秀本地缓存解决方案,提供了基于容量,时间和引用的缓存回收方式。基于容量的方式内部实现采用LRU算法,基于引用回收很好的利用了Java虚拟机的垃圾回收机制。其中的缓存构造器CacheBuilder采用构建者模式提供了设置好各种参数的缓存对象,缓存核心类LocalCache里面的内部类Segment与jdk1.7及以前的ConcurrentHashMap非常相似,都继承于ReetrantLock,还有六个队列,以实现丰富的本地缓存方案。
通俗的讲,Guva是google开源的一个公共java库,类似于Apache Commons,它提供了集合,反射,缓存,科学计算,xml,io等一些工具类库。cache只是其中的一个模块。使用Guva cache能够方便快速的构建本地缓存。
Caffeine是使用Java8对Guava缓存的重写版本,在Spring Boot 2.0中将取代Guava。如果出现Caffeine,
CaffeineCacheManager将会自动配置。
1.1.1 为什么要用本地缓存
相对于IO操作
速度快,效率高
相对于Redis
Redis是一种优秀的分布式缓存实现,受限于网卡等原因,远水救不了近火
DB + Redis + LocalCache = 高效存储,高效访问
访问速度和花费的关系如下图所示:

1.1.2 什么时候用
- 愿意消耗一些内存空间来提升速度
- 预料到某些键会被多次查询
- 缓存中存放的数据总量不会超出内存容量
1.1.3 怎么用
- 设置缓存容量
- 设置超时时间
- 提供移除监听器
- 提供缓存加载器
- 构建缓存
1.2 使用Caffeine Cache
使用springboot2.x操作Caffeine Cache
搭建工程:Springboot2.x + MyBatis + MySQL + Caffeine Cache
Caffeine是使用Java8对Guava缓存的重写版本,在Spring 5.0或者Spring Boot 2.0中将取代,基于LRU算法实现,
支持多种缓存过期策略。
1.2.1 准备工作
- 准备好数据库和数据表并插入相应实验数据(MySQL)
-- 新建表
create database if not exists guavach charset utf8;
-- 使用表
use guavach;
-- 创建用户表tbl_user
create table tbl_user(
id int(10) not null primary key auto_increment,
name varchar(50) not null,
age int(20) not null
)engine=innodb default charset=utf8;
-- 初始化数据
insert into tbl_user values('1','codesheep.cn','25');
insert into tbl_user values('2','hansongwang99','30');
insert into tbl_user values('3','刘能','35');
insert into tbl_user values('4','赵四','38');
1.2.2 java工程
1.2.2.1 添加依赖
        <dependency>
            <groupId>com.github.ben-manes.caffeine</groupId>
            <artifactId>caffeine</artifactId>
        </dependency>
1.2.2.2 配置类
引入 CaffeineCache的配置文件 CaffeineCacheConfig
@Configuration
@EnableCaching
public class CaffeineCacheConfig {
    @Bean
    public CacheManager cacheManager(){
        CaffeineCacheManager cacheManager = new CaffeineCacheManager();
        //Caffeine配置
        Caffeine<Object, Object> caffeine = Caffeine.newBuilder()
                                            //最后一次写入后经过固定时间过期
                                            .expireAfterWrite(10, TimeUnit.SECONDS)
                                            //maximumSize=[long]: 缓存的最大条数
                                            .maximumSize(1000);
        cacheManager.setCaffeine(caffeine);
        return cacheManager;
    }
}
说明:
Caffeine配置说明:
- initialCapacity=[integer]: 初始的缓存空间大小
- maximumSize=[long]: 缓存的最大条数
- maximumWeight=[long]: 缓存的最大权重
- expireAfterAccess=[duration]: 最后一次写入或访问后经过固定时间过期
- expireAfterWrite=[duration]: 最后一次写入后经过固定时间过期
- refreshAfterWrite=[duration]: 创建缓存或者最近一次更新缓存后经过固定的时间间隔,刷新缓存
- weakKeys: 打开key的弱引用
- weakValues:打开value的弱引用
- softValues:打开value的软引用
- recordStats:开发统计功能
注意: - expireAfterWrite和expireAfterAccess同事存在时,以expireAfterWrite为准。
- maximumSize和maximumWeight不可以同时使用
- weakValues和softValues不可以同时使用
1.2.2.3 配置文件
server:
  port: 9020
# Mysql
spring:
  datasource:
    url: jdbc:mysql://localhost:3306/guavach?useUnicode=true&characterEncoding=utf-8&useSSL=true&serverTimezone=UTC
    driver-class-name: com.mysql.cj.jdbc.Driver
    username: root
    password: root
# mybatis配置
mybatis:
  configuration:
    map-underscore-to-camel-case: true
#debug: true
1.2.2.4 实体类
public class User implements Serializable {
    private static final long serialVersionUID=1L;
    private Long id;
    private String name;
    private Integer age;

    public static long getSerialVersionUID() {
        return serialVersionUID;
    }

    public Long getId() {
        return id;
    }

    public void setId(Long id) {
        this.id = id;
    }

    public String getName() {
        return name;
    }

    public void setName(String name) {
        this.name = name;
    }

    public Integer getAge() {
        return age;
    }

    public void setAge(Integer age) {
        this.age = age;
    }
}
1.2.2.5 mapper
@Mapper
public interface UserMapper {

    @Select("select * from tbl_user")
    List<User> getUsers();

    @Insert("insert into tbl_user values(#{name},#{age})")
    int addUser(User user);

    @Select("select * from tbl_user where name=#{userName}")
    List<User> getUserByName(String userName);
}
1.2.2.6 service
@Service
public class UserService{
    @Autowired
    private UserMapper userMapper;

    public List<User> getUsers() {
        return userMapper.getUsers();
    }

    public int addUser(User user) {
        return userMapper.addUser(user);
    }

    @Cacheable(value = "user",key = "#userName")
    public List<User> getUserByName(String userName) {
        List<User> users=userMapper.getUserByName(userName);
        System.out.println("从数据库中读取,而非从缓存读取!");
        return users;
    }


}
说明:在 getUsersByName接口上添加了注解:@Cacheable。这是 缓存的使用注解之一,除此之外常用的还有 @CachePut和 @CacheEvit,分别简单介绍一下:
@Cacheable:配置在getUsersByName方法上表示其返回值将被加入缓存。同时在查询时,会先从缓存中获取,若不存在才再发起对数据库的访问@CachePut:配置于方法上时,能够根据参数定义条件来进行缓存,其与@Cacheable不同的是使用@CachePut标注的方法在执行前不会去检查缓存中是否存在之前执行过的结果,而是每次都会执行该方法,并将执行结果以键值对的形式存入指定的缓存中,所以主要用于数据新增和修改操作上@CacheEvict:配置于方法上时,表示从缓存中移除相应数据。
1.2.2.7 controller
@RestController
public class UserController {
    @Autowired
    private UserService userService;

    @Autowired
    CacheManager cacheManager;

    @PostMapping("/getuserbyname")
    public List<User> getUserByName(@RequestBody User user){
        System.out.println("------------");
        System.out.println("call  /getuserbyname");
        List<User> users = userService.getUserByName(user.getName());
        return users;

    }

    @GetMapping("/hehe")
    public String hehe(){
        return "hehhehhehe";
    }
}
1.2.2.8 启动类
@SpringBootApplication
@EnableCaching//新增注解
public class Caffeinecache01Application {

    public static void main(String[] args) {
        SpringApplication.run(Caffeinecache01Application.class, args);
    }

}
1.3 运行
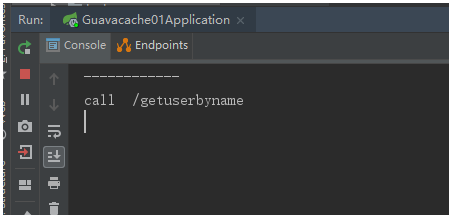
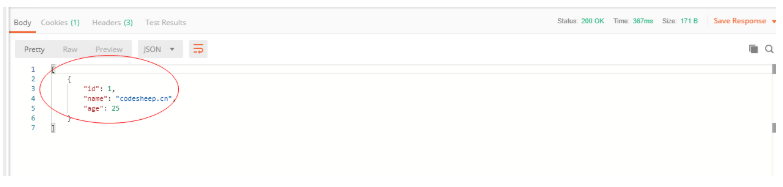
启动主类,使用postman测试
打开postman,输入json字段,点击send按钮后,显示返回结果
查看IDEA控制台输出
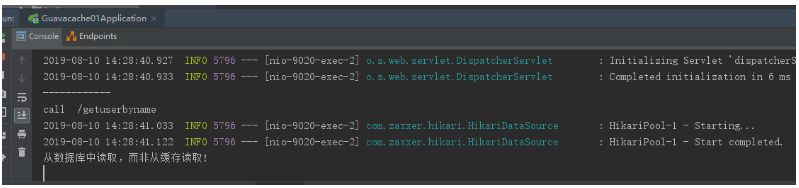
第一次获取时,为从数据库读取
接着点击,间隔时间少于10秒,显示如下结果,可以看到缓存的启用和失效时的效果如下所示(上文 Guava Cache的配置文件中设置了缓存 user的实效时间为 10s):