前言
加入新公司的第二个星期的星期二 遇到另一个项目需要技术性支持:验证es多集群的数据备份方案,需要我参与验证,在这个项目中需要关注到两个集群的互通性。es集群是部署在不同的k8s环境中,K8s环境未必可以互相通信。在这个过程中也遇到很多问题,关关难过关关过。
因为是新入职的公司的第一个完成的任务,特记录如下
环境
k8s版本:1.18.3
es版本:7.8
logstash版本:7.8
ceph: s3
验证方案
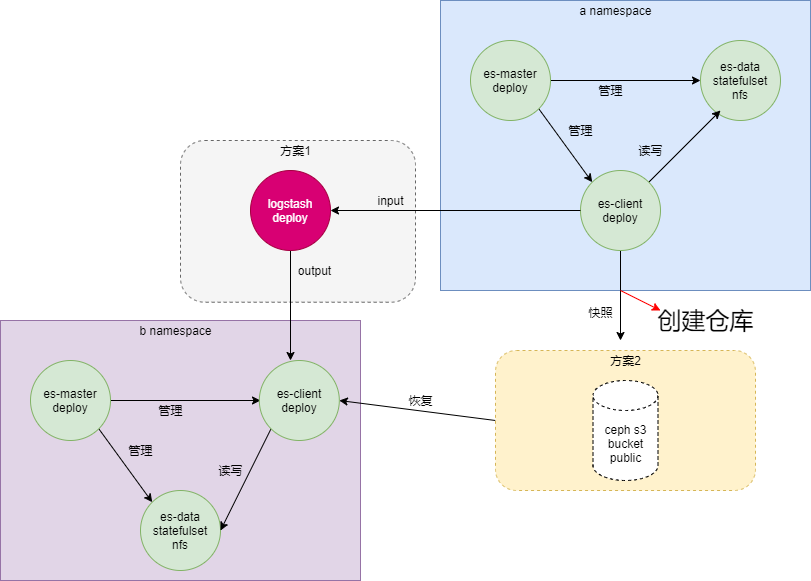
-方案1 : logstash
- 方案2: ceph s3
- s3 操作:https://www.cnblogs.com/sunhongleibibi/p/11661123.html
- 部署资源清单: 链接:https://pan.baidu.com/s/13wxwywdu_9g-Szxy_ugC7w
提取码:anch- PS:链接为部署资源清单和验证方案可编辑图
es 双集群环境
[root@localhost a]# ctl get po -n a
NAME                                    READY   STATUS    RESTARTS   AGE
elasticsearch-client-7bf748d697-gnrjz   1/1     Running   0          23h
elasticsearch-data-0                    1/1     Running   0          23h
elasticsearch-master-7569856dd7-z7q4z   1/1     Running   0          23h
logstash-69f7b75f5-vl4k2                1/1     Running   0          23h

-------------------------------------------------------------------------------

[root@localhost a]# ctl get po -n b
NAME                                    READY   STATUS    RESTARTS   AGE
elasticsearch-client-84f954845b-4tj2s   1/1     Running   0          2d1h
elasticsearch-data-0                    1/1     Running   0          2d1h
elasticsearch-master-58b5bf9d-62nfg     1/1     Running   0          2d1h
数据节点存储为nfs
go向es插入数据
/**
 * @Author: anchnet
 * @Description:
 * @File:  main.go
 * @Version: 1.0.0
 * @Date: 2021/7/2 13:07
 */

package main

import (
	"bytes"
	"encoding/json"
	"flag"
	"fmt"
	"github.com/elastic/go-elasticsearch/v8"
	"io/ioutil"
	"strconv"
	"time"
)

func main() {
	start := time.Now() // 获取当前时间

	//支持参数
	var (
		count int    // 起始数
		total int    // 截至数
		index string // index
		id    string // id
		title string // title
	)
	flag.IntVar(&count, "c", 1, "起始数")
	flag.IntVar(&total, "e", 1, "截至数")
	flag.StringVar(&index, "i", "", "index")
	flag.StringVar(&id, "d", "", "id")
	flag.StringVar(&title, "t", "", "title")
	// 解析参数
	flag.Parse()
	if index == "" {
		index = "demo"
	}
	if id == "" {
		id = "id_1"
	}
	if title == "" {
		title = "安畅"
	}
	fmt.Println("count:", count)
	fmt.Println("total:", total)
	fmt.Println("index:", index)
	fmt.Println("id:", id)
	fmt.Println("title:", title)

	addresses := []string{"http://192.168.201.113:31001"}
	config := elasticsearch.Config{
		Addresses: addresses,
		Username:  "elastic",
		Password:  "l605eslS0mYOYEB4grNU",
		CloudID:   "",
		APIKey:    "",
	}
	// new client
	es, err := elasticsearch.NewClient(config)
	if err != nil {
		fmt.Println(err, "Error creating the client")
	}

	//Get(*es, index, id)
	//Update(*es, index, id)
	//Get(*es, index, id)
	create(*es, index, count, total)
	//Search(*es, index, title)

	elapsed := time.Since(start)
	fmt.Println("该函数执行完成耗时:", elapsed)

}

func create(es elasticsearch.Client, index string, count int, total int) bool {
	//var wg sync.WaitGroup
	// Create creates a new document in the index.
	// Returns a 409 response when a document with a same ID already exists in the index.
	for i := count; i < total; i++ {
		//wg.Add(1)
		k := strconv.Itoa(i)
		var buf bytes.Buffer

		content, err := ioutil.ReadFile("./test.log") // just pass the file name
		if err != nil {
			fmt.Print(err)
		}

		doc := map[string]interface{}{
			"title":   "安畅是一家怎么样的公司呢?" + k,
			"content": content,
			"time":    time.Now().Unix(),
			"date":    time.Now(),
		}
		if err := json.NewEncoder(&buf).Encode(doc); err != nil {
			fmt.Println(err, "Error encoding doc")
			return false
		}

		func() {
			time.Sleep(1 * time.Millisecond)
			res, err := es.Create(index, "idx_"+k, &buf)
			if err != nil {
				fmt.Println(err, "Error create response")
			}
			//wg.Done()
			defer res.Body.Close()
			fmt.Println(res.String())
		}()
	}
	//wg.Wait()
	return true
}

//go run main.go -c 3 -e 10000
方案一验证:
验证向a集群写入数据
# kubectl exec -it elasticsearch-client-7bf748d697-gnrjz  -n a -- curl -u elastic:l605eslS0mYOYEB4grNU http://elasticsearch-client.a:9200/_cat/indices
yellow open demo                        sOGM8_9UTnuEUyCpLRx6Mg 1 1  10000     0 74.3mb 74.3mb

logstash-cm.yaml
apiVersion: v1
kind: ConfigMap
metadata:
  name: logstash-config
  namespace: a
data:
  containers.conf: |
    input {
      elasticsearch {
         hosts => ["http://elasticsearch-client.a:9200"]
         user => "elastic"
         password => "l605eslS0mYOYEB4grNU"
         index => "demo"
         #size => 10000
       #  scroll => "1m"
        # codec => "json"
         #docinfo => true
     }
    }
     #filter {
       #sleep {
         #time => "1"
         #every => 10
       #}
    #}
    output {
      elasticsearch {
         hosts => ["elasticsearch-client.b:9200"]
         user => "elastic"
         password => "bcsvxqPxIKIJ5p5e20zZ"
         index => "demo"
         document_type => "%{[@metadata][_type]}"
         document_id => "%{[@metadata][_id]}"
      }
    # stdout { codec => rubydebug { metadata => true } }
    }
验证b集群

PS:在反复验证下 在现有集群环境下,在数据量为74.3M 时,由a es集群向b集群 数据传输的时间大约为3S.
方案二验证:
- 推荐此方案
- 已解决的问题:1、es官方镜像与s3插件的集成 2、bucket的权限问题 3、es配置重载 4、a es集群向s3快照 到b es集群恢复
Dockerfile
es镜像增加s3插件
FROM elasticsearch:7.8.0
ADD https://artifacts.elastic.co/downloads/elasticsearch-plugins/repository-s3/repository-s3-7.8.0.zip /usr/share/elasticsearch/
RUN yes | elasticsearch-plugin install file:///usr/share/elasticsearch/repository-s3-7.8.0.zip
创建s3 bucket
# s3cmd ls | grep zisefeizhu
2021-07-06 09:24  s3://zisefeizhu

# s3cmd info s3://zisefeizhu
s3://zisefeizhu/ (bucket):
   Location:  default
   Payer:     BucketOwner
   Expiration Rule: none
   Policy:    none
   CORS:      none
   ACL:       *anon*: READ
   ACL:       anchnet: FULL_CONTROL
   URL:       http://49.235.65.51:7480/zisefeizhu/

  # s3cmd setacl s3://zisefeizhu/ --acl-public --recursive
es 结合s3
以下操作在a es 集群的每个Pod 上执行
# elasticsearch-keystore add s3.client.default.access_key

# elasticsearch-keystore add s3.client.default.secret_key

# elasticsearch-keystore list
keystore.seed
s3.client.default.access_key
s3.client.default.secret_key
创建一个S3类型的仓库
# ctl exec -it elasticsearch-client-7bf748d697-gnrjz -n a -- curl -u elastic:l605eslS0mYOYEB4grNU -H 'Content-Type: application/json' -XPUT http://elasticsearch-client.a:9200/_snapshot/s3_obs_repository  -d '
{
  "type": "s3",
  "settings": {
    "endpoint": "49.235.65.51:7480",
    "bucket": "s3://zisefeizhu",
    "base_path": "/zisefeizhu",
    "max_snapshot_bytes_per_sec": "200mb",
     "max_restore_bytes_per_sec": "200mb"
   }
}
'
!报错:
{"error":{"root_cause":[{"type":"repository_verification_exception","reason":"[s3_obs_repository] path [/zisefeizhu] is not accessible on master node"}],"type":"repository_verification_exception","reason":"[s3_obs_repository] path [/zisefeizhu] is not accessible on master node","caused_by":{"type":"i_o_exception","reason":"Unable to upload object [/zisefeizhu/tests-FLt0bsA2QcCTc_l9JeO78w/master.dat] using a single upload","caused_by":{"type":"sdk_client_exception","reason":"sdk_client_exception: Failed to connect to service endpoint: ","caused_by":{"type":"i_o_exception","reason":"Connect timed out"}}}},"status":500}

PS:master node 无法访问base_path ????
master node 也已经添加了s3的访问权限、且s3的bucket 也已经公开了权限。
es 与ceph s3 关联问题解决
1、es 集群的master节点和data节点 增加 s3的key
2、es配集群重载配置
# kubectl exec -it elasticsearch-client-7bf748d697-gnrjz -n a -- curl -u elastic:l605eslS0mYOYEB4grNU -XPOST http://elasticsearch-client.a:9200/_nodes/reload_secure_settings
a集群创建S3类型的快照仓库
# ctl exec -it elasticsearch-client-7bf748d697-gnrjz -n a -- curl -u elastic:l605eslS0mYOYEB4grNU -H 'Content-Type: application/json' -XPUT http://elasticsearch-client.a:9200/_snapshot/s3_obs_repository  -d '
  {
    "type": "s3",
    "settings": {
       "endpoint": "http://49.235.65.51:7480",
       "bucket": "zisefeizhu",
       "base_path": "/zisefeizhu",
       "max_snapshot_bytes_per_sec": "200mb",
       "max_restore_bytes_per_sec": "200mb"
     }
}
'

## 成功会返回:
 {"acknowledged":true}

## 查看
# ctl exec -it elasticsearch-client-7bf748d697-gnrjz -n a -- curl -u elastic:l605eslS0mYOYEB4grNU  -XGET http://elasticsearch-client.a:9200/_snapshot/s3_obs_repository/_all
{"snapshots":[]}

## 删除
# ctl exec -it elasticsearch-client-7bf748d697-gnrjz -n a -- curl -u elastic:l605eslS0mYOYEB4grNU  -XDELETE http://elasticsearch-client.a:9200/_snapshot/s3_obs_repository
{"acknowledged":true}
a集群创建快照
# ctl exec -it elasticsearch-client-7bf748d697-gnrjz -n a -- curl -u elastic:l605eslS0mYOYEB4grNU -H 'Content-Type: application/json' -XPUT http://elasticsearch-client.a:9200/_snapshot/s3_obs_repository/snapshot_zisefeizhu  -d '
{
  "indices": "demo",
  "ignore_unavailable": true,
  "include_global_state": false
}
'

## s3 查看快照大小
# s3cmd du -H s3://zisefeizhu
  74M      41 objects s3://zisefeizhu/   #和demo 索引大小一致

## 查看仓库下的所有快照
# ctl exec -it elasticsearch-client-7bf748d697-gnrjz -n a -- curl -u elastic:l605eslS0mYOYEB4grNU  -XGET http://elasticsearch-client.a:9200/_snapshot/s3_obs_repository/_all
{"snapshots":[{"snapshot":"snapshot_zisefeizhu","uuid":"OhTUdg63QuGEtiynLQUh2A","version_id":7080099,"version":"7.8.0","indices":["demo"],"include_global_state":false,"state":"SUCCESS","start_time":"2021-07-13T05:23:53.378Z","start_time_in_millis":1626153833378,"end_time":"2021-07-13T05:24:09.226Z","end_time_in_millis":1626153849226,"duration_in_millis":15848,"failures":[],"shards":{"total":1,"failed":0,"successful":1}}]

## 查看 snapshot_zisefeizhu 快照的概要状态
# ctl exec -it elasticsearch-client-7bf748d697-gnrjz -n a -- curl -u elastic:l605eslS0mYOYEB4grNU  -XGET http://elasticsearch-client.a:9200/_snapshot/s3_obs_repository/snapshot_zisefeizhu
{"snapshots":[{"snapshot":"snapshot_zisefeizhu","uuid":"OhTUdg63QuGEtiynLQUh2A","version_id":7080099,"version":"7.8.0","indices":["demo"],"include_global_state":false,"state":"SUCCESS","start_time":"2021-07-13T05:23:53.378Z","start_time_in_millis":1626153833378,"end_time":"2021-07-13T05:24:09.226Z","end_time_in_millis":1626153849226,"duration_in_millis":15848,"failures":[],"shards":{"total":1,"failed":0,"successful":1}}]}

## 查看 snapshot_zisefeizhu 快照的详细状态
# ctl exec -it elasticsearch-client-7bf748d697-gnrjz -n a -- curl -u elastic:l605eslS0mYOYEB4grNU  -XGET http://elasticsearch-client.a:9200/_snapshot/s3_obs_repository/snapshot_zisefeizhu/_status
{"snapshots":[{"snapshot":"snapshot_zisefeizhu","repository":"s3_obs_repository","uuid":"OhTUdg63QuGEtiynLQUh2A","state":"SUCCESS","include_global_state":false,"shards_stats":{"initializing":0,"started":0,"finalizing":0,"done":1,"failed":0,"total":1},"stats":{"incremental":{"file_count":34,"size_in_bytes":77950953},"total":{"file_count":34,"size_in_bytes":77950953},"start_time_in_millis":1626153833378,"time_in_millis":15848},"indices":{"demo":{"shards_stats":{"initializing":0,"started":0,"finalizing":0,"done":1,"failed":0,"total":1},"stats":{"incremental":{"file_count":34,"size_in_bytes":77950953},"total":{"file_count":34,"size_in_bytes":77950953},"start_time_in_millis":1626153833627,"time_in_millis":14222},"shards":{"0":{"stage":"DONE","stats":{"incremental":{"file_count":34,"size_in_bytes":77950953},"total":{"file_count":34,"size_in_bytes":77950953},"start_time_in_millis":1626153833627,"time_in_millis":14222}}}}}}]}

## 删除快照
# ctl exec -it elasticsearch-client-7bf748d697-gnrjz -n a -- curl -u elastic:l605eslS0mYOYEB4grNU  -XDELETE http://elasticsearch-client.a:9200/_snapshot/s3_obs_repository/snapshot_zisefeizhu
- ignore_unavailable true 在创建快照的过程中会忽略快照请求中不存在的索引。
- ignore_unavailable 的默认值为false,即如果要做快照的索引不存在,快照请求就会失败。
- include_global_state false 能够防止集群的全局状态被作为快照的一部分存储起来。
- include_global_state的默认值为true
- partial默认值是false,如果快照中的一个或多个主分片不是可用状态,集群会等待直到主分片全部可用才开始做快照。 通过设置 partial 为 true 可以忽略主分片全部可用检查直接做快照。
b集群增加s3 key
# ctl get po -n b
NAME                                    READY   STATUS    RESTARTS   AGE
elasticsearch-client-7bf748d697-tfh26   1/1     Running   0          4m7s
elasticsearch-data-0                    1/1     Running   0          4m12s
elasticsearch-master-7569856dd7-828hp   1/1     Running   0          4m13s

# ctl exec -it elasticsearch-client-7bf748d697-tfh26 -n b -- bash
[root@elasticsearch-client-7bf748d697-tfh26 elasticsearch]# elasticsearch-plugin list
repository-s3
[root@elasticsearch-client-7bf748d697-tfh26 elasticsearch]# elasticsearch-keystore list
keystore.seed
[root@elasticsearch-client-7bf748d697-tfh26 elasticsearch]# elasticsearch-keystore add s3.client.default.access_key
Enter value for s3.client.default.access_key:
[root@elasticsearch-client-7bf748d697-tfh26 elasticsearch]# elasticsearch-keystore add s3.client.default.secret_key
Enter value for s3.client.default.secret_key:
[root@elasticsearch-client-7bf748d697-tfh26 elasticsearch]# exit

# ctl exec -it elasticsearch-data-0 -n b -- bash
[root@elasticsearch-data-0 elasticsearch]# elasticsearch-keystore add s3.client.default.access_key
Enter value for s3.client.default.access_key:
[root@elasticsearch-data-0 elasticsearch]# elasticsearch-keystore add s3.client.default.secret_key
Enter value for s3.client.default.secret_key:
[root@elasticsearch-data-0 elasticsearch]# exit

# ctl exec -it elasticsearch-master-7569856dd7-828hp -n b -- bash
[root@elasticsearch-master-7569856dd7-828hp elasticsearch]# elasticsearch-keystore add s3.client.default.access_key
Enter value for s3.client.default.access_key:
[root@elasticsearch-master-7569856dd7-828hp elasticsearch]# elasticsearch-keystore add s3.client.default.secret_key
Enter value for s3.client.default.secret_key:
[root@elasticsearch-master-7569856dd7-828hp elasticsearch]# elasticsearch-keystore add s3.client.default.secret_key
Setting s3.client.default.secret_key already exists. Overwrite? [y/N]y
Enter value for s3.client.default.secret_key:
[root@elasticsearch-master-7569856dd7-828hp elasticsearch]# exit

## 重载配置
# ctl exec -it elasticsearch-client-7bf748d697-tfh26  -n b -- curl -u elastic:ygYv2Zj7kCiIr3rTpSpY -XPOST http://elasticsearch-client.b:9200/_nodes/reload_secure_settings
{"_nodes":{"total":3,"successful":3,"failed":0},"cluster_name":"elasticsearch","nodes":{"ECOASZjXQlqgeGAEEh93cg":{"name":"elasticsearch-client"},"hdJqqU95RqWwDu9IRUiL1g":{"name":"elasticsearch-master"},"WvafQLYwTyWimASYT8aK6A":{"name":"elas
b集群创建s3类型的快照仓库
# ctl exec -it  elasticsearch-client-7bf748d697-tfh26 -n b -- curl -u elastic:ygYv2Zj7kCiIr3rTpSpY -H 'Content-Type: application/json' -XPUT http://elasticsearch-client.b:9200/_snapshot/s3_obs_repository  -d '
   {
     "type": "s3",
     "settings": {
        "endpoint": "http://49.235.65.51:7480",
        "bucket": "zisefeizhu",
        "base_path": "/zisefeizhu",
        "max_snapshot_bytes_per_sec": "200mb",
        "max_restore_bytes_per_sec": "200mb"
      }
 }
'
{"acknowledged":true}
b集群恢复快照
### b集群已有索引
# ctl exec -it elasticsearch-client-7bf748d697-tfh26  -n b -- curl -u elastic:ygYv2Zj7kCiIr3rTpSpY http://elasticsearch-client.B:9200/_cat/indices
green open .monitoring-es-7-2021.07.13 iPnlqDtXSja5sUiGRC9xqg 1 0 32 2  262kb  262kb
green open .security-7                 lB-855UKS_CKJrefolaN8g 1 0  7 0 23.7kb 23.7kb

### 在b集群查看a集群的快照
# ctl exec -it  elasticsearch-client-7bf748d697-tfh26 -n b -- curl -u elastic:ygYv2Zj7kCiIr3rTpSpY  -XGET http://elasticsearch-client.b:9200/_snapshot/s3_obs_repository/_all?pretty=true
{
  "snapshots" : [
    {
      "snapshot" : "snapshot_zisefeizhu",
      "uuid" : "eG6ndGcGRX61CnnTJzI50w",
      "version_id" : 7080099,
      "version" : "7.8.0",
      "indices" : [
        "demo"
      ],
      "include_global_state" : false,
      "state" : "SUCCESS",
      "start_time" : "2021-07-13T05:30:40.333Z",
      "start_time_in_millis" : 1626154240333,
      "end_time" : "2021-07-13T05:30:53.365Z",
      "end_time_in_millis" : 1626154253365,
      "duration_in_millis" : 13032,
      "failures" : [ ],
      "shards" : {
        "total" : 1,
        "failed" : 0,
        "successful" : 1
      }
    }
  ]
}

### 在b集群恢复快照
# ctl exec -it  elasticsearch-client-7bf748d697-tfh26 -n b -- curl -u elastic:ygYv2Zj7kCiIr3rTpSpY -H 'Content-Type: application/json' -XPOST http://elasticsearch-client.b:9200/_snapshot/s3_obs_repository/snapshot_zisefeizhu/_restore  -d '
{
"indices": "demo",
"index_settings": {
  "index.number_of_replicas": 1  //副本数
},
"rename_pattern": "demo",
"rename_replacement": "demo_s3"
}

{"accepted":true}
## 查看b集群索引
# ctl exec -it elasticsearch-client-7bf748d697-tfh26  -n b -- curl -u elastic:ygYv2Zj7kCiIr3rTpSpY http://elasticsearch-client.b:9200/_cat/indices | grep demo
yellow open demo                        Avsk9cr9RvSQTEIHxGUHHg 1 1 10000 0   74.3mb   74.3mb

- 方案二 完美结束