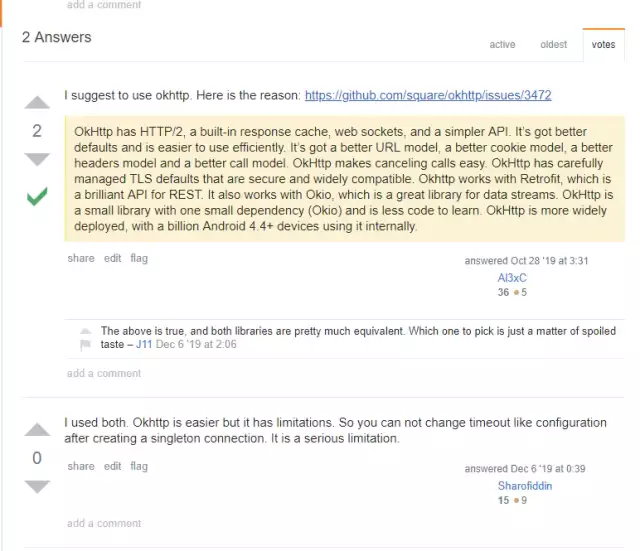
1、有关于HttpClient和OkHttp两种调用服务的方式区别,我们先到overstackflow上看看大牛们的讨论。
所以从使用、性能、超时配置方面进行比较
使用
HttpClient和OkHttp一般用于调用其它服务,一般服务暴露出来的接口都为http,http常用请求类型就为GET、PUT、POST和DELETE,因此主要介绍这些请求类型的调用。
HttpClient使用介绍
使用HttpClient发送请求主要分为以下几步骤:
-
创建 CloseableHttpClient对象或CloseableHttpAsyncClient对象,前者同步,后者为异步
-
创建Http请求对象
-
调用execute方法执行请求,如果是异步请求在执行之前需调用start方法
创建连接:
CloseableHttpClient httpClient = HttpClientBuilder.create().build();
该连接为同步连接
GET请求:
1 @Test
2 public void testGet() throws IOException {
3     String api = "/api/files/1";
4     String url = String.format("%s%s", BASE_URL, api);
5     HttpGet httpGet = new HttpGet(url);
6     CloseableHttpResponse response = httpClient.execute(httpGet);
7     System.out.println(EntityUtils.toString(response.getEntity()));
8 }
使用HttpGet表示该连接为GET请求,HttpClient调用execute方法发送GET请求
PUT请求:
 1 @Test
 2 public void testPut() throws IOException {
 3     String api = "/api/user";
 4     String url = String.format("%s%s", BASE_URL, api);
 5     HttpPut httpPut = new HttpPut(url);
 6     UserVO userVO = UserVO.builder().name("h2t").id(16L).build();
 7     httpPut.setHeader("Content-Type", "application/json;charset=utf8");
 8     httpPut.setEntity(new StringEntity(JSONObject.toJSONString(userVO), "UTF-8"));
 9     CloseableHttpResponse response = httpClient.execute(httpPut);
10     System.out.println(EntityUtils.toString(response.getEntity()));
11 }
POST请求:
添加对象
 1 @Test
 2 public void testPost() throws IOException {
 3     String api = "/api/user";
 4     String url = String.format("%s%s", BASE_URL, api);
 5     HttpPost httpPost = new HttpPost(url);
 6     UserVO userVO = UserVO.builder().name("h2t2").build();
 7     httpPost.setHeader("Content-Type", "application/json;charset=utf8");
 8     httpPost.setEntity(new StringEntity(JSONObject.toJSONString(userVO), "UTF-8"));
 9     CloseableHttpResponse response = httpClient.execute(httpPost);
10     System.out.println(EntityUtils.toString(response.getEntity()));
11 }
该请求是一个创建对象的请求,需要传入一个json字符串
上传文件
 1 @Test
 2 public void testUpload1() throws IOException {
 3     String api = "/api/files/1";
 4     String url = String.format("%s%s", BASE_URL, api);
 5     HttpPost httpPost = new HttpPost(url);
 6     File file = new File("C:/Users/hetiantian/Desktop/学习/docker_practice.pdf");
 7     FileBody fileBody = new FileBody(file);
 8     MultipartEntityBuilder builder = MultipartEntityBuilder.create();
 9     builder.setMode(HttpMultipartMode.BROWSER_COMPATIBLE);
10     builder.addPart("file", fileBody);  //addPart上传文件
11     HttpEntity entity = builder.build();
12     httpPost.setEntity(entity);
13     CloseableHttpResponse response = httpClient.execute(httpPost);
14     System.out.println(EntityUtils.toString(response.getEntity()));
15 }
通过addPart上传文件
DELETE请求:
1 @Test
2 public void testDelete() throws IOException {
3     String api = "/api/user/12";
4     String url = String.format("%s%s", BASE_URL, api);
5     HttpDelete httpDelete = new HttpDelete(url);
6     CloseableHttpResponse response = httpClient.execute(httpDelete);
7     System.out.println(EntityUtils.toString(response.getEntity()));
8 }
请求的取消:
 1 @Test
 2 public void testCancel() throws IOException {
 3     String api = "/api/files/1";
 4     String url = String.format("%s%s", BASE_URL, api);
 5     HttpGet httpGet = new HttpGet(url);
 6     httpGet.setConfig(requestConfig);  //设置超时时间
 7     //测试连接的取消
 8
 9     long begin = System.currentTimeMillis();
10     CloseableHttpResponse response = httpClient.execute(httpGet);
11     while (true) {
12         if (System.currentTimeMillis() - begin > 1000) {
13           httpGet.abort();
14           System.out.println("task canceled");
15           break;
16       }
17     }
18
19     System.out.println(EntityUtils.toString(response.getEntity()));
20 }
调用abort方法取消请求 执行结果:
1 task canceled
2 cost 8098 msc
3 Disconnected from the target VM, address: '127.0.0.1:60549', transport: 'socket'
4
5 java.net.SocketException: socket closed...【省略】
OkHttp使用
使用OkHttp发送请求主要分为以下几步骤:
-
创建OkHttpClient对象
-
创建Request对象
-
将Request 对象封装为Call
-
通过Call 来执行同步或异步请求,调用execute方法同步执行,调用enqueue方法异步执行
创建连接:
private OkHttpClient client = new OkHttpClient();
GET请求:
 1 @Test
 2 public void testGet() throws IOException {
 3     String api = "/api/files/1";
 4     String url = String.format("%s%s", BASE_URL, api);
 5     Request request = new Request.Builder()
 6             .url(url)
 7             .get()
 8             .build();
 9     final Call call = client.newCall(request);
10     Response response = call.execute();
11     System.out.println(response.body().string());
12 }
PUT请求:
 1 @Test
 2 public void testPut() throws IOException {
 3     String api = "/api/user";
 4     String url = String.format("%s%s", BASE_URL, api);
 5     //请求参数
 6     UserVO userVO = UserVO.builder().name("h2t").id(11L).build();
 7     RequestBody requestBody = RequestBody.create(MediaType.parse("application/json; charset=utf-8"),
 8     JSONObject.toJSONString(userVO));
 9     Request request = new Request.Builder()
10             .url(url)
11             .put(requestBody)
12             .build();
13     final Call call = client.newCall(request);
14     Response response = call.execute();
15     System.out.println(response.body().string());
16 }
POST请求:
添加对象
 1 @Test
 2 public void testPost() throws IOException {
 3     String api = "/api/user";
 4     String url = String.format("%s%s", BASE_URL, api);
 5     //请求参数
 6     JSONObject json = new JSONObject();
 7     json.put("name", "hetiantian");
 8     RequestBody requestBody = RequestBody.create(MediaType.parse("application/json; charset=utf-8"),     String.valueOf(json));
 9     Request request = new Request.Builder()
10             .url(url)
11             .post(requestBody) //post请求
12            .build();
13     final Call call = client.newCall(request);
14     Response response = call.execute();
15     System.out.println(response.body().string());
16 }
上传文件
 1 @Test
 2 public void testUpload() throws IOException {
 3     String api = "/api/files/1";
 4     String url = String.format("%s%s", BASE_URL, api);
 5     RequestBody requestBody = new MultipartBody.Builder()
 6             .setType(MultipartBody.FORM)
 7             .addFormDataPart("file", "docker_practice.pdf",
 8                     RequestBody.create(MediaType.parse("multipart/form-data"),
 9                             new File("C:/Users/hetiantian/Desktop/学习/docker_practice.pdf")))
10             .build();
11     Request request = new Request.Builder()
12             .url(url)
13             .post(requestBody)  //默认为GET请求,可以不写
14             .build();
15     final Call call = client.newCall(request);
16     Response response = call.execute();
17     System.out.println(response.body().string());
18 }
通过addFormDataPart方法模拟表单方式上传文件DELETE请求:
 1 @Test
 2 public void testDelete() throws IOException {
 3   String url = String.format("%s%s", BASE_URL, api);
 4   //请求参数
 5   Request request = new Request.Builder()
 6           .url(url)
 7           .delete()
 8           .build();
 9   final Call call = client.newCall(request);
10   Response response = call.execute();
11   System.out.println(response.body().string());
12 }
请求的取消:
 1 @Test
 2 public void testCancelSysnc() throws IOException {
 3     String api = "/api/files/1";
 4     String url = String.format("%s%s", BASE_URL, api);
 5     Request request = new Request.Builder()
 6             .url(url)
 7             .get()
 8             .build();
 9     final Call call = client.newCall(request);
10     Response response = call.execute();
11     long start = System.currentTimeMillis();
12     //测试连接的取消
13     while (true) {
14          //1分钟获取不到结果就取消请求
15         if (System.currentTimeMillis() - start > 1000) {
16             call.cancel();
17             System.out.println("task canceled");
18             break;
19         }
20     }
21
22     System.out.println(response.body().string());
23 }
调用cancel方法进行取消 测试结果:
1 task canceled
2 cost 9110 msc
3
4 java.net.SocketException: socket closed...【省略】
小结
OkHttp使用build模式创建对象来的更简洁一些,并且使用.post/.delete/.put/.get方法表示请求类型,不需要像HttpClient创建HttpGet、HttpPost等这些方法来创建请求类型
依赖包上,如果HttpClient需要发送异步请求、实现文件上传,需要额外的引入异步请求依赖
 1 <!---文件上传-->
 2  <dependency>
 3      <groupId>org.apache.httpcomponents</groupId>
 4      <artifactId>httpmime</artifactId>
 5      <version>4.5.3</version>
 6  </dependency>
 7  <!--异步请求-->
 8  <dependency>
 9      <groupId>org.apache.httpcomponents</groupId>
10      <artifactId>httpasyncclient</artifactId>
11      <version>4.5.3</version>
12  </dependency>
请求的取消,HttpClient使用abort方法,OkHttp使用cancel方法,都挺简单的,如果使用的是异步client,则在抛出异常时调用取消请求的方法即可
超时设置
HttpClient超时设置:
在HttpClient4.3+版本以上,超时设置通过RequestConfig进行设置
1 private CloseableHttpClient httpClient = HttpClientBuilder.create().build();
2 private RequestConfig requestConfig =  RequestConfig.custom()
3         .setSocketTimeout(60 * 1000)
4         .setConnectTimeout(60 * 1000).build();
5 String api = "/api/files/1";
6 String url = String.format("%s%s", BASE_URL, api);
7 HttpGet httpGet = new HttpGet(url);
8 httpGet.setConfig(requestConfig);  //设置超时时间
超时时间是设置在请求类型HttpGet上,而不是HttpClient上
OkHttp超时设置:
直接在OkHttp上进行设置
1 private OkHttpClient client = new OkHttpClient.Builder()
2         .connectTimeout(60, TimeUnit.SECONDS)//设置连接超时时间
3         .readTimeout(60, TimeUnit.SECONDS)//设置读取超时时间
4         .build();
小结:
如果client是单例模式,HttpClient在设置超时方面来的更灵活,针对不同请求类型设置不同的超时时间,OkHttp一旦设置了超时时间,所有请求类型的超时时间也就确定
HttpClient和OkHttp性能比较
测试环境:
-
CPU 六核
-
内存 8G
-
windows10
每种测试用例都测试五次,排除偶然性
client连接为单例:

client连接不为单例:
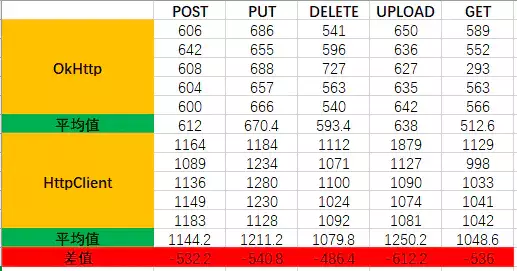
单例模式下,HttpClient的响应速度要更快一些,单位为毫秒,性能差异相差不大
非单例模式下,OkHttp的性能更好,HttpClient创建连接比较耗时,因为多数情况下这些资源都会写成单例模式,因此图一的测试结果更具有参考价值
总结
OkHttp和HttpClient在性能和使用上不分伯仲,根据实际业务选择即可