要求:开发一个手机端上报体温的手机APP,上报内容包括姓名、日期(自动生成)、时间(自动生成)和体温。
一、设计思路
首先需要写一个应用的界面用来上报信息,至于自动生成日期和时间可以利用Calendar来获取系统时间,其次在自动生成位置了利用百度地图SDK来获取位置,最后还需要连接Sqlite数据库来进行数据的登记。
二、代码
1、界面
首先做了APP的页面,包括编辑框、文本框、按钮及背景图片等,xml文件如下:
  1 <?xml version="1.0" encoding="utf-8"?>
  2 <TableLayout xmlns:android="http://schemas.android.com/apk/res/android"
  3     xmlns:app="http://schemas.android.com/apk/res-auto"
  4     xmlns:tools="http://schemas.android.com/tools"
  5     android:layout_width="match_parent"
  6     android:layout_height="match_parent"
  7     android:background="@mipmap/bj3"
  8     android:stretchColumns="2"
  9     tools:context=".MainActivity">
 10
 11     <TableRow
 12         android:layout_width="match_parent"
 13         android:layout_height="match_parent">
 14         <TextView
 15             android:layout_width="wrap_content"
 16             android:layout_height="wrap_content"
 17             android:text="  姓  名:"
 18             android:textSize="18sp" />
 19         <EditText
 20             android:id="@+id/edit_text1"
 21             android:layout_width="280sp"
 22             android:layout_height="wrap_content"
 23             android:hint="请填写姓名"
 24             android:maxLines="1"
 25             android:scrollbars="vertical"
 26             />
 27         <TextView />
 28     </TableRow>
 29     <TableRow>
 30         <TextView
 31             android:layout_width="wrap_content"
 32             android:layout_height="wrap_content"
 33             android:text="  日  期:"
 34             android:layout_marginTop="15dp"
 35             android:textSize="18sp"/>
 36         <TextView
 37             android:id="@+id/textView1"
 38             android:layout_width="match_parent"
 39             android:layout_height="wrap_content"
 40             android:layout_marginTop="15dp"
 41             android:textSize="18sp"/>
 42         <TextView />
 43     </TableRow>
 44     <TableRow>
 45         <TextView
 46             android:layout_width="wrap_content"
 47             android:layout_height="wrap_content"
 48             android:text="  时  间:"
 49             android:layout_marginTop="15dp"
 50             android:textSize="18sp"/>
 51         <TextView
 52             android:id="@+id/textView2"
 53             android:layout_width="match_parent"
 54             android:layout_height="wrap_content"
 55             android:layout_marginTop="15dp"
 56             android:textSize="18sp"/>
 57         <TextView />
 58     </TableRow>
 59
 60     <TableRow>
 61         <TextView
 62             android:layout_width="wrap_content"
 63             android:layout_height="wrap_content"
 64             android:text="  体  温:"
 65             android:textSize="18sp"/>
 66
 67         <EditText
 68             android:id="@+id/edit_text3"
 69             android:layout_width="match_parent"
 70             android:layout_height="wrap_content"
 71             android:drawableRight="@mipmap/wd1"
 72             android:hint="请填写体温"
 73             android:maxLines="1"
 74             android:scrollbars="vertical"/>
 75         <TextView />
 76     </TableRow>
 77
 78     <TableRow>
 79         <TextView
 80             android:layout_width="wrap_content"
 81             android:layout_height="wrap_content"
 82             android:text="  地  点:"
 83             android:textSize="18sp"/>
 84         <EditText
 85             android:id="@+id/edit_text2"
 86             android:layout_width="280sp"
 87             android:layout_height="wrap_content"
 88             android:scrollbars="vertical"
 89             android:onClick="getAddress"
 90             android:hint="点击获取您的位置"
 91             android:minLines="2"
 92             />
 93         <TextView />
 94     </TableRow>
 95         <Button
 96             android:id="@+id/add_data"
 97             android:layout_width="wrap_content"
 98             android:layout_height="wrap_content"
 99             android:background="#328359"
100             android:onClick="insertData"
101             android:text="登  记"
102             android:textColor="#F2F2F2"
103             android:layout_marginTop="20dp"
104             android:textSize="18sp" />
105
106 </TableLayout>
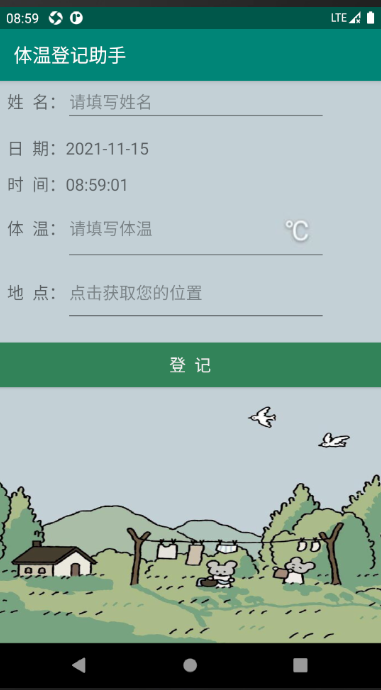
页面效果如下:
2、 自动生成日期和时间
利用了Calendar来获取系统时间。首先用Calendar.getInstance()函数获取一个实例,再使用Calendar.get()函数来获取时间的具体信息,如年、月、日、小时、分、秒等。需要注意的是获取hour时可以利用Calendar.AM_PM来判断上下午。
protected void onCreate(Bundle savedInstanceState) {
        super.onCreate(savedInstanceState);
        setContentView(R.layout.activity_main);

        tv_date = (TextView) findViewById(R.id.textView1);
        tv_time = (TextView) findViewById(R.id.textView2);

        cal = Calendar.getInstance();
        year = String.valueOf(cal.get(Calendar.YEAR));
        month = String.valueOf(cal.get(Calendar.MONTH)) + 1;
        day = String.valueOf(cal.get(Calendar.DATE));
        if (cal.get(Calendar.AM_PM) == 0) {
            if (cal.get(Calendar.HOUR) < 10) {
                hour = "0" + cal.get(Calendar.HOUR);
            } else {
                hour = String.valueOf(cal.get(Calendar.HOUR));
            }
        }
        else {
            hour = String.valueOf(cal.get(Calendar.HOUR) + 12);
        }
        if (cal.get(Calendar.MINUTE) < 10) {
            minute = "0" + cal.get(Calendar.MINUTE);
        } else {
            minute = String.valueOf(cal.get(Calendar.MINUTE));
        }
        if (cal.get(Calendar.SECOND) < 10) {
            second = "0" + cal.get(Calendar.SECOND);
        } else {
            second = String.valueOf(cal.get(Calendar.SECOND));
        }
        my_time_1 = year + "-" + month + "-" + day;
        my_time_2 = hour + ":" + minute + ":" + second;
        tv_date.setText(my_time_1);
        tv_time.setText(my_time_2);

    }
3、利用百度地图API来获取定位信息
首先需要申请密钥(API Key)
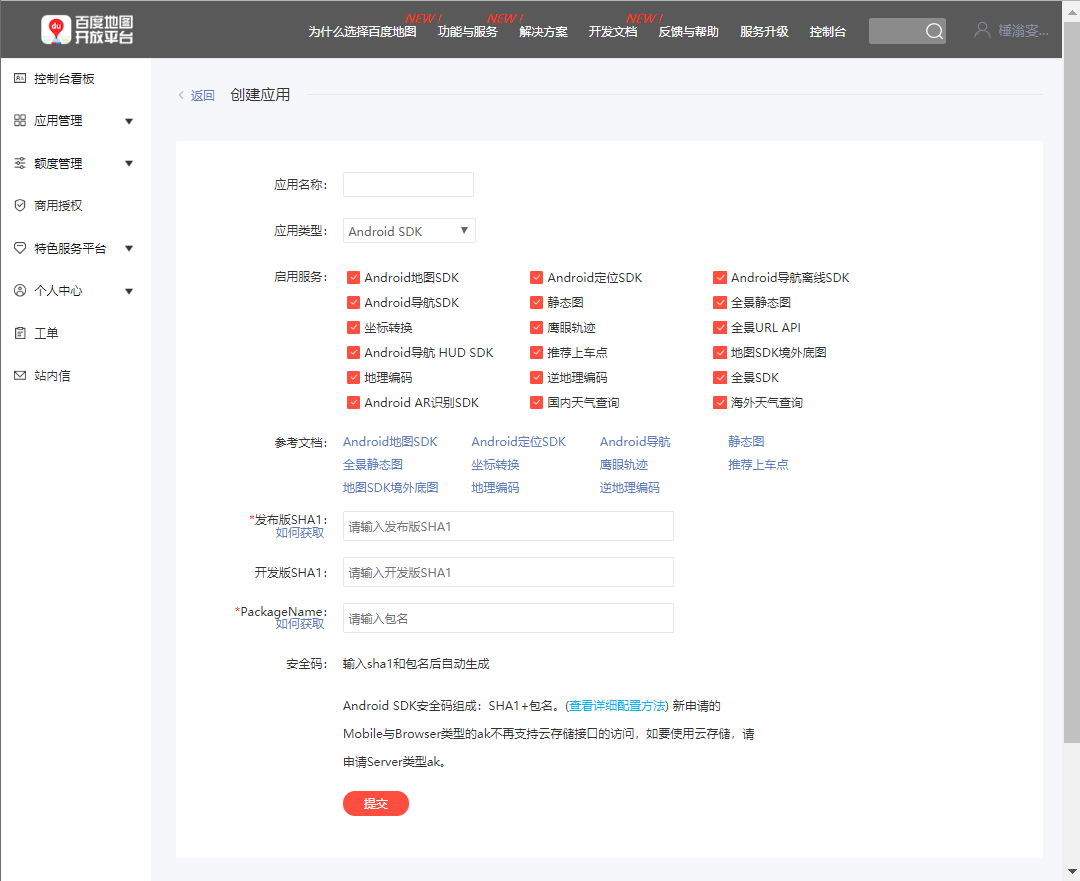
登录百度地图官网http://lbsyun.baidu.com找到申请密钥,如果没有百度账号需要进行注册,并且进行开发者激活。创建应用并且填写应用名称、选择应用类型(我们这里是Android SDK)、填写发布版SHA1和创建的应用所在包名。
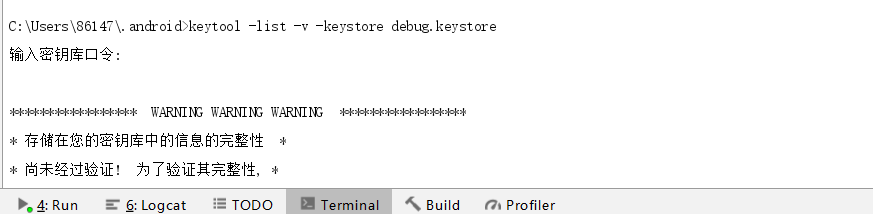
至于发布版SHA1的值可以打开Android studio的Terminal选项卡,并且切换到.android目录中,并且输入keytool -list -v -keystore debug.keystore,密钥库口令直接回车,即可找到SHA1.

填写信息成功提交以后就可以得到一个密钥

其次需要下载百度地图SDK开发包
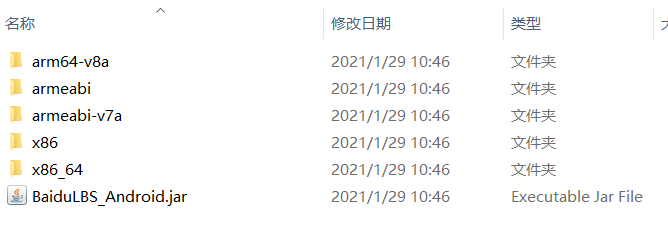
将lib中的文件全部复制到AS项目中的libs文件夹中,并进入File->Project Structure,添加Jar Dependency,选择Jar包,进行配置。

在build.gradle里面添加对应语句

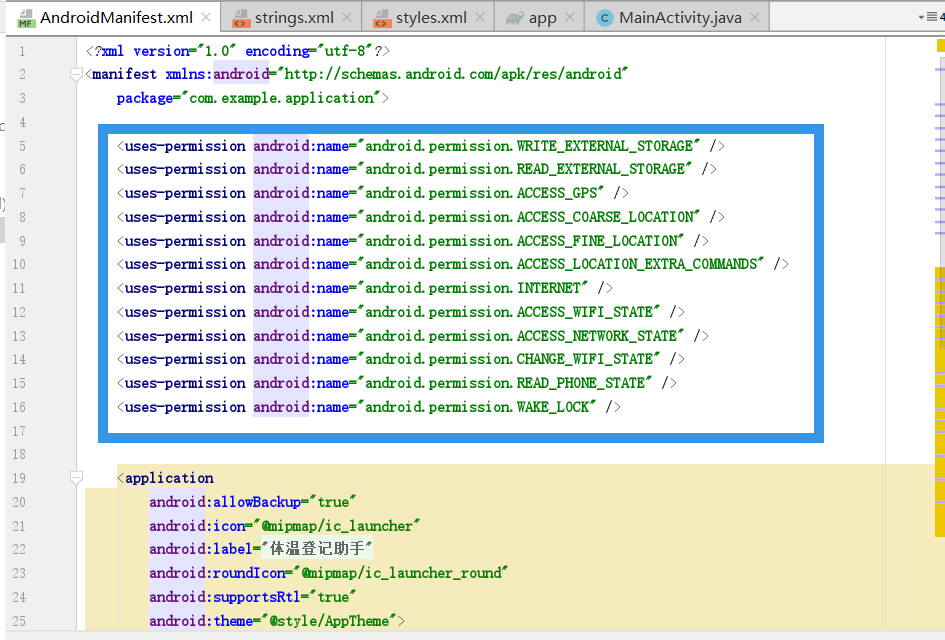
在AndroidManifest.xml中增加权限,修改配置内容

    public LocationClient mLocationClient = null;
    private MyLocationListener myListener = new MyLocationListener();

    public class MyLocationListener extends BDAbstractLocationListener {
        @Override
        public void onReceiveLocation(BDLocation location){
            //此处的BDLocation为定位结果信息类,通过它的各种get方法可获取定位相关的全部结果
            String addr = location.getAddrStr();    //获取详细地址信息
            String country = location.getCountry();    //获取国家
            String province = location.getProvince();    //获取省份
            String city = location.getCity();    //获取城市
            String district = location.getDistrict();    //获取区县
            String street = location.getStreet();    //获取街道信息
            String town = location.getTown();       //获取乡镇信息
            et_location=(EditText)findViewById(R.id.edit_text2);
            et_location.setText(country+province+city+district+town+street);
        }
    }
    @Override
    protected void onCreate(Bundle savedInstanceState) {
        super.onCreate(savedInstanceState);
        SDKInitializer.initialize(getApplicationContext());
        setContentView(R.layout.activity_main);
    }
    public void getAddress(View view)
    {
        mLocationClient = new LocationClient(getApplicationContext());
        mLocationClient.registerLocationListener(myListener);
        LocationClientOption option = new LocationClientOption();
        option.setIsNeedAddress(true);
        option.setNeedNewVersionRgc(true);
        mLocationClient.setLocOption(option);
        mLocationClient.start();
    }
4、创建Sqlite数据库
先创建一个类继承SQLiteOpenHelper类,再实现里面的方法,创建构造方法然后创建子类对象,再调用getReadableDatabase()/getWritableDatabase()方法。
 1 package com.example.application;
 2
 3 import android.content.Context;
 4 import android.database.sqlite.SQLiteDatabase;
 5 import android.database.sqlite.SQLiteOpenHelper;
 6 import android.util.Log;
 7
 8 import androidx.annotation.Nullable;
 9
10 public class DatabaseHelper extends SQLiteOpenHelper {
11     private static final String TAG="DatabaseHelper";
12     public DatabaseHelper(@Nullable Context context) {
13         super(context, Constants.DATABASE_NAME, null, Constants.VERSION_CODE);
14     }
15
16     @Override
17     public void onCreate(SQLiteDatabase db) {
18         //创建时的回调
19         Log.d(TAG,"创建数据库...");
20         String sql="create table "+Constants.TABLE_NAME+" (id integer primary key autoincrement, name varchar,date varchar,time varchar,location varchar,temperature varchar)";
21         db.execSQL(sql);
22     }
23
24     @Override
25     public void onUpgrade(SQLiteDatabase db, int oldVersion, int newVersion) {
26         //升级时的回调
27         Log.d(TAG,"升级数据库...");
28     }
29 }
protected void onCreate(Bundle savedInstanceState) {
        super.onCreate(savedInstanceState);
        setContentView(R.layout.activity_main);
        //创建数据库
        DatabaseHelper helper=new DatabaseHelper(this);
        helper.getWritableDatabase();
        bt_add=(Button)findViewById(R.id.add_data);
        tv_date = (TextView) findViewById(R.id.textView1);
        tv_time = (TextView) findViewById(R.id.textView2);
        et_name=(EditText)findViewById(R.id.edit_text1) ;
        et_temperature=(EditText)findViewById(R.id.edit_text3) ;
    }
    public void insertData(View view)
    {
        DatabaseHelper helper=new DatabaseHelper(this);
        SQLiteDatabase sqldb=helper.getWritableDatabase();
        ContentValues contentvalues=new ContentValues();
        contentvalues.put("name",et_name.getText().toString());
        contentvalues.put("date",tv_date.getText().toString());
        contentvalues.put("time",tv_time.getText().toString());
        contentvalues.put("location",et_location.getText().toString());
        contentvalues.put("temperature",et_temperature.getText().toString());
        if(et_name.getText().toString().equals("")|| et_location.getText().toString().equals("")||et_temperature.getText().toString().equals("")){
            Toast.makeText(this,"请将信息填写完整",Toast.LENGTH_SHORT).show();
        }else {
            long flag = sqldb.insert(TABLE_NAME, null, contentvalues);
            Toast.makeText(this, "登记成功", Toast.LENGTH_LONG).show();

        }
        sqldb.close();
    }

三、遇到问题
从数据库的创建到利用百度地图API来进行定位遇到了各种各样的问题,在这里就不一一列举了。目前的APP还有很多待完善的地方,比如数据的查询、用户登录、页面跳转等,还需要不断学习。