一、 重写 super pom
修改 maven 的 settings.xml
Configuring Maven to Use a Single Repository Group
<settings>
  <mirrors>
    <mirror>
      <!--This sends everything else to /public -->
      <id>nexus</id>
      <mirrorOf>*</mirrorOf>
      <url>http://localhost:8081/nexus/content/groups/public</url>
    </mirror>
  </mirrors>
  <profiles>
    <profile>
      <id>nexus</id>
      <!--Enable snapshots for the built in central repo to direct -->
      <!--all requests to nexus via the mirror -->
      <repositories>
        <repository>
          <id>central</id>
          <url>http://central</url>
          <releases><enabled>true</enabled></releases>
          <snapshots><enabled>true</enabled></snapshots>
        </repository>
      </repositories>
     <pluginRepositories>
        <pluginRepository>
          <id>central</id>
          <url>http://central</url>
          <releases><enabled>true</enabled></releases>
          <snapshots><enabled>true</enabled></snapshots>
        </pluginRepository>
      </pluginRepositories>
    </profile>
  </profiles>
  <activeProfiles>
    <!--make the profile active all the time -->
    <activeProfile>nexus</activeProfile>
  </activeProfiles>
</settings>
补充:
目的是只使用nexus
http://maven.apache.org/ref/3.0.4/maven-model-builder/super-pom.html
二、修改项目中pom文件
1. 指定仓库
    <repositories>
        <repository>
            <id>nexus</id>
            <name>nexus</name>
            <url>http://localhost:8081/nexus/content/groups/public/</url>
            <releases>
                <enabled>true</enabled>
            </releases>
            <snapshots>
                <enabled>true</enabled>
            </snapshots>
        </repository>
    </repositories>
    <pluginRepositories>
        <pluginRepository>
            <id>nexus</id>
            <name>nexus</name>
            <url>http://localhost:8081/nexus/content/groups/public/</url>
            <releases>
                <enabled>true</enabled>
            </releases>
            <snapshots>
                <enabled>true</enabled>
            </snapshots>
        </pluginRepository>
    </pluginRepositories>
2. 设置部署
项目中pom.xml文件
    <distributionManagement>
        <repository>
            <id>user-releases</id>
            <name>user-releases</name>
            <url>http://localhost:8081/nexus/content/repositories/releases/</url>
        </repository>

        <snapshotRepository>
            <id>user-snapshots</id>
            <name>user-snapshots</name>
            <url>http://localhost:8081/nexus/content/repositories/snapshots/</url>
        </snapshotRepository>
    </distributionManagement>
maven的setting.xml
  <servers>
    <server>
      <id>user-releases</id>
      <username>admin</username>
      <password>admin123</password>
    </server>
    <server>
      <id>user-snapshots</id>
      <username>admin</username>
      <password>admin123</password>
    </server>
  </servers>
补充:
目的是 mvn clean deploy 时自动部署到私服
http://maven.apache.org/ref/3.0.4/maven-model/maven.html#class_distributionManagement
关于部署到 repository OR snapshotRepository
查询资料
Prepare a Release
Preparing a release goes through the following release phases:

Check that there are no uncommitted changes in the sources
Check that there are no SNAPSHOT dependencies
Change the version in the POMs from x-SNAPSHOT to a new version (you will be prompted for the versions to use)
Transform the SCM information in the POM to include the final destination of the tag
Run the project tests against the modified POMs to confirm everything is in working order
Commit the modified POMs
Tag the code in the SCM with a version name (this will be prompted for)
Bump the version in the POMs to a new value y-SNAPSHOT (these values will also be prompted for)
Commit the modified POMs
实际测试
<version>0.0.1-SNAPSHOT</version>
版本号加-SNAPSHOT 会自动部署到Snapshots仓库,格式必须为 【版本号-SNAPSHOT】
生的jar包自动添加时间戳 例如:0.0.1-20160315.073435-1.jar
去掉-SNAPSHOT 则会部署到releases 仓库
http://maven.apache.org/maven-release/maven-release-plugin/examples/prepare-release.html
三、手动上传组件
1. 登录nexus
2. 选择目标仓库
3. 选择Tab [Artifact Upload]
4. 完善组件信息
备注:Snapshots 仓库不能手动上传
四、设置代理
1. 登录nexus
2. 进入仓库管理添加代理

五、仓库类型
group、hosted、proxy、virtual
group由三类组成
宿主再分三类
代理一开始有3个
http://books.sonatype.com/nexus-book/reference/confignx-sect-manage-repo.html

六、删除私服中的组件
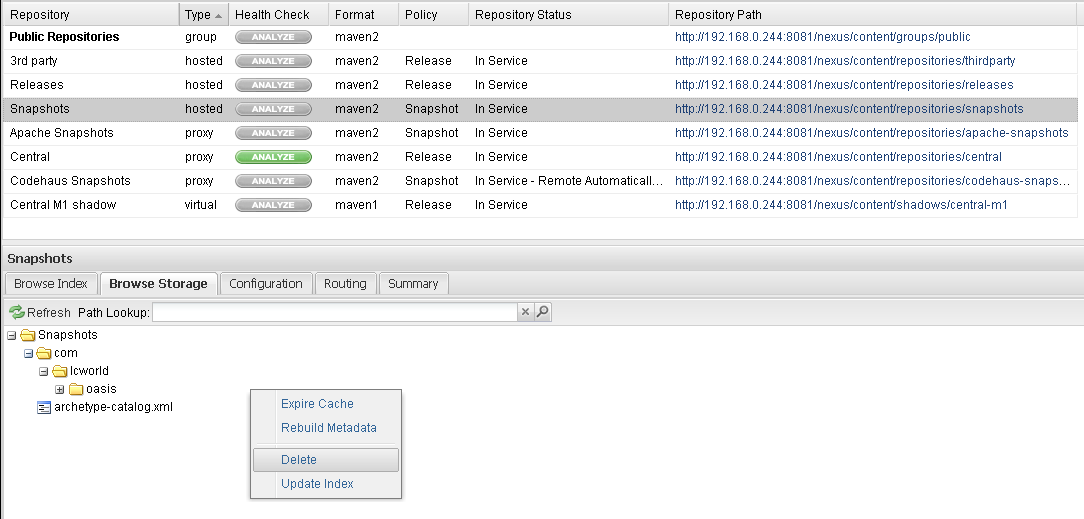
右键删除即可
七、查找并使用组件
登录 nexus
search
就看到组件坐标了