KITTI数据集接口已经提供了matlab接口,本篇将说明详细说明其应用并与PCL进行对接。PCL为C++点云处理语言库,详情可见:http://pointclouds.org/
程序可以从官网下载,也可以从我的github上下载https://github.com/ZouCheng321/fusion_kitti,为运行本代码,必须先编译make.m文件。
关于激光相机的demo为 run_demoVelodyne.m
本例以读取 2011_09_26_drive_0005_sync场景,读取第一帧,为例
首先设置读取路径和基本信息
if nargin<1
  base_dir = './data/2011_09_26_drive_0005_sync';%场景路径
end
if nargin<2
  calib_dir = './data/2011_09_26';%标定文件路径
end
cam       = 2; % 第二个相机
frame     = 0; % 帧数
读取标定文件:
% load calibration
calib = loadCalibrationCamToCam(fullfile(calib_dir,'calib_cam_to_cam.txt'));
Tr_velo_to_cam = loadCalibrationRigid(fullfile(calib_dir,'calib_velo_to_cam.txt'));

% compute projection matrix velodyne->image plane
R_cam_to_rect = eye(4);
R_cam_to_rect(1:3,1:3) = calib.R_rect{1};
P_velo_to_img = calib.P_rect{cam+1}*R_cam_to_rect*Tr_velo_to_cam; %内外参数
其中P_velo_to_img 为上文所释的投影矩阵:KRTcl。 Tr_velo_to_cam 为RTcl矩阵,R_cam_to_rect为相机畸变矫正矩阵,calib.P_rect{cam+1}为相机内参。
接下来读取图像和激光数据,并删除在相机平面后面的激光点:
% load and display image
img = imread(sprintf('%s/image_%02d/data/%010d.png',base_dir,cam,frame));
fig = figure('Position',[20 100 size(img,2) size(img,1)]); axes('Position',[0 0 1 1]);
imshow(img); hold on;

% load velodyne points
fid = fopen(sprintf('%s/velodyne_points/data/%010d.bin',base_dir,frame),'rb');
velo = fread(fid,[4 inf],'single')';
velo = velo(1:5:end,:); % remove every 5th point for display speed
fclose(fid);

% remove all points behind image plane (approximation
idx = velo(:,1)<5;
velo(idx,:) = [];
最后就是投影过程:
velo_img = project(velo(:,1:3),P_velo_to_img);
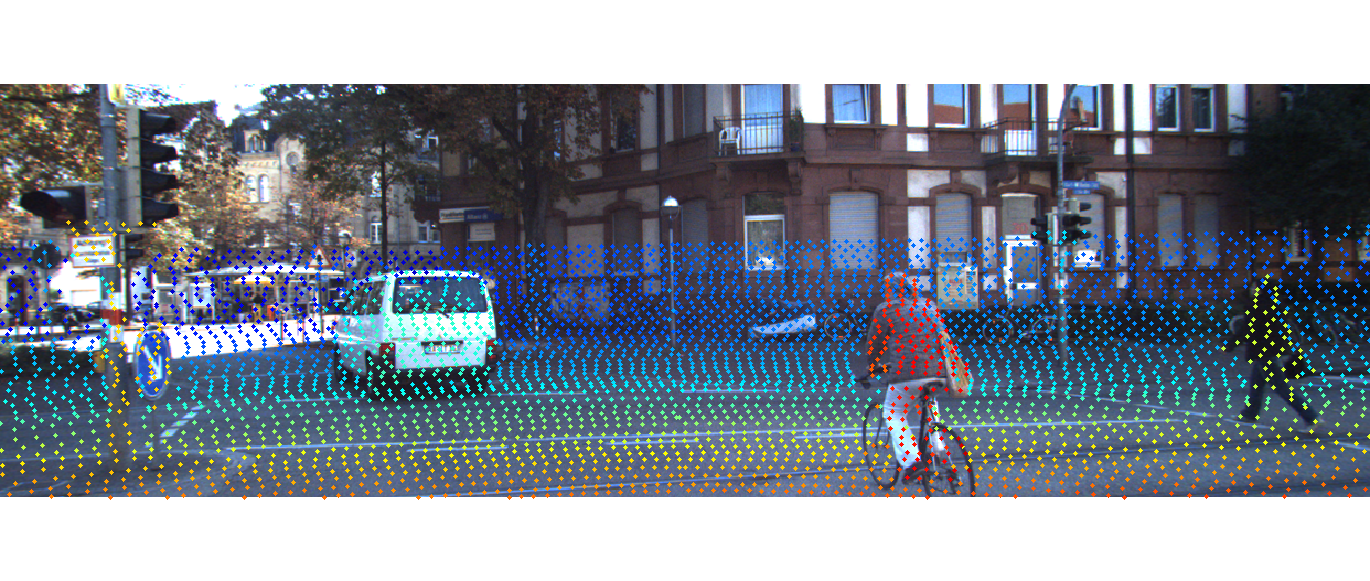
在图像上显示,距离用颜色表示:
cols = jet;
for i=1:size(velo_img,1)
  col_idx = round(64*5/velo(i,1));
  plot(velo_img(i,1),velo_img(i,2),'o','LineWidth',4,'MarkerSize',1,'Color',cols(col_idx,:));
end
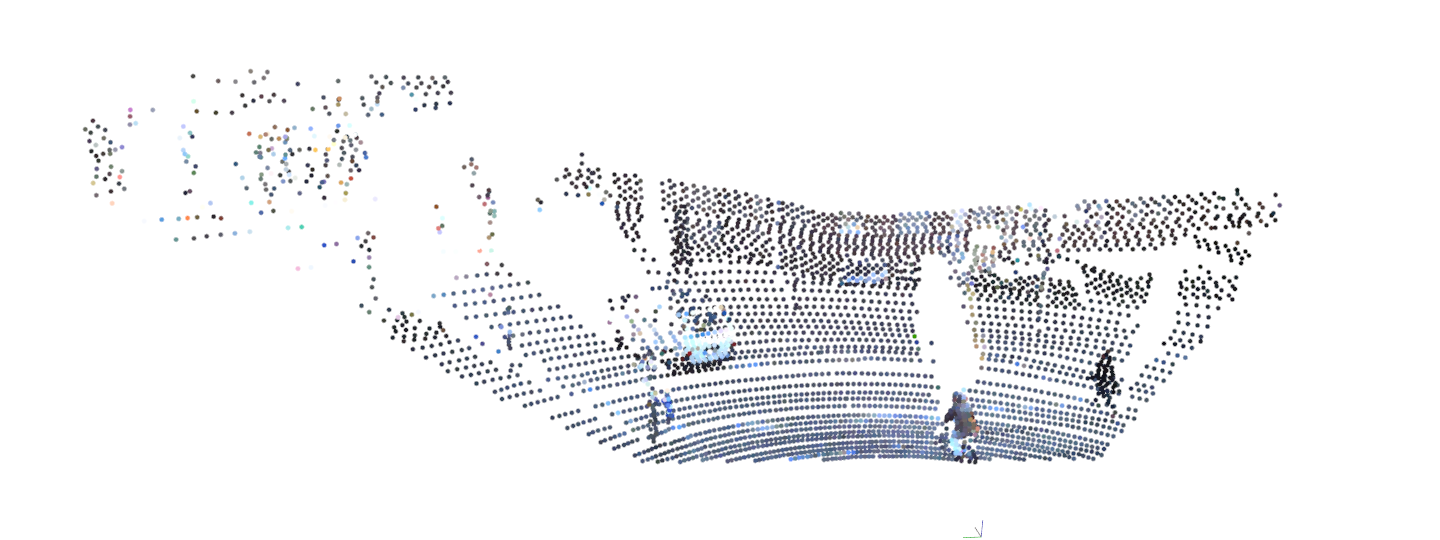
下面我将为大家说明获取保存为彩色点云,为后续算法做准备。
首先去除投影到图像外界的点:
X_plane=round(velo_img(:,2));
Y_plane=round(velo_img(:,1));
cloud=velo(:,1:3);
indice=find(X_plane>size(img,1));
X_plane(indice)=[];
Y_plane(indice)=[];
cloud(indice,:)=[];
indice=find(X_plane<1);
X_plane(indice)=[];
Y_plane(indice)=[];
cloud(indice,:)=[];
indice=find(Y_plane>size(img,2));
X_plane(indice)=[];
Y_plane(indice)=[];
cloud(indice,:)=[];
indice=find(Y_plane<1);
X_plane(indice)=[];
Y_plane(indice)=[];
cloud(indice,:)=[];
然后获取图像每个点的RGB值:
R=img(:,:,1);
G=img(:,:,2);
B=img(:,:,3);

induv=sub2ind(size(R),X_plane,Y_plane);

cloud(:,4)=double(R(induv))/255+1;
cloud(:,5)=double(G(induv))/255+1;
cloud(:,6)=double(B(induv))/255+1;
最后将点云保存为pcd格式,借助了外部文件savepcd.m:
savepcd('color_cloud.pcd',cloud');
接下开用pcl库显示点云,请确保电脑已经安装pcl:
cd view
mkdir build
cd build
cmake ..
make
./cloud_viewer ../../color_cloud.pcd
可以看见融合后的彩色点云:
至于如何利用所以帧建立地图将在后面的博客中介绍。