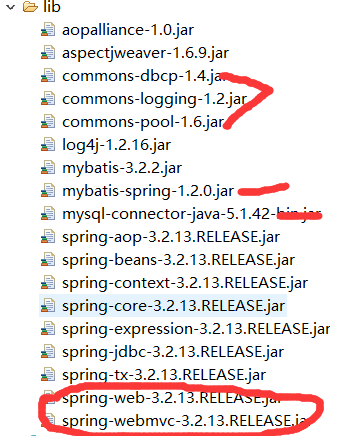
1.整合环境搭配

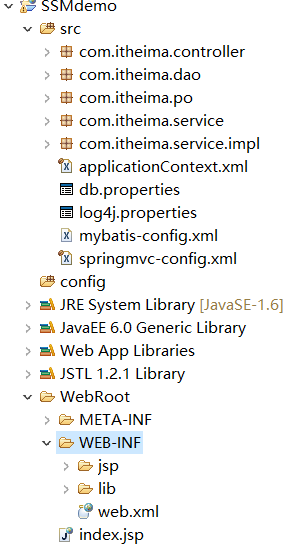
2.文件目录最后如下

3.编写各个配置文件
db.properties

applicationContext.xml

<?xml version="1.0" encoding="UTF-8"?>
<beans xmlns="http://www.springframework.org/schema/beans"
    xmlns:xsi="http://www.w3.org/2001/XMLSchema-instance"
    xmlns:aop="http://www.springframework.org/schema/aop"
    xmlns:context="http://www.springframework.org/schema/context"
    xmlns:tx="http://www.springframework.org/schema/tx"
    xmlns:mybatis="http://mybatis.org/schema/mybatis-spring"
    xsi:schemaLocation="
    http://www.springframework.org/schema/beans
    http://www.springframework.org/schema/beans/spring-beans.xsd
    http://www.springframework.org/schema/aop
    http://www.springframework.org/schema/aop/spring-aop-2.0.xsd
    http://www.springframework.org/schema/tx
    http://www.springframework.org/schema/tx/spring-tx.xsd
    http://mybatis.org/schema/mybatis-spring
      http://mybatis.org/schema/mybatis-spring.xsd
    http://www.springframework.org/schema/context
    http://www.springframework.org/schema/context/spring-context.xsd">


     <!-- 配置数据源 -->
     <!-- 读取db.properties -->
     <context:property-placeholder location="classpath:db.properties"/>

    <bean id="dataSource" class="org.apache.commons.dbcp.BasicDataSource">
        <property name="driverClassName" value="${jdbc.driver}"/>
        <property name="url" value="${jdbc.url}"/>
        <property name="username" value="${jdbc.username}"/>
        <property name="password" value="${jdbc.password}"/>
        <property name="maxIdle" value="10"/>
    </bean>

    <!-- 事物管理器,依赖于数据源 -->
    <bean id="transactionManager" class="org.springframework.jdbc.datasource.DataSourceTransactionManager">
        <property name="dataSource" ref="dataSource"/>
    </bean>

    <!-- 开启事物注解 -->
    <tx:annotation-driven transaction-manager="transactionManager"/>

    <!-- 配置mybatis工厂 -->
    <bean id="sqlSessionFactory" class="org.mybatis.spring.SqlSessionFactoryBean">
        <!-- 注入数据源 -->
        <property name="dataSource" ref="dataSource"/>
        <!-- 指定核心配置文件的位置 -->
        <property name="configLocation" value="classpath:mybatis-config.xml"/>
    </bean>
    <!-- Spring会自动地通过包中的接口来生成映射器 mapper接口文件扫描器-->
    <bean class="org.mybatis.spring.mapper.MapperScannerConfigurer">
        <property name="basePackage" value="com.itheima.dao"/>
    </bean>
    <!-- 注解扫描的配置代码 -->
    <context:component-scan base-package="com.itheima.service"/>
</beans>
mybatis-config.xml
别名配置

<?xml version="1.0" encoding="UTF-8" ?>
<!DOCTYPE configuration
  PUBLIC "-//mybatis.org//DTD Config 3.0//EN"
  "http://mybatis.org/dtd/mybatis-3-config.dtd">
<configuration>
  <typeAliases>
      <package name="com.itheima.po"/>
  </typeAliases>
</configuration>
springmvc-config.xml

<?xml version="1.0" encoding="UTF-8"?>
<beans xmlns="http://www.springframework.org/schema/beans"
    xmlns:xsi="http://www.w3.org/2001/XMLSchema-instance" xmlns:mvc="http://www.springframework.org/schema/mvc"
    xmlns:context="http://www.springframework.org/schema/context"
    xmlns:aop="http://www.springframework.org/schema/aop" xmlns:tx="http://www.springframework.org/schema/tx"
    xsi:schemaLocation="http://www.springframework.org/schema/beans
        http://www.springframework.org/schema/beans/spring-beans-3.2.xsd
        http://www.springframework.org/schema/mvc
        http://www.springframework.org/schema/mvc/spring-mvc-3.2.xsd
        http://www.springframework.org/schema/context
        http://www.springframework.org/schema/context/spring-context-3.2.xsd
        http://www.springframework.org/schema/aop
        http://www.springframework.org/schema/aop/spring-aop-3.2.xsd
        http://www.springframework.org/schema/tx
        http://www.springframework.org/schema/tx/spring-tx-3.2.xsd ">

        <!-- 指定需要扫描的包 -->
        <context:component-scan base-package="com.itheima.controller"/>
        <!-- 配置注解驱动 -->
        <mvc:annotation-driven />


        <!-- 定义视图解析器 -->
        <bean id="viewResolver" class="org.springframework.web.servlet.view.InternalResourceViewResolver">
        <!-- 设置前缀 -->
        <property name="prefix" value="/WEB-INF/jsp/" />
        <!-- 设置后缀 -->
        <property name="suffix" value=".jsp" />
        </bean>


</beans>
前端控制器web.xml

<?xml version="1.0" encoding="UTF-8"?>
<web-app xmlns:xsi="http://www.w3.org/2001/XMLSchema-instance" xmlns="http://java.sun.com/xml/ns/javaee" xsi:schemaLocation="http://java.sun.com/xml/ns/javaee http://java.sun.com/xml/ns/javaee/web-app_3_0.xsd" version="3.0">
  <!-- 配置加载spring文件监听器 -->
  <context-param>
    <param-name>contextConfigLocation</param-name>
    <param-value>classpath:applicationContext.xml</param-value>
  </context-param>
  <listener>
    <listener-class>
              org.springframework.web.context.ContextLoaderListener
          </listener-class>
  </listener>
  <!-- 编码过滤器 -->
  <filter>
    <filter-name>encoding</filter-name>
    <filter-class>
              org.springframework.web.filter.CharacterEncodingFilter
          </filter-class>
    <init-param>
      <param-name>encoding</param-name>
      <param-value>UTF-8</param-value>
    </init-param>
  </filter>
  <filter-mapping>
    <filter-name>encoding</filter-name>
    <url-pattern>*.action</url-pattern>
  </filter-mapping>
  <!-- 配置前端控制器 -->
  <servlet>
    <servlet-name>springmvc</servlet-name>
    <servlet-class>
        org.springframework.web.servlet.DispatcherServlet
    </servlet-class>
    <init-param>
      <param-name>contextConfigLocation</param-name>
      <param-value>classpath:springmvc-config.xml</param-value>
    </init-param>
    <load-on-startup>1</load-on-startup>
  </servlet>
  <servlet-mapping>
    <servlet-name>springmvc</servlet-name>
    <url-pattern>/</url-pattern>
  </servlet-mapping>
</web-app>
4.整合应用测试
a.在pojos包中创建Customer类

package com.itheima.po;

public class Customer {
    private Integer id;//主键
    private String username;
    private String jobs;
    private String phone;
    public Integer getId() {
        return id;
    }
    public void setId(Integer id) {
        this.id = id;
    }
    public String getUsername() {
        return username;
    }
    public void setUsername(String username) {
        this.username = username;
    }
    public String getJobs() {
        return jobs;
    }
    public void setJobs(String jobs) {
        this.jobs = jobs;
    }
    public String getPhone() {
        return phone;
    }
    public void setPhone(String phone) {
        this.phone = phone;
    }
    @Override
    public String toString() {
        return "Customer [id=" + id + ", username=" + username + ", jobs="
                + jobs + ", phone=" + phone + "]";
    }

}
b.在dao包中创建接口和对应的xml映射文件


package com.itheima.dao;

import com.itheima.po.Customer;

public interface CustomerDao {

    public Customer findCustomerById(Integer id);

}

<?xml version="1.0" encoding="UTF-8" ?>
<!DOCTYPE mapper
PUBLIC "-//mybatis.org//DTD Mapper 3.0//EN"
"http://mybatis.org/dtd/mybatis-3-mapper.dtd">
<mapper namespace="com.itheima.dao.CustomerDao">
<!-- public Customer findCustomerById(Integer id); -->
<select id="findCustomerById"  parameterType="Integer"  resultType="Customer">
select * from t_customer where id = #{id}
</select>
</mapper>
在配置文件applicationContext.xml中使用包扫描形式加入了扫描包dao下的所有接口和映射文件,所以完成DAO层接口及映射文件后,就不要进行映射文件的扫描配置了
c.在service包下创建CustomerService接口文件

package com.itheima.service;

import com.itheima.po.Customer;

public interface CustomerService {
    public Customer findCustomerById(Integer id);

}
d.创建继承接口类

package com.itheima.service.impl;

import org.springframework.beans.factory.annotation.Autowired;
import org.springframework.stereotype.Service;
import org.springframework.transaction.annotation.Transactional;

import com.itheima.dao.CustomerDao;
import com.itheima.po.Customer;
import com.itheima.service.CustomerService;

@Service
@Transactional
public class CustomerServiceImpl implements CustomerService{

    //注解注入CustomerDao
    @Autowired
    private CustomerDao customerDao;

    public Customer findCustomerById(Integer id) {
        return this.customerDao.findCustomerById(id);
    }


}

5.在controller包下创建一个用于处理页面请求的控制类

package com.itheima.controller;

import org.springframework.beans.factory.annotation.Autowired;
import org.springframework.stereotype.Controller;
import org.springframework.ui.Model;
import org.springframework.web.bind.annotation.RequestMapping;

import com.itheima.po.Customer;
import com.itheima.service.CustomerService;

@Controller
public class CustomerController {
    @Autowired
    private CustomerService customerService;
    /**
     * 根据id查客户详情
     */
    @RequestMapping("/findCustomerById")
    public String findCustomerById(Integer id,Model model){
        Customer customer = customerService.findCustomerById(id);
        model.addAttribute("customer", customer);
        System.out.println(customer);
        return "customer";
    }
}
6.编写前端页面看结果

  <body>
    <table border="1">
    <tr>
        <td>编号</td>
        <td>名称</td>
        <td>职业</td>
        <td>电话</td>
    </tr>
    <tr>
        <td>${customer.id}</td>
        <td>${customer.username}</td>
        <td>${customer.jobs}</td>
        <td>${customer.phone}</td>
    </tr>
    </table>
  </body>
其中数据库中的表是这样的


观看建议:可以先从头看到后,再次想想这个工作流程是怎么样实现的,然后你再从后玩前看,就可以加深理解了
